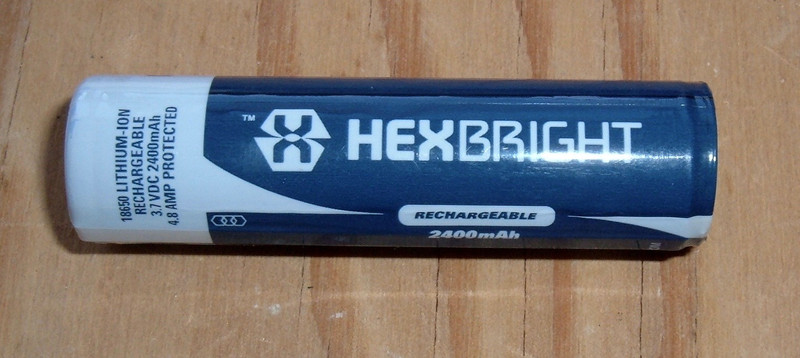

The HexBright flashlight, from 2011, is an interesting little device. It’s a flashlight with an embedded Arduino for control, so you can reprogram it to do whatever you want. Which, being a flashlight, mostly involves turning the light on and off and changing the brightness.
In 2016, it’s abandonware. The creator has left a nice little note saying, essentially, “So long and thanks for all the fish.” It lives on in a weird state - what was claimed to be an “open source flashlight” is left without that much information available, a half-finished community wiki, and… that’s about it.
One problem is that the design of the battery holder is very, very touchy. The flashlight fits the provided battery like a very tight glove, but protected 18650s vary in length by more than a little bit, and it’s nearly impossible to find one that specifies the exact length accurately. Of course there are no HexBright replacements available.

And, sadly, my battery died after a few months of sitting in a box when I moved. I suspect I’m not the only one with this problem.
So I set out to replace the battery, succeeded in two different ways, and am sharing them with the world!
Read on if this is at all relevant to you.
HexBright Battery Teardown
My HexBright battery was stone dead. Zero volts. But, it’s a protected battery (it has that little PCB on the bottom that’s supposed to keep it happy and alive), so I had great hopes. I left the flashlight on a charger for a long while. Nothing. I put it in my normal 18650 charger, and… yeah. Still nothing. Doesn’t charge. No real surprise.
Being me, and blogging about electronics and battery pack rebuilds and such, I set out to figure out what was going on with things. The first step is to unwrap the battery and see what I had in terms of actual cell voltage. The plastic comes off easily enough - you can see the protection board down there at the bottom.

I figured the battery would be at 2.5V, maybe 2.0V - low, but safe to recharge manually. Attach it to my bench power supply, charge it, and be on my way!
Or… wow. No. Not at 0.8V. That might be OK - or it might not. And I’m not going to mess around with a lithium battery in a sealed metal tube. I’ll recharge stuff that’s been down to 2.5V without worrying about it, 2V if I know what happened, but below that? Forget it.

With the rest of the wrapper off, it’s a bog standard protected 18650. The metal on the side goes to the positive lead, the battery “protection” board lives at the bottom, and there’s a bit of foam rubber adhesive between the battery and the board.

I’ll go through removing this later, but here’s the battery management board. Model RG-18A1SE-HX (hello, people here by searching for that, since this is the only hit on the internet for it).
And why is my battery stone dead? Because this stupid thing doesn’t cut off until 2.4V - which is “stone dead” for a lithium cell anyway. There’s no energy left, and the protection board circuitry plus self discharge will drag that low voltage lower in a hurry. If you’re going to try and protect a lithium battery from being fully discharged, cut off at something sane, like 2.7V, or 2.9V, or even 3.0V - leave something left for self discharge and BMS draw!
The board has 2 8205A ICs on it (the large ones). These are MOSFETs (datasheet) commonly used in battery protection boards, then a small DW01 protection IC (datasheet) that, coincidentally, lists a 2.4V over-discharge protection. Just, no. Don’t let your lithium batteries get that low.
In theory, this IC should support being charged again. I tried it for a while. Maybe not long enough. But, still 0.8V - nothing good comes of charging a battery that deeply drained.

Replacement Version 1
My first attempt at replacing the battery happened shortly before a camping trip for which I wanted my flashlight working. No time to order things, so I worked with what I had.
A non-protected 18650 (in this case, a Sony US18650V3, because I have a lot of them laying around) is too short to fit in the flashlight and make contact. So, I used other things I have laying around (nickel strip and my spot welder) to create an extension on the end. Why the negative end? It’s easier to weld to by some tiny fraction.

If I left it there, it wouldn’t remain in contact after getting rattled around. So, I found some convenient squishy material (one of those dissolving packing peanuts) and stuffed it in.

Did it work? In a word, yes. Perfectly. I could charge, discharge, and fully use the flashlight.
Interestingly, these cells are flat topped (not button topped). They still work fine. So there’s no need for a button top cell if you don’t want one.
If you don’t have access to a spot welder, this is still a decent method. Find some stiff metal fragment, curve it into a U shape, and fill the space. It’ll work.

Downsides? You don’t have overcharge protection (not really a big deal on a solidly built USB flashlight), you don’t have overdischarge protection (look how well that worked for me), and you don’t have overcurrent protection (so… don’t short the battery in the flashlight?) - not a huge deal to me. But, this was a quick hack, and I decided I wanted to try something better.
Replacement Version 2
The quick hack with the spacer worked for the camping trip (not that we spent much time outside after dark - it was damned cold out in the mountains, and with a burn ban, there’s just not much to do after the sun goes down). But, it wasn’t “right” - I like protected batteries for low draw things.
I ordered a Panasonic NCR18650B 3400mAh protected cell, thinking I could just drop it in and it would fit. Because, you know, button tipped protected 18650. They’re all basically the same, right?
Not really. It wouldn’t fit. Barely, but wouldn’t fit - too long. So, time to do some playing around.
If you do this, be careful. A shorted 18650 will spot weld basically anything. So keep other metal objects clear, and do it somewhere reasonably safe. This happens to be my solar powered office, away from the house, with a very large fire extinguisher right near me. And batteries that are drained or in a shipping state of charge. Seriously, don’t charge your battery before you go about doing this.
Recall that I pulled the fancy HexBright wrapper off the cell above - I’m left with this.
The top strip goes to the positive terminal. The short little strip goes to the negative terminal. There’s a chunk of foam rubber or something on top of the protection IC, and at this point, tossing random metal objects around the battery is a bad idea (though at 0.8V, it won’t do much).

Here’s a comparison with my shiny new cell and protection board. Longer. By just enough to cause a problem. And covered in a clear plastic layer that inhibits my investigation of what’s going on.

So, I removed the plastic layer. Here are both cells, side by side.
Interestingly, the new cell has a plastic retainer for the protection PCB. It’s hard, doesn’t squish a bit, and is slightly longer than the foam rubber. Otherwise, the cells are nearly identical in length.

I had a brilliant idea to replace the plastic gizmo with the foam rubber from the other cell and see if it worked. The first step is to get that hard plastic thing out of the way. A bit of work with some snips (seriously, be careful with metal snips around a charged 18650) took care of it, and I was able to get the plastic out.

Since the old cell is dead, I can snip away anywhere and make my life easier. I did. The new cell has a somewhat different looking protection board that appears to have the same parts, arranged differently.

With a bit of careful fiddling, I swapped the squishy foam rubber bits onto the new protection board. This is worth a mm or two in length, and is somewhat squishy (being foam rubber instead of hard plastic).

Protip for people with a HexBright: The bit of plastic behind the negative terminal comes out. It’s a wedge that one can remove and insert at will, which makes it easier to insert batteries.

I tested things, and they fit. Barely.
But I really don’t like this exposed positive terminal wire. That’s just a short to the case waiting to happen.
Strangely enough (for a guy who does a lot of work with batteries), I have some 18650 heat shrink wrappers laying in one of my parts boxes. Surprised?

With a bit of heat gun application (1200W monster, low makes my inverter make awful noises, high means I’d better have the AC off or I’ll overload things), I’ve got a nicely shrinkwrapped 18650 with a revised battery protection board. Nifty!

Pull the wedge out slightly, insert the battery…

And shove the wedge back in. It’s tight. But so was the original battery.

Does it work? Why, yes! It does! Charges, discharges, runs just fine. The stock battery is 2400mAh. This one is 3400mAh - 30% larger capacity, and, in theory, 30% longer runtime. Awesome!

Lies, Damned Lies, and *FIRE Batteries
“But, wait! You only used a puny 3400mAh cell! There are 9000mAh cells on Amazon and eBay! Why not use those?”
Because they’re lies, that’s why. The highest capacity 18650s (as of late 2016) are around 3600mAh. Anything claiming more is lying - and, since they’re not honest, they’re not even going to come close. What’s the difference between a “4000mAh,” “8000mAh,” and “10000mAh” 18650? Nothing. They’re all recycled garbage that will be lucky to put out 1500mAh, and probably won’t even put out that. On top of that, the current ratings will be lies, so at best they’ll sag quickly in your flashlight, and at worst they’ll overheat, enter thermal runaway, vent, and make your flashlight into a pipe bomb.
Just say no to 18650 lies. Any battery with FIRE in the name except SureFire is certain to be junk. Don’t waste your time or money on junk.
Final Thoughts on the HexBright
The HexBright is a really, really cool flashlight - that seems to have set out to solve a problem nobody was actually having. Don’t get me wrong. I like mine. It’s wonderfully geeky in a Rube Goldberg kind of way, and it is actually a good flashlight. But… do you really need the ability to program your flashlight with whatever you want? I’m not sold on that. I’ve messed around with it a bit, but at the end of the day, I really don’t have much beyond what a normal 18650 based flashlight offers.
At the end of the day, I owned mine for years before I messed around with the programming, and even now, with some fancy programming that lets me tilt it to set brightness and half a dozen operating modes, I mostly just use it as a regular flashlight. On. Off. Charge.
In any case, hopefully this helps some people keep theirs running longer when that first battery goes dead.
Comments
Comments are handled on my Discourse forum - you'll need to create an account there to post comments.If you've found this post useful, insightful, or informative, why not support me on Ko-fi? And if you'd like to be notified of new posts (I post every two weeks), you can follow my blog via email! Of course, if you like RSS, I support that too.

