
One particularly warm February morning, I decided that a useful thing for me to have would be a hefty bench I could use for stone cutting.
Why stone cutting? I have a lot of basalt on my property, and I’d like to learn to do something useful with it - such as turn it into building blocks I can use to make structures. The raw lumps of basalt aren’t terribly useful for that (they have lots of points and are generally oddly shaped), so I’d like to work with them - standing up. To do this, I built a workbench! A very, very beefy workbench.

How? Is it any good? Should you build one?
Carefully but with plans, yes, it is, and probably not. Read on!
Stone Cutting Benches
The first question I expect is, “Why? Why on earth would you build a stone cutting bench?”
The answer should be obvious: “Because I want to cut stone.” Why else?
To expand: I have a lot of basalt on and immediately around my property. No, really, more than a few stones laying here and there. A lot.

I want to learn to do something useful with it. This requires splitting large blocks into small blocks, turning small blocks into something suited to building, and generally shaping, forming, and beating on basalt with chisels until it’s less randomly formed lumps and more structural building shapes. Once I have those, I can use them for other projects - but the first step is to figure out how to work with it, and how to shape it.
A side benefit here is that moving and working with basalt is a really, really good upper body workout (and some lower body as well, when you’re waddling with a huge lump of basalt). A useful metric I feel I should keep with is that I should be able to bench press my daughter (and, coming this summer, son) endlessly without even breathing hard. Even when they get older. My daughter really likes being a bench press weight (actually, she’s a fan of being any variety of exercise weight - Art of Manliness covered this well), but I figure I have a decade worth of workout in basalt alone. Basalt is really heavy - a 1’ x 1’ x 1’ cube of it is nearly 200lb. The stuff is dense! Admittedly, my basalt has a lot of voids, so it’s a bit less dense, but, still. You get the idea.
To accomplish all this, I’d like a good space to work it. Since my basalt is scattered around (increasingly in a pile on the far corner of the property as I move it there), a good outdoor bench is useful, and it has to be strong. Really strong. I’ll work really heavy stuff on the ground, but anything I can lift is likely to come up on the bench, so I may as well go for bonkers.
I’ve been rattling around the idea for a while in various forms, but that was before I found Don Dougan’s excellent plans for a bench floating around the internet. These benches have survived 20+ years of hard use, and that’s a good enough test for me! There’s no point in reinventing the wheel if there’s a perfectly good set of plans for a wheel floating around, so I decided to build one of his benches. If it works, awesome. If not, I’ll know enough that I can design something more to my needs next time, but this bench should still be an excellent place for stonework. Maybe I’ll get into basalt carving!
I’m following Don’s plans pretty closely, though there are a few errors I’ve seen in the plans (part count related - figure out how many lag screws you need and you’ll spot the errors). I’m assuming you’ve read the plans if you want to actually build this bench.
Building the Top
The top surface of the bench is the working area, obviously. For this bench, it’s built out of 2x4s on a 2x6 frame, and serves to support the 4x4 legs. If this sounds like an absurdly overkill solution - yes, it is. It might even be overkill enough for the abuse I intend to subject it to.
I’ve built mine out of pressure treated lumber, because I expect it will spend a lot of time outside (which is to say, all summer long, every summer). I probably could have gotten away with untreated lumber, but I don’t care to paint this, and I’m in a dry enough climate that it should be fine as long as I put it inside during the winter (or, likely, in a corner of my shipping container - that soaks up tons of heat from the winter sun and is a remarkably nice little workshop).
The process starts with cutting out the 4x 16.5” lengths of 2x6, and the 5x 18” lengths of 2x4. I still hate circular saws, but I’m getting better with them. Putting in a set of earplugs is a big improvement over letting one destroy your ears.

Take the 2x6 boards and screw them together with overlapping ends (like this). For this type of work, pre-drilling pilot holes is helpful to prevent the wood from splitting. Newer screws are less likely to split the wood, but the pilot holes are still a good idea (and don’t add much time). Drill to something like the diameter of the solid core of the screw, plus or minus (I tend to go with the minus side).

With the base of the top screwed together, the next step is to put the 2x4s on to make the top. One screw on each side is enough for this - you just need to keep them in place. This is a replaceable surface, if you find it getting torn up badly enough. It requires 5x 18” 2x4, so a single 8’ 2x4 will resurface the whole top, if you find reason to. This also serves as a base to screw things to if needed - I hear small turntables work well.
I’ll see how long it lasts - the original design for these benches seems to be more “carving” and less “bulk splitting,” but it’s a solid surface, at least! In any case, it’s designed for stone cutting and working, and it’s a better proven design than anything I was considering!

The next step is a bit odd - putting a strip of 1x2 around inside, right against the top. This serves to guide the 4x4 legs to the proper splayed angle without requiring much in the way of precision measurement or protractors. It’s a quite elegant solution to the problem.

Building and Installing the Legs
The legs are made of 4x4, 36” long (and then cut to length). One problem with my circular saw is that it won’t cut all the way through a 4x4. The best method I’ve found to deal with that is to make marks at the proper point on three sides (just use a square to chase the mark around the sides), and then cut from both sides.

That method doesn’t lead to an absolutely perfect cut, but it does lead to something good enough for most uses. You get better at it with time - don’t ask how bad the cuts on my first solar panel mounts are…

The 1x2s serve to push in the tops of the 4x4 legs evenly, such that the legs are splayed out. Vertical legs would be the easiest, but the footprint of the table for the height (and weight) would be very narrow, and a table with a heavy rock on it falling over just doesn’t sound fun to me. The spread out legs give the table a much more solid base (roughly 24” square).

The next step is boring holes through the sides of the top and through the legs for the lag bolts. It took me a few legs to work out a clamping scheme that worked well, but ideally you want the pressure in the center of each side - if it’s all the way at the top or bottom, the leg won’t be tight at the other end. It should be firmly pressed against both the 1x2 spacer and the 2x6 - this creates the proper angle. Play around with your clamps until you find something that works.

You’ll need a good set of augers to drill the holes for the lag bolts. These differ from normal drill bits in that they’re designed to pull into the hole (they have screw threads at the tip) and they are better at clearing the cut debris out. For shallow holes, normal drill bits are fine, but for going through, say, a 2x6 and a 4x4 at once, you need augers.
You’ll also want a set of Forstner bits to drill the holes for countersinking the bolt heads. It’s certainly an optional step, but catching your clothing on lag bolt heads isn’t particularly fun, so… go get a set to countersink the heads.

The process here is fairly simple: Drill two pilot holes from each side, all the way through the 4x4, countersink the holes for the bolt heads, and drive a lag bolt and washer combination all the way through.
It’s important to make sure the lag bolts don’t collide in the wood - they won’t go through each other very well. You can stagger the holes to accomplish this, or have two “center” holes and two “outside” holes, or any number of other combinations that lead to lag bolts not colliding.
One build time tip: Make sure you have the adapters needed to drive the lag bolts most of the way in with some sort of drill (you’ll want a geared one or an impact driver to avoid loading a cheap drill up). You can do it manually, and I did, but it does take a long time to do this by hand. I don’t particularly mind, but I easily spent an hour driving the various lag bolts in by hand.
Don’t tighten the lag bolts down yet. That happens after you adjust the legs.

After a bunch of work, you should have something that looks more or less like this - a table with four legs sticking out at more or less equal angles. Now it’s time to make the table actually stand straight!

Adjusting the Legs and Building Crossmembers
The next step requires a good, flat surface. You’ll be adjusting the legs so the table sits flat, and then tightening the lag bolts down. The easiest way to do it is with a moderately sized hammer. Rock the table, and whichever two legs it rocks on, spread them a bit wider. Or if they’re already adjusted out, push one of the other legs in slightly. Tighten the lag bolts, adjust the legs, and repeat until it’s pretty well tight.

With the legs adjusted, bolt the crossmembers in. Also drill pilot holes here, since lag bolts don’t self-tap. These lag bolts are smaller, and simply need to keep the legs in adjustment - they’re not taking the sort of same loads as the upper lag bolts.

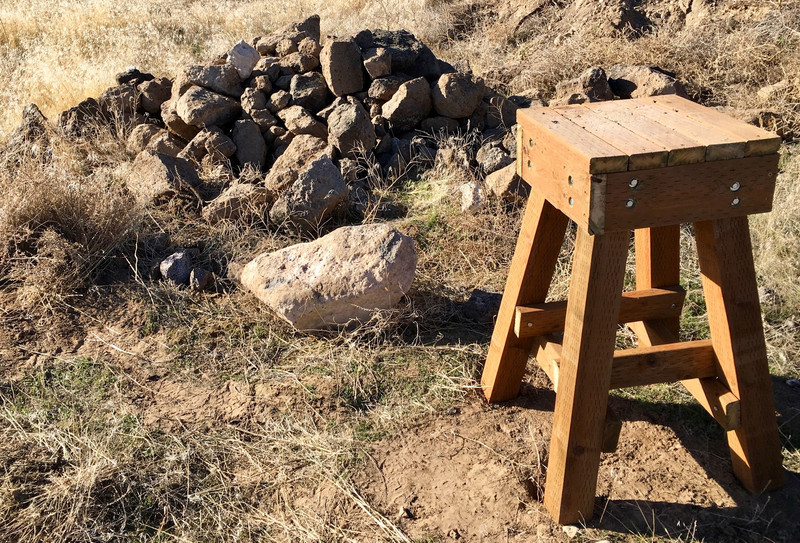
Flip it over, and you should have a completed table!
If you’re working with it on a flat surface, now is the time to mark the legs and cut them flat with the ground so the bench doesn’t sit on the corners (they won’t last long). You can run around the edge of each leg with a small spacer block to mark the height, and cut it with a small hand saw to keep the alignment. Since I intend to use mine out in the dirt, I didn’t bother with this - it’ll just sink in slightly, and the points will help hold it in place.

Does it Work?
I saw a few concerns about the table design when I posted the build on a forum - mostly about the fact that the wood would be too springy and I wouldn’t be able to get a good hit (the wood would absorb the impact). There’s an easy way to test this - and it’s to try and split some rock!
I picked up some masonry chisels from the local hardware store, mostly because I couldn’t find anything harder. I expect I’ll be hauling these to a grinder somewhat regularly to sharpen them until I buy something nicer with a carbide tip.
But, even with simple steel tools, I can split rock!

It’s oddly satisfying to break rock exactly where you want to break it. I’ll likely detail the process a bit more once I’ve worked out more details (it’s hard to find stonemasons who still work things by hand), but, basically, a wide chisel (2” or so) is set along the desired line of break, and then you give it a double tap - the first one, more gently, to set the chisel (this breaks it through any high points so it’s sitting more evenly), then a harder hit. Repeat this along the desired line, and around the edges if possible (so you split from both sides), and eventually a crack forms and the stone splits.
For finer work and removing high points, a smaller chisel works well. A pointed chisel works for removing small high points, and a narrower chisel (1/2” or so wide) is well suited to taking off corners or random raised bits.
It’s not easy work, but it’s satisfying, and I’m able to turn the random shaped hunks of basalt on my property into something more building-block shaped. By the end of the summer, I expect I’ll know quite a bit more about the process, since I intend to work on it several times a week for an hour or so in the evening (increasing as my endurance increases - a light hammer, used repeatedly, is still a proper workout).

At some point, I’ll probably invest in some carbide tipped chisels. Trow and Holden makes some nice ones, though they’re pricey enough that I intend to learn on cheaper ones first. There’s some debate about carbide tipped being too brittle to work basalt, so… ask me later and I’ll probably have an opinion.
For splitting larger rocks, I’ll be getting some pin and feather wedges and some rock drill bits. Hopefully I can abuse my DeWalt cordless into putting holes in rock with the proper bits!
Total cost for the table isn’t that much, though certainly more expensive than in the 1980s when they were designed. It’s around $100, depending on how much you have laying around to reuse and how many bits you have to buy (but I don’t mind buying new drill bits).
If you find yourself needing a stone cutting table, consider this design! So far, it’s working quite well for me.
Comments
Comments are handled on my Discourse forum - you'll need to create an account there to post comments.If you've found this post useful, insightful, or informative, why not support me on Ko-fi? And if you'd like to be notified of new posts (I post every two weeks), you can follow my blog via email! Of course, if you like RSS, I support that too.

