
Speaker stands: Either a simple mechanism for elevating speakers, or a central contributor to the audio system’s sonic qualities, worth massive investment in time and experimentation to find out how different fills change their sound, how minor changes in assembly torque impact things, and… well, the rabbit hole goes as deep as you want to go.
But, regardless of the rabbit hole, I still had a need for some speaker stands - so I built some!

This particular set of stands is the SANUS SF34-B1 - and they’re well regarded as having dreadful instructions. Which they do. But I’ve made my way through the install, documented it, filled the stands with something to damp vibrations, and they work great!
Why the SANUS Stands?
Like anything else in audio, there’s an infinite number of stands available, all promising varying things like “amazing audio” and “holds speakers up better than the next guy.” And maybe, “Made in a factory, and not made of scrounged materials.” Though I might be inclined to go for the recycled bits, given an option…
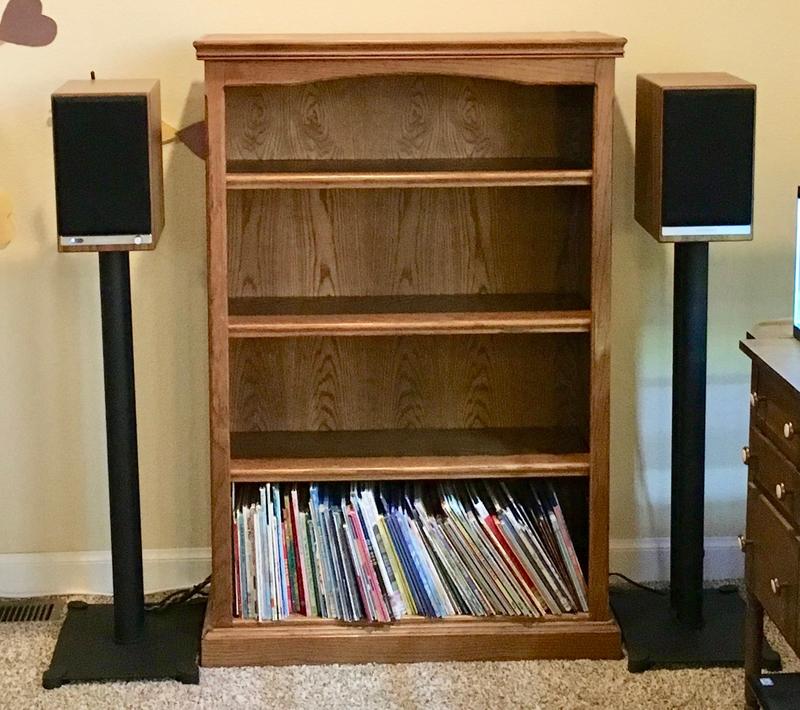
I have a pair of AudioEngine HD6 speakers for the living room. I replaced some ancient (1970s) speakers with these, and they’re great! Good clean audio, and as a Bluetooth target, you can stream to them from laptops (my wife’s laptop is a Lenovo, and the internal speakers are rubbish - sorry about that!). Plus, if both ends support it, they let you use AptX for the audio codec, which means Bluetooth audio that doesn’t sound like you’ve run it through a blender with a potato. They’re a very, very nice set of bookshelf speakers that don’t cross into the “completely obscene” price range, and you can often find them lightly used at a remarkable discount on eBay. New, they’re $700, but if you’re patient, you should be able to find a used set for around $400 - and that’s an amazing deal for a very, very good set of speakers.

The AudioEngine website recommends some speaker stands for their speakers, and they suggest the various SANUS stands. Presumably, this means their audio engineers are happy enough with the quality of the stands - and, conveniently, the stands are drilled for a hold down bolt that sinks into the base of the speakers! One of the absolute requirements of any speaker stand (for us) is that it tolerate a small child pulling himself up on them, and that means that the speakers need to be secured, not just sitting on top. It also means that I need to secure the stands to the floor at some point, and I’ve got some ideas for this set.
I went with the SF34-B1s - which are 34” stands ($160 on eBay). For the smaller bookshelf speakers, this should put the speakers more or less at head height for a typical couch, which is our common listening height. It’s more than close enough for our needs, and it also keeps the speakers up out of easy small-child reach.

Filling Speaker Stands
Another important feature of these stands is that you can fill them with some sort of material. Not only does this add weight (helping stability), it helps damp vibrations and prevents the stands from ringing at audible frequencies. I’ve got a video clip of the result later, but while a hollow tube will “ping” when you hit it, a filled tube will simply thud. Does it make a difference? Almost certainly. Does the nature of what you fill it with matter that much?
Well, if you want to go down a rabbit hole of audiophile forums, you can go search for what material to fill a speaker stand with. You’ll find lots of people suggesting sand (of different varieties and preparations), some people suggesting industrial sand, some people suggesting rice, some people suggesting shot (and then going on in depth about the differences between steel and lead for the purpose), and there exists some exotic, expensive, engineered materials that claim to (of course) be better than anything else.
After more than a tiny bit of analysis paralysis (something I frequently inflict on myself), I decided to go with industrial quartz. It’s cheap (the bag was about $6), it should be more than good enough for my purposes, and it should be dry enough that it won’t get weird and grow odd things in the years to come. I hope.
You can find this, or something similar, at your local Home Depot. It’s a 50lb bag. I expect getting it shipped would cost far more than I paid for it. The 4075 is smaller granules than 4095.

Starting the Assembly
The instructions for this set of stands are simply dreadful, so feel free to use my build as a reference.
Everything shows up in a rather heavy and well protected box. You’ll want to check for any internal damage if the box is trashed, but the box can survive a good bit of damage before anything inside is even slightly scuffed - and, remember, it’s quite heavy steel. Go through the instructions and make sure no parts are missing. You definitely won’t use all of them as the install is quite flexible in how everything goes together, so don’t worry much about spare parts!

All the small parts are contained in a nicely labeled bit of plastic bag, which keeps them from falling out in transit - and makes it easy (or, at least, a bit easier) to find the parts you need for a particular step!

The main uprights are stout - the steel is thick, and nicely powder coated. It’s not a cheap, flimsy bit of hardware. There’s mass behind it, which is great! It’s rare to see something this solid these days.
On the other hand, both ends are identical. Gravity pulls fill materials down. While the center hole will be filled with a nice bolt at both the top and the bottom, the surrounding three holes won’t be filled with anything unless you fill them. Not having a great feel for how much tightening, loosening, and adjusting I’ll be doing with this build, that struck me as a way to make a horrendous mess in the house when the fill started coming out while I was messing with things. Horrendous messes in the house are ideally avoided by being smart beforehand. Or, alternately, a shop vac.

A bit of RTV (Permatex Ultra Black) later, on all four tubes (only one end!), and the problem should be solved. I used RTV because I had it laying around, but any sort of caulk, goop, sealant, or something that will fill the holes and cure hard should be fine. You might want to avoid anything that releases acid when it cures like some of the cheaper RTVs (they release acetic acid) - or you might not care. I don’t think it will impact the powder coat and the steel underneath, but it’s not hard to find one that shouldn’t be a problem. Anything “sensor safe” is probably fine, and GE Silicone II is fine as well.
Let it cure before you continue - I gave it a day.

Base Plates and Feet
After you’ve (optionally) gooped up one end of the four supports (and they’ve cured), it’s time to assemble the base. You need to do this before any sort of filling, as the bolt hole in the end won’t be filled until you’ve attached the uprights to the base.
You’ll find the bases under the main collection of parts, contained in separate cardboard and plastic protection. I’m actually surprised the parts aren’t oiled with how heavily plastic coated they are - I normally see this sort of packing for things like brake rotors that are coated in oil to keep them from rusting. Fortunately, there’s no oil here - just somewhat comically well packed plates of steel.

If it’s not clear from the marketing material, the plates are rather significantly curved - along one axis. This is relevant when putting the feet on, because not all the corners are at the same angle relative to the ground. Again, there’s some hefty steel stiffening plates down here. You get the impression that the people who designed this really, really like heavy plate steel, welded together. I have to say, putting it together, I’m a huge fan of heavy plate steel, welded together!

The first step is to put the feet on. There are eight of them. You’d be forgiven for thinking they’re all the same, because the manual has very little in the way of hints that they’re not - but there are two different types of feet here. If you don’t realize this, you’ll drive yourself batty!

Look deep ~into my eyes~ the feet, and you’ll see numbers - 1 or 2. There should be four of each, for eight total. The same numbers go on diagonal corners - so going around the edge, you’ll have 1, 2, 1, 2 (or 2, 1, 2, 1, if you start at a different corner).

Which goes on which corner? Play with it. It’s somewhat obvious if you have it correct - the feet sit fairly flat on the floor (not perfectly, but that’s what the spikes are for).

On the other hand, if you guess wrong, they sit quite tilted and don’t look at all right. Swap this out with the other number, and it will sit properly. This is one of the weirder aspects of construction, because the manual doesn’t mention it at all. But, once you know it’s a thing, you can work it out pretty quickly.

Once you’ve worked out where the feet go, use the 5/8” pan head bolts to secure them in place. The holes in the corners of each base plate are threaded, and these simply screw in tightly to hold the feet in place.
You don’t need insane torque here - if you crank them in too tight, you could conceivably break the top of a foot off (the bolt will press against the top of the foot after going through the plate, and if you watch while cranking down, you’ll see the top start moving - back it off a bit). They just need to keep the feet from sliding off. Not even one ugga dugga (though if you’re assembling this with an impact wrench, you’re doing multiple things wrong).

I suppose you could mount the carpet spikes now, but… I’d wait. At least if you’re planning to fill the stands outside. Those spikes aren’t kidding around, and I’d hate to take one to the shin. It’s been long enough since my track days that I don’t recall quite what that feels like, and I’d rather not remember.
Mounting the Uprights
Next, it’s time to mount the four uprights on the bases. You’ll need the 1-1/2” pan head bolts, and the lock washers.

Dig out the two spacers from the box - they look like this, and serve to adapt the flat bottoms of the uprights to the curved base plate. You can probably figure out which side goes down yourself…

Use the lock washers on the bolts, run them up through the bottom, and secure the uprights in place! If you’ve used some sort of sealant on the bottom, there is no reason to crank these down really tight right now - that just spreads the uprights apart, because the bolts align with the angled bottom plate. Get them more or less tight, but if they wiggle a bit, perfect. It makes it easier to fill them. If you haven’t gooped the bottom of the tubes, you might need them tighter. Really, why did you ignore that step? Getting sand all over your floor is no fun!
This is the first step when you’ll need to put one of the wire guides in, if you want to use them. They go on the “rear” tube, facing the back, and if you’re not cranking things down at this step, don’t worry about exact alignment. You’ll align it later.

Filling the Uprights
Now is a good time to take the uprights outside to avoid making quite the mess inside if your process doesn’t work as well as you hoped.
Get some masking tape (2” wide is ideal, or wider if you can find it), and make a couple wraps around the top of each upright. This will help hold the material in as it flows down. The tubes will self fill with any reasonably dry, small granule material, so you shouldn’t have to do a lot of wiggling/pounding except at the very end.

To get an idea of what I’ve filled them with, here’s the quartz in a 1/2 cup measure. You’ll find people expressing concern over silicosis and related diseases if you spend too much time researching speaker fill material, so I’ll make a suggestion: stand upwind. You’re filling some speaker stands, not working in a factory that grinds the stuff. Try not to breathe it, but I see no reason to worry about it to the level that some people feel the need to.

If you’re careful, you can just tip from the measuring cup into the extension made of tape, or you can be lazy and grab a funnel you have laying around. If you use a funnel from your shed for filling speakers, make sure you clean it really, really well before using it as an oil funnel - this sort of stuff doesn’t belong in engines.

A suitably dry material fills in smoothly, and leads to a genuinely weird looking pattern as it flows in. This is actually one of the cooler “unintentional really neat things” I’ve seen in a long, long while - and the video is great fun to show to random people, because they’ve got no clue at all what it is!
You can also hear the difference (if you turn up the volume a bit) between a filled tube and an empty tube. One thuds. One pings.
I found that each tube takes a hair under 6 cups of material. You’ll know it’s full because the stuff stops flowing in! At this point, wiggle, tap, shake, and pound the tube - you can get a good bit more in. Don’t dent it, obviously, but you can find creative ways to get the quartz to settle. I’m sure if I applied the proper techniques, I could fit another cup or so in, but I just don’t care that much. It’s mostly full, and while I’m sure it will settle, that doesn’t really concern me.

When you’re done, pull the tape off. If you’d used stronger tape, you would have made decent sandpaper! Masking tape doesn’t hold the quartz well enough, though. I tried.

Mounting the Top Plates
While you’re still outside, mount the top plates - this will hold all the stuff inside before you go back inside. You’ll need the cork damping washers, the flat head bolts, and the second wire guide for each stand.


Plus, of course, the top plates. Peal the adhesive off two damping washers and secure them to each top plate. It might help to shove a bolt through the hole to help with alignment, but they’re cork - just get them pretty close and things will fit.
You could install these upside down, with the adhesive pointing down and gripping the slim edge of the tube, but it doesn’t make much sense, it looks worse, and the adhesive will collect dust over time. So adhesive faces the top plate!

Use the bolts and anchor the top plate in position, using the second wire guide if desired. Position on them doesn’t matter at this point - you’ll fix them later.
What you’ll notice, if you have things somewhat loosely connected, is that everything twists - badly. This is not ideal for speaker stands, unless it is. If you have some reason you want the top twisted relative to the bottom, well, figure out the twist and tighten everything up (having adjusted the wire guides if needed).

For the rest of us who want the top and bottom aligned properly, lay the stand down on a more or less flat surface, and you can use the ground to align the stand properly! While down here, align the cable holders properly, and then tighten all the various bolts at the ends. It should hold position very well after this.

At this point, you have a stand that’s assembled, tight, but doesn’t have any feet on it. Not a bad looking unit that definitely thumps when you tap an upright.

Carpet Spikes & Speaker Mounting Bolt
Now, you get to install the carpet spikes (if you’re planning to put it on carpet), or the rubber feet. And, either the speaker hold down bolt or the speaker supports.
Again, the internet gets silly here if you go down the rabbit hole, but you (ideally) want the speaker stands either well coupled to the floor, or totally floating. If you have carpet, and don’t mind putting (very tiny) holes in it that aren’t noticeable after removing the unit, you really should use the carpet spikes. If you have hardwood floors, use the rubber feet instead.
The carpet spikes look like long spikes from track shoes, and are likely similarly uncomfortable to have scrape against you.

They screw into the feet. You might consider a pair of pliers to help tighten them and make sure they’re fully seated. They dig through the carpet and couple the speaker stands to the base wood beneath the carpet and the pad.

If you have speakers with a threaded hole in the bottom (as mine do) you can use the center hole in the stand to secure them down. Obviously, this won’t take massive amounts of abuse, but if you’re massively abusing your speakers and speaker stands, something has gone wrong. It will keep them secure for a reasonable amount of movement, and should work even against toddlers.

Aligning the whole setup blind is a bit tricky. Pushing the bolt through first, and then putting the speaker on seemed to work best. I had to make a Home Depot run and get a shorter bolt than the supplied bolt with the kit - the supplied one was too long to fully tighten down. If you aren’t really worried about the speakers moving in the first place, that might be fine, but with a small child rapidly growing, I wanted the speakers bolted down tight. So, a shorter bolt worked perfectly. You might find a 1/4-20 thread specification useful.

Run the cables down through the wire guides, and you’re done!
The Result
So, the result? A very nice, well built, acoustically solid speaker stand! Repeat for the other side as needed. I’ve got plans for how to anchor them down with a bit of scrap lumber in the back.

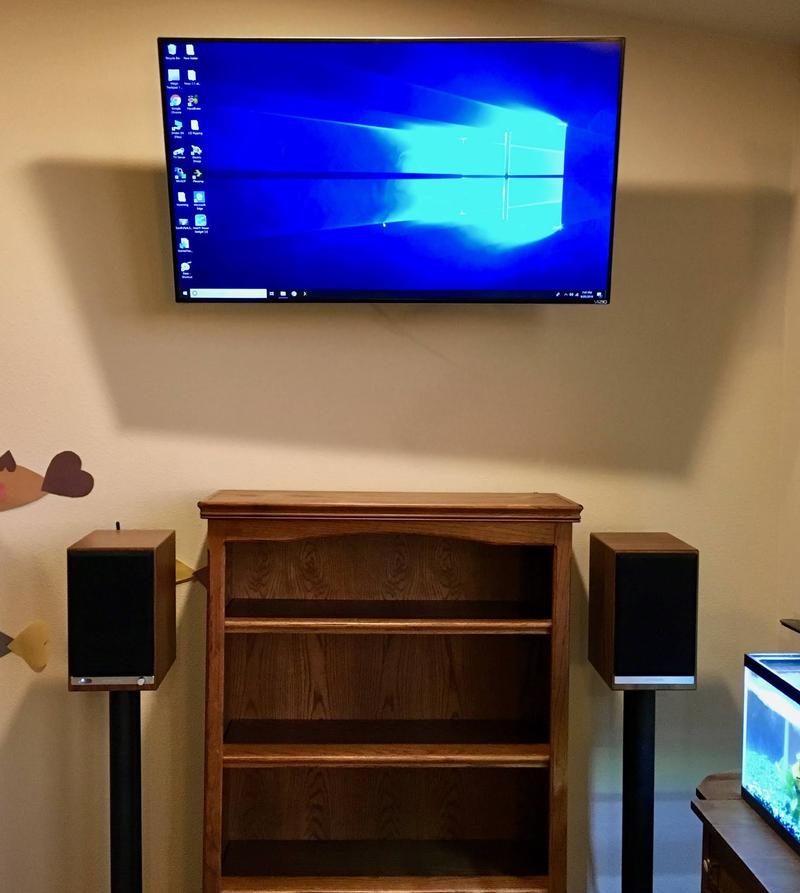
We’ve had them in place for a while, and… well, I really can’t tell a difference (acoustically) between having the speakers on stands or having them on the bookshelf. What I can tell is a massive difference in how neat our TV install looks - which was the main goal here. They look good, they sound just fine, and I’m quite happy with them.
Last week, I talked about putting a NUC in a passive case. This week, I’m talking about speaker stands. This is all related to cleaning up our TV install - and next week, I’ll cover how it all fits together!
Comments
Comments are handled on my Discourse forum - you'll need to create an account there to post comments.If you've found this post useful, insightful, or informative, why not support me on Ko-fi? And if you'd like to be notified of new posts (I post every two weeks), you can follow my blog via email! Of course, if you like RSS, I support that too.

