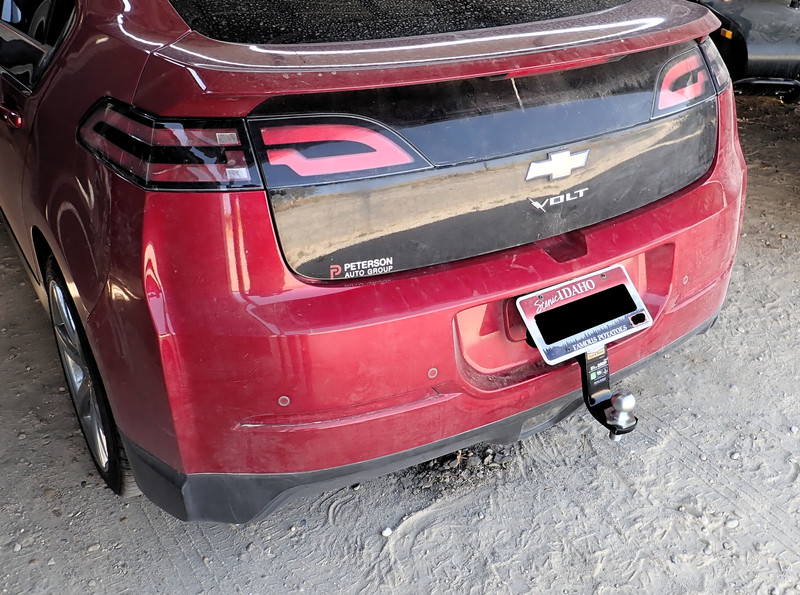

This week, I’m talking about how to install the Torklift EcoHitch Invisi on our 2012 Chevy Volt. Why? Partly for a rear cargo rack, and partly for towing a lightweight trailer that, if all goes well, should complement the Volt very, very well.
Why “Invisi”? Because this receiver, in a James Bond sort of way, hides behind the license plate when not in use! It’s quite stealthy, and as a bolt-on install, I think it’s a very good option if you’ve got an older Volt you want to add some capabilities to!

Installation was not actually as bad as I’d feared - though there are a few little gotchas in the install process relating to how the rear surround is attached.
Towing, Tow Ratings, and US/EU Trailers
Talk about towing with a car online, and you’re guaranteed plenty of controversy in certain circles (though not quite so divisive as the Goldwing practice of “Darksiding”). It’s common to see a car sold in the US have no tow rating, or “Towing not recommended,” while the same exact car, sold over in Europe, has a 3000 lb tow rating. There are several issues, all of which come down to “The US and Europe don’t have the same towing environment nor the same towing standards.”
In Europe, trailers are generally limited to 55mph - and this is enforced. To maintain trailer stability at 55mph, having 5% of the trailer weight on the tongue is typically sufficient - so a 2000 lb trailer in Europe would need 100 lb on the tongue. For the higher towing speeds in the US, which can be up past 85mph, one needs the trailer balanced rather further forward - you want 10-15% of the trailer weight on the tongue, so 200-300 lb for that same trailer. As cars have both a gross vehicle weight and a gross per axle weight, that extra couple hundred pounds on the rear axle adds up in a hurry (especially if you want to have anyone in the vehicle’s rear seats while towing, which many people do).
That higher speed also means that there are more stresses on the hitch, and there have been reports of the rear subframe welding not being up to a heavy trailer (2000 lb) for long distances without some strengthening.
However, my use cases involve a rear rack for handling “bulky but light” stuff on road trips (think a duffel bag strapped down with some clothing in it), or, on occasion, some quite light (1000 lb) trailers, for fairly low speeds, around the area. If I need to tow anything larger, I’ve got a perfectly good truck for it, but there is this one trailer that really pairs well with the Volt…
So, yes. I plan to tow a light weight trailer, loaded to about 10% tongue weight (100 lb), with the Volt, at 55mph, on some rare occasions. It should be just fine.
Despite this all being doable on the 1.25” receiver that’s common among cars, I went with a 2” receiver. Why? More torsional rigidity for a cargo rack, and because it means I can share ball adapters (stingers?) with my truck.
Getting Started: The Volt Rear End
The receiver I’m using mounts using the bumper supports for the Volt - which means the whole rear plastic molding has to come off for access. You can do this without removing any wheels - I did. But I would suggest that the time spent removing the rear wheels and putting the car up on jackstands would be time well spent, because it would have made things an awful lot faster. There are a lot of fasteners that have to come out from the wheel well, and they’re not all easy to get at with the wheel in - though the right rear is worse than the left rear.
You can see the whole rear single piece that has to come off here - it starts below the black panel for the hatch, curves up to under the lights, and down to the wheel wells. It’s big, it’s floppy, and you probably don’t want to undertake this project in the extreme cold (car plastics being a lot more brittle and prone to cracking in the cold).

If you’ve ever poked around a Volt or owned one, you know that it has exceedingly low ground clearance. No, really. There’s not much ground clearance at all. This is not a vehicle suited for anything worse than fairly smooth, perhaps mildly washboarded, gravel roads. It’s intended to be efficient on hard paved roads, does a very good job of it, but you don’t want to take it on a mountain trail that might have some rocks sticking out of the road. You will bang things up that are expensive and annoying to replace.
No, the rear axle isn’t particularly fancy… I’m not even sure what to call this thing. Half cut torsion beam trailing link?

Another interesting quirk of the Volt is that there’s an aero guide that prevents the rear bumper from being a huge parachute. It bolts up under the car and serves to guide air around the enormous rear bumper assembly for, presumably, aerodynamics reasons. It also serves as an amazing collector of dust, grit, and gravel. Be aware when you drop it!
Speaking of that - see all those little 7mm bolts? Remove them. There are an awful lot of little fasteners that have to come out, and these are the start. A bunch run across the back, and then there are another few up forward, fastening the front end of the aero shield.

There are a bunch of little T20 Torx fasteners in the wheel wells too that have to come out. You can see two down at the bottom, there are some up along the outside edge, and one annoying one inboard of the wheel.

I didn’t really have a driver suited to handling this, so I clamped a random Torx bit from some bucket of screws or another in an adjustable wrench. Once they were loosened, I could use the bit in my fingers to remove the screws, so it worked well enough.

Plus, a push type trim pin that will be the standard thorn in your side to remove.

If you’re not familiar with these things, they’re a two part assembly. Pull the center button out (or pry it out with a flathead screwdriver, more likely), and the rest should then be free to come out. When you push the button in, it spreads the grips such that the assembly remains firmly in place. After a number of years, they tend to be quite irritating to get apart, although this one came out without fragmenting into a ton of pieces, which is always nice!

This is what the rear aero shield looks like, dropped down and with a couple pounds of grit and rock removed. I have no idea how some of that debris got up in there!

Removing the Rear Cover
Removing the rear cover involves two screws (in the lower corners), and a whole bunch of fiddly little clips. It’s hard to figure out what’s going on with the whole assembly in place, but, fortunately, I took photos after I figured out how to get the thing off!
After you remove the screws, you need to remove the rubber weatherstripping to get access to the clips. It just pulls off with a bit of a tug, and goes back on the same way.

You start at one corner or another of the assembly, and the bit wrapping around the side pulls “out” - away from the car. The lip on the edge fits in the gap between the black plastic piece here and the next segment of car. Those little clip tabs have to be pushed into release the surround. You’ll want a small standard screwdriver to slide in and pop them free. You can pull on the surround enough to open up a gap, see where the tabs are, reach in, and click each one in order. Careful - there’s one on the top of the black plastic bit too!

Coming around to the top section, same deal - find the clips and push them in. As you go, it’s helpful to have someone to help support the rest of the surround, because it’s rather large and floppy as it comes free.
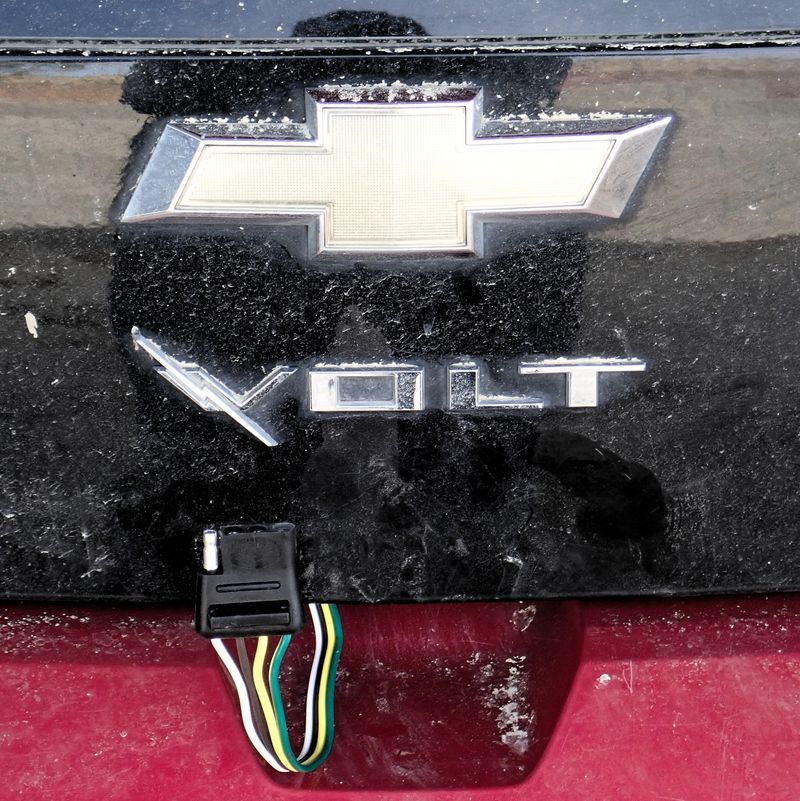
On the left end, there’s a wire harness connector that has to be pulled free - and there’s not really enough slack to set the surround on the ground to do so. It’s a standard auto connector - push the tab while pushing the halves of the connection towards each other, and it should click free and let you pull them apart. This is the connection for the ultrasonic sensors, the backup camera, and the big triangular rear light that’s exactly where one might normally put a trailer hitch.

This is a shot looking straight down from the top - you’ll see the very edge of this as you peer into the gap left by the weatherstripping. It’s harder to tell what is or isn’t a tab if you don’t know what to look for first.

Bumper surround off! It’s a big contraption.

The car looks a lot less substantial in the rear without it. You can see the cabin vent flaps (the louver looking things) - if the HVAC is sucking in outside air, the rubber flaps allow air to exit out the back into the bumper surround. You can also see the large aluminum bumper assembly, which is what we will be putting the hitch under.
Yes, I know my car is dirty. This is life on a gravel driveway.

Installing the Receiver
With the whole surround removed, the next step is to remove the actual aluminum bumper bar - which is the sort of wrench turning that can be done very effectively by loosening the bolts slightly and handing off the wrench to a couple kids who were looking for ways to help out. Removing bolts is a good one!

Each side has three nuts holding the aluminum assembly on - one accessible over the top, and two accessible through the holes in the bumper. You’ll need a long extension on your socket wrench, or a box end wrench, to remove these - but as they’re put back on with a torque spec, use a socket and extension.

Fewer and fewer parts on the car… yes, that pile of debris in the center came from the air guide and such. But this is as far apart as the car has to come - time to start putting things back together!

The receiver simply sits over the existing bolts used for bumper mounting. A couple of the holes are slots, a couple are rounded, so the whole assembly is rather self centering. You can see, in this shot, some of the welding involved in holding panels together - it’s a sort of zig-zag stitch of welding. However, the important point here is that the car really isn’t designed for an awful lot of “pulling” loads here - it’s designed to take bumper loads, which are explicitly compression. The hitch is rated for a 2k lb trailer, but be gentle. This isn’t a receiver mounted to the frame rails of a truck!

Centered and good to go! They have some other options for the car that drop the hitch out below the bumper, but that eliminates the rather limited ground clearance almost entirely in the process.

The bumper sits back over the new receiver, and it’s time to bolt things back together! The slight offset from the receiver doesn’t seem to bother anything during reassembly.

Bolt the stack back together. There is a torque spec in the manual for the install, and I’d suggest following it. It’s a hair tighter than I would have put in for the bolt without a torque wrench, but presumably it’s there for a reason. I didn’t snap anything off, and nothing felt like it was yielding, so, probably fine! There is a bit of shifting of something as you torque the nuts down, and I think the bumper and receiver are fitting to each other a bit here.
But, before putting the bumper back on, it’s time for the worst part of the whole project - taking a hole saw to your car!

Hole Sawing Away…
The real catch to this install is that you have to make some rather irreversible holes in your car for the receiver to poke through under the license plate. There’s no opening there to use - so you have to make one with a couple hole saws.
The kit comes with a template, and I copied it to another sheet of paper so I could just drill holes into it. Screw it into place with the stock mounting bolts, and you’re ready to drill!

Waaaaait! Actually, you’re not. There’s an awful lot of wiring back behind. You did check, didn’t you? The wiring routing seems to depend on the year, but I had to move a good bit of wiring out of the way to clear the opening for both cutting and for clearing the receiver. The wiring harness has some flex in it, so it’s not hard to reroute, but you have to do it.

A bit of work with zip ties later, and I’ve got the harness moved out of the way without putting too much stress on it. Snip a few connections, route things slightly differently, and you have the slack. I also took a saw to the corners left from the hole saw to straighten things out.
I did not think this project through well enough to replace my backup camera while I was in here. I’ve got the “muddy, crappy image” edition of the backup camera, and there’s a newer version that’s an awful lot crisper. Had I been thinking ahead, I would have replaced the camera too - but, this occurred to me about at this point in the project, and same day delivery of auto parts just isn’t a thing out here.

The bumper surround goes back on they way it came off, snapping onto the clips, and… heyo! That’s a 2” receiver poking out the middle of the hole I drilled! Perfect!

The concept, using a random hitch I had laying around from my truck, is that the ball sticks out and is secured in place. The license plate has a handy flip up assembly that means you can have it in the normal place. Or one could probably just screw the license plate in and be fine - but flip up holders are just so James Bond!

Reassembly is the Reverse of Disassembly
Except with a new hole in the car.
There’s a lot of crawling around in the dirt here, and I don’t mind it, but a smarter me might have put some cardboard down - or gone and used the lift up the hill that’s available for the use, if I care to move a few other cars out of the way. It’s not hard, just slightly annoying, and the clearance under the car is minimal.

However, I did get some help here as well! I figure it’s important for my kids to know how to swing wrenches, and that you can take stuff apart and repair/improve it, so I try to get them helping out when I can. Both of them were generally interested in what I was doing out here taking the car apart. My daughter definitely wasn’t familiar with just how much I used to work on cars, back when I was a decade or two younger and an awful lot shorter on money. I spent more than a few evenings (and occasionally deep into the night) working on vehicles so I had something running properly to take to work the next day.

With everything buttoned back up, all the screws back in their slot, and a new hitch with a bit more of a drop obtained… I’m done with this part of the project!

Not Totally Done Yet!
Those familiar with trailers would likely recognize that I’m not entirely done - I don’t have the wiring harness done. And you’d be entirely right. But I’ll address that in another post, because it’s another bunch of digging into the car, removing trim pieces, and wiring stuff around. I’m trying to get better at not writing so many 10k word epics…
How does it tow? Acceptably enough. I’m not going to replace my truck with the Volt any time soon, but for towing ~1000 lbs into town, it works. Energy consumption is higher by about 50%, and you can definitely feel the trailer back there (I wouldn’t even notice this trailer behind my truck), but it works.
What, exactly, is this trailer? Well, that, too, is a story for another post.

But it sure runs a movie night well!
Comments
Comments are handled on my Discourse forum - you'll need to create an account there to post comments.If you've found this post useful, insightful, or informative, why not support me on Ko-fi? And if you'd like to be notified of new posts (I post every two weeks), you can follow my blog via email! Of course, if you like RSS, I support that too.


