
Yet more Ural notes… it’s easy to write on this, because it’s how I spend a lot of my weekends these days. If you’re not interested in life with an old Russian clone of an ancient BMW, I hear there’s some AI generated content over on YouTube…
Excitingly, I now have an entire spare Type V ignition system for the Ural!

Ural Tool Kits
Motorcycle tool kits are somewhat interesting. Most bikes come with one, though the size varies a lot. Some bikes come with a small bag of adapters and other somewhat bike-specific gizmos you need to maintain the bike.
Urals… well, they come with a toolkit. You should be able to fully disassemble the bike with the provided tool roll - and it’s really a tool roll. Rolls up and everything!
My 2005 comes with this fairly complete kit in a leather roll. Pin wrenches for the wheels (that also work on the spare tire nut), an assortment of wrenches (bolt heads and nuts are different sizes on Urals so you can use the provided wrenches properly), some pliers, a couple screwdrivers… it’s got a solid kit that, for some while, was the unofficial church toolkit.

That said, I’ve since improved it. Over time, you learn about other things that are useful to have around, you end up with spare parts, and the trunk tends to be a bit of a cluttered mess. I’ve solved it by picking up a large, somewhat flexible tool bag that allows me to keep all the Ural-specific bits and pieces better contained. I’d suggest an adjustable wrench or two, a very small flathead screwdriver to adjust the front brake microswitch (for when it slips and the brake light won’t turn off), wire strippers and crimpers, a voltmeter, some terminals and wire splices, and… you’ll work it out over time. The tools you left at home are as useless as the altitude above you, the runway behind you, and the fuel you left in the fuel truck. This is also a good container to keep a moderate collection of spare parts in. I mean, who doesn’t carry a spare ignition coil, plug wire, couple bulbs of various sizes, dipstick, and spare washers?

At some level, the tool kit is a good test for Ural ownership. Does this look like the best tool roll you’ve ever seen, and it would be so nice if your motorcycle came with one of these? You might be cut out for Ural ownership. Are you horrified that a motorcycle would come with such an extensive toolroll, and you cannot imagine ever using one on the side of a road? Urals might not be for you. Or, at least, not the old ones. Get a newer one and you’ll hopefully have less excuses to use it.
One of the most entertainment moments in Ural ownership so far was changing a tire on the side of the road - by which I mean, “swapping the spare on.” My pusher (rear motorcycle) tire had gotten a screw in it, and was properly flat. I was changing it on the side of the road, when, as is the general custom, someone else riding stopped to see if I needed a hand. “Oh, no, I think I’m okay. I got a flat, but I got it up on the center stand and I’m putting the spare tire on.” You could watch the gears just… sort of grind in his head. None of these things make any sense for motorcycles. They do make sense on a Ural. They’re weird contraptions. Also, you probably want a can of bungee cords. The rear drum wheels can go on the front disc wheel - just, you have to keep the brake caliper and associated hardware out of the way somehow.
Adjusting Valves
Another common bit of maintenance on Urals is the old art known as “adjusting valves.” There are several better writeups on the internet about this, and my suggestion is to simply use one of them for the fine details of engine positioning. I personally find the F2 method leads to better results than the official method, because, as they note, setting at the absolute opposite end of the cam leads to things being really tappy (loose clearances). It’s fine, just noisy, and a bit hard on the valvetrain.
The camshaft is in the center of the engine case, and pushes on the (rather appropriately named) pushrods - the rods extending down into the center of the head, and through passages to the engine case. And once again, if you’ve not read about the lunatic doing an Iron Butt rally on a Ural, you should really read it. “Find metal, make pushrod!” These, as they’re pushed, lift the rockers (the curved pivoty-looking things), which press down on the valves (on the outside). Setting the valve clearances involves adjusting things so the valves will always fully close (a valve hanging open will leak, but, worse, won’t cool properly and will fail in a hurry as a “burned valve”) - but aren’t looser than needed, because if they’re too loose, there’s a lot of banging going on in the valvetrain, and the valves aren’t opening as far as they should be.

In practice, this involves a feeler gauge between the end of the rocker arms and the valve, and adjusting things at the pushrod end to the correct clearance. Once you’ve done it a half dozen times or so, it’s pretty quick. On a Ural, this is done… oh, every few thousand miles, or when the valvetrain gets too clattery. It’s a constant maintenance item and you’ll get good at it soon enough.

Shimming the Needles
One thing that I should have done years ago, but have finally gotten around to as things chilled out this winter, is shimming the needles in the carburetor to richen up the mixture coming off idle. My bike is of the “excessively lean” tuning that means it basically won’t run right until warmed up. Off idle, when not warmed up, there’s a dead spot, and it tends to pop and fart (backfiring through the carburetor, which is hard on a lot of things - and, no, popping out the exhaust is not a backfire - that’s an afterfire, and I don’t have that problem on this vehicle of mine, but we won’t discuss what my RX-7 tended to do when run hard in open loop mode).
Most motorcycles, to include my daily driver, have a “constant velocity” style carburetor. The defining characteristic of these is a slide that goes up and down based on airflow, opening and closing a passage. As the engine requires more air, the slider rises, opening up the passage - and as the engine slows down, the slide drops, closing the passage. The result is, in theory (and in practice, close enough!) a “constant velocity” of airflow through the fuel metering circuits. This makes certain things easier to deal with, and leads to a bit more consistent fuel metering than other styles of carburetors. These also happen to work better on the lower airflow of motorcycle engines. There are some good diagrams of the various operating modes here: http://www.vessels-clan.com/jay/1200s/cv/
The slide, as it goes up and down, has this needle protruding out the bottom into a metering jet, restricting the passage of fuel. As the slide lifts, the needle lifts, and more and more fuel can flow into the passing air (which is nominally at a constant velocity). If you lift the needle further, you get more fuel (as less of the metering jet area is blocked). It works great, and all I’m going to do is shift this ever so slightly “up” with a shim so I get a bit more fuel at all positions - and, mostly importantly, just off idle.

There are some guides to the process, but they all work out to the same thing. Pull the top off the carburetor, get the needle out, and add a shim. I will suggest that you find a bit that fits very nicely in the screws, and make sure you can pop all 8 screws free before proceeding. Despite the reputation these have for rounding out, I didn’t have any trouble. You might consider hitting the screws with some PB Blaster for a few days before you start the process. Plus then you get that tangy PB Blaster smell while riding! Yum!

As the last screw comes loose, the top of the carburetor will start to rise. There’s a spring in there. Make sure things don’t go flying around - the spring isn’t terribly strong, but it’s enough to be aware of. Vacuum from airflow fights against this spring to keep airflow roughly constant through the main metering opening.

Below the cap is a rubber diaphragm. You could remove this and the slide, but it’s well known for not liking to seat back in the groove until everything dries out. Fortunately, you don’t have to remove this. See the metal button looking thing in the bottom of the center well? That’s the needle, and with the right tool, you can remove it without having to pull the slide.

A standard iFixit pair of tweezers works perfectly (yes, I am aware older readers may have a different name for this particular style of tool). Reach down, holding the slide down so you don’t pull the slide up and knock the diaphragm loose, and pull the needle up. No problems!

Finally, add a shim. Your local hardware store M3 washers work fine, though most of the cheap ones have some flashing on the back you’ll want to sand off. Put it around the needle, drop it back in, and you’re done!

Of course, you could also just order a needle with a different profile, and I’m considering that too. This is a cheap fix, and makes a real difference in the off-idle performance in cold weather. If you get a lot of popping and farting when cold, this should help out - and it will help, even when the engine is warmed up, keep things from that lean transition that’s hard on pistons. See if your bike needs it in the summer - mine behaves perfectly fine without the shim in the warmer weather, so I pulled it out.
Repairing an Oxidized Rear Tail Light Lens
Yet another interesting issue I’ve run into is that my tail light lens got very heavily oxidized over… quite a few years, and a lot of sun. I think I replaced this lens shortly after I got the bike, so it’s 8-9 years old. I found a replacement again (they’re getting harder to find, like all parts for a 2005), and you can really see the difference.

But also, since I have a replacement, there’s absolutely nothing but a few bucks to be lost experimenting with the previous one. I’ve known about the “headlight restore” kits for some while, though I’ve never had to use one as most of my headlights are glass, as they should be, not some funky plastic that turns yellow with age. But, also, there are no shortage of kits to help with that problem. For no particular reason beyond “It seemed like it would work, and didn’t involve drill polishing tools,” I grabbed this kit from my local parts store for about $12.

This is a two step process: First, you use a couple oxidation removal wipes to, somehow, scrub off the oxidation. Then, you apply a silicon based UV sealant to everything and let it dry. I’d use gloves, personally… but I also wear gloves for all sorts of things.
After the oxidation removal step, which took about 5 minutes, things looked a lot better! It’s no longer hazy white, it’s actually red plastic again.

You’re supposed to let it dry after this step until it’s completely dry, and I did so. At this point, things are dramatically improved, but it’s still somewhat matte. Fortunately, there’s a sealant that’s supposed to fix this!

Whatever the sealant layer is made of goes on as a somewhat thick, glossy layer - and while it’s wet, at least, the lens looks brand new! The box claims it takes three hours “or more” to dry, and I’ll agree with “or more.” It took until the next day to be dry to the touch - so don’t plan on doing this right before a ride.

The results, though… I can’t argue with them!

Same lenses as when I started, same position. It’s not quite as good as new - but neither is it far from it! The lights are clear through them, and I’m absolutely happy with the results. As far as I’m concerned, if your rear lens is looking oxidized, the headlight restore kits work more than well enough - especially if a replacement lens is harder and harder to find, as mine are. I’ll keep the new one safely tucked away just in case I need it and keep running the old one, slight crack in the top and all!

Tractor Seat Details and Replacement
One downside of the tractor seats is that, over time, the rubber ages. It’s probably worth getting a cover for them, if you still use them - not just to make them more comfortable, but to help protect them from the sun. I set out to replace mine the hard way, and learned several important lessons.

First and foremost, not all the “BMW/Ural seat rubber” options on eBay work. Mine has the “long nose” style, and that’s not what exists on eBay for the most part.

However, if you want to disassemble your seat, the trick is that the rear support bar slips into the rear supports about like this. The whole thing pulls “up and to the rear,” and comes free. If your old seat is trashed, cutting it off is probably the easiest option here.

The front part, similarly, slides in. However, after some large number of years, you’ll probably need a hammer to get it out. Good luck!

After discovering that my replacement rubber was entirely wrong, I went about the next best option, and purchased a new enough tractor seat from someone on Soviet Steeds (the remaining Ural forum). Remove the old mounts, and the new seat slips right on!

It really just is a few bolts to remove it, and they go right back in with the new seat. Sorry! I wish I could offer advice on fitting the new rubber parts, but as I’ve not managed to find the correct replacement rubber, I’ve not sorted out the details. The front has to go in first, and you work the rear in, but as to how to do that, I suppose, leave a comment if you figure it out!

More Ignition Troubleshooting: Hall Sensor Replacement
As the weather warms up, I’m dealing with yet more ignition issues. Things feel a bit wrong off idle, which isn’t uncommon with a Ural, but after the bike has heat soaked for some while (it’s worst after about half an hour of being shut down in the heat), it does not run right. It misses, badly, at low RPM, and generally shows all the signs of an overheated ignition coil. Those, of course, are hard to find, so I decided to do a few other things and eliminate other possibilities first. My ignition system is a few-model-year special, and is hard to find parts for, of course…
I could probably just throw an ignition coil at the problem and be fine, but I wanted to be comprehensive, and answer a few questions I had in the process. The first being, “Is the hall sensor failing?” They generally are binary devices - working or not - but I’ve also seen, on occasion, people fix a pile of weird running issues by replacing this sensor. It’s usually the last thing on the list, but I also wanted to check the two piece ignition rotor again, so, into the timing chest I go! There are more details on this system back in Part 4.
After the timing cover is removed, set the bike to the proper timing mark - it should be a “line with a dot,” per the manual, but as the assorted marks on my flywheel are less than clear, I wanted to verify things before I took the system apart. The “trick” to setting the timing on a Type V ignition system (and a Type IV) is that you rotate the hall sensor plate until the LED flickers on and off as you rotate it - and if you’ve done that with the flywheel at the correct mark, shortly before top dead center, the timing is set. This also means you can verify that the mark is the correct one by doing this as you slowly rotate the flywheel. I’ll suggest “bike on the center stand, in 4th gear.” You can inspect the timing hole and move the rear wheel gently until you have things aligned, and verify by rotating the hall sensor plate to make sure that you are, in fact, lined up on the mark you should be.

This is the timing mark I found. I swear, it’s a line with a dot, if you imagine well enough…

You’re not going to find a Ural hall sensor for a Type IV or Type V ignition listed anywhere. What you will find are some Lada timing sensors that are identical, with a different connector at the end of the wiring harness. This is what you’re looking for, and as near as I can tell. Search for “Lada Hall Sensor” in a few various places and you’ll find something that looks like this - and it’s what you need, as long as you’re willing to swap the connector around.

The wiring colors even match! I mean, what more do you want in a part?

Clip the wires at some useful distance from either connector, unscrew the old one, and screw the new one on. I did notice a difference between the old and new unit - the magnet is significantly stronger on the new one. I’m not sure if this is the result of 20+ years of product development, or if my magnet was losing strength with the heat. In any case, that’s about the only difference between the two I noted.

If you don’t yet have a set of these solder/shrink tubes, they are awesome. I use them on quite a few things, and they’re well worth having around. Seriously. If you fix wiring, get a set of these.

Other random advice, don’t try to use liquid flux on the connectors. It boils and inflates the tube, and does not improve your connection. Anyway, make the connections and reinstall the plate! Rotate it until you set the timing correctly, tighten things down, and see what happens!

In my case, the result was “Absolutely no change.” The bike ran exactly as it did before, had the same heat soak issues, the same off-idle stumble, and as near as I can tell, there was absolutely nothing wrong with my old hall effect sensor. But I’ve demonstrated how to replace it, and I know I’ve got a decent unit on for further troubleshooting!
Of course, while I was in here, I also discovered two important things: With the timing chest cover off, I could see the “air gap” firing on occasion, and wow does the exhaust header get hot fast. The coil contains some designed voltage relief gaps on either end to allow the system to function if one plug fails, and to allow overvoltage somewhere useful to go, other than “through the insulation.” These shouldn’t be firing in normal operation, but mine certainly were… corresponding perfectly to a miss. Huh. I tweaked the gap slightly wider, but obviously there’s more to investigate. The air gap should only fire if there’s a problem with the spark plug or plug wires. If you have a miss, run the bike without the timing chest cover, and if you’re getting “snaps” out of there with visible arcs, you’ve got some things to fix.
A Spare Type V Ignition System? Wow!
Of course, around this time, I discovered on eBay an entire Type V ignition system. These parts are basically impossible to find, so of course I picked it up… I’ve got a spare hall sensor and plate, a spare computer unit, a spare coil, and…
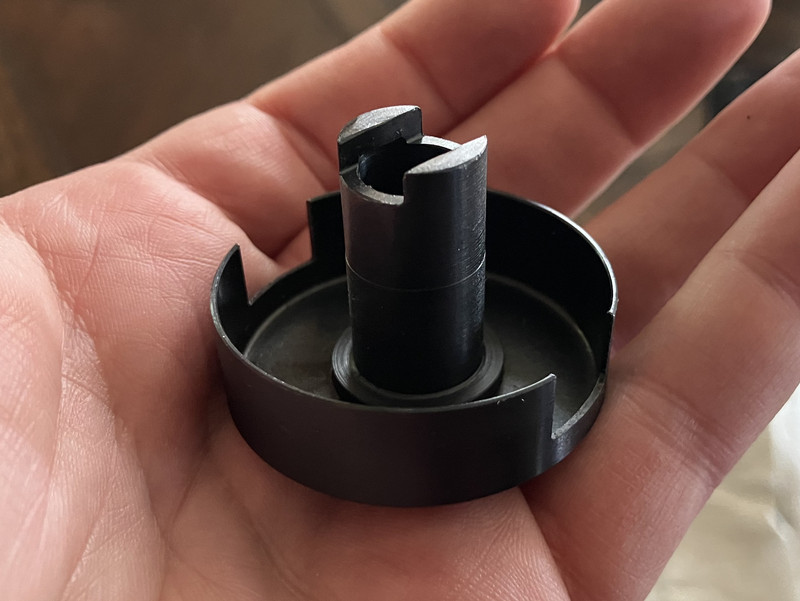
A spare ignition timing rotor! These things are basically impossible to find! Or, at least, were…

Of course, shortly after this, the guy making the one piece rotors got his production back online, and I have one of those on order. They don’t tend to separate like the two piece rotors, but neither am I going to complain about a good collection of spare parts. A 2005 Ural is the sort of vehicle you want a few boxes of spares for.
Plug Wires
Plug wires are another interesting challenge with Urals, because nobody sells plug wire sets for older Urals. A common enough cause of ignition system issues is plug wires going bad - and I… don’t know how old mine are. Somewhere between 8 and 20 years. I have no idea if the previous owner ever replaced them, but I suspect not, as they look very much like the stock factory plug wires. Spark plug wires do go bad over time, and a common way they fail is increasing in resistance. If the path to the plugs is very high resistance, that would explain the spark jumping the bypass air gap, and would also explain some of the running issues.
Here’s a tip: The plug wires you need are used on older “BMW Airhead” engines. You want 5kOhm resistance in the wire, and the best way to do this is a 5k resistor cap at the spark plug end, with solid metallic plug wires. Often, the plug wires themselves are the resistor, but this makes dialing in the resistance hard, as it’s dependent on the length. The 5k resistor caps do everything you need, and the couple ohms of the metallic wire don’t matter.
I got a set of 18” wires, expecting to trim them to length. On the website, the coil ends weren’t shown as attached, but… they did ship with everything attached. To the tools!

The fix here is simple: Remove the coil end connector, cut the wire to length. The coil end connectors are just crimped on with the metallic wire center wrapped around behind making contact.

Pry the connector free. A series of increasing diameter small screwdrivers works well. Be careful, it’s easy to jab yourself doing this wrong. Yes, I managed to do so. Yes, it hurts. Be careful.

With the end off, you just have what amounts to a stranded coax cable. There’s a metallic core, and a lot of insulation around it to handle the tens of thousands of volts this wire handles thousands of times per minute. Trim to length, use your wire strippers to expose the center wire, wrap it around, and put the connector back on.

If you’re clever, you’ll even remember to put the coil end boot and the “plug” for the timing chest on before you put the new connector on…

Connect it all up, and, hey, things run! I’ve even got a spiffy looking sleeve on my shiny new plug wires.

I measured the old ones. Remember, spec is 5kOhm. One was 11kOhm, and one was 33kOhm. They should have been replaced rather long ago…
Did the bike run differently? Yes, in fact! My miss off idle seems gone, and the bike idles better - it doesn’t feel like it’s “loading up” with an overly rich mixture and dropping RPMs down at idle, requiring holding some throttle. It’s a noticeable improvement down low - and hopefully this holds up high too!
But it didn’t solve the “heat soak” issues. So, I shall replace the coil one of these days.
This Is Ural Life
I think this is likely to be the last post on Ural maintenance for some while, because at this point, I’ve dealt with pretty much everything that needs to be dealt with - and future work is just going to be a lot of the regular repetition of the stuff I’ve already written about. Hopefully. The reality of a year of daily driving a Ural is simply that it’s a very 1960s-style vehicle, and you work on it constantly - but also, mine has been getting me around as needed, and I can’t fault a vehicle that gets me home to work on things! Or, at least, to a gas station to reseat a relay when the headlight stops working reliably at night.
Really, though, if you want a Ural, get a newer one. Either get a 2012-2013, the last of the carbureted models, or get a 2nd gen fuel injection model - skip the first gen FI models, that system is not well liked and is hard to get parts for.
But, it’s hard to beat the amount of attention you get with a Ural!
Comments
Comments are handled on my Discourse forum - you'll need to create an account there to post comments.If you've found this post useful, insightful, or informative, why not support me on Ko-fi? And if you'd like to be notified of new posts (I post every two weeks), you can follow my blog via email! Of course, if you like RSS, I support that too.


