
Power 788+ Battery Spot Welder
So, you find yourself needing to spot weld a battery pack (or something else) together. And, spot welders are expensive, and most people end up building DIY devices, but there’s this little gizmo (and it’s siblings) all over the internet. Alibaba, eBay, Amazon… it’s a common item that claims to be a decent spot welder. It runs about $200 shipped to the US. Be sure you get the 110v one - most of them run on 220v (unless you have 220v power, of course).

But what is it? What makes it tick? Why is it so much cheaper than every other spot welder out there except ones that are very obviously related to it?
Well, as it so happens, I’ve gotten very friendly with one (details in a separate post), and will happily share some of my insights with you.
Let’s dive in.
The photos are mostly from a bit of repair work, so if it looks like it’s not fully assembled… that’s because it’s not. Good eye!
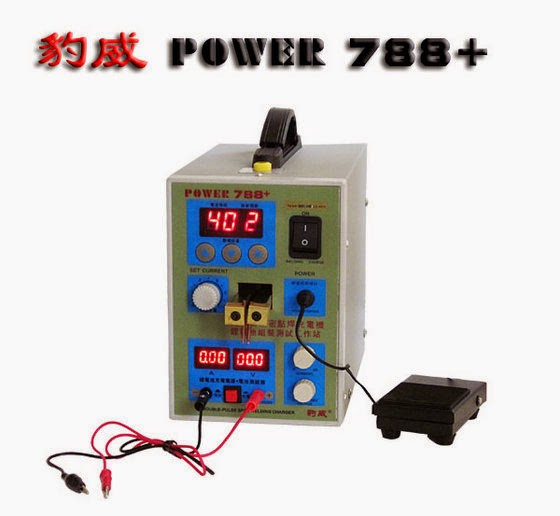
The “User Interface”

This is the unit. The top display shows, on the left, some number related to current. The rightmost digit shows the number of pulses (1 or 2). You set these parameters by using the “star” button to select the position to edit, and the up/down arrows to change the number. It goes from 00-99, and 60-70 seems to be a reasonable setting for double pulse welding of 0.2mm thick nickel sheeting (with the “set current” knob at zero). Bigger numbers mean more power.
Below it is a “set current” knob. I cannot find out what this does. Turning it up appears to increase the power of the weld. It doesn’t seem to increase the number of pulses, which is what the (very poor) advertising documentation implies it does. Each pulse is a very distinct thump, and I only get two, even with that turned up a bit.
The top right has welding and charger power switches.
The foot pedal plug is on the right side, and attaches to the foot pedal that comes with the unit. Be aware that the foot pedal is an “or” with the normal welding microswitch, and it will happily try to weld air if you tap the pedal with nothing attached.
The main welding arms are in the center. Under normal operation, when you push up on them with a workpiece, they hit a micro switch and apply welding current.
Below that is the charger, with voltage or current settings. I haven’t played with it, since I don’t find myself charging batteries with this unit. But, in theory, it’s capable of doing it. I think it has a voltmeter capability as well.
Finally, on top of the unit is an adjusting screw for “welding pressure.” This is not some archaic use of the term pressure to refer to welding voltage - it literally is adjusting the spring tension that holds the arms down. Increasing it increases the pressure on the workpiece.
Going Inside
The core of the Power 788+ welder is a simple: One big transformer, and one big circuit board.

Power comes in, goes through a fuse, goes into the circuit board (which handles both the high voltage and low voltage), through a triac, into the transformer, and back. The high amperage welding current flows through the wonderfully shielded braided copper cables and into the arms. I intend to heat shrink those at some point, but for now, I just rely on the fact that any strand of copper that touches the other arm will vaporize on the next weld or two. I’m pretty sure that spiral wrap isn’t designed for this, but the welding current is very low voltage.
I’m fairly confident this welder isn’t UL listed. Or, really, listed by anyone. And I wouldn’t leave it plugged in unattended. You probably shouldn’t plug it in at all, but… that’s no way to get a job done. Make sure you have a good circuit breaker. This thing is really a bit frightening on the inside, and the circuit board is worse.
You can see, on the top, the adjuster for the welding pressure. It’s just a machine screw and it pulls the spring tighter when you crank it. It could use some oil, if you’re willing to put oil inside this enclosure.
If you find yourself needing to remove the circuit board, it’s doable. The front panel comes off easily enough, and the board is screwed in. Once you have the screws out, there are a few points that cause trouble removing it. The first is the power switches on the top - they’re just a press fit in the terminals, so a bit of pressure pops them out. The second tricky part is the switch at the bottom, in the charging section. I wasn’t able to remove this properly, and ended up separating the two parts of the switch - the top remained in the front panel, with the bottom in the circuit board. You could easily enough desolder the switch, though. If you do choose to separate it, it takes a good bit of pulling, and a spring will fly out when they come apart. Don’t lose the spring!
Be careful of the voltage sense wires (the small red/black wires going to the terminals above the main power connector), and the LED light wires. They’re not very long!
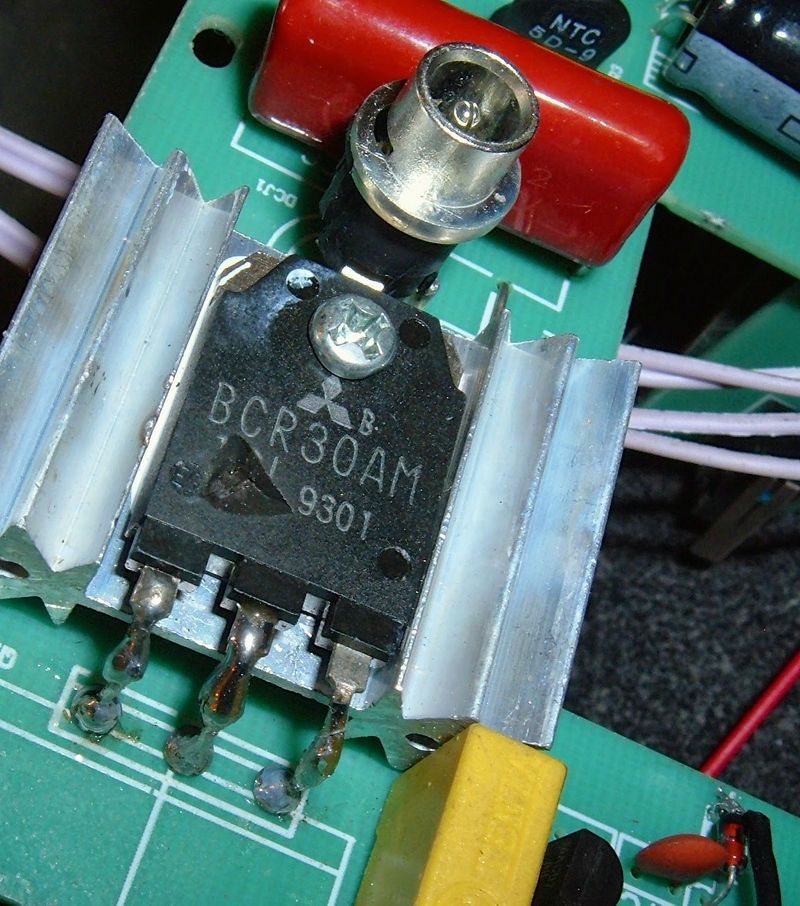
Circuit Board Shots
The circuit board is two sided. You may notice something slightly wrong with the triac. You may also notice a different component, detailed, that is connected to a trace that’s pulling clear of the board. High quality, this is not. And, really, the rest of the board is a hand soldered, globby shitshow as well.


That’s about it. I haven’t reverse engineered the board, but if you are interested, contact me and I can send you native resolution images. I’d love to know more about this thing.
Does it work?
Yes. It does. It does a surprisingly decent job of spot welding for a $200 welder. At least until it blows up.

I’ll caution you to be very careful on the duty cycle. The stock triac location is not “good” in terms of cooling, which is the whole reason this thing was in pieces. Either the triac was bad, or it overheated with my welding. Either is possible.
Comments
Comments are handled on my Discourse forum - you'll need to create an account there to post comments.If you've found this post useful, insightful, or informative, why not support me on Ko-fi? And if you'd like to be notified of new posts (I post every two weeks), you can follow my blog via email! Of course, if you like RSS, I support that too.

