
I have a Sunkko 788+ Spot Welder. It failed on me rather quickly, either from a faulty triac, or from overheating the triac due to an aggressive duty cycle (I’d say I exceeded the rated duty cycle, but that would imply there was enough documentation to determine this, which… not so much).
The quality customer support on eBay was at least nice enough to suggest I replace the triac. They did imply that this was about the only support I was going to get, so… well, in I go.
This might be part of the problem…

Failure Behavior
I was welding away at a battery pack, happily popping nickel strip onto batteries. I stepped away for a bit to get the next part of the pack assembled, and when I came back, the unit wouldn’t power on. Well, I’m smart enough to know that if a unit comes with spare fuses in the box, blowing a fuse is somewhat common. Annoying, but common enough. I removed the fuse holder, dumped out the shattered remains of a fuse (it apparently crumbled when the holder was turned), and replaced the fuse. Excellent.
I plug it back in, hit the power switch, and… BANG. Something inside the unit fails, hard.
The unit still powers on, but it won’t weld anymore.
https://www.youtube.com/watch?v=Pt8RJ3pCrlM shows it’s behavior after the failure, if anyone is curious.
Well. Time to dig in. Read on for the photos.
Having been told that my options from the seller were “Repair it,” I decided to repair it. Also, I was planning to repair it anyway, because I’m curious about things like this.
The case comes off easily enough, to show the transformer and the backside of the circuit board.

The front comes off easily enough. An inspection showed some pulled traces - this is, as expected, truly a thrown together piece of work.

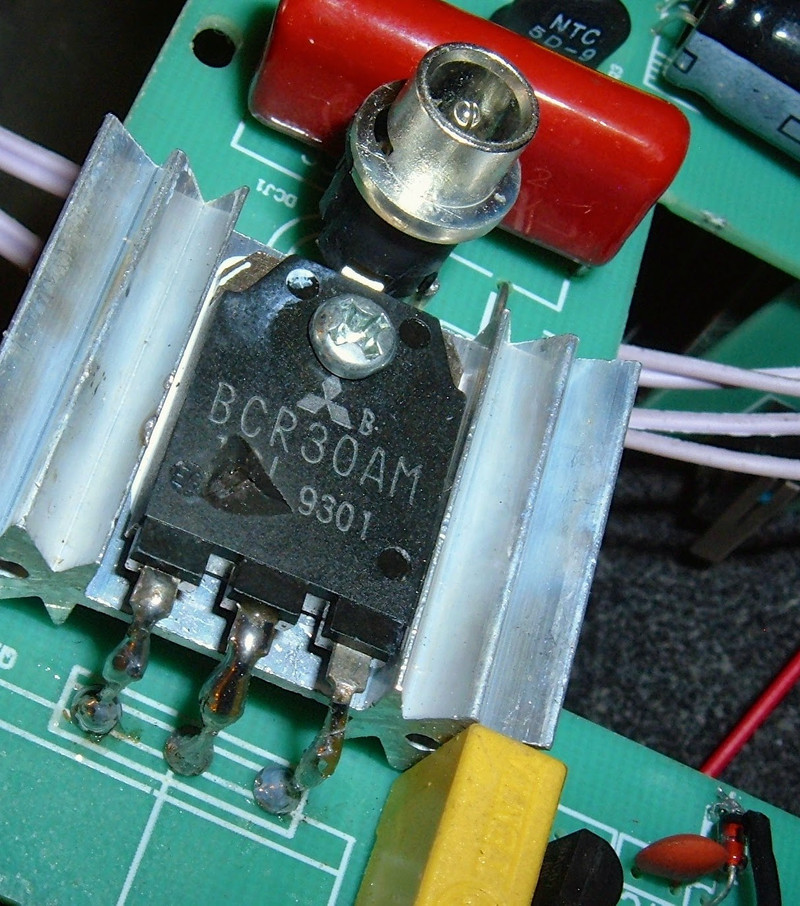
A whole lot of messing around later, I had the board out. The other side had what appeared to be the actual problem: A large hole blown in the main switching triac.

The plastic front of the unit where this thing blew also gave evidence of the failure.

Well. I don’t know if this is going to fix the problem or not, but it’s sure worth trying! I mean, I just wanted to rebuild a battery pack, but a spot welder is almost the same, right?
A bit of research, an eBay order, and a week or so of waiting around provided me with new triacs.

While I was waiting for the parts to arrive, I discussed the failure with some people online. One of the things that came up in conversation was the location of the triac. It has a heatsink, but the triac and heatsink are in the very small amount of air between the circuit board and the front of the welder. Further, it can’t even get any good convection going because of the power switches right above it.
There’s a giant amount of air space behind the circuit board - it would be nice to relocate the triac into that space, so it could cool better.
I sat down with the unit and figured out that, in fact, I could do just this! The triac is mounted with through-board holes, and if I just flip the triac around, I can hang it into the open air. This can’t cool any worse than up where it was, and while it might not be strong enough to ship the unit that way, I’m not planning to ship it! I’m planning to use it.
The Repair and Re-engineering
As far as repairs goes, this one is pretty simple. Remove the old triac (I just cut the legs to make it easier), move the heatsink onto the new one, resolder it out the backside of the board.

I was genuinely surprised to find thermal compound between the triac and the heatsink. I was expecting it to be dry, or at best, some thermal tape.

You can see some of the high quality soldering around the board. At least they thickened up the traces for the 110 current… I do suspect this may be the only change from the 220v version to the 110v version other than a transformer winding difference.

The new triac was thermal compounded and attached to the heatsink before being mounted, facing the other way, very careful to ensure the pins remained where they were supposed to be.


The final step was to reattach the voltage sense lines (?) from the transformer before putting things back together and testing.


A bit more assembly, and success is mine! The welder works, and the weld is solid!

Analysis
So, what happened? Obviously the triac blew up. What caused that, I can only speculate about.
It’s important to recognize that this welder seems to be well enough liked in China and other countries. So I don’t think there’s a fundamental design flaw. However, this welder normally comes in a 220v version. There are 110v versions, and I suspect the difference is mostly or entirely in the transformer winding. I don’t have a 220v version to pull apart and test, but as I’ve not seen any dual mode versions and the wall current goes straight to the transformer, I’d expect a factor of two difference on one of the sides.
However, this means that the 110v version is taking ~2x the current on the input side for the same output power. And, all the input current goes right through the triac.
Given the lack of documentation, it’s entirely possible I blew right past whatever duty cycle rating there was, overheated the triac, and caused it to blow up.
Or it might have just been a bad triac.
In any case, I’ve got better cooling on it now (I may add a fan), I’ll take it easy on it, and I have a good understanding of what’s in here. And, plenty of spare triacs.
Comments
Comments are handled on my Discourse forum - you'll need to create an account there to post comments.If you've found this post useful, insightful, or informative, why not support me on Ko-fi? And if you'd like to be notified of new posts (I post every two weeks), you can follow my blog via email! Of course, if you like RSS, I support that too.


