
A month or so ago, I posted a teardown of a BionX 36v 9.6AH battery pack. Some of you may have guessed that I was going to rebuilt it! You were right!
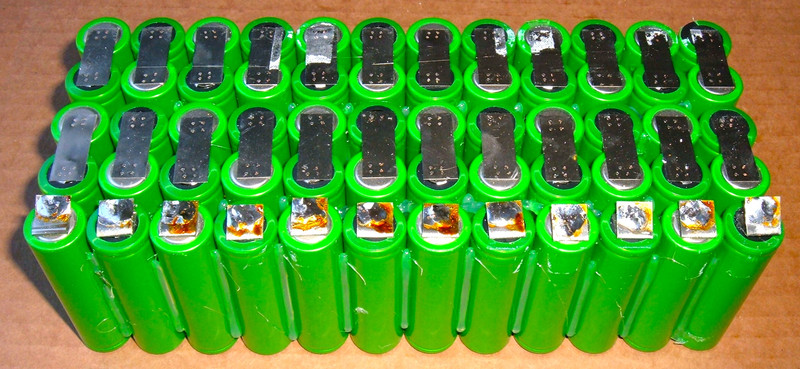
As you may recall, the core of the BionX 36v battery pack is a 5x12 grid of batteries glued together. Freed from the power wires, it looks an awful lot like this:

I’m going to build one just like that - but better!
And you absolutely want to read on to see the photos of the rebuild…
Cell Selection
The old pack was built out of 60 Sony US18650V cells in a 10S6P configuration (strings of 10 in series, then 6 of those in parallel). Each US18650V cell is rated at 1600mah (1.6AH), for a total pack capacity of (6 * 1.6) = 9.6AH. At least until it went flat (apparently, it will beep at you for quite a few months before finally dying). These cells are a LiMn chemistry, which is a decent blend between safety and density. They are also mildly self balancing, which is how BionX gets away without a BMS on this pack (they just monitor bulk voltage - high quality cells + slight self balancing = <3).
Unfortunately (or fortunately, depending on your point of view), these specific cells are not easily obtained anymore - I could get them, but only used. Fortunately, they have been replaced by the Sony US18650V3 cells - which are pretty much the exact same thing, but at a 2250mah capacity. I bought them, brand new, from Batteryspace.
1x5 Module Assembly
This pack took a little bit of pondering to rebuild, as there were a few different ways to get it built. However, my spot welder’s arms are not infinitely long, so there was really only one way to build it that works with my tools.
The pack is held together by copious amounts of hot glue. Step 1 is to obtain a hot glue gun and a pack of hot glue. It really does take a lot to put this pack together! On the other hand, the pack won’t come apart easily (or at all). It’s really, really well built!
I started out by assembling strings of 5 18650 cells, properly oriented for a series pack (so positive terminals at opposite ends for each cell). I happen to have a 1x6 alignment jig that came with my welder, so I used it. A bit of hot glue on one side, and they were attached!

After that side cooled, I could flip them over and hot glue the other side. Hot glue is cheap. Batteries are expensive. I may as well make sure they’re not going to go anywhere! Do this for 60 batteries worth, and you’ve got the start of a pack rebuild.

Nickel Strip Tweaks
Before rebuilding this pack, I spent a bit of time playing with some spare 18650s I had laying around. One of the things I learned is that with a bit of abuse, the corners of the nickel strip welded to the positive terminal can easily punch through the plastic wrap and insulation, make contact with the negative sides of the battery, and short things out. If you want to play with this, I suggest using mostly discharged scrap batteries.
In this naked (scrap) 18650, you can see what I’m talking about. The raised center cap is the positive terminal, and then there is insulation between that and the outside ring, which continues down the side and makes up the negative terminal. The plastic ring and plastic insulation provide some protection, but it’s not hard to punch through it and short things out. The discoloration on this particular cell may be a result of some experimentation along this lines…

In any case, I wanted to reduce the risk of this in the rebuild. So, I trimmed the sharp corners of the positive end of the nickel strips I used to assemble the pack. You can see the revised strip form here. It takes a bit longer to create, but not by much, and pack rebuilding is a short project compared to the lifespan of a battery pack, so one may as well do it right!

After spot welding the revised strip on one of the strips of batteries, it looks like this. The risk of punching through the plastic insulation on the positive terminal is significantly reduced with this design. The negative terminal doesn’t matter, as the only thing the sharp corners can punch through to is the negative terminal (where it’s already connected). The excess metal I’ve hacked off isn’t contributing to current carrying, just to being a potential short. So I’m happy with this tweak.

Finished 1x5 Modules
This is what a finished 1x5 module looks like. It’s a 5S strip, with a positive terminal on one end and a negative terminal at the other diagonal corner.

Building the 10 cell modules
The next step is to put pairs of 1x5 modules into a 2x5 module (10S). This will have the full pack voltage, and there are 6 of these modules.
The right angle alignment is a bit tricky to eyeball, so I used some scrap angle aluminum I had laying around to build a right angle jig. Hot glue solves many problems!

When putting the 10 cell modules together, it’s important to set them up so they can be welded into a 10S pack - so positive and negative ends next to each other. I used the jig to align them.

A bit of hot glue along the edges, and a lot more hot glue down the center gaps, and there’s a 10 cell pack! It’s still 2 5S packs glued together right now, as it’s not welded into a 10S pack yet, but there’s a good reason for this isolation that will be made clear later.

Rotational Symmetry
An interesting part of this pack build is the rotational symmetry involved. The 1x5 modules are free to be rotated around to match the desired orientation, and the 2x5 modules can be as well. Depending on how you rotate it, they are capable of having the positive terminal on the top right, or the top left - the two following pictures are of the same two modules, just rotated relative to each other. Pay attention to the positive terminal location.
What this means is that until after the 2x5 packs are glued together, there’s no need to pay attention to how things are assembled, other than to ensure that positive/negative terminals are oriented properly. You can’t mess it up yet!


Physically assembling the 5x12 pack
Once the 2x5 modules are built, it’s time to line everything up for the whole pack. At this point, orientation matters! To match the existing pack, the positive terminals are in the “top left” of each module when put together.

If you rotate the 2x5 modules differently, they can be aligned in the opposite configuration - see below. You do NOT want to do this or you’ll have a bad time with the final wiring (look at the orientation of the left module and where the positive terminal is). If you were to do this and wire things up properly, with the positive and negative wires swapped to match the pack, it’d be fine. If you didn’t, you’d short the whole pack out and probably get some nice venting. So don’t do this. It’s definitely not OK!

With a lot more hot glue, things start sticking together into what looks like a battery pack!

You’ll notice that I haven’t welded any of the 1x5 modules together yet. There’s a good reason why, and it’s the hot glue gun. To put the pack together, I have to run the hot glue nozzle into the gaps between the cells - I’m not just gluing at the edges, but for all the interior junctions as well. Were the pack welded up fully, the following would be disturbingly close to a short (this wouldn’t actually be, because it’s between 2x5 modules, which wouldn’t be wired together, but if I miscount or need to touch up a 2x5 module glue job, I’d run a good risk of shorting the pack).
Shorting cells is bad, m’kay? If you can build the pack such that you reduce the risk as much as possible, it’s worth doing!

After an awful lot of glue has gone into the pack, it’s physically connected.
The next step is to insulate it. I’m using electrical tape here. This is because, as noted above, I really don’t like shorting packs out. Especially with the spider web of power wires coming off the pack, there’s a big risk of doing this if I don’t insulate everything carefully.

Final Welding
There are two steps left in the spot welding. The first is to join the 2x5 packs into 10S packs. This is done opposite the power connection wiring, and looks a lot like this. After welding, it’s taped off.

The final step is to spot weld tabs for the power wires to be connected to. Note that it’s a lot easier to put the tabs on, then solder wires to it, instead of doing the opposite. The tabs are easy to solder to, and the wiring can be kept out of the way while each one is put in place.

Power Wire Soldering
With the tabs welded in place, the final step is to connect the power wires! To make this easier, I fluxed all the tabs, and added solder pools to them, so I could easily connect the wires. Trying to hold the soldering iron, wire, and solder all at once requires more hands than I have - sorry!

With the solder pools in place, the wires are soldered to the tabs. Note that the temperature probe needs to be connected to one of the ground wires.

Repeat the above very carefully for the positive wires (do not short happy fun battery pack). This completes the electrical wiring of the pack.

On the 36v packs, voltage can be measured in the XLR charging connector. It turns out that I was successful - the pack measures exactly what the pack should! Great news!

Final Assembly
A bit of structural tape helps keep the wires in place, and it’s time to assemble the pack. These pictures have the battery unit rotated 90 degrees from the final orientation, since it was easier to take photos this way.


Back together!
Once the battery pack is in the right position, it’s time to put it back together. At the end, it looks an awful lot like a BionX battery pack!

Installation and Testing
After resolving an issue with some mounting screws that were sitting higher than they should, the pack worked perfectly! The owner reports that the battery works perfectly, and has a significantly better range than it did when new - which is what I’d hope, with the higher capacity!
Final Thoughts
This pack isn’t that hard to rebuild, and it’s now a significantly longer ranged battery pack than stock. I’m a big fan of upgrading battery packs when I rebuild them, and this one certainly is upgraded! It should have a good long life in front of it.
If you’re interested in having me rebuild one of your BionX packs, let me know - I’ve got a few others queued up, but am working on increasing my capacity. I’m also interested in full BionX systems with dead batteries.
If you’d like a pack rebuilt, please contact me using the form on the right!
Comments
Comments are handled on my Discourse forum - you'll need to create an account there to post comments.If you've found this post useful, insightful, or informative, why not support me on Ko-fi? And if you'd like to be notified of new posts (I post every two weeks), you can follow my blog via email! Of course, if you like RSS, I support that too.


