
It’s been a while since I’ve posted anything about my office - and that’s simply because there’s been nothing to post about. It’s been absolutely wonderful as a daily use sort of office, doing what I need, powering what I need, and not causing any drama. I really can’t say enough good things about just how well this space has been behaving for me!

But, coming up on 8 years of use, I decided it was time to preemptively replace my lead acid bank out back with something… a tiny bit more modern. That’s right. My office energy storage is now based around lithium batteries!

Eight Years of Deep Cycle Lead Acid
First, I want to review nearly eight years of daily cycling on a 48V, 225Ah deep cycle lead acid bank. They’re a bank of eight Trojan T105-REs, which have long since been replaced by various other (similar) models, and… well, they’re a bit messy by now. Water use is going up, and despite the water miser caps, misting has been increasing too, which is a big part of why I’m replacing them. That’s a good indication of end of life on lead acid batteries, and while I’ve not abused this set, they’ve certainly been cycled - typically down to 80% SoC, sometimes deeper, and for a good 2500+ cycles. It’s not at all bad for a $1400 bank of batteries! The white powder is just a layer of baking soda I tend to sprinkle after watering to help absorb some of the acid - it looks gross, but does neutralize a lot of the acid mist!
General wisdom is that “You’ll kill your first bank of off-grid lead acid batteries in a year” - so having gotten to nearly eight years on this bank means I’m doing something right!

But I’ve got some corrosion going on, and… while I’m sure I could get another few years out of this bank, “run it to failure” no longer has the appeal it once did. I’ve found out just how much lead time there is on lead acid (see what I did there? lead, lead…) this past year or two with solar trailers, and I can’t just bounce down to the corner battery store anymore and find a compatible bank. Yes, I can run off one of the solar trailers or a generator for a while, but this bank will remain in use for quite some time to come as a big UPS bank, and it seemed the time was right to swap stuff out.
Nothing I’ve said in the past has changed - my 11k word epic of “how to treat a lead acid bank” still holds just as true as when I wrote it, and treating the batteries that way has certainly worked out well for my bank.
I put my batteries out back of my office in a plastic deck box for reasons consisting largely of “I didn’t have space inside, I didn’t want to deal with the hydrogen inside, so a box seems a good idea.” Would I do it again that way? Maybe, but with a few modifications to seal the box up better, and I wouldn’t just leave the lid cracked open to vent the hydrogen. It works - but it also leads to a lot of dirt getting in. The electronics down there were behaving, but you really should seal up your battery box better and put in deliberate hydrogen vents. I’m not saying my solution doesn’t work - and if you’re on a budget, it’s certainly a good enough option - I got eight years out of it. But find a way to seal it up better.

The dirt also makes it harder to see what’s going on down there. I discovered, to my utter surprise and concern, that one end of my main battery fuse holder had started getting rather toasty - and I had no idea. The insulation on the wire is a bit blackened, and there’s that cavity melted in my foamboard insulation. I probably should have taken a thermal imager to my battery bank when it was under high load… but, in any case, things have been working.
You can also see quite a bit of corrosion on the battery terminal. If you’re doing a lead acid bank, it’s worth finding some sort of coating for the terminals that stands up to acid and won’t corrode the copper (I think a layer of vasoline works fine). The bank still works - but it’s messy, and it will eventually cause problems for you.

I think the core of my problem was using this sort of screw terminal on a fine stranded welding cable wire. Looking into it, I should have crimped some sort of terminal on the wire, and then tightened that down in here - not just tried to crush the fine stranded wire in here. It definitely got toasty. And, no, I don’t think that’s funny, cute, or any other “O-face” YouTube reaction. It’s quite concerning, and I’d have fixed it immediately had I known it was a problem. When people say “Don’t use a screw down terminal on fine stranded wire,” they’re not kidding - this is exactly why. Now you know…

LiFePO4 For Stationary Storage!
So, yes. I’m going lithium. But I’m going with lithium iron phosphate - LiFePO4, also commonly seen as LFP. This is a “less potentially exciting” lithium chemistry. Energy density is lower than the standard 3.7V nominal/4.2V fully charged chemistries, though power density is quite good. Importantly, though, LiFePO4 is a much more stable chemistry - it’s not nearly as runaway prone as the other chemistries can be, which means it’s safer for something like “the corner of a shed.” Also, the longevity on them is just excellent - these packs are rated for a whopping 7000 cycles at 80% of pack capacity (I use far less), and come with a 10 year warranty. They’re also (now) UL listed - so you could potentially use them for a grid tied storage system legally in many areas.
I don’t mind the use of high energy lithium chemistries where it makes sense. I just don’t like seeing them used in places where a more stable, long lived, less exciting chemistry is the better option. And for stationary storage, energy density just doesn’t matter that much.
The EG4-LL LiFePO4 Rack
The EG4 batteries come in a 4U rack mount form factor - and if you’re stacking up a bunch of batteries, EG4 has two rack options too - a 12U chassis that will fit 3 batteries, and a 24U chassis that will fit 6! These come complete with busbars on the side, which is handy enough that I think the rack is worth picking up if you’re using the batteries. They also make it a lot easier to roll the bank around while you’re installing it. Again, if you’re on a tight budget, you can skip it (or save even more with lead), but I think it’s a handy little gizmo.
The rack shows up in a box, and everything comes on a pallet, so the box isn’t likely to be very dinged up. But if it does show up damaged, make a note, because there is no padding - it’s literally just a cardboard wrapper around the steel rack chassis. Trust me, you’ll notice the weight when you try to get it out!

It is a 2’ cube of steel. And it’s absolutely every bit as unfriendly to wrangle around as that sounds. Fortunately, it comes with wheels. Unfortunately, you get to install them.

The casters are properly stout little units. The batteries are 100lb each, and the rack weighs most of that too - so it’s 400 pounds rolling around. These are absolutely up to that sort of weight, and even fully loaded, the rack rolls around easily in my office.

They bolt in. Make sure they’re snug, because once this rack is loaded, you’re not going to want to be under it again. On the bottom, there’s one opening for wiring. On the top, there are two. This rack is really designed to have cabling coming in the top - you can do it from the bottom, as I have, but it’s quite a bit more work than just coming in from the top. Consider that if you’re designing a system around this rack design from scratch. Of course, you don’t need to use the rack either - but “having everything in a nice, custom fit case, with busbars on the side, and good coasters” is a nice little feature to have.

With the wheels on, I promptly ran into a problem. See, I measured to see if the rack would fit back here. I didn’t measure to see if I could actually wrangle the rack back in there - and the answer is, “No, really, I can’t get it in there.” It goes in diagonally, but wouldn’t clear everything enough to slide how I wanted it. It hung up on the shelves to the left, as well as my storage bins over to the right. No, trimming the shelves didn’t help - I tried it.

Long ago, I had a whiteboard in here - which, for my use of my space, was “mostly useless.” It got removed at some point so it could be used for something else, and I’ve never put it back up. So this open space, and my need to move things around, got me thinking.

This time, I was smart. I didn’t tighten down the screws after I mounted the stuff-holder-boxes on them, so I can remove them far more easily in the future if I have to! Each of these hangs on four screws, but I’d gotten the bright idea to tighten them down in the past. Anyway, this solves my problem, gives me more storage space, and, most importantly, let me wheel the box of batteries where I wanted it!

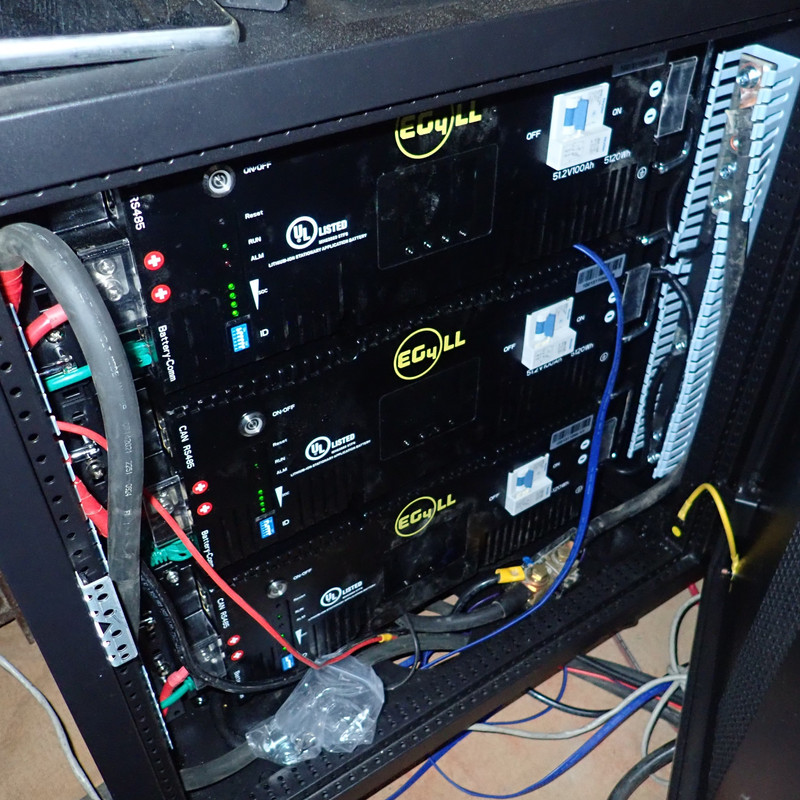
The EG4-LL-V2 Batteries
You know how a 4U server is awkward to move around, but not terrible? Imagine one that weighs 100 pounds, with absolutely zero handholds on the back. None of that usual lip you hold onto when moving it. That’s what these batteries are. They’re absolute little bricks that suck to move. There’s no good spot to lift them, and no good way to hold them.

I found that “standing them on end, then grabbing under them” worked well enough. I’ve got the fancy ones with a built in BMS display that shows me some useful stats like per-cell voltage and temperature, as well as overall SoC. The basic interface on the left is “Four state of charge LEDs, a run light that flashes when it’s working, and an alarm LED.” Over on the right, a 100A breaker is the disconnect for the output terminals - you can turn the battery electronics on and off, and then the breaker has to be on in order to let the electrons flow.
There’s really not much to set up on the batteries - just set the ID (lower left DIP switches) to unique values for each battery in the chain (the manual comes with a table).

There are shelves in the rack already installed, so the batteries just slide right in! You’ll want to secure them in place later, but they can just slide in and sit there while you ponder the rest of the install. It’s a good looking bank of batteries, really!

Wiring it Up
One of the perks of this rack case is that it comes with a pair of very nice busbars - one positive, one negative. There are three screws for the batteries to connect (the “extra” small ones, top and bottom, are mounting bolts - and while you probably could use them, you shouldn’t, because they’re not threaded directly into the busbar). Plus a set of three terminals up at the top for aggregate current extraction. This is why it’s easier to have your big wires coming in the top - the main takeoff points are at the top. I don’t think the busbar can be flipped over and still clear the case, either - I pondered it briefly, though I didn’t actually try after looking at the asymmetry of the busbars.

Two pieces of advice here: Fold the handles behind the busbar clips before you start, and don’t worry about connecting each battery to the nearest terminal. Play around with the angles, and you may find that it works better to swap two batteries (lower battery connects to the mid terminal, in my case). Theoretically, these wires are rated for the full 100A output current of the battery, though if I were planning to use anywhere near that much current, I’d double them up. I know what wires are rated for, and I know what temperature they’re allowed to get at those ratings, and I’d rather be conservative. You might also consider building your own wires for the interconnect, if you’re bored - the provided ones are really quite a bit too long.

Some of my wiring locations here are just so I can reuse the existing wiring from the lead bank. I’ve put my main measurement shunt (the WhizzBang Junior) down at the bottom, since it’s a good spot for it. This interfaces with the Midnite Classic and provides “net current” values to and from the battery bank, which allows me some ground truth about how the battery banks behave. It matters less with lithium than with lead, but it’s still a very, very useful tool, and allows state of charge guesstimates on the Classic.

All of the other connections are on the far side of this shunt. Power out to the inverter, charging current from my various solar arrays, all comes in on the far side so it can be measured. This shunt doesn’t see current flowing from the charge controllers into the inverter directly, though I used to have a load shunt that showed me “inverter DC draw.” I couldn’t fit it in here, and I’ve got some ideas for other places to mount it down the road closer to the inverter. But, for now, it’s missing in action.

Crimp. Your. Terminals. Seriously. The one problem I had with my lead acid wiring was a spot in which I didn’t crimp my terminals, and relied on screw terminals on the fuse! A good crimped connection won’t ever give you any trouble. Bonus points for heat shrinking them - though my heat shrink setup is offline while I wired this up, so I wasn’t able to make use of it.

My positive terminal area is a bit more crammed than I’d like. There’s just no good way to get these wires run in and hooked up - the busbar area is pretty tight. But, I did get it all hooked up (no shunts on the positive side to worry about), and after some testing, everything’s online!

Using the EG4-LLs
Setting these batteries up, once they’re plugged in, is just a matter of setting the charge controller to match what they want. It’s rather different, and far simpler than setting up lead acid batteries. If you’re setting up a Midnite Classic with a WhizzBang Junior (WbJr) shunt, you’ll want to set things up roughly like this:
- Absorb voltage 56.2V. Disable temperature compensation in the T-COMP menu! There’s no need to jack voltages in the cold like there is with lead acid, and you really don’t want to as you can easily exceed the BMS upper limit in the cold.
- Float voltage 54.0V, though talking with their tech support, the batteries seem to like 55.0V somewhat better (and I think I agree). Play with both and see.
- End Amps (the transition from absorb to float) should be around 1.5A per 4U battery - so 4.5A for my bank, plus or minus. You’ll see them drop to well under an amp per battery if you force things to keep charging, until they (temporarily) disconnect and enter standby (see below). There’s no point in continuing to charge them at this point.
- Set your WbJr shunt SoC estimation for (in my case with 3x 100Ah batteries) 300Ah, no temperature compensation, and about 98% charge efficiency. You can get better SoC off the batteries themselves, but this seems to be within a few percent.
- Disable any automatic equalization! You really don’t want to suddenly zap these batteries with 65+V, and if you try, they’ll just shut down on you. I have no idea what this does to loads, but I assume nothing good. They’re not lead acid.
Do that, and… then just ignore them. However, if you’ve limited your charge current to something lead-acid-ish (because they just don’t sink a lot of current for long), you may want to upgrade stuff. I initially put a 50A breaker in for my charging, and limited my charge current to about 45A. This wasn’t a problem on lead, because they almost never rode the limiter. This bank? It’ll take all the current you throw at it until it’s fully charged, so I upgraded my charging circuit to 80A in order to better charge this bank. It doesn’t really matter in practical use, but it makes somewhat better use of the “random sunny times” in the middle of cloudy winter days.
Otherwise… they’re batteries. Just a very stiff, well behaved battery that can soak and source immense amounts of current on short notice. Be careful with them - this bank, as installed, is good for over 15kW. Sustained!
If you’re familiar with lead acid charging behaviors, though, you’re in for a surprise! Lead acid takes a long time to charge. This is what a lead acid charge curve looks like - voltage goes up, and stays there, as the battery charges and current tapers off over time. It took 5+ hours to go from “hit absorb voltage” to “switching to float.” This is a big part of why I like my east-west facing panels - to give me a longer solar day for this sort of charging behavior.

The EG4s? Nothing of the sort. They charge, and charge, and then when they’re full, they just hit a brick wall. Here, a reasonably depleted bank charged as the sun came up, and when it was full, it was full. Wham. Down to float, and hold it there. It’s a very different style charging, though it still benefits from a long solar day in terms of “not needing to use batteries because you can directly power loads off solar.”

Random Other Operating Notes
For lack of a better place to put my random notes and observations in a month or so of operation (and I’ll extend these as I learn new things):
- When the batteries are charged and floating along happily, if there’s no strong demand on them, they’ll enter standby and internally disconnect from the external battery bus. The “run” light will stop flashing, they’ll show “standby” on the display, and you may notice the BMS reported voltage is drifting down from the external battery bus voltage (an easy way to force this is to hold the voltage up at absorb after they’re full with no net discharge on the battery bus). It seems perfectly fine, and they’ll connect right back in as the bus voltage falls from loads.
- Related, for very light net loads, I’ve noticed that one battery will remain connected, while the others are in standby. For me, it’s the top battery, which is the lowest ID - though I don’t know what the algorithm here is. Again, they sort things out as needed, but don’t be surprised if it doesn’t look like all your batteries are running when you’re purring along in float. As I write this, I’ve got 400W flowing from my panels to my inverter, and all my batteries are in standby.
- The SoC meter on them does qualify, as always, as a Guess-O-Meter. After a week or two of PSoC (partial state of charge) cycling, don’t be surprised if one or more is wandering from both the rest and anything resembling what you’d expect. They seem to reset to 100% when charge amps up at the absorb voltage (56.2V or so) drops to almost nothing. They don’t seem to reset after a while sitting at 55V as a float voltage. If you’ve got a Midnite Classic, you can set the “skip days” parameter in advanced charge settings to start most days at float, and only go up to absorb every N days. This works wonderfully with this bank, though they go from 55V to 56.2V so quickly (and so decisively if you’re using end amps) that I’m not sure it makes a real difference. They’re not lingering up at absorb for any length of time.
Bonus: Morning Panel Conduit
While I was rewiring stuff, I routed my morning panel wiring through conduit. I’d originally run the wiring down low along the base of my shed, and that ran into a certain problem this year that I believe is called “bunnies.” They chew on everything, and I’m fairly certain, by the shape of the cuts, that this included my wiring, somehow. But the wiring was getting some UV damage on the insulation and the time was right to replace it anyway. May as well run conduit!
Something new and rather recent in non-metallic junction boxes is the arrival of “universal 1/2 and 3/4” conduit boxes. They come with a bunch of 3/4 blockoff plates, and several 3/4 to 1/2 bushings you can use to reduce an opening down. Should you care, you don’t even have to use all the same opening sizes - which may be useful for some other projects of mine!

If you recall my office build, you’ll recall that my walls are rather thick. I’ve got standard 2x4 studs for the walls (filled with rock wool), then 2” of foamboard on the inside, then some plywood. If you’ve ever had a bunch of 1/4” drivers laying around from “free drivers in boxes of screws” (say, from a deck), and you want to build an extender - superglue is your friend, and I’ll suggest not using a magnetic (but shallow) bit on the end. The hole saw wiggles around a bit too much.

On the back of my office, I sealed up a junction box tight against the wood (silicone is your friend here), and ran it around to the other side. Nothing fancy.

On the side behind the morning panels, the conduit zips along, shoots up a bit to better match where the wires come off the swinging frame (at the top, because solar panels have the junction box up there), and ends with a gland facing down to allow the PV wire in.

Always have a drip loop. I did have to add some splices to the PV wires, and then join them to the rest of the wires running back into my office, and I used some heat shrink crimp connectors. As far as I can tell, these are entirely fine to use inside a junction box - so I did. I assume they’re fine without electrical tape, but i decided to add more insulation, just because I can.

Closed up, this is even rated for marine environments! It’s a well gasketed little junction box. And should last a long while out here, shaded behind the panels at almost all hours.

Even though I don’t swing them around anymore as I initially designed them for, it’s nice having the morning panels back. They’re a solid 6-8A of charge current when the sun just starts coming over the hill, and that makes a real difference in how quickly the battery bank comes back up. It doesn’t matter nearly as much now as it did with the lead (when i wanted all day long in the winter to top them off), but it’s still nice to see the “whomp” of power as the sun shows up. They’re not critical anymore - I ran all summer without them - but they’re definitely a nice couple hundred watts to have!
So, Should You LFP?
I’ve been using this new bank for a bit, and… I have to say, it’s properly nice. However, it’s also significantly more expensive than my previous lead acid bank was. So, if you’re considering an off-grid system in 2024, what should you do? If you have the money, I think at this point, going with a good LFP bank is well worth it. They (supposedly…) are long lived, and the charge/discharge behavior is a lot nicer to deal with than lead acid. People in the quiet backwaters off-grid power IRC channel who have been living with off-grid power systems for a lot longer than I have also say the same thing - if you can afford it, go LFP and don’t look back.
But if you’re on a really tight budget, there’s nothing wrong with a lead acid bank. They’re a bit more work to deal with (watering and such), but as far as “doing the job they’re rated to do,” they do a very good job. A set of deep cycle lead acid batteries, ideally focused around off-grid use (the “solar” or “renewable energy” lines), still works just fine. And they’re not nearly as bad as assorted “influencers” would like you to believe. They’re long lived, well behaved, and lack the energy to get too terribly exciting. Just vent the hydrogen properly.
I have to say, though. I’m really liking this bank so far!
Comments
Comments are handled on my Discourse forum - you'll need to create an account there to post comments.If you've found this post useful, insightful, or informative, why not support me on Ko-fi? And if you'd like to be notified of new posts (I post every two weeks), you can follow my blog via email! Of course, if you like RSS, I support that too.


