
Midway through 2021, I started a deck. Then the horrid weather of 2021 hit (our year was wind, then heat, then smoke, then winter) and I didn’t get much done outside. It warmed up in 2022 and I made progress, and then proceeded to spend the majority of the year doing something silly like helping out at the local Farmer’s Market on every Saturday, showing off power trailers, and generally doing everything and anything but actually building the deck. I did get a bit done. But, 2023! This is the Year of the Deck!
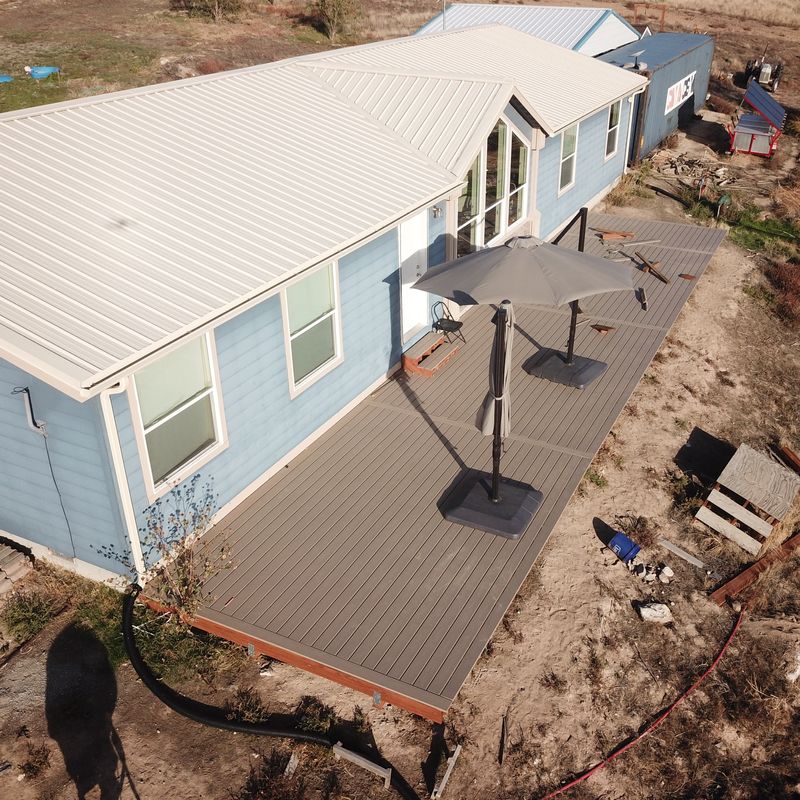
Our deck will go on the south side of our house, facing out towards the mountains, and will add quite a bit of usable space for living and gathering.
So, join me for this year’s major project, the continuation of last year’s major project, the deck!

Deck Design Goals
We’ve known since we moved in that we wanted to build a deck - I just haven’t gotten down the priority list to doing so for the past few years. It’s yet another massive, somewhat expensive project, and as I’m just not a fan of debt, it takes some time to build up the reserves between such projects. But, with solar done, that frees up a decent chunk of monthly change for other projects, and should continue doing so for a long while!
Fundamentally, there’s nothing complex about the deck. It’s just a big, rectangular deck, on the south side of the house. I’m sure a contracting company could slap it out in a hurry, but that’s not my style, and none of them have any free time anyway with all the new construction going up like weeds out here.
I don’t want to have much in the way of maintenance once it’s up in terms of annual staining, so I’ve planned around Trex since the start. Everything I’ve heard says the fading in high UV environments of the early stuff has been resolved, so I’m willing to give it a shot.
The only real catch is that I’d like, eventually, to put a hot tub in. Sitting out under the stars, in a hot tub, with the mountains in the distance, sounds like a good way to end a variety of evenings. Hot tubs, however, are quite heavy. A deck built to support people may struggle and sag with a hot tub on it, so I wanted to add in some reinforcements during the design stage to help with that design goal.
The deck railings are questionable in terms of being required, but I plan to put railings on. A friend of mine out here builds deck railings among many other things, and we’ve brainstormed some neat design options to allow for the flexible mounting of planter boxes and other things on the rails, involving regularly spaced captive nuts and some round head bolts to keep them filled unless in use. I want the railing to be flexible for a variety of uses down the road. They’ll be properly well anchored into the deck frame as well.
The Layout
After consulting some standard deck charts, I settled on a simple layout. The house is at the top of this sheet, and as our concrete foundation is exposed, the ledger board will simply bolt into that using concrete anchors - this is far simpler and easier than having to anchor the deck to the actual house, and eliminates a lot of steps regarding sealing so water doesn’t flow into the house. The bottom row of holes is for the far beam that will run the full width of the deck, roughly 10’ out from the house - and that would be sufficient, were I not planning to add a hot tub. On the left, a set of five pilings will support a mid-span beam that simply adds some additional strength under the area I intend to, eventually, put a hot tub!

Oh, yeah, and it’s 12” on center for the joists. Trex is a bit more flexible than wood, and while I could have gone slightly further apart (residential use allows 16” on center with Trex), I wanted the tighter spacing for the hot tub side, and decided to just carry it all the way through for consistency. While I’m not the sort of person to regularly have huge gatherings, I’d like the ability to do so if I wanted - so overbuilding by a bit is fine. Similarly to solar, I save enough doing it myself that a slightly increased bill of materials isn’t a big deal.
Initial Layouts
A deck starts life as nothing but a set of lines, carefully measured and pulled tight to use as a reference. I created some pointed 2x2s with my saw and proceeded to splinter them attempting to drive them into our ground, which is mostly rock, with a bit of dirt on top of it…

However, after a few attempts and a lot more 2x2s, I managed to get a set of guides in place. The house is off to the right, and the “vertical” lines in this picture are for aligning the posts holes, with the other line being for the end of the deck as a measurement reference.

My tractor has a perfectly good post hole digger that I use for most of the holes around my property - but the deck is built on a bit of a slope, and some (brief) experimentation with the tractor, the slope, and the auger gave me a simple answer: “This is not the right solution to the problem.” It was the sort of thing that might work, and might roll the tractor down the slope - and, at best, it was going to be a horrendous pain of aggressive wheel chocking and fuel pickup issues. So, off to the local rental store for something a bit smaller, and a bit less likely to kill me on a slope. No, I couldn’t see it behind my truck while I was towing it. This was before I put the hitch on the Volt, so, yes, it felt quite absurd.

My holes in the ground all start with making a divot with a post hole digger to guide the big auger in. The auger then digs in an inch or two, and starts pounding on rocks. This was no exception. However, an afternoon or so of work got the various holes dug. Most of them are about 24” deep, with some a bit deeper, and they’re roughly 12” in diameter, though it doesn’t really matter. Once the core hole is dug, “scraping it wider” with a post hole digger is easy. It’s the “getting the initial hole drilled” part that I like my power tools for.

One Ground Hog digger! Funny story about Ground Hog, I actually wrote the ordering backend for their website about 15 years ago (and as far as I know it’s still in use). I never had a use for their tools until I moved out here, because I’ve never had a need to move serious amounts of dirt before.

Yet another attack of the Giant Geometric Gopher on my property!

But this time, I managed to get a picture of it, popping out of one of the holes! My daughter loves holes in the ground, and will generally go explore all of the new ones. Our dirt, freshly dug out, is a rather interesting texture - it’s exceedingly fine.

This, meanwhile, is a ground wasp nest over by my office. It’s a rather different “hole in the ground.”

Concrete Work
Loading bags of concrete into the back of a truck with a topper on it sucks. I’ve done it plenty of times, and finally got smart. You don’t load the bags - you bring a trailer, round up to the nearest pallet of bags, and have someone with a forklift load your trailer! This is about 6000 lbs of concrete, and I definitely noticed it back there…
The forklifts can’t load anything between the fenders, and in this case couldn’t slide the rear pallet up easily (it wasn’t feeling like moving), so this is a slightly more tail-heavy loading than I like. I just come home slowly if I’m loaded like this - it’s never been a problem, but there was less weight on the tongue than I really like having with this trailer.

When rain threatens to show up between getting the concrete and pouring the concrete, tarps to the rescue! Yes, I’m building up a decent collection of trailers around here - and, no, I don’t expect to replace a single one of them with a self driving autonomous delivery whatever, because that’s not in the slightest bit compatible with how I use trailers.

I’ve talked before about my garden wagon, and this thing just proves how useful it is, time and time again. Load it up with just about anything, and it’ll run easily over almost any terrain you can find. I’ve had to replace a few pieces due to some over-optimistic loading of rocks when towing it cross country around the hill with the tractor, so.. maybe don’t push the weight limits on insanely rough terrain! Or, at least, load the back - that takes a lot more weight than the front before it starts bending.
It’s also great fun to ride - steers well, rolls easily. However, that also means that you probably shouldn’t ride it down a long, sloped driveway with a corner at the bottom. Even if a standard kids wagon (plastic wheels, sleeve bushings) is entirely safe and sane, this thing, with pneumatic tires and good wheel bearings, will build up an awful lot of speed. It corners well, and will take a corner at… rather alarming speeds, actually. But it doesn’t have any brakes, and it will get going in a surprising hurry when given the chance! Multiple people have independently learned this lesson, and at this point I tend to keep it loaded, even if there’s no good reason to, so people won’t be tempted to try and ride it down the driveway.

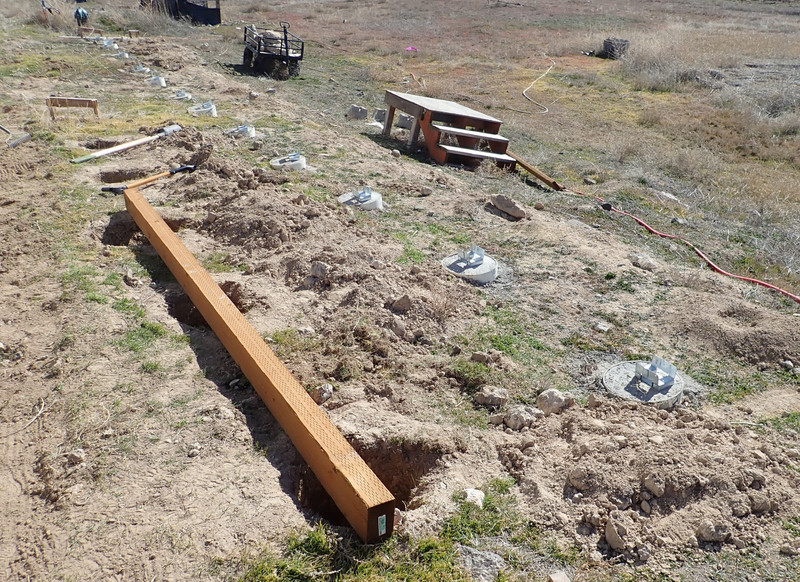
In the past, I’ve used some various wooden forms around the tubes to help hold them in place. For the deck, I’m just putting concrete in, and using the level to align the tube as I go. Faster, easier, and ends up with about the same result.

I know there exist people who can put a row of concrete pilings in a perfectly straight line. I’m not one of them. I’m happy when they’re all at least “lined up such that I can put a bolt in them and have the bolts line up.” No matter how precisely I line up the initial holes, as soon as the auger hits the first rock, the alignment is shot. Maybe if I rented a Bobcat with an auger…

In any case, the main row of footings is done.

After the concrete has a chance to cure for a while, I performed the next steps in my frequent ritual out here and drilled holes in the concrete. I then blasted them clean with air, and epoxied bolts in place to hold the post bases. This technique allows me to accurately (within some reasonable tolerance that the post bases can adjust for) put the bolts in a line, even when the concrete isn’t quite lined up.

Ledger Board Bolts
Finally, towards the end of 2021, I found a stretch of tolerable weather and attached the ledger board to the house. We have an exposed concrete foundation, and it makes far more sense to attach the deck to that than to the house. I’ll need steps to get into the house, but it means the deck is lower, it avoids some height ranges that require plans approval and such (which I’m a bit gunshy about, after the solar plans review debacle), and it leaves me plenty of room to run conduit and a few outlets up above the deck. My plan is to slide some conduit up under the edge of the house, with the hot tub power box mounted at the near end, and several quad outlet boxes mounted further down for various other loads. I’ll have a 50A 240A circuit run for the hot tub, and probably a pair of 20A circuits run for the other loads, just because that means I don’t have to worry about what’s plugged in. Yes, weather resistant, tamper resistant, ground fault outlets…
I’ve made the general assumption here that our foundation is level (it’s close enough), and measured down from the house to align the ledger boards. Long chalk line fun!
The rest of the process involved a weekend with yet another hammer drill, and those stupid expanding concrete anchor sleeves. They’re an exercise in frustration, as if anything goes ever so slightly wrong, they won’t set properly, and you can’t get them out. Also, if you crank them down too tight, they start sliding out.
But, I’ve put enough of the things in that even with a few failures (which got other holes drilled near them to take the load), it should require an awful lot of tons of force to remove the deck from the foundation, such that the wind loads probably mean we’ve gone to Oz.

I also had to dig down a bit to make room - leading to yet more earthwork to make sure everything drains away from the house. But that’s for the next post!
Comments
Comments are handled on my Discourse forum - you'll need to create an account there to post comments.If you've found this post useful, insightful, or informative, why not support me on Ko-fi? And if you'd like to be notified of new posts (I post every two weeks), you can follow my blog via email! Of course, if you like RSS, I support that too.


