
One of the more interesting projects I undertook during a low connectivity Lent (though it wasn’t low on computer use, I solved some interesting problems) was getting an old record player back online and operational. This took, in addition to some cleaning and fiddling, a few new pieces for the home sound system, and having a particular part reverse engineered and 3D printed to bring full function back to an older record player! So, join me for a dive into the guts of a JVC QL-A2, as well as some other bits and pieces of record playing joy!

It’s 2023. Records?
Yes, indeed! I’ve given an old turntable a prominent position in the living room, dug out some of my old records, raided the inlaws collection, my wife has been raiding the thrift stores, and we’ve been playing records again. The kids were both baffled by playing music without a computer, which is certainly part of the consideration here.
In many ways, I’ve been turning my back on modern consumer tech, having determined through experience and evaluation that it’s a cesspool of crap. I’m trying to revert to some simpler technologies that worked, and, importantly, that don’t feed into the whole “big data, behavioral collection” ecosystem that literally defines all of modern consumer tech. Regardless of your opinions on the sound quality of records, tapes, CDs, and the like, it should be reasonably clear that, unless you’ve got an always-on room mic or fifteen in your house, what you play is your business - and your business alone, unless you’ve got close neighbors and a good sound system. My record player isn’t sending a stream of what I listen to into some aggregator.
Plus, there’s just something nice about the process of putting a record on, and curling up with the album art, liner notes, lyrics, and such. I accept that not everyone is into that yet, but with vinyl sales increasing year over year since about 2008, obviously there’s something to it. So, yes. Records. Local music, internet-free, and wonderfully tactile.
But the record player wasn’t working quite right. So, out comes the screwdriver!
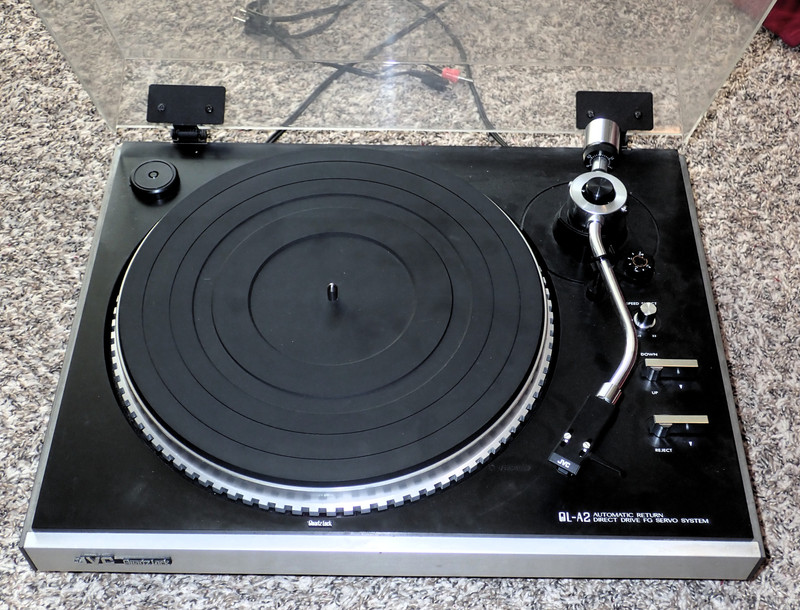
The JVC QL-A2
This turntable is, quite literally, the turntable I grew up with. It was part of the family sound system for years. My dad purchased it in the 1970s while in Japan, and various bits and pieces of that system have followed me around for quite a few years. So I’m familiar with this turntable, but it’s also been sitting for many years, and wasn’t fully operational.
It spun and played, but the RPM control (33/45) wasn’t consistently switching, and the cueing mechanism (the center “up/down” lever that allows you to lift the tonearm and gently drop it into place on the record without doing so by hand) wasn’t working at all. The reject mechanism (lift the tonearm and return it to the rest, either at the end of the LP or when you use the lower lever) worked fine, so I had my suspicions that something had come loose or broken internally - which, indeed is the case. So, first, we must open the case!

Before flipping the turntable over to get in, the massive cast table comes off. If you don’t remove it, because it feels well attached, it will happily come free the moment you flip the turntable over. Just wiggle until it comes off. Of course, you’ll want to latch the tonearm in place so it doesn’t flop before you go further.

Under the massive base plate, the exposed gear is part of the reject mechanism. The central shaft is turned by the motor, and this large gear can be engaged to cycle things back out at the end of the album.

There’s a gap in the gear teeth that the central spindle shaft normally turns in. There are also those bits of metal that, normally, don’t touch anything - so the spindle turns, and nothing else engages. But, as the tonearm swings into the center, a lever mechanism underneath pushes on the metal bits - and pushes them into the center.

Look closely at the gear on the spindle, and you can see both gear teeth, but also a nub up above - just about to make contact with the metal pieces. When the metal is pushed into the center, that nub makes contact, rotating the gear just enough that the teeth can now engage.

Once that happens, the large gear turns the rest of the rotation, powered by the spindle, and performs the actions via a set of cams and levers to lift the tonearm, swing it back to the rest position, and drop it gently on the rest! It’s entirely mechanical here - no electrical sensors at all. If you use the reject lever, that also pushes the metal pieces into the center, triggering the automatic return mechanism from wherever in the album you are. No need to manually lift the tonearm and risk scraping it across a few grooves!

Flipping the unit over (carefully, after having secured the tonearm, and realizing that the plastic cover isn’t screwed in place but will drop freely out of the hinge slots), there are eight screws around the perimeter, plus three in the center that have to be removed to take the base plate off.

There is also a warning, of the variety I typically enjoy ignoring. Not only am I going to user-service parts, I’m even going to have new parts made for this unit!

With the bottom off, you can see the guts. There’s a rather simple looking main PCB, the drive motor in the center, a transformer in the top right for power, and the various controls and levers on the left. Yes, the cueing mechanism is missing in this picture - for reasons that will soon become clear.

With the exception of a single IC in the center, this board is all through-hole mounted components. I’m sure someone might consider replacing (or at least checking…) some of the capacitors, but as the unit is working fine and I see no evidence of leakage, I’m just going to leave them alone for now. Seriously, a single sided PCB with through hole parts! So nice!

In the top left, the tonearm pivot connects with some of the various actuation levers and cams. I’m not going to attempt to explain all of them here, because this really is the sort of thing better served by video, and I don’t care to do that. Suffice it to say, this is a fundamentally mechanical unit, solving the problems of the day with mechanical levers and linkages, and as it seems to be mostly working 40+ years later, they’ve done something right!

Finally, there’s the switch board. The left lever is attached to the 33/45 RPM knob. The center lever is the (not fully present) cueing lever, and the right lever is the reject mechanism. Notice that they all use the same actuating design - and I expect it’s used on some other players from the same company and era too! The springs give a nice solid feel as you actuate the levers.

The first bit of repair work involved the 33/45 RPM switch. This is the small circuit board attached, and there’s a button on it that connects the wires to indicate which RPM you’d like to use. Mine wasn’t being reliable, so I unscrewed the PCB, and applied some Deoxit (a standard contact cleaner) to the switch, and fiddled with it for a minute or so, just pressing and releasing it. This solved the problem perfectly, and now my player switches smoothly between 33RPM and 45 RPM!
The Cueing Mechanism
But the major problem was the broken cueing mechanism. I took the mechanism for that off, and discovered that, indeed, it was broken. The plastic actuator had split, the spring was rattling around doing nothing, and it simply didn’t work.

I proceeded to look for a replacement part, and discovered that this particular part simply isn’t available. You can find all sorts of pieces for this turntable - but not this one. A bit more reading indicated that this piece, after some number of decades, almost always breaks - because the lubricant gets stiff (which mine was), bits don’t move as they should, and eventually the spring stresses just crack things such that they no longer work. My spring was rattling around too, and I considered a bit of glue, but the plastic was quite fragile, and it didn’t seem like it would take repair very well.
Fortunately, I know someone who has 3D printers and deep CAD skills - so I bagged up the parts and sent them his way.
The result? A beautiful red 3D printed replica of the broken part, true to the original dimensions!

But, the original silicon grease in there (remember, it’s 40+ years old) just wasn’t behaving correctly. After sitting for a day or two, it would be incredibly stiff before starting to allow things to move - and this is exactly what causes the failure in the first place. The lever rotates, but the metal damped part can’t move, and the spring eventually cracks things. No good.
If you have one of these, it may look like the unit doesn’t come apart when you start poking at it. I assure you, it does. Take the screw out, and wiggle the pieces until they come loose. They’re held together by a lot of old, very viscous silicone oil, and they may take some wiggling and poking to get into the proper collection of parts!

It’s not as bad as the rear brake adjustment mechanism on an old Subaru I had for a while, though… it took me half an hour to figure out that the mechanism was more than two pieces. It was a black rounded solid that was, in fact, three or four pieces that were actually intended to move relative to one another! No wonder the brakes were out of adjustment…
You can’t just clean the pieces off and go, though. That heavy, viscous oil is doing a very important job in damping the movement of the tonearm lifter. If it’s not there, or is replaced with something not viscous enough, the tonearm lift doesn’t happen slowly. It will “bounce” the tonearm up, and drop it quite hard onto the record. Needless to say, this is NOT the intended operation!
Diaelectric grease is not the right grease. It’s far too thin. So is moly paste. You’re quite unlikely to have anything just laying around that will work.
What you need is the right grease. It’s a silicone oil, exceedingly thick. There are two different (common) viscosity options - 300,000 and 500,000. Not knowing which one I needed, and not being able to find documentation, I ordered both. And the results are clear: For this style damping system, you want the 500k. The 300k will work, but it’s a bit on the thin side, and the tonearm drops faster than I’m really comfortable with.
With that done, the friction between the metal and grease will gently raise and lower the tonearm into position as it did when it was new!
If you need one of the lift cams (part number E34240-002), I’m selling them on eBay. You get a regular one, plus a version with a heavier wall print.
Installed back in place, you can see the new, red lever resting against the actuator lever. This is the “down” position. There’s a bit of spring tension on the rod, but it just helps keep anything from rattling.

When the lever is moved into the “Up” position, the nub pushes the red lever over, and the spring tension starts slowly moving the metal actuator clockwise. This pulls the rod, which, if all goes well, will gently raise the tonearm lifter. It’s really not supposed to be fast - but it should be consistent.

Of course, being older, that didn’t quite solve things perfectly either. The tonearm lifter was a bit stiff, and wasn’t being agreeable about moving smoothly under this spring tension. From the underside, it’s the screw-looking thing in the center. That’s actually a spring, and the plastic piece above it rotates to push on it. A drop or two of oil smoothed operation out nicely!

Finally, I had to adjust the tonearm lift height. The adjustment screw is under the resting position of the tonearm, and I had to tweak it up ever so slightly. The reject mechanism was scraping the record at the start of the return, which just isn’t OK. There’s a screw, adjust it.
The Rest of the System
With the turntable fixed, I’ll briefly cover the rest of the system. I’ve covered aspects of our home audio system before, and it remains mostly the same. The passive NUC failed (GPU issues, which seem to be the standard death of NUCs), and I replaced it with an AMD small form factor system that’s roughly the same thing, just not Intel, and a bit louder (though it’s not been an issue in practice). The speakers and speaker stands are working great, and the speakers have a spare analog input that I can feed.
Record players, though, typically can’t feed a speaker input directly. I mean, you can hook it up, you’ll get sound, but you won’t get the right sound. The RIAA equalization curve and cartridge output levels mean that you’ll get a very quiet, “all the treble” sound that’s quite wrong. You need a phono preamp, and while I plan to build a Bottlehead unit some day, I just picked up a Schiit Mani 2 for now. This is a flexible, somewhat overkill, built-in-the-USA-for-real unit that sits between the turntable outputs and the speaker inputs and makes things sound correct. It works as advertised!

As I had no idea the age of the stylus on the turntable, I found a compatible one with the cartridge and replaced it. I also got some new LP cleaning equipment, as I didn’t have much in the way of that.

So, the result? Once nicely upgraded home audio system, now with records!

Just needs more tube…
Comments
Comments are handled on my Discourse forum - you'll need to create an account there to post comments.If you've found this post useful, insightful, or informative, why not support me on Ko-fi? And if you'd like to be notified of new posts (I post every two weeks), you can follow my blog via email! Of course, if you like RSS, I support that too.


