

It’s been about a year since the rest of my KeroPunk series, and while that covered the common kerosene equipment you’re likely to find, there is one more “final evolution in kerosene” sort of lantern that I’d like to talk about: The mantle lanterns. If you’ve ever used an old Coleman propane lantern, you’re familiar with the concept - and also the loud hissing coming off such lanterns. With kerosene, the mantle lantern is utterly silent in operation, while throwing about a 40W (incandescent) bulb worth of light (if you have everything even and bright).

Mantles: Heat to Glow
All of the previous lanterns I’ve talked about use the flame as a source of light - carbureted in various ways, but “carbon in the flame glowing directly.” A mantle is a device that, when heated, glows brightly in the visible regions - it puts out more light than a blackbody radiator at a given temperature, because it uses materials that are low emissivity in the infrared spectrum (heat), and high emissivity in the visible spectrum (light, useful to humans). There are also some benefits from helping contain the flame and the heat within the enclosure, but the end result is rather more light for a given amount of heat than you’d otherwise get.
However, the downside is that, in “usable” form, mantles are very fragile (barely hung together metal oxides). This poses a problem for shipping - so to solve the problem, they’re shipped in a raw form, covered with something that helps them hold together. Before using them, you need to burn this coating off - and it’s typically some form of nitrocellulose, which is, to put it lightly, “rather flammable.” Before you use the lantern, you need to light the mantle - and it will burn. Think of a few seconds of a 2 or 3 foot flame. Assemble it in the proper base and light it without the chimney, but be sure you do it somewhere safe!

The Lantern Parts
In normal operation, the only part you have to remove is the mantle gallery and chimney - which twists a bit, then pulls straight up. This is how you light the wick - though not how you extinguish it, unless you’ve got welding gloves. The font on my lantern holds about 24oz, which is good for roughly 8 hours of burning - yes, these lanterns are rather fuel hungry, but they’ll also genuinely light (and heat) a room. The only real reason to remove the chimney from the gallery is to replace the mantle - otherwise, the whole thing sticks together as one unit in daily use.

The gallery exists to secure the mantle - the mantle comes with the whole metal frame and is generally easy to attach (I believe it twists, but I’m not going to remove my mantle to verify). Again, the mantle is very fragile in the burned state - so be gentle with the upper half of the lantern! However, in a year of use, I’ve not had problems with it coming apart. Just be gentle and don’t beat it around, and you can move the lamp around the house, cold or hot, without trouble.

It’s not stock with most lanterns, but I’ve added a heat deflector/bug guard to my lantern on the top of the chimney. One problem with lanterns like this is that if a fly gets down the chimney, it can thrash around and tear the mantle up. Given that this bug guard costs about the same as a mantle, it seems worth using. It also serves to deflect and spread the plume of heat coming off the lantern. When turned up and burning 3oz/hr of kerosene, the lantern is a 900W heater - and the plume of very hot exhaust goes straight up. Under a lower ceiling, it can start to put a bit of a stain above over time, and you really need a good bit of clearance over the lantern (at least two feet, far more is better) for fire safety reasons. The heat spreader serves to deflect this blast out to the sides and it can mix with air far better.

Down below, the burner assembly (everything perforated) screws into the font that contains the fuel - and I’ll talk about that more later. There’s also a nice brass fuel fill port attached to the font, though I don’t really use it much.

As you turn the wick up, the cylindrical wick slides up around the flame deflector and receives air from both sides - this is how it burns with a hot, blue flame. If you’re getting any light off the actual flame with one of these (when the gallery is installed), something is wrong, or you’re overfiring the lamp by a good margin.

The burner unscrews from the font, and I find it far easier to refill the lantern this way. I open the fill port to watch the kerosene level, unscrew the burner, and pour it in the large hole until it’s at the base of the fill port. Far less spillage this way than trying to guide it in the small hole with an unknown level!

The Burner Assembly and Wick Replacement
The burner assembly is a bit more complex than the flat wick burners on the hot and cold blast lanterns. It’s an annular wick fed air from both sides - but this is needed to provide the complete combustion for maximum heat. If you want to replace the wick, you’ll need to fully disassemble the housing, so I’ll cover that as I describe it.

The flame spreader just pulls up from the center. This serves to guide and direct air up the center hole towards the flame. While any modern one should mostly sit fully seated, you can impact the path of the flame and heat by adjusting the height. If you pull it higher, the flame will spread “out” more - so you’ll get heat lower on the mantle than with it fully pushed in. If only the top center section of the mantle glows, adjusting this can help you get a fuller glow. Very, very slight tweaks make a big difference! You should also inspect this occasionally for wear - if the grate is starting to burn through, the lantern won’t burn properly, and while I don’t expect it with a newer flame spreader, it is a possibility with a heavily used lamp.

With the flame spreader out, the part surrounding the wick is the aptly named “outer wick tube.” This is the conical grate and tube surrounding the wick. Twist it counterclockwise until the nubs and gaps align, and it just pulls out!

Once it’s out, you can see the outside of the wick (mine is kind of chewed up, which is why I’m replacing it) and the top of the wick mechanism - the metal bit down in there. Normally, this hits the bottom of the wick tube and prevents the wick from coming up past the designed height. With this out, twist the knob until things stop moving, and…

Presto! You can see the wick holder - a toothed wheel engages in the slots to the right, and this holds the wick in the proper position! Basic mechanical works and no good reason to change it. Pull on the wick at this point and the whole contraption should come right out. Keep pulling, and the tails that absorb kerosene from the font will pull out too.

You can see the “fluff” on my wick that was causing problems - but I’ve also burned a decent amount of the wick down trying to level it. I’ll talk about this more below in the “charring the wick” section.

Comparing the old wick (left) to the new one (right), you can see just how much I’ve managed to chew up trying to flatten things - and it’s still not really perfect. But that bit of fluff was causing me some trouble as well, and I needed to fully disassemble things to get the photos for this post, so I’m replacing the wick. You should keep a few spare wicks and mantles around if you have one of these - just like any other backup sort of lantern.
The metal tabs (visible on the red wick base) latch into the wick holder, and the tube in the center keeps them expanded out and firmly pressed into the wick carrier. To replace the wick, just gently squeeze the sides of the one you want to remove and it’ll pull out. Reverse the process with the new one, and it will slip right in!

The bottom of the new wick will come with some paper tape to help get it through the burner, though a strip of masking tape works fine if you don’t happen to have this, or if you’re messing around with an old wick (it needs to be mostly dry before the tape will stick - doing this “wet” is an exercise in covering your hands in kerosene, but a day or so sitting outside in the sun does a fine job of removing most of the kerosene from wicks).

The wick slides in the two halves of the burner assembly, and the paper should let you easily pull the rest through. On the side with the knob, particularly, the tape is needed so the end of the wick doesn’t catch the cog wheel and get jammed.

Don’t forget to remove the paper once it’s through! Getting the wick over the central cone is just a matter of fiddling it on - if it’s not fully expanded into the wick holder, it won’t slide over it. I’ve found that it’s a bit easier with the flame spreader inserted, but I’ve done it both ways. Put the rest of the pieces back on, and you’re done!

Operating Notes
To light the lamp normally, remove the gallery with the chimney and light the wick. It has to be up a bit in order to light, and the flame will slowly creep around it until you’ve got a flickering orange flame. If the wick is too high, it’ll smoke quite badly, so turn it down. Plus, you’re about to be working over it.

With the flame fairly low, place the gallery and mantle over the flame, twist into place. This is the last time you should touch the gallery until things are well cooled, as you’ll see below. Now turn the wick up until the mantle is glowing dimly and let things warm up. Kerosene lanterns of all types need to warm up a few minutes before you turn them up fully, otherwise they’ll start overburning once things are up to temperature, and that leads to smoke, overheated chimneys, and all sorts of other nastiness. Once it’s warmed up, you can turn the flame up - but look for yellow sections of the mantle. If you’ve got a high section of your wick, that section will cap out first - and you’ll start carboning up the mantle. It’ll usually burn off, but it’s not a good habit to get into - so if you see yellow sections, back off some and wait for the wick to burn more evenly, or you can attempt to clean the wick and level it out, or re-char it. Not that I’ve had amazing luck with either option, unfortunately.

To extinguish the lamp, turn the flame down to the minimum and let it sit for 20 seconds or so. You’ll see it drop down, but not go entirely out. Now, a quick puff of air either across the top of the chimney (if the lamp is low) or through the top of the burner (if the lamp is up on a counter) should do the job of extinguishing the flame. Make sure it’s out by raising the wick slightly.
You don’t want to leave the lamp running with the flame “down but not enough to light the mantle” - that doesn’t generate enough of a draft through the lantern to keep things cool, and you risk overheating it. The same goes for a very high flame that’s sooting up the mantle - you can overheat things. Within the designed operating range, there’s more than enough air to keep things cool, but stay within that range (which is to say, “mantle glowing at some level”).
Cleaning the Wick
The lantern comes with a wick cleaner that should look something like this. It serves to level the wick out and smooth the top after burning - and I’ll suggest you use a very light touch with it, otherwise you can chew the top up and require re-charring to get things to burn right.

Remove the flame spreader and put the wick cleaner in (once the lantern has cooled). Raise the wick until it only barely touches the edge of the cleaner, then give it a gentle turn or so. You shouldn’t need to force it, and if you are, you’re damaging the wick, so stop it. This will level the wick out and help keep things even.

Charring the Wick
If you’ve screwed the wick up and it’s burning unevenly, you can try re-charring it. To do this, drain the lantern of kerosene and let the wick dry out. Then dip (briefly) the top of the wick in a container of kerosene, reassemble the lamp, expose a small section of wick, and light it. It’ll burn rather high and smokey at first, but it should settle down quickly. The goal is to burn the wick material into a smooth, level ring.

If you have any high spots, you’ll probably observe them continue burning for a while - this should help bring them down. After it’s gone out and cooled off, a quick pass of the wick cleaner is supposed to help level everything - but I admit I’ve not had the best of luck accomplishing this. It’s something I’ll mess with over time, but you shouldn’t really need to do it unless things are quite out of whack.

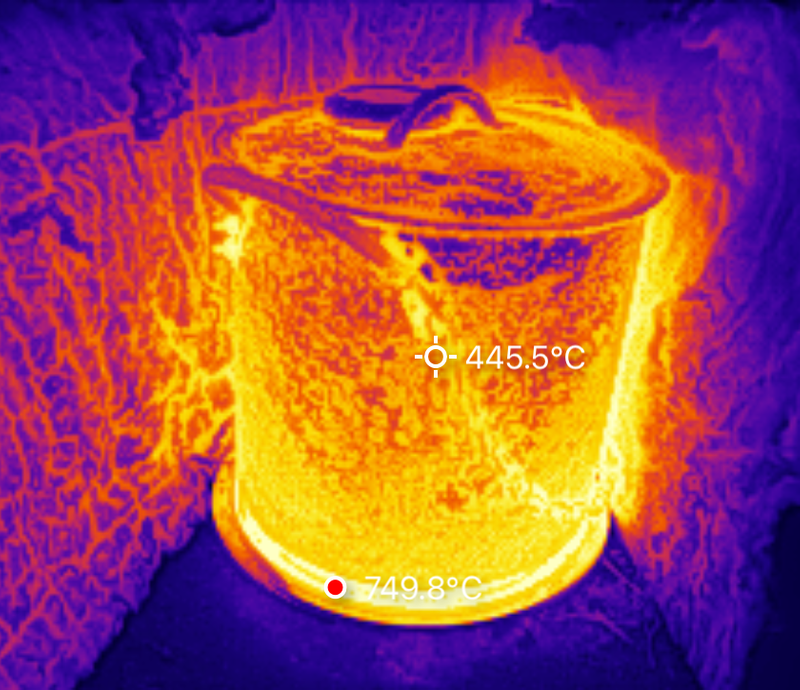
Thermal Images
What’s a Syonyk post without gratuitous thermal images? I took these with my P2 imager in the wide range (mostly) because of the temperatures involved.
First, the lantern gets hot in operation. It’s shiny metal and glass, so I don’t have great confidence in all these values exactly, but the bottom of the chimney, where the wick is, radiates a huge amount of heat in operation, and you can see the general pattern of heat - “Do not touch anything gallery or above in operation.”

The gallery is north of 200F, so do not touch. Again, shiny metal, not the best emitter of heat, so these temperatures are not exact - but, seriously don’t touch any part of the lantern above the burner base while running.

Up top, you can see the smoke deflector working - the heat is flowing out around the edges (and if you can see hot air in a thermal imager, it’s properly hot). Again, do not touch. The darker regions indicate 500F, and I’ve no reason to disbelieve them, though I have my suspicions that the center region is similarly hot. Keep fingers away!

From below, you can see that the heat really just cooks the top of this. Mine is certainly getting a heat patina from use, and I don’t mind that in the slightest. My solo stove, similarly, looks well used!

And after some time in operation, my ceiling is noticeably warmer than the surrounding area. This certainly isn’t enough to cause a problem at 92F, but the point stands - you really have to be aware of the hot blast coming off the top of this sort of lantern, especially without a spreader. A bit of breeze in the room would help spread it out, but if you don’t have the heat spreader and have roof material too close, there’s more than enough heat to cause a serious problem. So just keep track of where you use it.

Spectrum Data
Similarly, what’s a Syonyk post without spectrum data? Here you go!

It’s… blue. Very, very blue. Not great for evening light, really. It lights a room, but it’s not the sort of thing you want to curl up with before bed. For comparison, here’s what a typical cold blast lantern spectrum looks like - note the shift over into the red. They’re both a nice smooth spectrum, but there’s a good bit less blue in the “glowing carbon particles” style illumination over the mantle.

Final Thoughts
Alright. Enough data. Should you buy one of these?
Like plenty of other things I’ve written about, your answer is probably already determined by now, but I’m not sure the kerosene mantle lanterns are worth the cost as a light source. They’re expensive (a basic one is going to run you almost $400 shipped), and while they are unquestioningly beautiful, the light coming off them is somewhat harsh. It’s a very bright white (read, “very blue”) sort of light, which I’m not sure is great to use in the evenings (though it will light a room, it’s still fairly dim as modern light goes), and it certainly goes through fuel.
As a backup room lantern, if you’ve already got another selection of cold blast lanterns, they’re fine - plus, they certainly are a conversation starter because they look like nothing else out there. And the heat coming off them can be very welcome in the winter - the nearly 1000W does warm a room noticeably in a hurry.
But for the cost of one of these, you could have several very nice looking cold blast lanterns (the Dietz Blizzard pictured with it should be less than $50 shipped and is my go-to “house lantern”), a kerosene radiant heater that will do a far better job of warming you and a room than this will (10k BTU is about 3000W, they’re $150 new, $50 used, often with a few gallons of kerosene), and still have money left over for quite a few gallons of kerosene.

They’re beautiful and they represent the pinnacle of kerosene lantern technology - which may very well be enough to make you want one, as it should. But otherwise, if you’re looking for either backup light and heat, or an incandescent way to light your evenings, I just think you’re better off with a good collection of cold blast lanterns instead.
Comments
Comments are handled on my Discourse forum - you'll need to create an account there to post comments.If you've found this post useful, insightful, or informative, why not support me on Ko-fi? And if you'd like to be notified of new posts (I post every two weeks), you can follow my blog via email! Of course, if you like RSS, I support that too.


