
Have you ever wondered about how hot electric stove burners run, or how hot you could get an empty pot on an electric burner if you insulated it? I’ve been trying to find answers for this for a while, I haven’t had any luck, so I’ve Done a Science with a thermal imager to answer my questions!
In short: An electric stove burner in open air will run around 550C (about 1000F), will rise in temperature when covered by a pot (to around 750C / 1400F), and I was able to get a stainless steel pot to around 450C (850F) after wrapping it in insulation!

Why on Earth… ???
It’s not the historical norm for this blog, but these questions relate to some of my recent work with charcoal production (with a specific focus on biochar). I’ve decided to sell biochar locally, which requires me to be able to produce high quality biochar locally. I’m starting out with small batches until I sort out the demand (which may require far larger retorts - some of us joke about finding my place by “Oh, yes, drive south until you see the flare stacks…”), and I know I can produce good charcoal with our firepit - but I’m also set up with basically “free electricity” out by my office. Between the array on my office and the solar trailer, I’ve got access to large amounts of zero-marginal-carbon electricity, and using that to either produce or refine a charcoal down is of great interest to me (keeping production costs low, among other reasons).
But these days it’s impossible to find data on even basic things like “How hot an electric stove burner runs” - the Internet, ever useful, gave ranges from “195F to 1500F.” Fine. I’ll do my own work and document it. Hopefully this is helpful to people who might want to do similar things.
Stove Burner Behaviors
You’ve probably, at some point, seen “coil burners” for electric stoves. They’re not great to cook on, they tend to be a pain to clean, and they’re cheap. So they’re everywhere, and once you get used to them, it’s not awful to deal with… mostly. They’re a big coil of resistance wire - usually something like 80/20 Nichrome, which melts around 1200C. On most stoves, the small burners are around 1500W (5000 BTU/hr), and the big burners are around 2500W (8500 BTU/hr). I’ve had to replace one of the controls on my stove, and taking apart the existing one demonstrated that there’s nothing fancy to them - no thermostatic control or anything else. Just apply voltage, pulsing it if needed for less heat - and “high” is a little detent that forces them to run at a 100% duty cycle.

Easy enough… I ordered a few (they’re stupidly cheap, and easy to find) and set out probing and prodding their behavior.
I started out by building yet more SketchyAdapters(TM). If you own an EV, you’ve probably got one of these already. This translates a 20A 240V outlet (L1/L2/G) to the normal 120V plug wiring (L/N/G). Doing this allows me to use a regular 120V extension cord for carrying 240V around. It’s fine - they’re insulated to 600V, and almost all my extension cords are 12AWG - so no problems carrying the expected 10A for extended periods of time. I hope the “double red wire” would help clue people in, at least if they know wiring conventions, as to what exactly this thing does. But I’ve also warned my kids, repeatedly, to not use random wiring adapters they may find around the hill without asking me first. This isn’t SCSI!

I built another chunk of adapter to go from a 120V plug to the burner - which, I’ll note, allows me to run the burner at far lower power on an actual 120V circuit, should I care to. My small burner pulls a relatively constant 5.2A at 240V - so right around 1250W. I’d wondered, before I started this project, if burners were self-regulating in terms of temperature by some behavior like “resistance rises as temperature rises.” Incandescent light bulbs regulate this way, but I’ve not seen any evidence of this in stove burners. They pull a nearly constant power, and their temperature just relates to how well insulated they are.

Sitting outside at about 40F, mostly out of the wind but with some breezes in the carport, it eventually stabilized at around 560C. Neat! My data here is coming from the P2 Thermal Imager I reviewed some while ago.

The large burner pulls a steady 9.8A - so about 2350W. I might see if I can find some higher power ones, but these are reasonable enough values as a “general burner ballpark” for now.

This burner ends up right about the same place - a peak coil temperature of around 550C. It’s got more coils, and pulls more power, but the actual “open air temperature” seems to be right about the same. However, outside some basic academic curiosity, the actual coil temperature isn’t useful to me. I want to know what I can get a pot to!

Hot Pot Experiments
I’ve been using this pot for a while as a charcoal burning retort - though I recently upgraded it with a BBQ grill thermometer that claims to be able to report up to 1000F. Well, that’s a tall claim, and as you’ll see later, cheap BBQ grill thermometers may not quite handle their ratings.

I don’t have anything in the pot - this is just “open air” heating to find out what the best case limits are for something like this. I’m sure I could sit down with a thermodynamics textbook and see what it maths out to, but that’s way more work than just trying to melt down a pot and see what happens. From the firepit, I already know this pot handles a dull orange glow just fine.
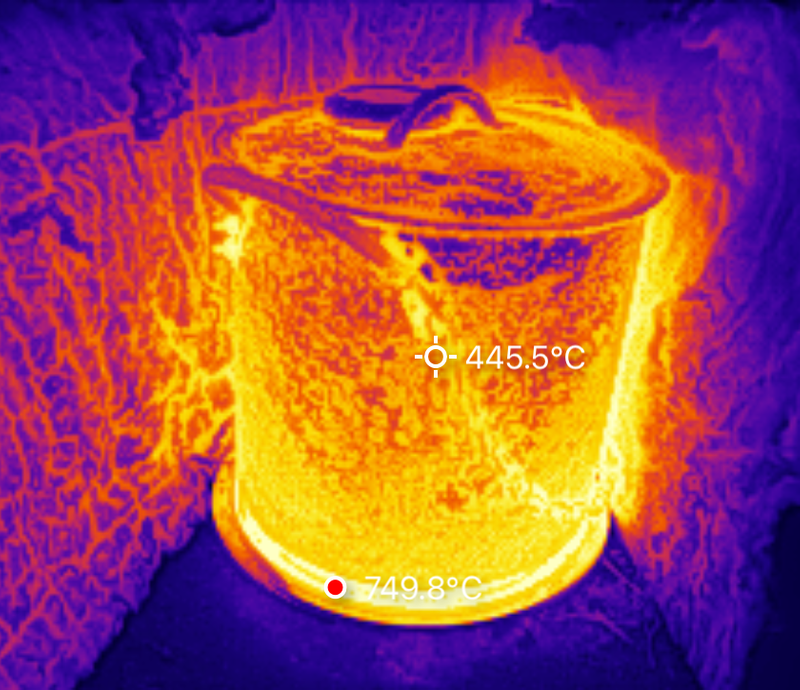
What happened is that the pot’s temperature rose up to about 280C (550F), and then sat there. This is, apparently, the point at which the pot is radiating out heat at the same rate it’s flowing in!

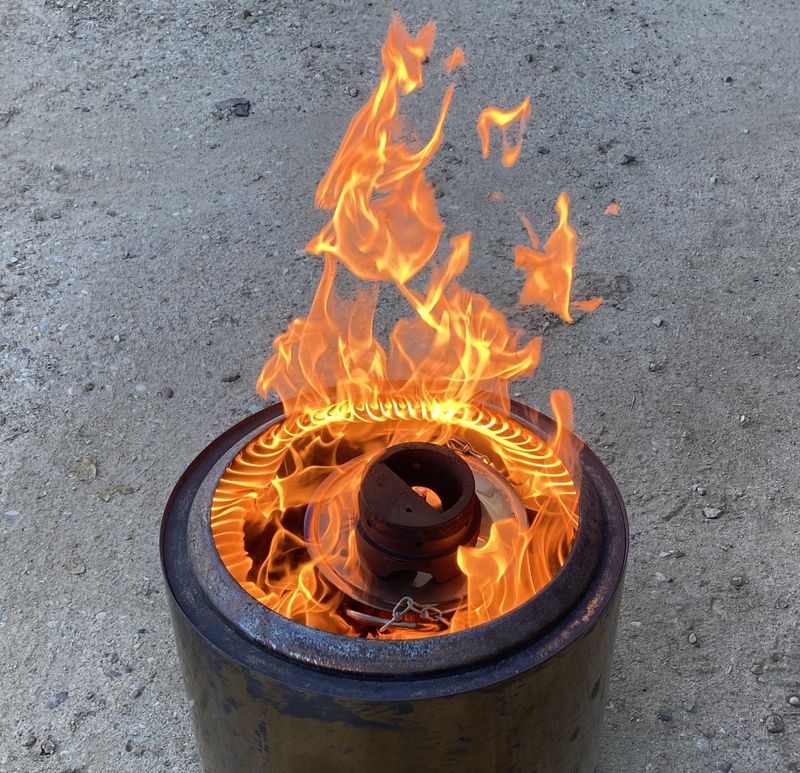
Normally, shiny pots don’t make good targets for thermal imaging - they don’t radiate well, and reflect their environment. Fortunately, my pot is far from shiny. It’s got a layer of rust, ash, and carbon on it from quite a few evenings in the firepit, so I have some confidence in the sanity of my imager here. The first thing you’ll notice is that the burner is running far hotter than before - nearly 200C hotter, as a result of the pot insulating the top and reflecting heat down. The outside of the pot is showing a toasty 240C, which more or less makes sense with an internal temperature reporting of 280C. But it’s also far from as hot as I want things to be. This would work well for drying wood and starting the biochar process (which would probably release quite a bit of heat), but it’s not as hot as I was hoping to get things.

Fortunately, I have some left over rock wool insulation from my office - and it’s been sitting out in the weather for eight years, so isn’t exactly the nicest stuff to deal with. But it’s a good high temperature insulation and there’s not much to catch fire in it - so I wrapped a bunch around the pot and stuffed the top (leaving an opening for the thermometer). The results were instant - the thermometer started going up, in a hurry!
Thermal imaging shows clearly that the insulation is effective - the top part, exposed for the thermometer, is hot, but the rest of the insulation is keeping the heat in. There’s some leakage, which doesn’t surprise me with how beat up this insulation is, but the concept of “Rock wool insulating the pot nicely and keeping the heat in” seems to work very well! This is about 3.5” of the stuff - and while I expect more heat would leak through eventually, the stuff works!

After a while of heating while insulated, I pulled the shroud open. Yeow! That’s cooking! And, importantly, nothing except the thermometer has come apart! I saw somewhere around 425C (800F) reported up top, which is the sort of temperature I need for my processing. Just, the BBQ thermometer didn’t quite like the heat…

After about 10 minutes at temperature, I shut down. The burner has some surface flaking, but I’m not sure how much of that is a problem versus “debris from the pot.” The coil seems fine, and even at the 750C I saw above, I’m nowhere near the 1200C melting point I expect. The heat reflector is rather blued from the heat, but I don’t care, and will probably insulate that better.

The “1000F BBQ Thermometer” failure
While the core of the experiment worked fine, I can’t say as many nice things about the “1000F” thermometer. It handles normal temperature ranges just fine - 550F is pretty darn toasty, well above oven temperatures, and there are no problems at all.

The problems started after I insulated the pot and temperatures went up in a hurry. Somewhere around 750F, I noticed that the thermometer wasn’t looking so good. It was not burning off moisture, it was burning off… something far more important, like the paint.

A bit later, it was almost entirely unreadable. The needle still pointed in the right general direction, but the inside had apparently burned off and deposited on the glass. Also, the stainless steel surround is darkening noticeably.

But, after things cooled down, the needle was pointing in the “Low” direction again. So I’m not actually sure if this is fried, or if I just can’t read the numbers anymore. Maybe I’ll scratch some markings on the outside ring. In any case, if you’re curious about how this thermometer handles the rated temperature range, it doesn’t! Don’t let it get over maybe 700F on your BBQ! Though what you’d have a BBQ at that temperature for is beyond me…

Final Thoughts and Conclusions
Well, I’ve toasted a thermometer, and I’ve learned a lot of useful things in an hour or two outside.
First, it seem as though I can get a retort hot enough to process charcoal with pure electrical heating. I sort of assumed I could, but the devil is in the details, and until I actually saw these temperatures, it was far from a given. The process may still lead to some failures - the coils are running HOT down there, but they’re still far enough from melting point that even a well insulated setup shouldn’t cause failures. I hope.
But I also have the problem of generated gasses - they’re not going to get burned if I use this method, and they’re generally on the “nasty” side. Wood alcohol vapors, tars, etc. I also don’t want to load up the rock wool with a ton of flammable condensates, because “The insulation was loaded with a range of flammable condensates…” is the sort of passage you read in industrial disaster reports. I’m inclined to think that this process may be more useful for post-processing of other charcoal, once most of the gases are driven off. My propane pot, right now, doesn’t get things hot enough throughout to be usable as a single stage process.
So, I shall carry on the experiments.
I’m also rather interested in what happens if I move the burner inside the pot. Right now, a lot of the energy is wasted. What if I just toss the burner inside, and insulate the whole thing? I’ll probably have to learn something about thermocouples in order to get good data there - and, oh no. Something else to learn about!
Comments
Comments are handled on my Discourse forum - you'll need to create an account there to post comments.If you've found this post useful, insightful, or informative, why not support me on Ko-fi? And if you'd like to be notified of new posts (I post every two weeks), you can follow my blog via email! Of course, if you like RSS, I support that too.

