
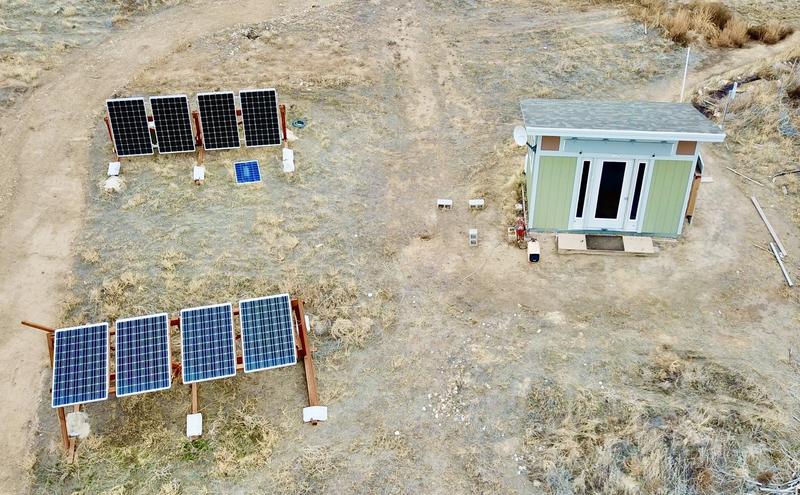
It’s the middle of October. I’ve been working in my solar powered office full time since July, and so far, all is good out there. I have plenty of power (so much, in fact, that I’m running Folding@Home and BOINC on sunny days), and even on cloudy days I’ve been OK so far. The temperature in the office remains entirely comfortable, and this is, quite literally, the best office environment I’ve ever had.
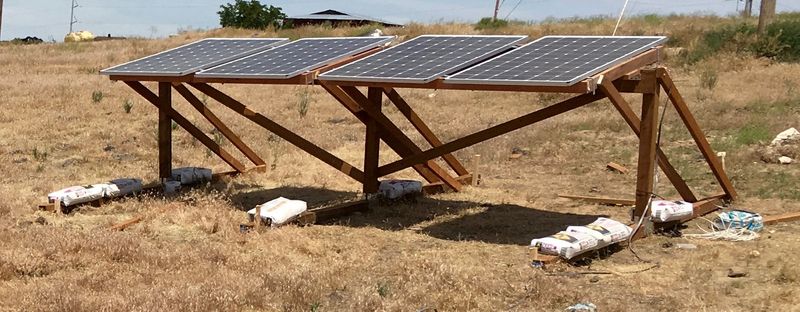
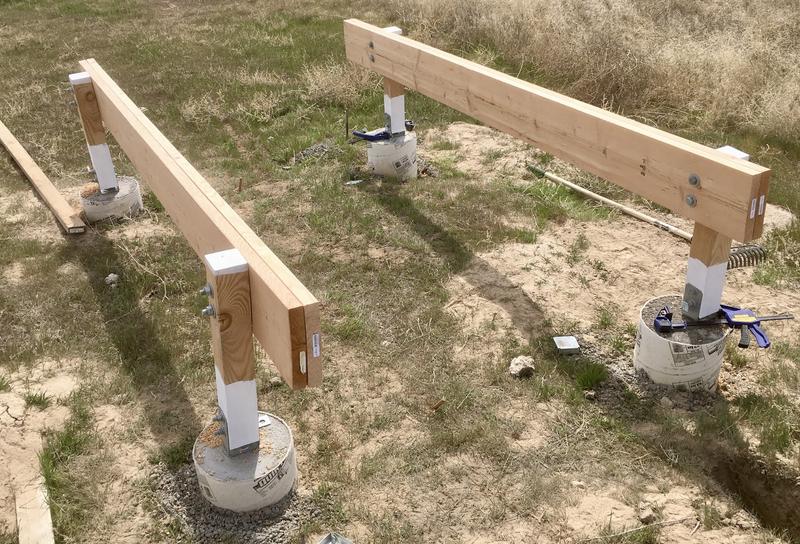
But, winter is coming, and power is much like a Spuddie - enough just isn’t enough. I’ve got 8 panels hung (two strings of 4, as documented here and here), but I ordered 10 panels. The remaining 2 panels are gathering impressive amounts of dust in my other shed (it lacks a door, and is sitting on some rather uneven ground under where the chains broke through the roof, so it seems to concentrate dust).
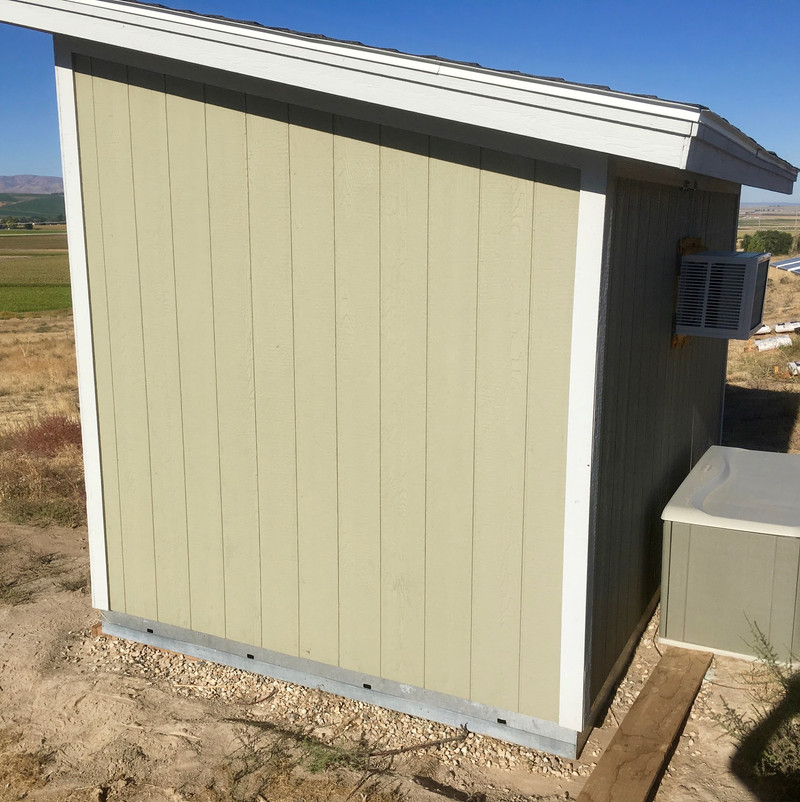
Nearly every single morning, as I’m walking out to my office, I see this beautiful east-facing wall, soaking up the sun. It’s full of sun long before my main panels are producing much (while my battery bank is lowest), and it’s just a beautiful empty canvas, begging for something useful.

I set out to do something useful with that wall. Bolting solar panels to the wall made sense to gather that wonderful morning sun - but I figured I could do more. Winter is what concerns me as far as power goes, and winter sun is low and south. Being able to swing those panels to face south would be nice. Southwest would be a nice touch too, should I need it to continue generating power in the winter evenings.
My office being my office and me being me, you can guess that I built such a panel holder!
These panels are normally docked for morning production, but can swing all the way around to face southwest for my “manual tracker” approach to gathering more winter sun.

That’s the “What and Why” - for the “How,” keep reading!
Design Concept
For a swinging set of panels, they obviously need to swing - which means hinges at one corner. For my arrangement, I knew that they would be hinged on the east wall, south corner, with some hinges that let the panels swing around almost 180 degrees (I didn’t quite get there, but close).
I thought quite a bit about the panel angle. Vertical is the easiest (and uses the least room), but kicking them out at the bottom would increase production, especially in the summer. That said, when stowed against the wall they receive morning sun (low in the sky), and in the depths of winter, the sun never gets past about 22 degrees above the horizon. This means that a vertical panel will actually be pretty good about soaking up the sun when I need it most. I really don’t care about these panels in the summer when the sun is high in the sky - I have more power than I can use on those days. If I really don’t like it, I can always change it later.
With heavy panels, this will be a heavy frame, but it’s remarkably similar in concept to a gate - and large gates can be quite heavy with all the wood slats. Therefore, I sketched out something that looked a bit like a gate frame with corner supports, “L” main supports for strength, and lots of hinges. It’s probably fine!
Building the Frame
I built the frame, like I build many of my projects, out of redwood - because it’s locally available, easy to work with, and holds up very well outside in this climate.
The main horizontal supports are these L-shaped constructs. This design is resistant to bending in both directions, and gives me solid mount points for the corner brackets I’ll be hanging the panels on. A single 2x4 wasn’t going to give me both the strength and mounting surface I needed, and I didn’t really want to work with 4x4s again. Yes. I know this is just as heavy. Shush. It’s stronger. I think.

After making very, very sure there were no rocks, I set a panel face down to use as a template. I learned my lesson on the first set of panel mounts with regards to tolerances, so I built my second set with an actual panel as a reference. That worked wonderfully, so I’m doing the same thing here.
The corners are quite screwed together, and should be reasonably strong. But I’ll add corner braces later on for yet more strength.
I cannot say enough good things about the GRK Fastener brand screws here. They’re a bit expensive, but seriously awesome, and you should use them.

The main frame is boxed in here. The panels hang from corner braces that are screwed into the top surface of the 2x4s - they have a large flat surface to sit on and are screwed in place, so the weight of the panels shouldn’t be a problem. My panels are awkward, but they’re not made of lead or anything.

With the addition of a bit more lumber, the main frame is done. The extra full height 2x4 on the right side is what the hinges will screw into.
One concern I had with the amount of weight and torque on this is that screws would rip out under load. In many areas, I thickened the structure, not because I believed it needed the strength, but to give me more thickness to seat screws in. This panel mount is mostly built with 4” screws, with a handful of 3” screws where I couldn’t quite sink a 4” one. This mostly works, though a few screw tips are sticking out where the screws sunk a bit deep. Fortunately, that’s fine.

Bending loads mean diagonal braces! So I added one. It’s starting to look like a large gate!

In retrospect, the brace probably should have gone the other way. I may add one on the inside so it will be taking compression loads instead of tension loads.
Mounting the Frame
The hinges have to let the panel swing out so it can collect the south sun, and I wanted to be able to collect the southwest sun as well. This means the hinges have to be right on the edge of the shed.
Fortunately, I’m intimately familiar with the interior construction of this shed, and I know that there are corner studs. From an insulation perspective, they’re an annoying thermal bridge, but from a “mounting something heavy on the corner of my office” perspective, they’re perfect. I can drive 4” screws in for the hinges, bite deep into studs, and have plenty of strength. So I did.

I also got a bit of help with this part from my little hinge inspector. She made sure the hinges worked, ready to mark them with her Sharpie if they didn’t! I actually got a lot of help from her in the form of handing me screws and parts - at least until this got boring and she went to go play in the dirt.

Failure is (relatively) expensive if it will probably destroy two solar panels. Hinges are (relatively) cheap. Five seemed about right. That means 25 4” screws securing it into the shed frame. I don’t think these will go anywhere.

With a bit of assistance in holding the far end up, I successfully mounted the frame! The screws on the other side of the hinge go deep into the panel frame. I’ve also added corner braces on all 4 corners, as well as a few braces on the rear where appropriate.
As a quick proof test, I hung from the right side of the frame (furthest from the hinges) and nothing moved. That’s more torque than it’s going to see with the panels (and the panels will add some stiffness), so I feel fairly confident in the design.

Latching Mechanism
A set of solar panels hinged to the side of a shed without any way to secure them won’t last the first windstorm.
My design is similar to a gate - so I use gate latches, of course!
I screwed both 2x4s into a stud in the shed as well as the siding, then mounted the gate latches. Conveniently, the 2x4s are slightly different thickness, so the top latch pin is forced into the back of the latch while the bottom pin is pulled forward and the gate doesn’t rattle (I was going to use washers if I needed to accomplish this). I’ll toss some bolts in the latches to make sure they don’t come free when I’m not regularly swinging the panels, but the panels aren’t going anywhere when properly stowed, and they don’t rattle.

Mounting the Panels
The panels are secured the same way I secured them on my second-gen panel mounts: 1/4” bolts through the corner braces. The bolts are slightly smaller than the holes, which gives me some wiggle room for alignment and makes getting everything together much easier.
Mounting panels vertically and solo is tricky, but I got it done!

I mentioned that my other shed gathers dust - you can tell which panel was in front. This is what’s left after hauling it quite the distance and letting it sit outside for a night or two. Lots and lots of dust.
A quick swing test indicates that the frame swings smoothly. I screwed the gate latches in before I mounted the panels and things still align perfectly with the panels on, so however much flex I have from the weight of the panels isn’t much.
As discussed in the design section, the panels are vertical. That works well enough for when I need them, reduces wind load when stowed (they’re not going to catch much wind here), and keeps my walkway clear.

Controllers and Hooking Them Up
With the panels mounted, I have to hook them into my existing system so they’re useful - which means I need some sort of charge controller. I’m going to have 570W (2x285W) of panels online, at about 60V max power point, 80V open circuit, and around 9A max power current.
Technically, I could just hook them into the battery bank with a big diode, but I’d rather have more control about when they’re hooked up and when they’re not. If I don’t have much load on a sunny morning, I’d rather they not try to boil my batteries. They probably won’t make that much power, but just to be safe, I went with a charge controller.
I considered buying a MPPT (Maximum Power Point Tracking) controller, but 48V MPPT controllers are generally designed for higher power systems and are priced accordingly. However, I can get a 48V 10A PWM controller for relatively little.
A MPPT controller finds the maximum power point of the panels and performs a voltage/amperage conversion from that voltage to the battery bank voltage (usually buck, but some boost controllers exist). A PWM controller, on other other hand, hooks the panels to the bank (dragging them down to the current bank voltage) or disconnects them. That’s it. It’s literally just an electronic toggle switch with a bit of brains behind it (hopefully).
For this subsystem, I went with a simple PWM controller. On the plus side, the controller was cheap ($30). On the minus side, I lose some power because instead of working at the panel max power point of 55-60V, my panels will be working from 48-60V (where my pack runs). That said, MPPT controllers are less efficient than a basic switch. There exist some cheap MPPT controllers, but I’m not entirely convinced that they’re actually MPPT. I may try one at some point and see what the difference is.
For now, I’ve got my cheap PWM controller. My pack voltage and the panel set voltage is close enough that I’m not worried about the small losses - it’s still going to be radically better than the nothing I had in the morning.
I do want to be able to control power on both sides of the controller (solar to controller and controller to battery). For that, I used a Midnite Solar Baby Box with two 15A breakers in it - one for the panel side, one for the battery bank side.

A bit of wiring, a few labels, and things are wired up and online. I’m running 12 gauge wire from the panels to the controller, and 12 gauge from the controller to the battery box (to the pack positive and negative terminal). I shouldn’t see more than 10A, so 12 gauge is more than fine.

Wired up, facing the sun, online, and happily feeding power to my battery bank! I gained half an amp (25W) just by cleaning the dirt off that one panel.

I’ll eventually figure out a better system to hold them in place, but the 2” conduit and a 2x4 work for calm days.


This is their normal position - folded against the east wall. It really does look a lot nicer than a blank, sunny wall. It’s a lot more useful than a blank wall, too!

Do They Work?
They most certainly do! I’ve reliably seen 8.5A out of them (around 450W) during sunny mornings.
What I’ve found the most interesting so far is that I can still get around 1.5A out of them on a cloudy day - with the panels facing away from the sun. Tucked against the wall, the diffuse light from the sky and clouds still gives me ~80W - radically more than I was expecting in those conditions, and certainly very useful to me when I’m running at my minimum “working” power draw of 250-350W.
In the morning, as the sun is coming over the horizon, these panels are working long before my main bank. With a sunrise at 0745, these are generating useful power by 0800, and are actually pushing more amps into the battery than my main bank until 0945 (not bad for 2 panels vs 8 panels). I normally see 7.5-8.5A (~400W) out of them for a few hours, then the output drops off as the sun moves south in the sky.
Even in the afternoon with the panels fully shaded, they still generate some power. I usually see about 1A (~55W) out of them on sunny afternoons when they’re fully shaded and looking at the sky. I see a bit more on cloudy days, unless the clouds are quite thick.
I’ve configured the charge controller to match my absorb voltage of around 60V. I try to run my battery bank through a full three stage charge every day (doable when it’s not heavily cloudy), so these will push amps right up to my full absorb voltage. If I have a very light load, they can hold the battery bank somewhat above the float voltage, and the main controller goes to sleep for a while as the sun moves through the sky. I’d rather the controller didn’t do this, but it’s simply not a problem most days (either I’m out there using power, or the F@H box is online soaking 400W).
I’m very happy with this set of panels. They do exactly what I want, and give me significant power early in the morning when I need it the most to recharge my battery banks.

Highly recommended!
Do you have east facing panels? Let me know in the comments!
Comments
Comments are handled on my Discourse forum - you'll need to create an account there to post comments.If you've found this post useful, insightful, or informative, why not support me on Ko-fi? And if you'd like to be notified of new posts (I post every two weeks), you can follow my blog via email! Of course, if you like RSS, I support that too.


