
If you were looking forward to this post last week - sorry about that! I ran across such utter and complete nonsense that I felt the need to offer my opinions on it. Anyway, back to my solar panels and wooden mounts.
The first generation panel mounts I built for my solar powered office weren’t amazing. They’re incredibly stout, and should last through any windstorm we get, but they’re simply too heavy. It’s nearly impossible to swing them solo, and they were a nightmare to build and assemble.
Based on what I learned, I drafted a different set of plans for my second generation panel mounts. Something lower, lighter, and better balanced. Something that looks an awful lot like this:

Why? And how? Read on!
Problems with the First Revision
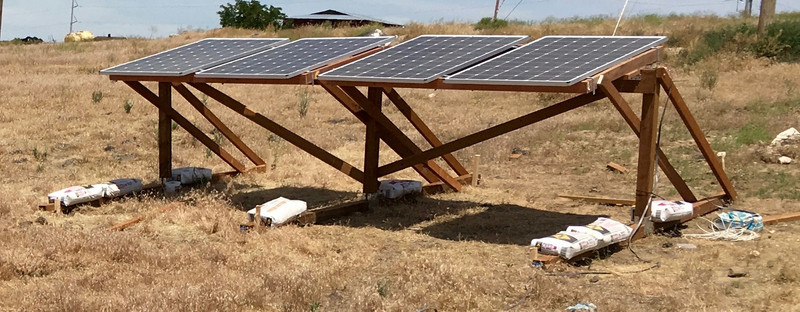
This is what the first revision panel mounts look like.

These mounts were designed to be heavy, strong, and robust. They succeeded far too well. They’re too heavy (I can barely swing them solo), they’re too strong (I burned out a drill trying to assemble them), and while I’m confident they’ll stick around, they’re just too much. I didn’t want to build another set like that.
There are also problems with having pressure treated 4x4s secured against aluminum solar panel frames. I used some plastic to separate them, but it would be easier to not have the problem in the first place.
So, with all my lessons learned, I set about designing a second generation of panel mounts. Something lighter, easier to build, and just as solid.
Design Goals & Considerations
For this new generation of panel mount, I set out to build something that was lower (for easier cleaning and maintenance) and better balanced (for easier swinging).
I didn’t want to have to drill holes through wood to line up with the panel frames. That’s just too difficult to do with the accuracy required.
So, I sketched out something faintly similar to my old build, but revised in many key areas.
It’s lower, lighter, easier to hang panels on, and easier to swing!
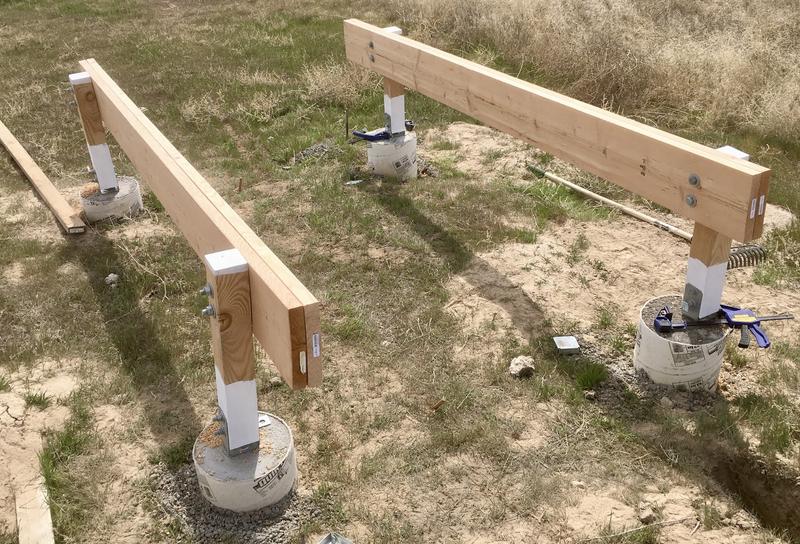
Frame Base Construction
The base of the mount is similar to the first generation - I built them out of 4x4s in a “T” with some diagonal bracing.
The major difference in the bases here is that they’re lower (4’ instead of 8’), braced with 2x4s instead of 4x4s, and are only braced in the rear. Some analysis of how wood works indicated that I should be more than fine with the reduced strength - especially since, with the lower height, there’s a lot less potential torque on the frames.
A nice perk of using 4’ uprights is that I can cut them all from a single 12’ 4x4. I’ve gotten halfway decent at cutting 4x4s with a circular saw.

The top bar is a 2x10 again, and as noted, I’m only using the rear diagonals here. There’s no issues with shading, and the lower structure should be plenty strong with less bracing.

A bit more assembly and the base of the mounts is ready to go! It’s so much nicer working with this lower height.

Panel Swings
The panel swings are also lighter. I built them from redwood 2x4s, and used angle brackets to tie into the panel frames. This gives a bit more mounting flexibility - the angle brackets can shift slightly as things move, so hopefully this will stress the panels less. There are four mounts per panel, so I’m not concerned about raw strength.
I’m also using 1/4” bolts instead of 5/16” bolts. This offers a bit of slop on both the panel side and the angle bracket side, so I can deal with a minor misalignment much more easily. Again, still plenty of strength, but easier assembly.
I was SMRT this time - I used an actual panel to align things! Instead of just measuring, I’m confident that things are lined up to an actual solar panel.

I also got smarter on this set and mounted the hinges part way down! It’s not exactly at the center point, but it’s a whole lot closer than the previous panel mounts. This means that I don’t have to lift the whole panel to swing them - they’re partially counterbalanced. To offer the hinges a place to mount, I secured a chunk of 2x4 rather well into the frame.

The hinges screw into these mount 2x4s. Four heavy duty gate hinges per panel swing (each swing holds two panels) should be enough for the winds I see out here.

Mounting the Swings and Panels
This is one time I borrowed a friend to help me - and it made a huge difference in speed of installation. I then proceeded to spend the afternoon running a concrete chute to help him install a pool, which was a good bit of fun. It was a great day!
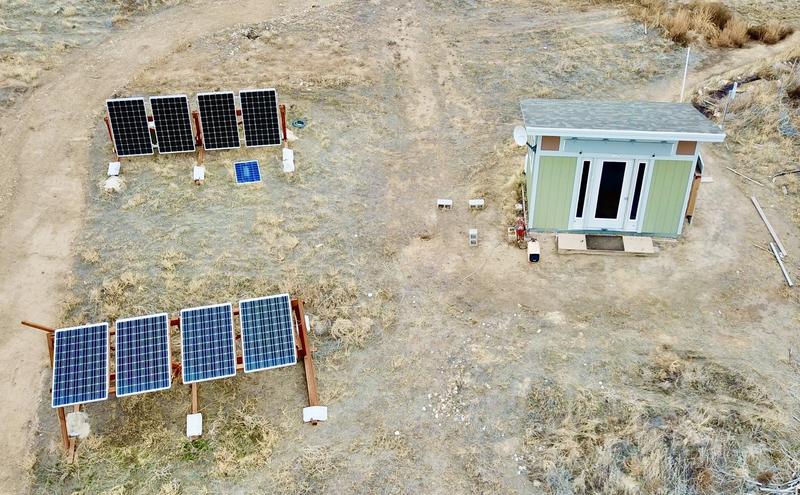
With the panels all mounted, things are looking good. I remain amazed that hanging these things out in the sun makes power.
These panels are also mounted more or less due south. You can see from this view that I will never have structure-shading-panel issues with this set!

At this point, the panels are not yet wired, but I’ve tested them all for voltage. The angle brackets are visible here. I’m confident things are well secured.

Finally, with the addition of some 2x4 supports, the panels are up at the summer angle.
I, uh, forgot the carriage bolts for this part. So the support rails are screwed in place for now. I’ll fix that in a few weeks when I get around to swinging the panels down for winter.

Final Steps: Wiring and Securing
With the panels up, I routed the wires. I’ve got a junction box I really should install here…
The wiring for this set of panels is simple. I’ve got a length of 12/3 + ground UF running up to the combiner box on the other set of panels. Ground to ground, negative to negative, positive to circuit breaker, and one wire unused. Since this set of panels won’t produce over ~9.5A even into a dead short, 12 gauge is overkill. However, I had it around - so, I used it.
As this is a ballasted ground mount, I went about ballasting it, and also staking it into place. The sandbags add weight, and all the legs have garden stakes driven in at the front and rear, screwed to the supports. It’s not going anywhere.

The stakes are ~2x2, and I drove them until either they wouldn’t go in any further, I broke the top (usually caused by it not going in any further), or it was flush with the base 4x4x. Have I mentioned my soil is rocky?

Finally, I added diagonal braces for additional strength.
That’s it!
Another 1140W nameplate, soaking up the sun.
Final Thoughts
This is a much better way of doing ground mount solar panels than my first attempt. It’s lower, lighter, easier to build, and the panels swing easily (instead of requiring a large jack or a winch truck).
They’ve sat, unmoving, through some pretty stiff winds. And, in the summer position, they make a nice cover for storing things - the panels keep the sun and some of the rain off. Great for things like generators that are designed to be outside.
If you decide to build yourself a set of solar panel mounts from wood - do it like this, not like my previous attempt.
Comments
Comments are handled on my Discourse forum - you'll need to create an account there to post comments.If you've found this post useful, insightful, or informative, why not support me on Ko-fi? And if you'd like to be notified of new posts (I post every two weeks), you can follow my blog via email! Of course, if you like RSS, I support that too.


