
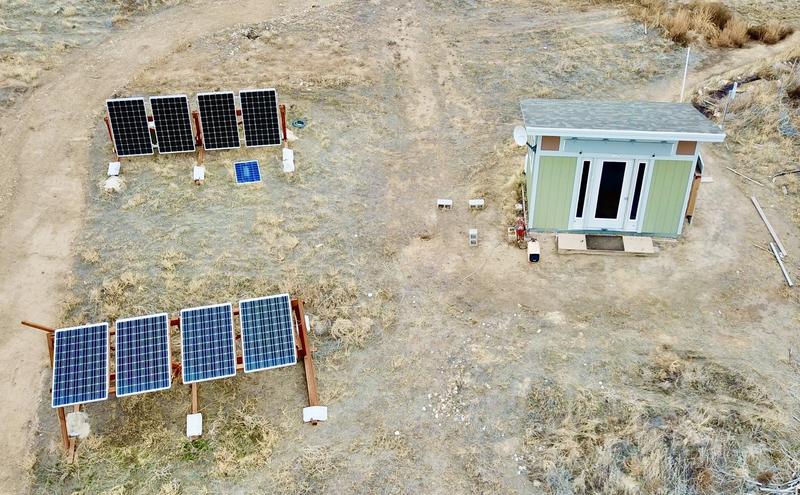
It’s time for a few more posts about my Tuff Shed to Office conversion. This post and the three following will focus on the details of my solar panel mounts and backup power systems, highlighting what I did, and what I wouldn’t do in the future.
All of this started with a stack of 10 solar panels delivered on a pallet. Which, of course, I didn’t bother to take a picture of. My panels are the SolarWorld SunModule 285W panels (details in my main post about the power system).
Now, a stack of 10 solar panels on a pallet is a pretty cool thing to have, but it’s not a particularly useful thing without a bit more work. Solar panels are like lizards. They are happiest lying out in the direct sun, just soaking up the photons. I needed something to take my panels off the pallet and let them soak up the sun, so I could extract their high energy electrons to run my computers and air conditioner.
So I built such a thing! This is revision 1 of my panel mounts. It’s a terrible design, for reasons I’ll go into later, but it does indeed work.

Read on for the details!
Methods to Mount Solar Panels
I considered a number of methods to mount my panels.
The “default method” most people think of for solar panels is rooftop mounting - stick them on the roof somehow. This is, however, a problem if you have a small, north sloping roof. Since I have one of those, roof mount isn’t a good option for me.
Another method often used is a top-of-pole mount (sometimes known as solar-on-a-stick, or perhaps a solar pop). A single central pole supports the panels, which are mounted to a frame attached at the top. This has the advantage of taking up basically no ground space, but it requires a rather deep hole filled with concrete to hold the pole. My whole project is designed to work around the massive quantities of basalt (lava rock) on my property, so that’s a risky approach. You can punch holes in basalt, but it’s not easy, and it’s not cheap.
Finally, ground mount involves panel mounts that are built along the ground. They can be anchored to the ground with ground anchors and concrete, or can be what’s called a “ballasted ground mount.” Basically, that means “make it heavy so it doesn’t blow around.” I excel at building things that are overly heavy! And I can do it with lumber obtained locally, so it’s quick to build!
Ballasted Ground Mount Design
A bit of research indicates that 7-10 lbs of weight per square foot of panel is about right. I’ll have about 70 square feet of panels per mount (I’m mounting 4 panels at a time), so 700-1000 lbs per mount should be just fine. I then proceeded to ask myself, “Well, what’s wrong with just putting all that weight into the structure?” I’ll tell you later on, but it turns out that there are reasons one shouldn’t do what I’m about to do.
The basic design I settled on is A-frame end mounts, 2x8 top bars, and a hinged mount for the panels so I can swing them to optimize seasonal production - nearly horizontal in the summer, nearly vertical in the winter. I won’t be moving them regularly - only a few times a year. I just want to be able to drop the panels down to collect the rather limited winter sun.
Building the Frames
The end frames are pretty simple 4x4 construction. I used a joiner where the vertical post meets the base, and 1/2” galvanized carriage bolts for joining the other joints. The finished assembly is very heavy - as intended!

I built two full “A” ends, and one half-A for the middle support (no front post, to avoid shadowing the panels in the winter).

Across the top, a 2x8 crossmember holds everything in place and serves as a place to mount the panel swings. I’ll brace the structure diagonally once everything is finished and I have it staked down.
The frame is pointed more or less due south. South facing panels produce the maximum daily power, and since I’ve got battery banks (12kWh of flooded lead acid), maximum power production is quite useful to me. My goal is to charge the battery bank fully every day (doesn’t happen, but that’s the goal), and producing the maximum power is a reasonable way to accomplish this.

Building the Panel Swings
I built the panel swings out of 4x4s as well. They’re very, very strong - and also absurdly heavy.
However, I didn’t realize this at the time. I used a sheet of plywood I had laying around as a large square for building the frames - it worked quite nicely!
The 4x4s are held together with some 6” long FastenMaster HeadLOK fasteners. They’re lag bolt replacements, and work great!

With a frame finished, I set out to hang it.
This took some work. Actually, a lot of work, a lot of head scratching, and trying several different methods. The way I’ve got the hinges set up, the panel frame had to be horizontal for me to mount it. Did I mention it’s heavy? It’s about 22 linear feet of pressure treated 4x4.
I eventually ended up with some ratchet straps and a brace.

Much lifting and cussing later, my first panel swing is up!
There are 4 heavy duty gate hinges holding the top up, and I’ll use some 2x4s to hold the bottom edge out at the desired angle. I’m confident that if two gate hinges can hold a gate, four hinges can hold a set of solar panels.

Death of a Cheap Drill
About this time, my Black & Decker drill gave up the ghost. Literally - I watched the ghost came out the back vents in the form of white smoke, and the usable torque went down dramatically. I’m fairly certain a combination of trying to drive my 6” bolts and the modified sine wave off my truck inverter burned a set of brushes out. I should replace those at some point…
I borrowed a much larger drill from a neighbor. It’s a Hitachi 1/2” drive, single speed, ancient, and is more or less a peer to the generator I used for the foundation.
You’ll note the second handle on the left. This is intended to give one more grip against the torque of the drill. It is very much needed! This drill has gobs of torque, and the trigger is an on/off switch. There’s a lot of inertia. This is back from the days when a drill was a drill, not a drill and driver combo. It just turns at rated speed, regardless of what you ask it to do.
My little drill would take several passes of clearing the bit to get through one of these 4x4s, and it bogged down significantly in the process. This green thing? Doesn’t even slow down. It just chews all the way through and out the other side. It’s very impressive to use!

So I used it. And build the second frame, offset down from the first. Thinking, somehow, this would be a good idea. Then I played with things a bit and realized I’d be shading my second panels rather substantially in the morning - which is no good. So I fixed it - they’re the same height now.

Securing the Panels
I cut some additional 4x4s to go between the top and bottom rails, aligned properly for my panel frame width. These got screwed in as appropriate.
The panels are secured to the 4x4 frames with 5/16” bolts through the panel frame. There’s a washer between the panel and the wood to keep the aluminum frame off the wood, and a washer above to spread the load. Then a nut. Once everything has finished compressing, I’ll locktite the nuts so they don’t back off.

To protect the panel frame from any vapors coming out of the pressure treated wood, I added a bit of plastic between the panels and the wood. This keeps the aluminum off the wood entirely.

One panel hung!

The second panel goes up about the same as the first.
I don’t recommend this method of installing panels. The precision required to hit a 5/16” hole with a 5/16” bolt, after boring through a 4x4, is significant. I had a hard time with that level of precision, so there was a bit of filing going on to hog out the panel frame holes and make things fit. Not recommended.
But, I did get them up.
The panels are held in their position by the 2x4s bolted to the bottom of the swing, and to the upright 4x4 post. I’ll just drill more holes when I need to move them.


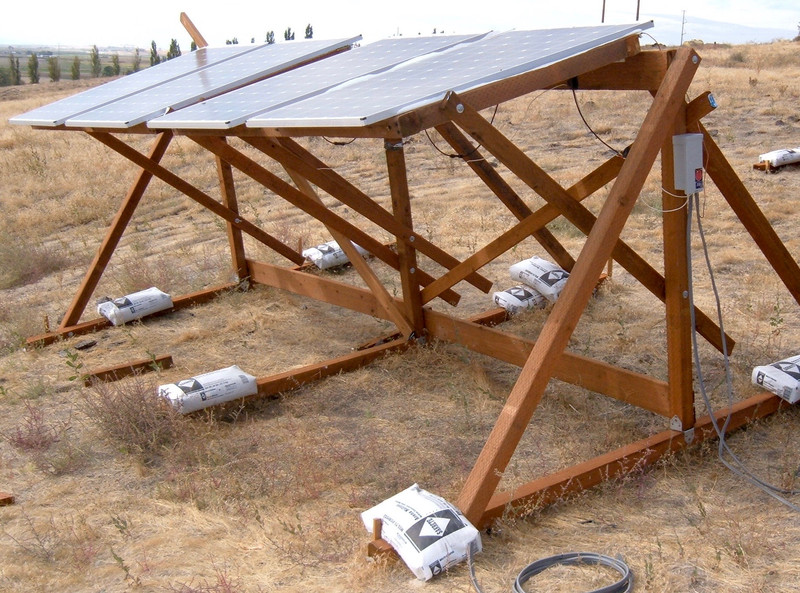
All four panels mounted and in position - time to wire things up!

Panel Wiring and Combiner Box
These four panels will be wired in series. Another four panels will also be wired in series, and that set will be in parallel with this group, feeding into my charge controller (as documented in part 9).
The wiring off the string of panels feeds into a Midnite Solar combiner box. This box holds breakers for each panel string (really, more of switches), and combines the current from all the strings together to feed into my shed.

Why do I have three breakers for only two strings of panels? If I want a third string, I can just wire it up without having to change anything else. My charge controller can handle a third string of 4 panels if I want, so I designed for that - just in case I need more power.

Ballasting and Staking
Here’s the final result. Note the wooden stakes driven into the ground. Those help keep it from moving. There’s also a few hundred pounds of sandbag on it, helping to keep it from moving.
And, so far, despite some serious wind - it hasn’t budged an inch! So, that part is successful!
Why You Shouldn’t Build This
So: I built it. The panels are up. They’re producing power. And this is a terrible way to build a solar panel mounting system. Don’t do it this way.
Why? Mostly, the panel swings are simply too heavy to move myself. The goal involved being able to swing the panels, and the reality is that I can’t - at least not without a tall handyman jack or something similar.
At some point here, I plan to reposition the panel swings so they’re more evenly balanced and I can move them without having to use mechanical lifting devices. I just haven’t gotten around to that yet…
In terms of “holding solar panels” - this method works. But in terms of being a reasonable way to hold solar panels, it’s really not.
Another problem is that the panels are way up there. I can’t reach them easily to clean them, and I’m not going to bring a ladder all the way out here just to clean panels. They get really dusty in the summer, and remain that way until the rain cleans them at some point or other.
So, consider it these a case study in absurdity. Good idea, but too much of a good thing. There’s no need to make all the weight be in the structure.
I did come up with a much better method for the second set of panels. I’ll detail that next Saturday, when I talk about my Revision 2 panel mounts!
Comments
Comments are handled on my Discourse forum - you'll need to create an account there to post comments.If you've found this post useful, insightful, or informative, why not support me on Ko-fi? And if you'd like to be notified of new posts (I post every two weeks), you can follow my blog via email! Of course, if you like RSS, I support that too.


