
I’ve collected a bunch of hydrogen and initiated fusion for power! Or, at least, something that sounds an awful lot like that. What does one call one’s solar system except a solar system, and imply that one has a small sun and planet set floating around?
In any case, you’ve stuck with me for 8 weeks of “installing insulation and stuff in a shed.” Time for the good stuff!
A solar powered off grid office clearly needs a solar power system - and mine is no exception!
So, here are the gory details on my solar setup. From panels to outlet.

Keep reading for gobs of details.
Overview & System Goals
If you recall from the whole project overview (part 1 of many), this is going to be a year round office and workshop for me. I work with computers (this is, perhaps, not terribly surprising), I rebuild battery packs, I tear down cheap Chinese gizmos, and I tinker with other things. This means I need to power a blend of computers, soldering irons, spot welders, lab tools, and the like. I also need to provide climate control for my space, powering my through-wall heat pump with enough juice to keep me warm or cool, as I so desire.
Deep winter heating is going to be propane, kerosene, or thermal collectors - so I’m not too concerned about handling very low temperatures. Plus, I have waste heat from my body and computers for some heat in the winter. I’d like as much power as I can get year round, obviously, but I recognize that winter will be a challenge, and I’m OK with running a generator and heater a bit for power/heat.
I did purchase most of my parts from eBay. The prices are solid on brand new parts!
Panels
It begins with the sun. Lots of nuclear fusion and an 8 minute journey later, the photons are rudely interrupted a tiny fraction of a second before hitting the ground by a set of solar panels.
My system starts with the solar panels. I’m using 8x SolarWorld SunModule 285W panels, obtained from eBay, for no particular reason than that they seemed to be good panels with good frames, and I got a pallet of them for a reasonable enough price ($3300 shipped for 10 panels - shipping on small numbers of panels is just brutal as they have to go by freight).
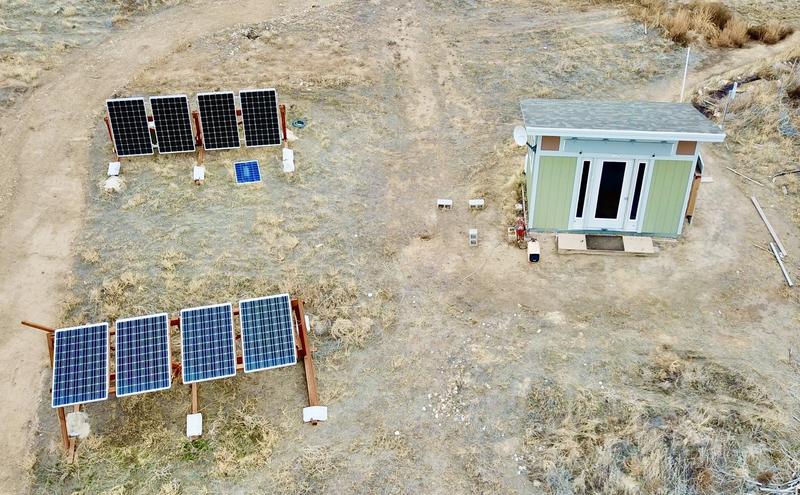
Right now, I have 8 panels installed, with another 2 sitting around waiting to be installed on a separate charge controller.
Here’s the spec sheet from the back of one of the panels. Important to note: Open circuit voltage is 40v, rated voltage is about 31v, and they’re just under 10A per panel.


Physically, they’re about 38” by 66” - fairly large. I was a bit surprised by how big they are. The frames are aluminum, and quite solid.

The panels are mounted in a 4S2P arrangement - strings of 4 panels, with two of these strings in parallel.
This puts my nameplate capacity at 2280W, open circuit voltage at just under 160v, peak power voltage around 125v, and slightly under 20A coming off the panels at peak output.
Panel Mounts
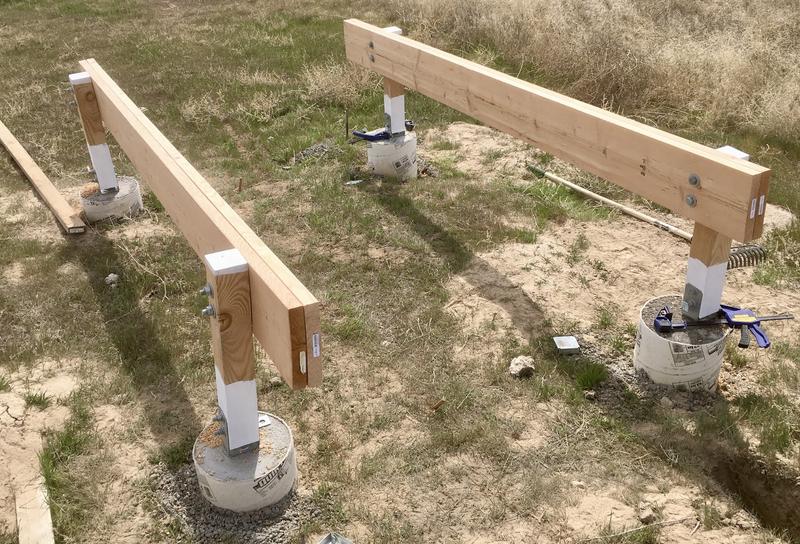
I may go into more detail on these in later posts, but I built two ballasted ground mount systems out of lumber. This works well with my environment, and as I’m in a very hot, dry climate, they should last quite a while. I expect the panels to outlast the mounts, though.
The first panel mount is mostly built of 4x4s, and is really quite heavy. It’s actually difficult to swing the panels, and with my summer overproduction, I’m unlikely to swing it past about 45 degrees next year. It’s just too heavy.
That said, it’s not going anywhere. Between the raw weight of this unit and the fact that it’s staked into the ground, I’m not concerned about the panels going anywhere!
On the right side, I have my combiner box. It’s a Midnite Solar MNPV3 Combiner Box, with room for three breakers (and three breakers installed, since I got everything at once). Both solar strings connect into this box before heading into my charge controller, and I can flip these breakers to isolate the solar panels from my charge controller if I’m working on the controller.
If I want to add another string of 4 panels, I can do so trivially - just build another mount, wire them up to my combiner, and they’re online! Everything is sized for this, if I need more winter power production.
I still need to run conduit and stick my UF (underground feeder) in those to below ground level. Trenching is a project for when it’s cooler out.

My second generation panel mounts are a lot nicer. They’re lower, lighter, better balanced (the hinge is partway down the mounts, not at the top), and are generally a lot better - to the point that I’m considering building another set of these in the fall to replace my first gen mounts. These are much easier to adjust solo.
This set is also ballasted and staked in, so it shouldn’t go anywhere either.

For those curious about the gory details of my system, I’m using 12 gauge wire to handle the 10A of a single string (return from the far end of the panels to the interconnect end), 12/3 UF with ground to go from the second panel mount to the combiner box (I had it laying around from wiring up a well pump, so one conductor is unused), and 6/2 with ground to go from the combiner box into the charge controller (as it could be handling up to 30A). Wire joins are made with crimp connectors. The panel frames are all grounded through the common ground in the system to the ground rod driven in behind the shed. The ground is bonded to the negative lines via the charge controller, so it can detect ground faults and sound an alarm.
MPPT Charge Controller
The wire from my combiner box on the solar panel mounts goes right into my charge controller.
What’s a charge controller? And what on earth is MPPT?
A charge controller is what it sounds like. It controls charging the batteries (gasp). This is the interface between the solar panels and the rest of the system. It handles managing the battery charge state, and ideally logs useful data about your solar panel production.
MPPT (Maximum Power Point Tracking) means that the charge controller is a bit fancier, and will find the point where your solar panels produce maximum power, right now - so it sweeps the voltage regularly and finds where it can get the most out, which is helpful for several reasons.
Solar panel output obviously varies based on the amount of sun one gets (cloudy days have less, sunny days have more), but it also varies based on panel temperature, soiling (the technical term for “dirt on your panels”), and panel age.
A MPPT controller will try to get the maximum power out of the panels at any given instance in time. This is particularly useful in the winter, as cold panels produce significantly more power than hot panels - so on a cold, clear winter day, the controller will be able to extract the extra power from the panels.
It also allows for a much higher panel string voltage than a PWM controller (the cheaper, “hook it up or disconnect it” style controller), as it has voltage conversion circuitry inside.
Basically, they’re more expensive, but you probably want one for any sort of system dealing with serious power.
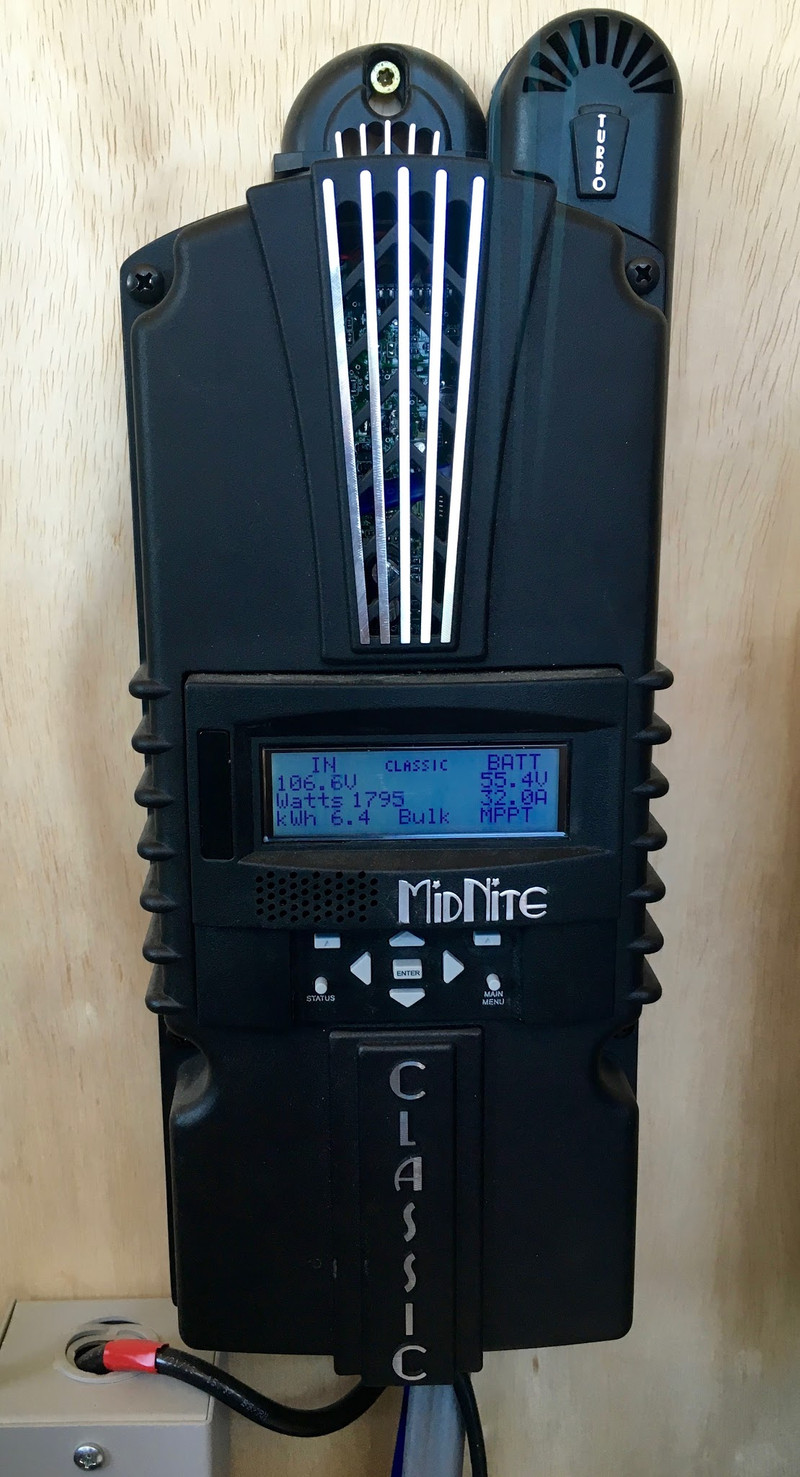
The MidNite Classic 200
Which one did I go with? The MidNite Classic 200 (obtained on eBay for a good bit less than list price - be aware that the Lite units don’t include the LCD). It’s rated for an open circuit voltage of up to 200v (hence the name), and a maximum output current of 79A. On my 48v system this works out to somewhere north of 3800W - plenty for my 2200W of panels (even if I add another string of 4 panels, I’ll only 3400W nameplate capacity).
There are plenty of good MPPT controllers out there, and everyone obviously claims theirs is the best. This is what I ended up with, mostly based on my goal of supporting 12 panels, and wanting strings of 4 as it’s a good size to mount with lumber.
That said, I really like it! It’s a very good looking controller. The primary interface is through the LCD panel and buttons, and it has an ethernet interface for network communication. There’s no web interface, though - just a ModBus endpoint that supports a single TCP connection. I’ll dive into this more later.
On the output side, a length of 4 gauge wire goes into a breaker before it heads into the battery box. This breaker box lets me disconnect the charge controller from the batteries. By flipping the breakers in the combiner box and the breaker going to the battery, I can totally disconnect the charge controller from my system if I need to reset it or do maintenance (mostly firmware updates, if I’m honest).
I had some stability issues with the network early on, but updating the firmware and switching to a static IP (instead of DHCP) seems to have fully resolved the problems.
Battery Box
I’ll get to the batteries, I promise!
But, first, I had to find something to put them in.
I thought about building something out of plywood (a lean-to type building), but then realized that rugged weatherproof enclosures are easy enough to find. They’re called “deck boxes” and your local Home Depot or Walmart stocks them.
So, I did some math, found one that would work, and bought it!
Deck boxes show up in a flat box with decent directions.

They’re really not bad at all to assemble. This happened between foamboard and plywood, on a day that was rather windy for cutting plywood outside.

After assembly, I caulked the inside corners to help improve the water and dust resistance. Will it help? I have no idea!

A bit of digging (yet more digging on this project), and I had a nice level spot for it. The battery box is on the north side of my shed, in the shade. Above it, the air conditioner takes advantage of the same shade.

Batteries
Alright, I’ll finally talk about my batteries.
I’m using a set of 8 Trojan T-105-RE batteries. This makes a 48v system (24 lead acid cells in series), with somewhere around 200Ah of capacity. Nameplate energy is 12kWh, though being lead acid, I can’t ever use all of that and shouldn’t drain more than about 2-3kWh out on a regular basis.
Why these? They’re a commonly available battery, the “RE” series is designed for off grid use, and there’s no core charge on the RE series, so they were about $10/battery more expensive than the regular T-105s. There’s supposedly some Smart Carbon magic that helps with partial state of charge use, which is certainly something I’ll be dealing with in the winter.

They fit nicely in the battery box, which means that I can do basic length and width calculations!
There’s a random chunk of 2” foamboard under there to help spread the battery load across the deck box floor. I’ll probably wedge some other chunks around the side in the winter to help keep the pack warmed up.

All of my battery power wiring (stuff in the path from the pack to the inverter) is done with 0 gauge wire, with copper terminals crimped on. I used a rather large DC terminal crimper for this, and it’s capable of some truly impressive pressure.

This is what it looks like wired up!
All 8 batteries are in series, with separate cables to the charge controller and inverter, and a shunt coming in the negative side for monitoring output amperage.
The blue cable running into the center is a temperature probe for my batteries. The proper voltages to use on lead acid cells change with temperature, and this allows my charge controller to adapt to the actual battery temperature.

I haven’t gotten the vent fans installed yet, so I’m venting the battery box by keeping it popped slightly open.

I’ll get a proper vent installed before winter.
There’s a 250A fuse between the battery pack and the inverter. My inverter can draw over 150A peak, so the fuse is slightly oversized, but not by that much.

Cable Runs
To run power cables between my battery box and the shed, I ran two lengths of 2” PVC between the inside and the battery box. Fun with a hole saw!


I’ve run the various wires through the bottom conduit, with the upper one left clear for some forced air ventilation of the battery box at some point. This is mostly waiting on my DC bus being online.

I ran another chunk of conduit to the outside, clear of the battery box. I use this for the incoming ground and power lines, as well as to run extension cords outside if I’m working outside and don’t want to leave the door open.
All the remaining space in the conduit is filled with rock wool. I have spare, it’s easy to remove, and it keeps air and critters out.

Inverter
My inverter is a 2000W Aims Power Pure Sine Wave unit suited to a 48v pack. This is capable of sourcing up to 6000W peak (very briefly), and significantly over 2000W for minutes at a time, if needed.
That said, I try to keep it under 2000W sustained. But the overhead is very nice - even if my air conditioner wants to pull a brief peak well beyond 2000W to start on a hot day, the inverter can source it. It’ll beep briefly to let me know that it’s overloaded past 2000W, but keeps everything running.
The only way I’ve found to trip it up so far is to have everything heavily loaded (pulling 1500+W), then use my spot welder (which is a purely inductive load - it’s a transformer, with no power factor correction). This makes things very unhappy, and will sag voltage enough to shut down computers. It’s not a problem if I keep things lightly loaded while using my spot welder, though I still see some voltage sag on the AC line.

This inverter also contains a 15A charger and an AC transfer switch. This means that in the winter, I can fire a generator up, charge the pack, and run my loads.
Am I going to use this charger much? I really don’t know. I’ll either use it, or I’ll feed a batch of DC-DC boost converters with my truck and bulk charge that way. The ideal case is that the panels produce enough power that if I’m not running BOINC and Folding@Home, I have enough power.
Distribution from here is, right now, an extension cord and a few power strips. I plan to put up some surface mount conduit at some point in the future to tidy things up a bit.
Monitoring - Discharge
My discharge monitoring, right now, is a MHF120200P. This unit, from eBay, is a wireless (!) 120v, 200A wattmeter. I’ll dig more deeply into it in future posts, but for now, I can say that it works exactly as advertised!
The shunt connects on the negative side of the pack for amperage measurements, with a connection over to the positive terminal for power and voltage measurement.
It transmits over a wireless signal to the receiver, which I have inside my shed.

The receiver looks like this. It has a number of options that can be set, with regards to over voltage protection, time based shutdown, amp-hour capacity, and the like, which I entirely ignore. I just use it to monitor my pack voltage and output power. I can compare this to my charge controller and see how I’m doing.
The range on this unit, through my wall, isn’t amazing. But it works well enough. I power it with a USB cord, because it’ll eat 5v and be happy enough.

At some point, I’ll probably replace this with a Whizz-Bang Jr, which provides the same data into my charge controller. This puts all my pack data in one place, and lets me more easily graph the output.
Or I could just tap into this data stream with another 2.4ghz wireless radio. One of the two…
Monitoring - Solar & Charging
That covers the output side monitoring for now. How about the input side?
I’ve got The Blackbox Project running on a Raspberry Pi in my office, and it talks to the Midnite Classic 200 over TCP (speaking ModBus), logs the data, and gives me fancy graphs as well as realtime data. This is the only device talking to the Classic, as it cannot handle multiple TCP connections at once (welcome to industrial control, where basic functionality from the 90s doesn’t exist).
This is the current layout of the webpage, though I change it regularly.

It means something useful to me, and that’s all that matters.
That’s about it for my system!
How Well it Works
The observant reader may have guessed that, by now, my shed is quite alive and online. They would be right!
How is this system working in the hot summer months? Very, very well.
On a sunny day, I’m demand-limited. The pack is full by slightly after noon, and the system just pulls what it needs after that.
Even if I’ve got all my computers on, the AC set to 65F (which ends up with a shed temperature around 70F), and am generally not thinking about energy use, it still provides enough - which is exactly what I hoped for.
I’ve even found a use for the excess energy (or, at least, some of it). I’m doing grid computing (BOINC and Folding@Home) as SolarSyonyk. If I have excess power, my desktop runs it’s Radeon 290X for F@H, and it’s CPU for BOINC. My iMac just does BOINC. If power is limited for whatever reason, I shut them down.
So far, I’m really, really happy with how this system is working. I’ve got a very useful, slightly over-powered, off grid workspace that keeps me cool!
How well does it work in the winter? I’ll let you know this winter.
Join me next week for a bit of a dive into my interior work - shelves, workbenches, desks, and the like.
Comments
Comments are handled on my Discourse forum - you'll need to create an account there to post comments.If you've found this post useful, insightful, or informative, why not support me on Ko-fi? And if you'd like to be notified of new posts (I post every two weeks), you can follow my blog via email! Of course, if you like RSS, I support that too.


