
It’s been oddly sunny and warm in Seattle this week - it was 60F yesterday - in February! And I’ve learned rather more about corneal ulcers in ferrets than I ever wanted to know. It would greatly benefit a certain elderly ferret to accept that he’s not the alpha anymore, and to stop starting fights he loses - every single time.
I have no idea if you’re the type of person who browses eBay and Amazon looking for cheap, interesting things out of China for your bike or not.
However: I most certainly am this kind of person! This may not surprise the frequent reader of this blog much.
When I found a lot of “laser bike light” listings on eBay, I was curious. They’re insanely cheap, and they seemed interesting enough to justify picking up a few to mess with. Plus, they have lasers!
These lights claim to lay down a “laser bike lane” behind your bike to make it easier for cars to see you and to get the idea they should move over. Plus, they’re a LED tail light with 7 patterns.
This is the one I’m tearing apart today. It’s one of two or three different models available, and if you pay more than about $5 shipped for this unit, you’ve overpaid. Oddly enough, eBay has this model with blue LEDs as well, though why you’d want a blue tail light is beyond me. Blue tail lights are also illegal in many places.

Keep reading for way more photos of this light than you ever realized you wanted, some teardowns of the lasers, and the (rather comprehensive) list of LED modes!
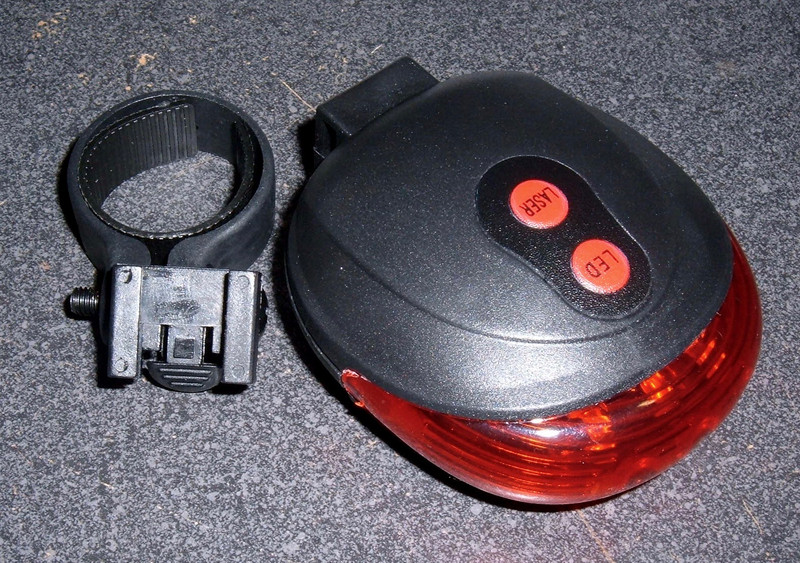
Exterior Overview
The top of the unit (shown above) has two buttons on it: LED, and LASER. The LED button toggles the LED modes (see later in the teardown for details), and the LASER button toggles the laser modes (“on,” “blink,” “off”). That’s it for the user interface. It’s very, very simple. I wouldn’t mind an “off” button that turned everything off, but that might make it a $6 light…
There are 5 red LEDs inside the lens - three pointing more or less straight back, and two pointing to each side.
On the bottom of the unit, there’s a battery door, two laser emitters (one for each side), and a few screws.
Inconveniently enough for me, this unit comes pre-assembled. That’s a problem for finding out what’s inside, so I’m going to go ahead & “fix the glitch” shortly.

With the battery door off, two AAA batteries fit neatly inside. There are two screw holes on either side of the battery box, and one near the bike mount. It can’t actually be this easy to get apart, can it?

Opening the Light
Amazingly, it really is that easy! Three screws, and I’m in. No glue, no fancy snaps, just three screws. Not even a “You are about to void the warranty, authorized personal only beyond this point, confined space certification required” label. As if it has a warranty to void…
Of note for those in wet places, on this $5 unit from China, there’s (surprise!) no real waterproofing. However, I really don’t think it will be a problem. It’s put together fairly tightly, and there’s nothing much for the water to bother anyway. Don’t take it scuba diving, but I wouldn’t think twice about using this for my rather wet and muddy commute in Seattle.
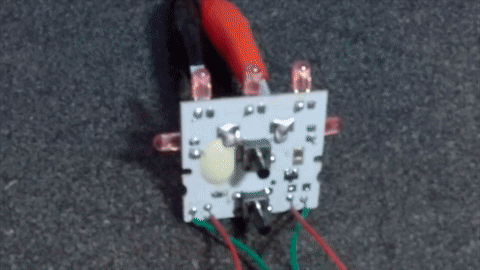
With the top off, the circuit board is visible. It has two pushbuttons (conveniently aligned with the external buttons for your button pushing pleasure), a bit of hot glue, and some wires going to two laser emitters.

It’s really quite roomy in here. There’s not much of anything actually in the unit.
The off-white blob on the bottom of the circuit board is presumably where the control electronics live. It’s probably a bare IC bonded to the board, covered in potting, but I don’t feel like digging that far in to find out. The coating is quite hard.

With the red lens cover off, the LED arrangement is clear. Five of them, soldered straight to the circuit board.

Lens
The lens is just colored plastic. It’s got some blobs molded into it to help focus the LEDs (perhaps), and a bunch of ridges that help scatter the light and make the bike more visible. It actually works surprisingly well.

Circuit Board
The board comes out easily - no snaps, and just a strand of hot glue in the way. It’s well secured when the unit is assembled, but once the top and lens are off, there’s nothing holding it in. The underside of the board is dreadfully boring. It’s just the LEDs and the paddles for the battery compartment.

A closer look at the top of the board indicates it’s almost certainly hand soldered. The switches aren’t fully soldered in (this doesn’t matter a bit), and the solder joints are adequate, but not amazing. They’re kind of inconsistent, and a little blobby, but they all work, which is the important part.
And, really, that you can get this at all for $5, shipped, is properly impressive. I don’t think I’d be willing to do just the soldering on this for $5, much less whatever few pennies someone is getting paid to do it. China has certainly optimized for low cost of production.

The Laser Emitters
You’re not reading this post because you care about yet another cheap LED based bike light. You’re interested in the lasers. And, really, that’s why I bought these anyway.
The laser emitters are wedged into small tubes, and the plastic is melted to hold them in position with some sort of hot blade. However, given how easily they came out once I removed the hot glue, this wasn’t enough, so a blob of hot glue is present on both sides. The hot glue holds them quite securely.

Lasers on! You can see the rings from interference patterns coming out the back of the right laser (the left one is aimed differently). I’m quite surprised by how much light comes out the back - I’d have expected them to focus more light forward.

The laser emitters come out easily after the hot glue is removed. If at first you don’t succeed in making something stay put, add hot glue. Or duct tape. Hot glue is cheaper.
This is what the laser emitter looks like. A small board on the left, a tube in the center, and a lens on the right.

Looking into the end of the emitter, there’s some sort of spreading lens.

This lens pops off with a bit of a twist. It’s just a cheap plastic lens to spread the laser into a line.

With the plastic lenses off, it’s just a bog standard laser emitter of the kind found in every $20 cat toy.
You might notice the top spot appears a bit dimmer. I… I might have been messing around with voltage a bit before I took this set of photos, and I might have damaged one of the laser emitters. Just a bit.

Ok, more than a bit. I definitely damaged one of them at 4.5v. However, the laser emitters do send a perfectly good beam across the room. They’re proper little lasers, and for $5, this is a lot of potential cat, ferret, or small child entertainment!

Pulling the circuit board out of the tube, there’s some sort of lens in there that turns the emitted light into a beam. I really don’t know much about laser diode optics, but they apparently need a “collimating lens,” and I’m pretty confident that’s exactly what this is.
Whatever it is, it works.

Here’s the emitter, freed from it’s tube.

And here’s what the output looks like without the collimating lens in place. The top spot still has the lens, obviously. I’m no expert, but I’d say that bottom emitter definitely needs collimating!

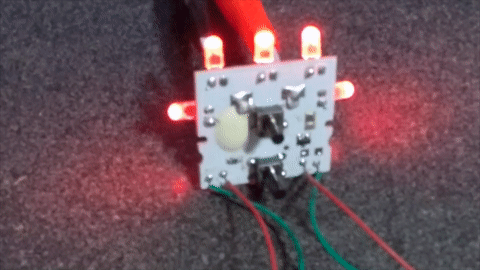
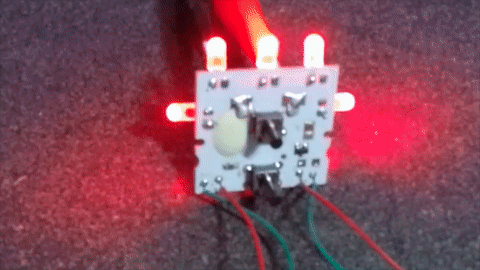
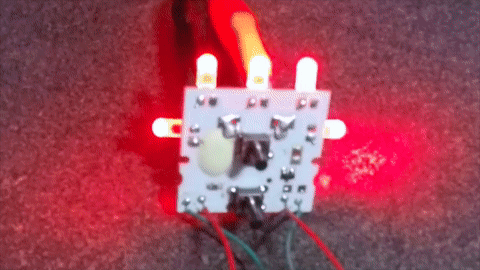
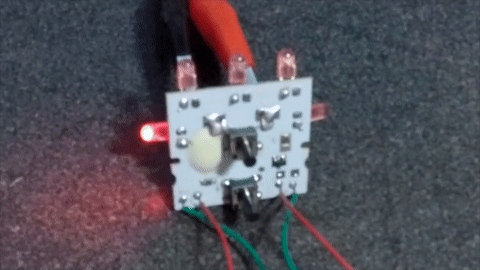
LED Flash Patterns
With the board freed from the case, I hooked it up to my power supply for some testing, fed it three volts, and took some video. Then, because Flash video is annoying, I converted things down to GIF loops. Hopefully this works well. Patterns are shown in order (at least on my unit) - press the “LED” button to step through them.
I am aware the video is a bit blurry. Close range work with a fixed focus lens does that.

Pattern #1: Solid
The LEDs are all on, more or less solidly.
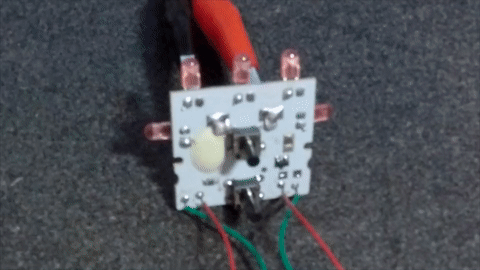
Pattern #2: Rapid Flashing
All the LEDs flash together, quite rapidly.
Pattern #3: Slow Flash
All the LEDs flash together, about twice a second.
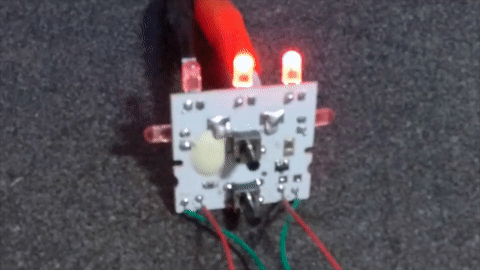
Pattern #4: “Move Left”
With the board installed in the unit, mounted upright on the bike, the LEDs sweep left. This actually seems to work fairly well, visually.
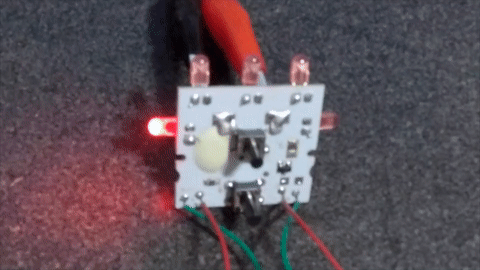
Pattern #5: “Move Right”
This is the reverse of the above, perhaps useful if you ride on the left side of the road instead of the right side.
Pattern #6: Sparkle
This is just a rapid pulsing of individual LEDs (there’s some pattern to it, but I didn’t feel like pulling out the high speed modes to figure it out). It’s a sparkle or dazzle effect, and is incredibly visible.
Pattern #7: “Knight Rider”
Yes. I’m dating myself. So be it. The pattern bounces back and forth, as shown below.
Voltage Tolerance
In the past, I’ve played around with voltage tolerance on some other lights as well. That light wasn’t particularly tolerant of higher voltages, so I built a DC-DC converter to give it the proper voltage. Of course, I wanted to try it on this light, which is radically cheaper.
The board has nothing that even faintly resembles a voltage or current regulator on it. I wasn’t particularly optimistic, so I tried anyway.
It turns out, as would be expected, that this unit is incredibly intolerant of higher voltages. It’s designed to run on about 2.5-3v, and you should run it on 2.5-3v. Below about 2v, the LEDs dim and drop out. Above about 4.5v, the laser emitters start failing. The LEDs are really bright, though!
The below clip is a sweep from about 1.5v to 5v and back down. The LEDs are being overdriven at the peak. They never get the ugly “aggressively overdriven” hellish glow about them, but they’re very bright.
Failure Voltages
Why test higher voltages if you’re not going to test to failure?
The laser diodes take damage starting around 4-4.5v, and die fully around 5v.
Amazingly, the rest of the board continued operating until 8v, when something popped and the LEDs went dark for the last time. I don’t think it would have operated very long at 8v, but the core LED board seems quite robust.
After running increased voltage through the now-dead board, the component below the epoxy blob got rather hot, smoked, and finally gave up the ghost fully at around 25v.
Seriously, don’t feed this thing much over 3v. It just won’t take it. It’s not designed for it. That said, it has enough safety factor built in that it should be quite reliable - at least the LEDs. Maybe not the lasers. Feel free to run it on either alkaline or NiMH AAA batteries.

Actual Photos of the LEDs
With the unit assembled and the lens on, the whole lens glows brightly. There’s a good amount of lit surface area for people to see, and it’s lit up over a rather wide angle - it’s not tightly focused like some bike tail lights.
The light isn’t blindingly bright, but it’s really quite sufficient to use as a single tail light (though I’d recommend backups, just because… $5). You can buy two and swap them if one fails.

Actual Photos of the Lasers
You scrolled here first, didn’t you? Just to see if I’d actually taken photos of the lasers.
The lasers are surprisingly bright. This is a slightly dim indoor environment, and the beams are clearly visible with the unit at waist height.

Outside, well… that depends on the exposure time, doesn’t it?
This is a 10 second tripod exposure on a fairly dark, wet night with a GoPro Hero 4. This is the type of thing you’ll see in the advertisements for the units, and the bulk of them are actual photos, near as I can tell. I think they’re just a very long exposure in a fairly dark area. The main light is on solid for this shot.

But, this isn’t what it actually looks like to a human outside. A 2s exposure gets the distant street light closer to correct for a somewhat night adjusted human eye, and gives a better idea of what they actually look like.

They’re brighter than I thought they’d be.
Are they going to make someone see you when they otherwise wouldn’t? No. But will it give someone on a darker stretch of road a better idea of where you are? Yes, I think they will. At the very worst, the LEDs are pretty spiffy for $5.
Conclusions
I purchased a few of these things thinking they’d be total junk, and worth a few laughs to tear apart. They’re $5. How good could they be? I mean, I ordered a few partly because I figured there was a good chance one wouldn’t even work properly.
But they’re not junk! They actually do what they claim, they’re cheap, and they seem to be perfectly adequately designed for what they’re doing. Did I mention they’re $5? That alone makes them worth it as a tail light, even without the laser feature (which is genuinely cool, though I don’t know how useful it actually is).
I’d wholeheartedly suggest picking one of these bike lights up if you need a spare tail light, or another tail light, or just want to casually drop the phrase, “Yeah, my bike has a laser light.”
They’re certainly not as nice as some other lights on the market - they don’t compete with a $70 USB chargeable Proper Bike Light in terms of light or quality. But in terms of “bike light value for your dollar,” I think these are really, really hard to beat. Five dollars. I’m putting them on my bikes. Are you?
Comments
Comments are handled on my Discourse forum - you'll need to create an account there to post comments.If you've found this post useful, insightful, or informative, why not support me on Ko-fi? And if you'd like to be notified of new posts (I post every two weeks), you can follow my blog via email! Of course, if you like RSS, I support that too.


