
Winter is coming. This means dark evening commutes, and a lot of biking in the rain. And that, of course, means I built this!

What is it? Two DC-DC converters, waterproofed with hot glue, to power my winter lights. Interested? Read on!
While my summer commuting lighting needs were handled just fine with the Cycle Lumenator and a BikeBlaze 1W strobe in the front, winter needs more. Wet roads seriously suck up the light, and pitch black trails need long distance illumination. I’ve got two additional lights mounted for winter and rain.
One is a “Cree 2000 lumen” light (not 2000 lumens, but it has a nice tight beam for long range illumination). I reviewed this one a while ago.

The other is a “3x Cree 2000 lumen” light (maybe 2000 lumens, total, but it’s a nice ditch light).

They both came with external battery packs. They’re not actually very good external battery packs (2P2S 18650s, and used batteries at that), so I had to charge them regularly. I could get a few days on the small light from a charge, but only about one day for the 3x LED light.
Carrying and charging small battery packs when I have a huge 500WH pack on the back of my commuter bike is annoying. So, I set out to build myself a nice voltage adapter before winter so I could run the lights off the main traction pack!
Adapter Design
At the start of the project, my light wiring consisted of a power cable run from the battery pack to the handlebars with pack voltage and a 5.5x2.1mm barrel plug. This went straight into my Lumenator (since it works on pack voltage).
These extra lights aren’t nearly so easy. As I discovered when reviewing the 2000 lumen one, they’re not very flexible about input voltage. Which is to say, they start smoking around 12v. Putting a 40v pack straight into them without voltage conversion is not an option (while failure is always an option, I prefer my LED headlights working and not smoking). As they top out at 8.4v, a steady voltage of 8.0v seemed about right.
I set out to power everything from the one cable running forward. This means a pack voltage feed into my Lumenator, and around 8v into both winter lights. This calls for a Y cable and some voltage converters!
The more difficult part is the voltage conversion. There are a lot of expensive DC-DC converters out there, and a lot of very, very cheap ones. Of course, for one of my DIY projects, I went with the cheap ones. I suffer a bit of a loss in efficiency, but my main pack has radically more power than I need for my commute, and “cheap is good” seems a decent first approach for something that might not even work. Also, I wasn’t interested in an expensive converter that cost more than the lights did. I’m only powering $50 of lights here…
For “power-per-converter” reasons, I opted to use two converters - one for each light. I probably could have gotten away with one, but it would have been pushing close to the power limit of the converters I ordered, and I’m rather uncomfortable pushing cheap Chinese devices beyond about 50% of “rated capacity” anyway. They tend to blow up when you do that.
So. That’s my plan! A Y cable and some DC-DC converters. Oh, and whatever I build has to be weatherproof, because I do commute year round in the rain. Yeah. It sucks, but it still beats driving…
Before I continue, here’s the various parts on a dollar bill so you’ve got an idea of the scale. The 18650 is not actually used - just a reference for people in other countries!

Barrel Plugs and Y Cables
I picked up a bunch of cheap barrel plugs on eBay. The plastic shroud screws off, and lets you get at the contacts inside. You solder your wires to these. By convention, the center pin is positive, and the exterior barrel is negative. I followed this.

After putting the wires in, you screw the plastic barrel back on, and you have a completed barrel plug!

Several more solder joints later, a bit of electrical tape, and I’ve got a Y cable. Perfect! Actually, not, but I’ll get to that later.

Avoiding Spectacular Failures
One thing I strive to avoid in my commuter ebike is spectacular failures. I’m not a fan of the Endless Sphere style builds in which failure is seemingly the goal, battery fires are just one of those things you deal with (like flat tires, and chain wear), and doing 60mph on a cheap build while trailing smoke and flames seems to be some sort of ideal. I’ve got a kid. And I don’t like parts failures. I especially don’t like failures while commuting back and forth to work, which is the whole point of my bike.
Let’s take a quick look at the barrel plug as soldered. Pay close attention to the metal spikes that should wrap around the black wire. They’re a bit of vibration away from punching through the red wire when crammed together - and that would be a short circuit. Short circuits are bad (unless you’r Johnny 5 and happen to be alive). So I fixed it.

The first step is to do what you’re supposed to do, with these and flatten the prongs down. This is an improvement, and should be fine in most reasonably static conditions.

However, Seattle commuting is not most conditions. It’s very wet, and my particular path to work has a lot of vibration. So, to help prevent vibration damage as well as to waterproof the back end of the connector, I added hot glue. It prevents the wires from moving relative to each other, and is also a good insulator, so this should work nicely, even in the wet.
All of the barrel plugs were given this treatment. Note that you don’t need much hot glue - too much, and the plastic protector won’t go over the plug.

Wiring the DC-DC Converters
I cannot say enough good things about having a decent, temperature controlled soldering station. It makes this work so much easier!
I’m using two DC-DC converters for this project - one for each light. They’re sharing a connection to the pack voltage (it’s well below 1A of my pack voltage for both, so not a problem). I want to be able to run both lights at full brightness if I want to, and the 2A output from a single converter is not enough (especially when applying my Standard Chinese Electronics derating of 50%).
Soldering the leads onto the ends of the converters is straightforward.

A few more connections, and I’ve got the electrical bits finished. The left side is pack voltage, and the right side is headlight voltage. Perfect! Though… not very waterproof. And not at all insulated.

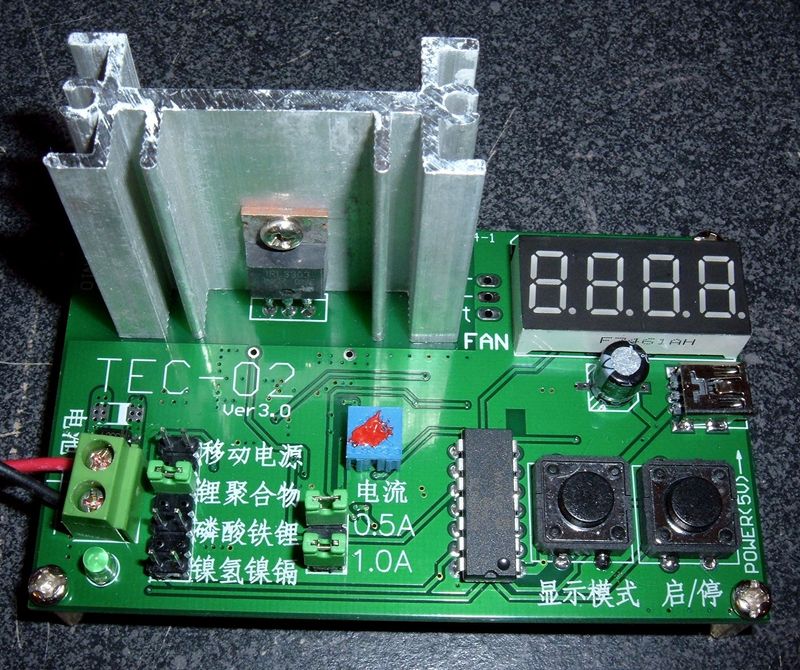
A bit of testing later, and I’m set! I adjusted the units to right around 8v output with a full pack. This is within the comfortable working range of the headlights. If it’s not obvious, you adjust the output voltage with the little screw on top of the blue gizmo. It takes a lot of turns!
Recall that I don’t like short circuits. I’m about to do something that could lead to short circuits if I’m not careful…
Waterproofing the DC-DC Converters
The easy way to mount these boards is back to back. Unfortunately, if I do this, both the input and the output sides are “positive to negative” when referenced between the two boards. Now, I’m no Electrical Engineer, but I am a Computer Engineer. And, I can assure you, that’s Bad. Short circuit, smoke, flames, the works. So, I need to keep those terminals from touching - ever.

My first attempt at this involved wrapping electrical tape around the boards, with one side open. After I got the spacing right, I filled the space between the boards with hot glue. In addition to keeping them in place, it’s slightly flexible so vibration shouldn’t be a problem, and it insulates.
I’d considered a number of options. The best approach would be some sort of potting compound. Another option would be epoxy, but most epoxies cure very brittle, and that plus expansion from thermal loads while operating is a good way to either crack the epoxy or rip parts off the board.
Hot glue has a few useful qualities. It’s an insulator. It dries slightly soft, so thermal expansion isn’t a problem. It’s also very, very cheap. And, as I use it for my various pack rebuilds, I have a lot of it around.
Amazingly, it worked. This approach to bonding boards together actually worked successfully the first time! The fill wasn’t perfect, as you can see in the photos below, but it was good enough to hold them at the proper distance. Fortunately, fixing gaps in hot glue is as easy as squirting more hot glue in, so I cleaned this up later.


The next step is to waterproof the electrical side of the boards. Electrical tape worked once, so maybe it will work again?
I built a dam around the first board with electrical tape - something like this.

After finishing the dam, I started filled it with hot glue, and kept filling until it was above all the parts. Then, it’s just a matter of twiddling my thumbs for a while while it sets up.


After the glue fully set, I pulled the tape off. It’s not perfect, but it’s actually a lot better than I was expecting! The sides didn’t get quite filled in, but everything else looks quite well protected.
Electrical tape leaves an interesting texture on the hot glue. I kind of like it.


A little bit of touch up with with the hot glue gun (to fix those exposed areas), and one unit is good to go.


The other side was the same process. After I got the bulk of it covered, I went around and filled in all the gaps, ensured the boards were fully waterproofed, and ensured the wires were coated with hot glue out to the insulation. I don’t ride in torrential downpours, but my bike does get wet regularly.
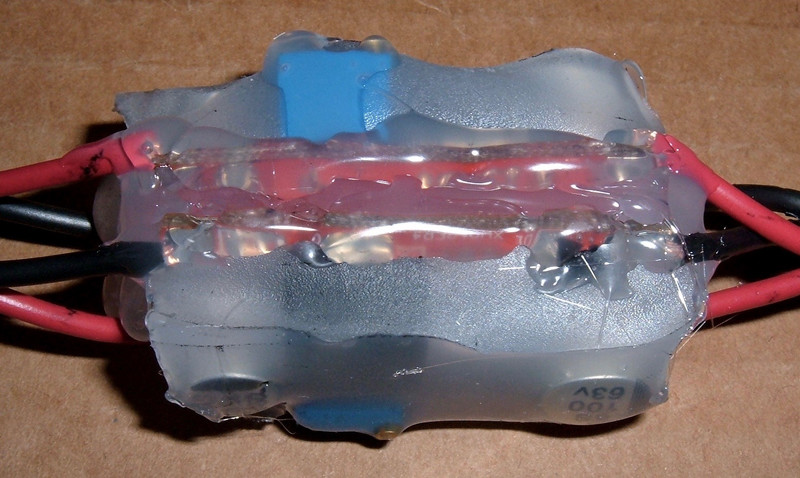
It’s not the prettiest thing I’ve ever built. It’s actually tremendously ugly. But, it’s cheap, and it works! And now I have pack powered lights!

This is the final result. A Y cable, and a colorful blob of hot glue with connectors coming out of it.

Mounting and Testing
After playing around with it, I found a good spot on the top of my bar clamp. This has several important advantages:
- It’s up in the cooling airflow. I’m not sure how much power it will dissipate, but it gets the best shot at staying cool up here.
- I can see if it’s melting, shorting, or otherwise misbehaving, ideally before it bursts into flame. If it does catch fire, I’ll be very aware of this fact in a hurry.
- It should deter anyone who was considering stealing my bike. If I’m the type of guy who zipties this up front and center, what’s the rest of the bike like?
The hot glue should protect it from vibration and water, and it’s fairly well secured with the zip tie.

And, the worst possible type of “LOOK AT MY NEW LIGHTS!!!” photo: A head on shot of them, blinding the camera! Yes. They’re all running off the pack, with the exception of the BikeBlaze, which is my strobe and “Aw, I ran the pack flat…” light.

How does it work?
Well, quite nicely, now. Initially, I had problems with my Lumenator. My barrel plugs aren’t long enough to fully seat in the Lumenator, so it kept cutting out. I gave up in the face of pending winter, and ordered a Y cable from Grin directly. This replaced my Y cable, and with that addition, everything works wonderfully! There’s a 2-3mm length difference between my connectors and the Grin connector, and this makes a huge difference.
The huge blob of hot glue will get a little warm to the touch if I run the lights at max brightness for my full commute, but I don’t generally do this, so I should be fine at my normal power settings. Most of the use will be when it’s cold and rainy anyway, so heat isn’t a big problem.
As for lighting? It’s excellent. With the aux lights on dim, I have a great beam pattern in front of me from the three lights, and can easily see where I’m going in the dark. It’s exactly what I was hoping for (though I knew the lights could do it from playing with the battery packs last winter).
So far? No problems at all!
Cost
How much did this thing cost?
2x DC-DC Converter 4.5-60V LM2596HV Adjustable Step-Down Buck Converter @ $1.86/ea: $3.72
4x DC Power 5.5x2.1mm Male Female Plug Jack Connector Cable Socket CCTV M70 @ 5.99/10: $2.40
Assorted wire, hot glue, etc: $2
Total cost: $8.12
… plus a $9 Y cable with the proper ends, and shipping. *grumbles* So about $35.
Conclusion
So far, so good! I’m happy with this after a few weeks, and it’s working wonderfully in the evenings.
I can’t say I’d build this for someone else, but if you’re looking for a cheap way to power cheap lights from your pack, this route absolutely works wonderfully! Just check your barrel plug length…
Comments
Comments are handled on my Discourse forum - you'll need to create an account there to post comments.If you've found this post useful, insightful, or informative, why not support me on Ko-fi? And if you'd like to be notified of new posts (I post every two weeks), you can follow my blog via email! Of course, if you like RSS, I support that too.


