
Syonyk’s Solar Shed (really, any shed) needs a good foundation. Normally, Tuff-Shed will accept a surface that’s within 4” of level, build it to the proper height with blocks as they’re assembling the base, and call it good. However, because I got mine as a full unit, they can’t do that - I needed to provide a level base.
So, I set out to do this. It also had to be quick, because I purchased the shed on a Tuesday, and it was being delivered Friday morning.
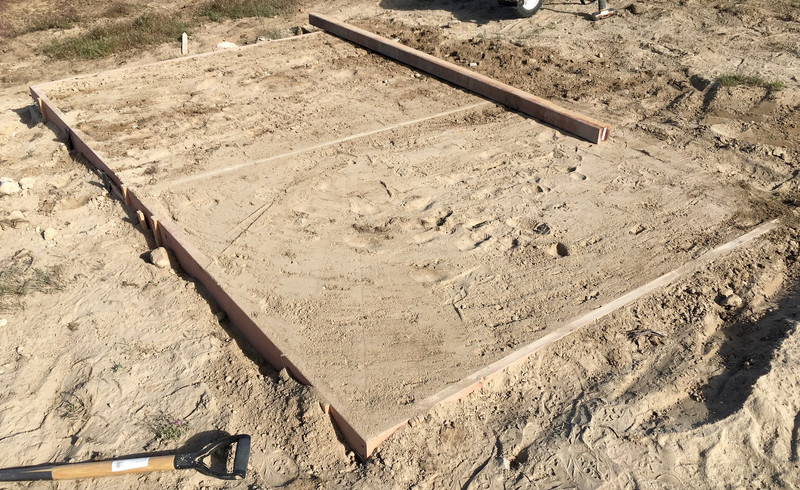
Which is to say, I turned a bare patch of earth into something like this. In a hurry!

If you have no idea why I’m doing this, I suggest you read last week’s post first.
Read on for details and an awful lot of manual earth moving.
The Site
My office site is along one edge of my property, and the area I chose had a slight slope to it. Nothing terrible, but certainly not level. Time to start leveling things…
I started out with this spare 4x4 I had laying around and a level, then played around to find the best area that would require the least work. A major goal was to find an area that would allow me to move as little dirt as possible, both because I’m lazy, and because undisturbed dirt is a harder surface for the shed to sit on.

The FramE
Why does it have a capital E at the end? It’s an E frame!
When I have to level a surface, I like to build frames to work from. They worked nicely for my cinderblock stairs, and so I built one for this site as well.
This is an 8’x12’ redwood frame, additionally strengthened by angle brackets on the corners.
I’ll bury the frame at the high corner, lift it up at the low corner, and use it as a guide to shoving dirt around. The frame isn’t actually going to be supporting the shed - just helping me move dirt around and serve as a level reference point.

Digging!
Since I moved, I’ve spent a lot of time digging. This foundation is no exception. There’s a lot of digging involved, done by hand. Sharpen your shovels if you have to dig, and it’s a lot easier!
I dug a deep trench for the high side, and used the level to figure out where I had to dig or fill next to get things close to level. The cinderblock is holding the high corner down so I can set the frame as low as possible. The less dirt I have to move, the better!
I’ve driven one stake in so far - you can see it at the bottom of the picture.
How do you drive wooden stakes into the ground? An 8lb sledgehammer works nicely. It’s a good day when I’m working in the sun, digging with high quality shovels, and swinging sledgehammers to the rhythm of something or other from Dropkick Murphys.

Jurassic Generator
One of the problems with an off grid site is that it’s also an off grid construction zone. Seems obvious, right?
I didn’t think this one through very well. My little 300W inverter wanted no part of running my drill, and I don’t have a cordless drill.
So, I borrowed a generator from a neighbor. You may have heard about the fancy new inverter generators that are nearly silent when running at a light load, or the expensive generators that have fuel injection and high end mufflers.
This generator is quite literally none of those things. It’s an ancient carbureted generator. It leaks oil when it’s running, and also when it’s sitting. You have to fiddle with the mixture screw once it’s warm because it won’t cold start with a proper running mixture, and it hunts and surges badly once warmed up with the starting mixture.
The muffler is the perforated thing hanging straight off the cylinder. It may, at one point, have contained some variety of muffling material. When I used it? There was no muffling to be had at all. This thing is LOUD. And it runs at 3600 RPM. Loaded or unloaded.
Not only will it wake the dead, it will piss them off in the process. It’s very much an “earplug tool” - which I’ve used a lot of lately, now that I think about it.
That said: It works just fine. It’s a 4400W generator, which is more than enough to run a drill. I did shut it off when I wasn’t actively using it.

Staking the Frame
To hold the frame level and in place while I filled it with dirt, I drove wooden garden stakes into the ground, then screwed the frame to them.
Stakes are cheap. Screws are fairly cheap. So I used a lot of both.

To reduce the amount of filling needed under the high corner, I dug a cinder block in and rested the frame on it. A small stack of these laying around is often useful, and I’d encourage anyone doing construction work to have a few. They’re dirt cheap, and come in handy quite regularly.

Leveling the Dirt
Once I secured the frame with stakes, it’s (yet again) Dirt Moving Time! I spend a lot of my life lately moving dirt…
The process, on paper, is simple. Remove dirt from the high points and put it in the low points.
In reality, there’s a lot of dirt to move, and not enough in the frames - so plenty has to come in from outside. I picked a blend of dirt and rock as fill, since it needs to take a load, but leveling rock is harder. I’m using the 4x4 as a reference, sliding it between the frame rails. Did you wonder why I put a center 2x6 in? This is why!

Not shown here is the process of packing the dirt in. Lots of time with a sledgehammer and what I call “The Persuader” (an old Chevy truck axle), pounding on dirt to compact it and force it down into the corners.

A lot of earth moved later, and I’ve got something that’s remarkably close to level!
Gravel and Tailgates
The final layer on top of the dirt is an inch or so of gravel. I borrowed gravel from a local gravel pile the owner wanted gone, and used an old coal shovel to pile gravel into my truck.
Shoveling gravel with a coal shovel is very loud! Yet another earplug task. The stuff is heavy. People pay money to go move random stuff around with CrossFit - can I get them to pay me instead?

Unloading the first batch of gravel was easy - 10 minutes with a shovel, slinging the gravel all over the leveled ground.
The problem showed up after I finished unloading the first batch and tried to close my tailgate. It simply would not latch.
A bit of investigation indicated the problem. In the process of unloading gravel, I had managed to pack both tailgate latches quite full of gravel.
After about 15 minutes of fiddling with trying to clear the mess with my fingers, I finally gave up, and grabbed some flathead screwdrivers. Another 10 minutes or so, and I had the gravel out.
I removed the tailgate before unloading subsequent loads…
By the time I was done, it was getting dark, I was entirely pissed off, and I completely forgot to take pictures of the leveled site with gravel.
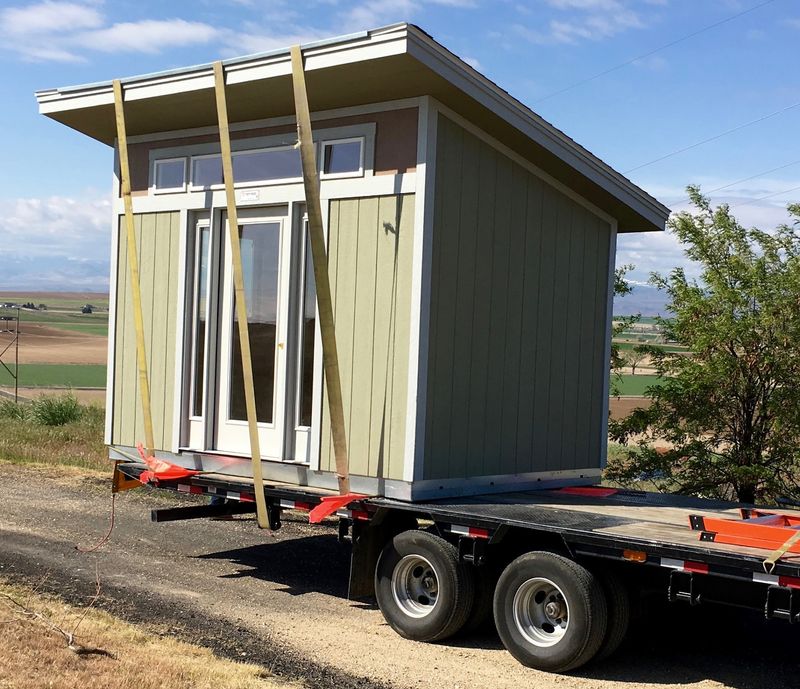
So you’ll just have to check in next week when the shed shows up to see the final result.
And how, exactly, does a 12x8 shed arrive assembled and get plopped on a foundation? You’ll have to check in next week to see!
Comments
Comments are handled on my Discourse forum - you'll need to create an account there to post comments.If you've found this post useful, insightful, or informative, why not support me on Ko-fi? And if you'd like to be notified of new posts (I post every two weeks), you can follow my blog via email! Of course, if you like RSS, I support that too.


