
Life update: A few weeks back, I bought a house. I’m not in Seattle anymore, and this blog may take a slight turn for the rural.
The house wasn’t quite finished. It still needed a few things before I could move in. Minor stuff - hooking up the well (lots of trenching), filling in the trench (lots of labor), putting numbers on the house (drilling holes in the wall), etc. I’ve learned a ton in the past few weeks.
One of the many things I had to do to get our house ready for the occupancy inspection was to add stairs. There are two ways of doing most things like this: Paying someone, or doing it yourself.
So, of course, I did it myself!
I had a set of standards for landing size, step rise, step run, and the like. They’re a good idea, unless you want the inspector to fail you for them - and I’ve heard if they’re having a bad day, they will pull out tape measures.
In any case, the end results include a small set of stairs weighing in at around 1500 lbs of materials, and a large set coming in at somewhere around 2500 lbs. They look more or less exactly like this!


If you’re interested in how I built these massive structures, read on!
The following is a report of the method I used to create my rather heavy temporary stairs for my house. I’m not a mechanical engineer, construction guy, building code guy, or anything else that would make this something you want to follow, and I’m sure I could change some things around if I were to do it again.
That warning aside: It passed inspection, and it was quite simple to build. Labor intensive, and a lot of heavy lifting, but quite straightforward.
Parts Run
It started, like all good construction projects, with a parts run.
This particular parts run involved 100 or so full size cinderblocks, a whole bunch (but not enough) sand, and some lumber to frame things in.
I figured that I needed about 90 cinderblocks, but I got more, because spares are cheaper than having to make another run. Also, cinderblocks are just plain useful.
The pallet of cinderblocks was too high for my topper, so a couple loaders and I frantically unloaded the top two rows into the front of the bed (which is to say, they put them on the tailgate and I put them in the front).
What’s this all weigh? About 3000 lbs - a ton and a half. Or about 62% of a Model S. Give or take a few hundred pounds. The truck rode smooth…

It wasn’t enough, though. I had to go back later for slightly over 1000 lbs more sand.
Getting Ready to Dig: Shovel Sharpening
Before I started digging, I took the time to sharpen my shovel. The shovel came with a very square edge, which, oddly enough, isn’t well suited to cutting through dirt or roots. I mean, it’ll work, but it’s not going to be as good as a sharpened one.
An hour or two with a set of files and I had a nice 45 degree edge on my shovel. It was an awful lot of work - this is easily a two beer job for a new shovel. But, it looked great, and more importantly, it dug great. It also cuts through tree roots like, well, a sharpened shovel through tree roots!
Even after quite a bit of digging (three sets of stairs, filling a trench, and a bunch of other stuff), the edge is still sharp. I was expecting it to dull quickly, but it’s holding up very well so far. If you haven’t sharpened your shovel, you really should!

I’m digging a hole!
Wanna help?
Step one of the stairs is to remove a bunch of dirt. And a non-trivial number of rocks. And a few very, very large rocks, of the “I can lever it out of the hole with a shovel but can’t lift it” variety.

A bunch of digging later, and I had a pretty good square hole for the base.
These stairs are “most-of-a-day” projects, at least for me, and the digging was a good chunk of this time. The hole needs to be big enough to fit the frame, and deep enough that you can build a good base of sand for the cinder blocks.


A Wooden Frame
Could one build one of these without a frame? Probably. But the frame holds the sand in, and lets you easily level things.
I built this frame out of pressure treated lumber, screwed together with deck screws.

To make sure that I didn’t screw up with the height, I used a #2 pencil to make marks on the side of the house. You’ll note that I did not fill in the bubbles completely, and I did write outside the bubbles. This isn’t school! I’m not sure this foundation will grade properly in a Scantron machine - though if one finds a way to get my foundation into the grading machine, I suspect the machine will not entirely survive the attempt.
The top mark (“2nd”) is where the top layer should sit. The lower mark is where the first set should sit - which means, where the top of the frame should sit.

I found a square garden shovel was more useful for removing the final bits of dirt to let the frame settle into place. It’s easier to dig straight down with it.

With the frame dropped in the hole and at the proper height, the next step is to make sure it’s level. Which it is. Of course, I nailed it on the first try, and definitely didn’t spend half an hour cramming dirt under corners and pounding on other corners to make it level. I’m just that good.
As proof, I offer you this photo of the level showing that everything is perfectly level!

With the frame in place and level, I backfilled around it up to the top of the frame to keep it in place while I filled it with sand.
This helps keep everything nice and stable for the following steps, which can get a bit violent.

“Go Pound Sand!”
I did. A lot. I got really, really good at pounding sand.
To successfully pound sand, one must have an implement (a “sand pounder”) suited to pounding sand.
I used an axle out of a Chevy truck of some year. The differential splines has been cut down with a torch to make something resembling a stake.
It’s metal, it’s heavy, and it has a small, mostly flat end to concentrate force.
In other words, it’s perfect for pounding sand, dirt, and frames. Not that I had to pound frames to level them. I’m just saying, hypothetically, one could use such a device for such things.
I’ve nicknamed this “The Persuader.” I suspect you could develop an aggressive full body workout around such a metal rod, though you might not want to try it as a group fitness class.

There’s a real art to pounding sand. You have to grab your sand pounding device, lift it up carefully, and slam it down into the sand exactly where you want it. Repeatedly. Music helps. Dropkick Murphys helps a lot.
I added a bag or two of sand, soaked it with water, and pounded it for a while. This gets rid of air bubbles, helps find dry patches of sand, and crams it down into the corners so there are no voids.
Repeat until done. It might take a few hours.

“Done” is defined as, “The frame is still level, and full of sand.”
Once you’ve hit this point, it’s the home stretch! Actually, once you think you’ve hit this point, it’s probably at least another bag of sand and half an hour as you pound the sand down and it disappears into hyperspace or something.

To level the sand, I cut another 2x4 down, and used it like a concrete float.
The end result is a flat layer of sand, even with the frame. This is the base for the stairs, so make sure it’s smooth and level!

Building the Stairs
Finally! The fun part! Hauling 28lb cinderblocks into place!
Compared to the digging and the pounding sand, this really is a lot of fun. Something happens quickly, instead of over hours. And moving half a ton of cinderblocks is actually easier than endlessly pounding sand.

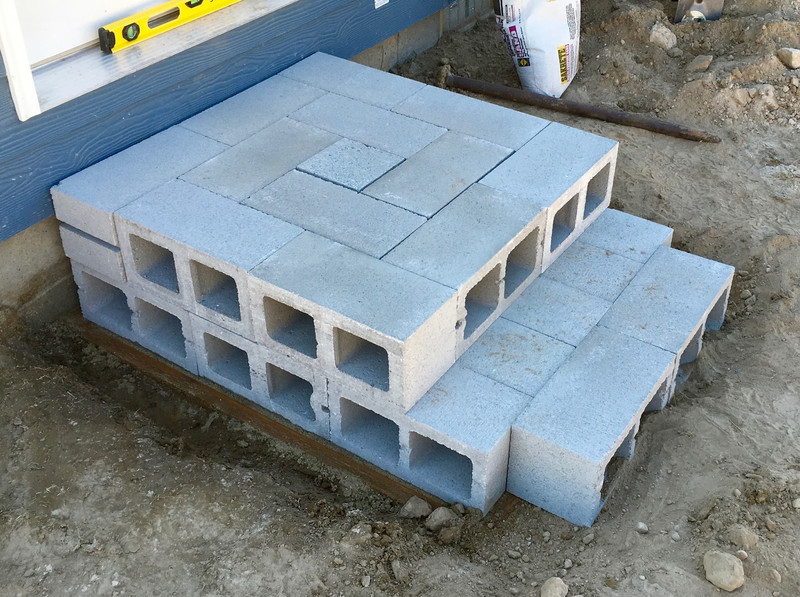
The first layer. It’s just simple place and pound (to make sure it’s seated). I just stomped on each one after putting it in place to level it.

And the second layer! With a fancy spiral pattern. Why? Because I could. And because I think it looks neat.

Ah. Yes. Well, no project is perfect on the first try. At this point, I figured out that I miscalculated the size by a row. Because there’s only 8” of step run on the first step, and I need 10” of run. And everyone knows what size cinder blocks are.
So, a bit of digging, use two of my spare cinderblocks, and problem solved!
After this, I just backfilled around the sides, and called it good!
Another set of stairs: Big Brother
That was the small set of stairs. Practice, if you will. It’s big brother is waiting at nearly twice the width.
Fortunately, I still have a large pile of cinderblocks!
Yes, I unloaded these all from my truck. By hand. Crossfit has nothing on “I need stairs so I can move in.”
Also, moving a ton and a half of cinderblocks repeatedly is really hard on gloves.

The major differences for this set are the size, the use of redwood lumber instead of pressure treated lumber, and the fact that I double checked my measurements to make sure I had the proper runs on both layers.
I also learned my lesson and didn’t dig as deeply. You don’t need to pretend you’re building a dwarven city here - doing that just requires more sand. A shallower hole works fine!

The building process is exactly the same, but more. Dump sand, wet sand, pound sand, repeat. You can see some of the empty bags on the far side.

Oh, and it uses more cinderblocks. Quite a few more cinderblocks.

Did you know that cinderblocks are not exactly half as wide as they are long? I learned this!
The left side is perfectly lined up.

The right side? Um. Huh. Well. About those measurements…

I fixed it, though. I just split the difference. And then put the top layer on, slightly offset to cover the gaps.
To help keep everything in place and from shifting around, I dumped a bit of sand down the gaps as well.

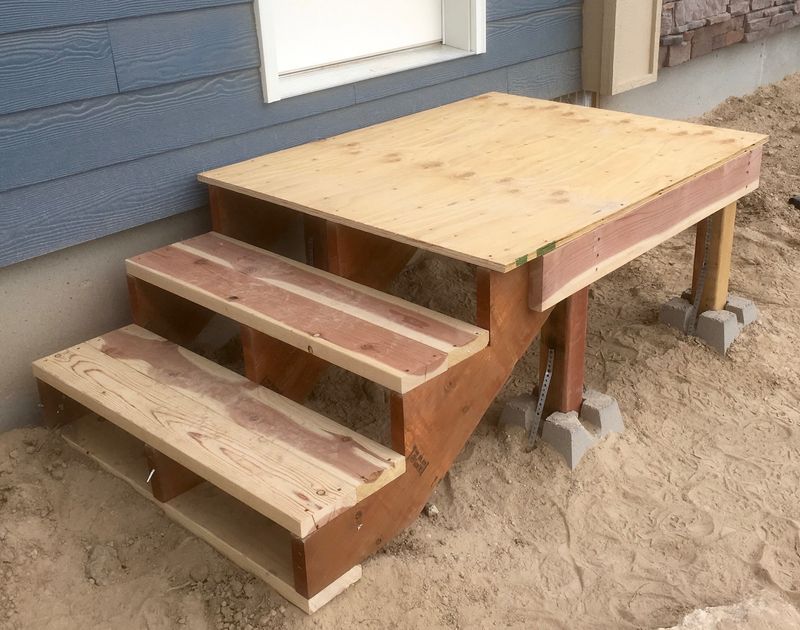
Final Thoughts
I’m very happy with how these stairs turned out. They passed inspection (that was the important part), they’re solid, and they look at least somewhat decent!
It took me about a full day per set, and it was a pretty solid day’s work - there wasn’t much head scratching, just a lot of digging and sand pounding.
They’re not the cheapest things to build - build cost was a few hundred dollars each. But they aren’t going anywhere until I take them apart, and they meet the letter and the spirit of the building code for stairs. Plus, I’m sure it’s a lot cheaper than paying someone to build me a few sets.
Next week, I’ll talk about a different set of stairs for the other side of the house - I got fancy and built them with lumber!
Have you done something similar? Let me know below!
Comments
Comments are handled on my Discourse forum - you'll need to create an account there to post comments.If you've found this post useful, insightful, or informative, why not support me on Ko-fi? And if you'd like to be notified of new posts (I post every two weeks), you can follow my blog via email! Of course, if you like RSS, I support that too.


