
After the last post, I had the deck framing done - and so this post, logically enough, covers the process of installing all the Trex. Hopefully, if you’re considering a deck, there’s something useful in here for you, too!

I had hoped I’d be able to get through this process a lot faster than I actually did… it took a month worth of weekends to get it done, having started with most of a week off to get it all started. But it’s done, usable, and still waiting on the rest of the project work for it!
Trex Decking and Hidden Fasteners
I’ve waffled back and forth on decking over the years, but I’ve been convinced by various people that the right answer for a deck, especially if you’re doing it yourself, is Trex. The older stuff had some problems with high UV environments (which I absolutely am), but the newer stuff is better encapsulated and, at least in theory, holds up far better. You can see the hard plastic shell around the core inner recycled plastic layer. Time will tell…

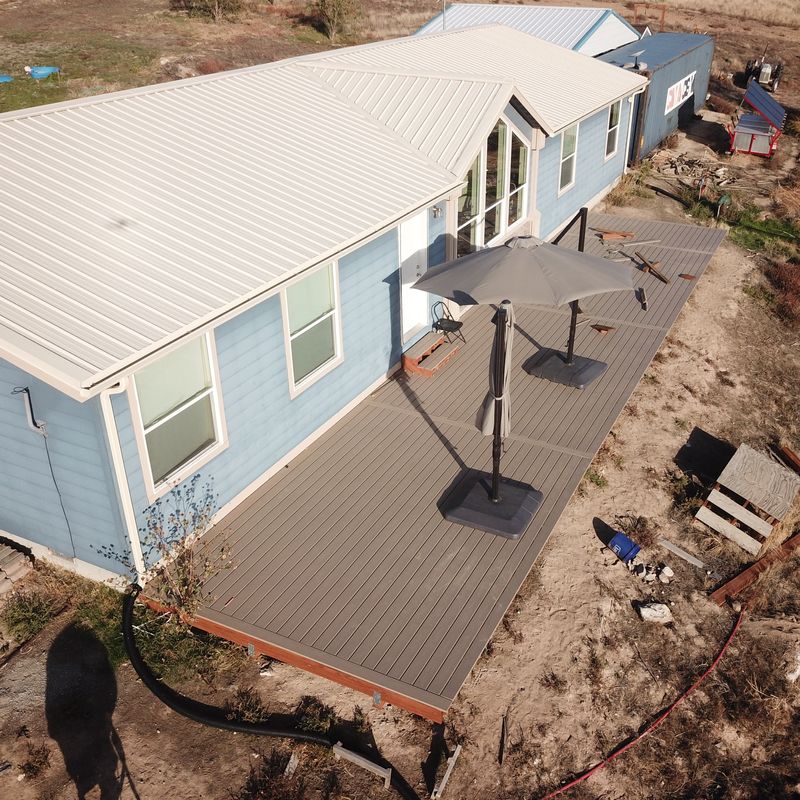
There are a few variants of Trex. Some are thinner and use less material, some are thicker. I got the high end thick stuff, under the logic that I’m saving enough money doing the work myself that I may as well put the money into materials. Also, I plan to put a hot tub on here, and I plan to have reasonably large gatherings. The deck is a third the size of our interior space, and it’s very much intended for “expanding in person gatherings outside.” Once I get the railings up, I’ll add some misters and some shade canopies and generally do as much as I can to make the space useful all year round.
I’m putting the deck together with the hidden fasteners. These are buried down between the boards, and serve to hold the deck down without a lot of visible screws poking through the top. There are other ways to do it as well, involving screws and plugs, but this seemed worth trying - and, it allows the deck to expand and contract a bit with the heat. Trex is rather more thermally expansive than wood.

From the end, this is what one of the hidden fasteners looks like. You can see that it serves to hold the boards down, but it also has the tabs on the end to handle the spacing between them. This is one of the perks of them - they automatically space the boards if you’re using them, consistently and evenly down the length. Be careful with them near the ends of the boards, though - the decking core is a bit closer to particleboard than you might assume, and it’s not too hard to rip part of the bottom lip off.

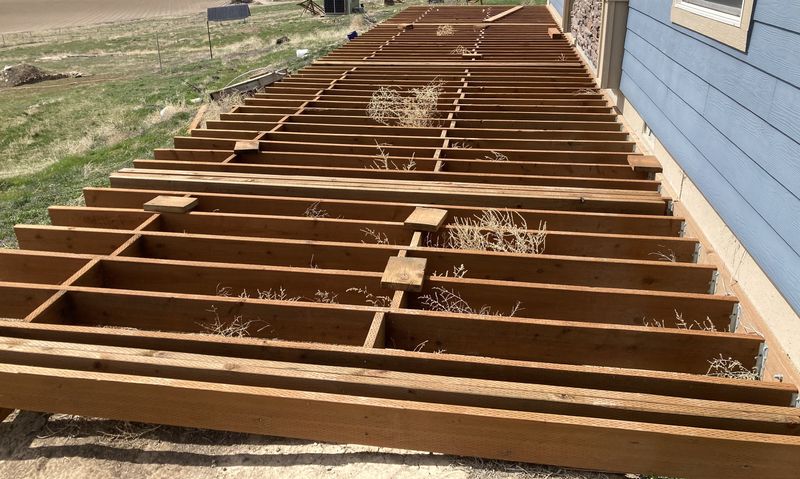
Leveling the Joists
One of the first things you’ll learn when you get a trailer full of Trex is that it’s very bendy compared to wood. For wooden decks, the joists can be reasonably far out of level with each other and the stiffness of the decking wood will just pull them into shape over time. Trex isn’t that stiff, so before any decking goes down, the joists need to be planed pretty darn level. I’ve seen suggestions of 1/4” variance, and I’ll suggest that you probably want less than that, if you can at all manage it. A low joist wlil certainly pull the decking down a bit, and it’s visible if you look from the right angles. The better you get this, the better the surface will look from a “Tour of my errors” perspective.
My tool of choice for this was a DeWalt surface planer. No need for a cordless one, plug in is fine. I bought it for this project, though if you could rent one, that might work too.

The process I used is pretty simple. I used a 6’ hunk of box tube and just went back and forth on the deck, finding the high spots. Rock it back and forth - it’ll show the high regions. I marked those with some chalk to indicate where I need to grind things down. You could also use a stringline across the whole deck, but it doesn’t matter quite as much if the entire thing is flat - just that relative sections are lined up with each other. You won’t notice a half inch variance over 10 feet, but you will notice half an inch between two joists.

Set the planer fairly shallow. If it’s running too deep, it’s a lot harder to control the cut, and it doesn’t do as good a job. Start with it shallow and adjust as needed. Once the areas are marked with chalk, spin it up, start sliding it along the joist, and drop it down. You want to feather the ends so there’s no step - just a smooth transition from the bare wood to the stuff you’ve cut down. Do this repeatedly as needed, letting your box tube guide you to something nearly level. Again, the closer you can get it, the better. Trex won’t level the joists - the joists will form the Trex.

For the blocker board framing, the key is to ensure that the two side boards on each side are level, and that the center board isn’t any higher. It can be lower - that’s no problem. But if it’s higher, you’ll have trouble getting everything to line up properly. So take your time on these. Again, it’s more important that they’re smooth across the transition from one side to the other than that everything is 100% level across the deck. You should probably hit the trimmed edges with some wood protectant after you’ve trimmed the edges, though - the pressure treating doesn’t go that deep.
Also, use metal framing. Seriously. Most of these problems go away with metal deck framing, and this project has made me wish I’d figured something like that out early on. I try to make 1/32” tolerances with pressure treated, and it just doesn’t do it.

Also, replace any joists that are just really trashed. This is one upside or downside of the process taking a while - the joists can dry and weather and you find out which hunks of pressure treated that looked perfectly fine when you installed them didn’t age right! Fortunately, they’re quick and easy to replace, and it’s well worth doing this before you put the surface on.

There exists a downside to running a planer over random pressure treated wood, though. I clearly hit some staples or something else embedded in the wood. The blade is a bit chewed up now, and probably needs replacement before any sort of quality finishing work. However, it’s totally fine for this sort of thing, so I’ll keep it around and replace the blades when I have cause to do so.

Joist Tape
One of the common questions I’ve gotten working on the deck is, “What the heck is that nasty black tape you’re applying to the joists?” It’s joist tape, and it serves an important purpose if you want a long lived deck (or so they claim). Apparently the problem people ran into with the Trex (and other synthetic) decking material is that the frame would disintegrate from rot long before the surface was having problems. This is mostly a result of water intrusion into the wood, along the nail/screw paths. The tape is designed to seal the top of the wood such that water won’t get into the grain and cause rot, improving your frame longevity. Sounds good to me!
I’m using TrexProtect, since it’s designed to work with the decking I use. It’s a thick rubbery butyl tape, and if that makes your fingers cringe from the sensation you expect, oh yeah. It’s that, and worse. It’s nasty, sticky stuff. But, that’s what it’s supposed to be.

Deploying it is far easier with two people. Have one person working in the deck laying the tape down, and the other person at the far end, simply holding a tape spool, letting it come off, and making sure it doesn’t touch anything. It will stick to anything when it touches - deck, person, pants, weeds. So try to avoid that. If you’re laying it down, just guide it into place and stick it every foot or two - it’ll get pressed into the wood as you lay the surface down, so you don’t have to do anything but make sure it’s not going to come loose before you’re finished with the decking.

Cut the end with your handy pocket knife. You’ll rapidly discover that the stuff leaves a snail snot sort of residue on your knife that builds up. When you’re done, a bit of kerosene on a paper towel does a grand job of cleaning all the nasty stuff off. Water and soap don’t really do much against it, since it’s designed to be waterproof. If you don’t have kerosene around, try something else similar, but… come on, it’s 2023, why don’t you have kerosene for your low-blue evening lanterns?
Snake, it’s a snake, ohhhhh, it’s a snake!
Badger badger badger… erm. While working on the deck, we disrupted a pretty good sized bull snake that was lurking around the house. It really didn’t want to be disrupted, but neither did I want it to get stepped on, so we chased it off. You’re welcome back to eat mice, just not while I’m working on things! I do like our snakes - we typically have some bull snakes and a few blue racers around the hill.

Blocker Boards
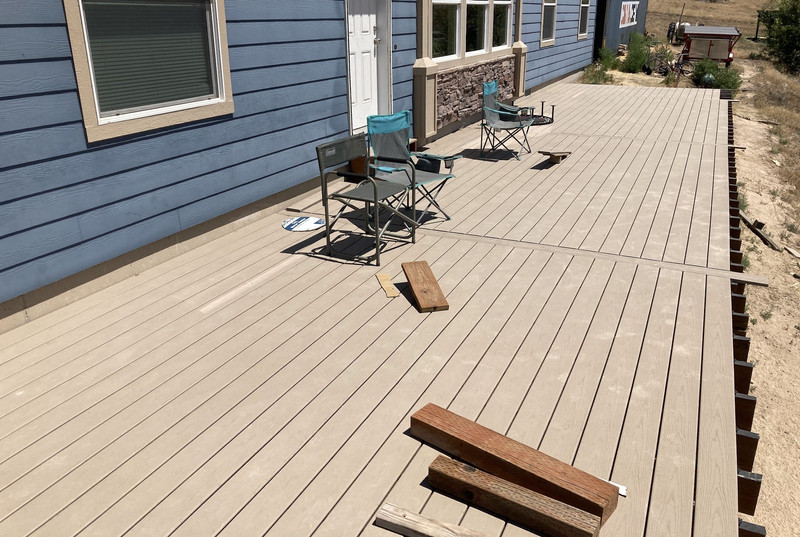
Another common question I get is, “Why do you have those perpendicular boards from the main run? Why not just run the boards end to end like most people do?” The reason for this involves the thermal expansion of Trex - which is a good bit higher than for wood. It doesn’t really swell with humidity, but it does get longer with heat. If you have butt joints on the boards with enough gap for the summer, they’ll end up very far apart in the winter as things shrink. So, the recommended design is to have these “blocker boards” for every section. It cuts the effective gap in half for each set of boards.
When installing them, the key point is having the two for each section absolutely parallel. Measure it in a bunch of spots and ensure it’s parallel. There’s more than enough flex in the boards to either align things or throw them off, so feel free to use plenty of screws to hold it in place once you’ve lined things up.

Good metal tape measures are your friend! You’ll use one quite a bit. I’ve got a nice long fiberglass one, but it’s also a tiny bit stretchy, and that’s just a good way to get erratic measurements.

Once the blockers are in for a section, cut the rest of your boards to length as accurately as you can. Once again, the big compound miter saw shows up. A friend, years ago, suggested that if I was going to get something like this, buy the biggest, baddest one I could find, put it on a nice work stand, and don’t look back. Once again, he was right. This is easily one of the most common tools I use around the hill. I did put a Trex-specific blade in, and while it makes nice cuts, I can’t actually tell the difference between those cuts and the cuts of a reasonable quality wood blade. Except that the wood blade cuts an awful lot faster. So you can probably skip the composite-decking specific blade if you want to save a few bucks. There are some differences, but I can’t tell the difference in the result.

You need to trim both ends of the board. The end from the factory is a sort of rough cut end that’s jagged, ugly, and not always exactly straight. So trim off something like a half inch from the first end to get you a good clean edge to work from. Then measure and cut. For the 16’ boards, this is a two person job - they’re too long and floppy for just the table supports, though you could probably rig something if you had to do it solo. But I borrowed some friends, and we were able to get through the boards quickly. Load, trim, slide, measure, trim, send off to be stacked.

These are not my kids working! Perks of having regular gatherings at your place (which the deck is designed to improve): You can borrow other people’s kids as hauling labor when needed! They’re just stacking the boards up on a finished section for easy access when I’m slinging them out. Two people cutting and two people hauling made quick work of each section - and, yes, the boards are a lot easier to move with two people. They’re quite heavy, and very, very floppy.

Finally: Trexing the Decking!
With all that done, one can finally start actually attaching the decking!
Start out by throwing a bunch of the boards across the joists. You get half the work of deploying joists done, and, more importantly, you get a lot of nice walking and sitting area. Also, a great spot for your kids to run back and forth and complain about you taking their jungle gym away. My kids, while nominally approving of the deck, took a while to get over the disappointment of their latticework of wood being covered up. It was quite the popular thing to run across!

In terms of tools for this part, I ended up mostly using an impact driver (with a different bit in it for the hidden fasteners), a drill (for toenailing the boards in - I’ll cover that later), a square for ensuring things were aligned (after learning the hard way that they aren’t always going to be perfectly aligned), a screwdriver for various alignment tweaks, and, of substantial use, a good dead blow mallet for ramming the boards into place. Cordless tools are properly nice here… you don’t end up using that much battery, but the portability is nice. I’ve torn apart a bunch of battery packs and I object to the DeWalt 20V Max stuff the least of that which I’ve pulled apart. I do like my DeWalt tools…

The first step is to get the edge clips in. These are aligned with the starting edge of your deck and are somewhat critical to get lined up - or, at least, to get close enough that you can get the first board straight. If it’s curved or crooked, everything else will be. The good news is that these bend a good bit and you can use a hammer on the board to align things. The bad news is that you shouldn’t just beat the carp out of the board, because it’ll end up somewhat wrong. Try to get the spacing between the wall and the clips even.
Also, you did caulk the gap between your ledger board and the foundation, right? It helps keep water from down between the ledger board and foundation.

Depending on the spacing, this may be a good place to use your handy right angle drive. I still can’t believe how well this thing holds up to an impact driver.

If you’re doing long board runs lined up through the blocker boards, it is really important to ensure things are lined up. Trust me, you’ll see it if they aren’t. A good metal square here solves a lot. Every board, ensure it’s dead on with the neighbor across the blocker - there’s a lot of adjustment room, but you need to check it, because if you don’t, alignment will drift.

To put the hidden fasteners in, you’ll either need the Trex tool to do it, or a scrap chunk of decking. I tried both, and settled on the scrap piece - it just worked better for how I was installing things, and seemed easier to use to align things properly (given the persuasion of the dead blow hammer). When installing the hidden fasteners, you’ll just use the scrap piece to hold them in place and then drive the screws most of the way in - but not all the way. Consult the Trex Installation Guide for details, of course…
You want the screw head below the top surface of the board, but not all the way in or it’s a pain to get the next board in. Leave it too far out, and it’ll chew up the edge of the two boards as you install the next one. You’ll get a feel for it quickly enough.

Your hammer is used to ensure the boards seat tightly against each other. The hidden fasteners have those little tabs to handle spacing - so all you need to do is ensure that the boards are tight up against the previous one - assuming you got the first one in straight. It just chains out from that one, so take the extra time on the first one.
Run down a board, pounding it into place, and installing the hidden fasteners. I found that I could do every third one and then the two previous - get the third one pounded in firmly and the new fastener screwed in place, then do the previous two and there’s no need to hammer things. Just get the fasteners in tightly enough. I also found that it worked best if I got the far end secured with one fastener, and then came back to the other side to work across - it was easier to keep everything lined up and tight. You can feel when the board is firmly seated - once it’s firmly pressed into those tabs, you don’t need to keep pounding it.

According to the installation guide, if your area has high day/night temperature swings, you should secure the edges of the boards in place with a toenail screw. This means putting a bare screw in at a 45 degree angle, down through the Trex and into the joist. I used a handy cordless drill to do it, and my suggestion is to use as high a speed as your drill supports. The Trex is slippery to a drill bit - so I found that the best approach was to get the bit spinning, touch it lightly to the Trex at the desired location, and then add some pressure to chew through. If I tried to place it first and then drill, it would reliably walk across the groove and make a mess of things. Drive a screw in, and you’ve reduced the amount of walking around the boards can do. I definitely have high temperature swings - 105F during the day to 65F at night isn’t unheard of, and as I’ll show later, the deck gets more than a tiny bit hotter in the sun than the air is…

After each row is in place, go through and tighten the previous fasteners. You will snap some screws off - the amount of torque they can take seem to vary wildly between batches. Some were constant, some were infrequent. I found that while I could move the connector over slightly and drive another screw in, it also worked just fine to simply put another screw down the same hole - it would work in next to the existing screw and fasten things tightly. Yes, you should deal with the snapped ones, though. Every joist should have a fastener to keep things tight.

Do that… uh… a lot… I didn’t finish out the edge, because that’s going to be done with a square edged board routed to fit, and I’m coming back around later to do that.

Tricks and Tips
My deck involves a lot of sitting on the south side of the house, facing north. I rapidly worked out that my neck was going to be charcoal if I didn’t do anything - so I came up with a handy contraption to keep my neck in the shade. It worked well - so well, in fact, that my wife and kids got me a hat with a built in version of this thing for Father’s Day. Mostly, I think they were tired of seeing me wandering around with this contraption…

There were some days that were just hot and calm, with no breeze. Well, when all else fails, “making your own breeze” is totally an option. This is one of my “I have no idea how many CFM it is but a lot” air movers that moves air, sand, grit, and small rocks. However, it does a nice job of keeping me cooler while working. It was quite loud, though… so pick between that and music. A smaller misting sort of fan may have been a wise purchase, but DeWalt doesn’t seem to have any options there.

The boards are very flexible - in both directions. If you can, and you notice some boards are curved from how they’ve been sitting, having them bend away from the previous row helps make things faster - once both ends are in place, the center will be held a lot tighter. I also played with caches of hidden fasteners across the deck, but without someone to regularly keep moving them, ti’s easier to slide the big bucket up and down the deck. Plastic slides on this really easily.

Don’t miss the forest for the trees. Every few rows, get up, step back, and sight down the deck. Make sure everything still looks straight - if you have long sight lines down the deck like this, it’s easy to get things “not 100% right,” and it will show. A good deck rug is always an option when you find this out too late. Someone asked why a lot of decks have 45 degree decking, and after having done this deck, it’s because having everything at an angle like that will hide an awful lot more mistakes and misalignments than this sort of fully square arrangement. You can do it, just be aware that you’ll have to pay a lot of attention to the long form alignment while you’re installing the deck.

I’ve still no idea how to make this task go faster with more people, though. With a skilled team, the right answer would be to do the sections in parallel - just making sure that they remain aligned. With myself and some extra hands, I’m not sure how to speed it up. I was able to get through one section in two solid mornings of work - though I was faster towards the end. By mid afternoon, it was just too hot to continue working out here.
Deck Thermal Images
Do you have an appreciation for just how much radiant heat off a house and deck impacts comfort on them? I didn’t - but, after having installed a deck in summer, I do now! One of the problems I found rapidly was that the decking gets very hot to sit on by early afternoon. I was curious as to what that meant, and discovered several interesting things. First, my blocker boards, with no airflow, get really hot - quite hazardously so, at times. Yeah, that’s 164 coming off one of them. The rest of the surface gets hot too, and while I’d not thought about it before, the section over the joists is hotter than the rest - because there’s no airflow around them. The rest of the surface has some cooling airflow, but not the section over the joists. I’d have assumed the thermal sinking of them would mean they were cooler, but, not in the summer!

Also, the side of a house gets properly warm. It’s like standing in a shipping container in the heat, and even though you don’t notice it for short periods of time, sitting out there for hours in the heat, the radiant heat makes a big difference. I was going through almost two gallons of saltwater a day while working on this deck in the heat - and still ended up somewhat dehydrated.

That’s it for this week, because I’m trying (mostly failing…) to keep my posts at least a bit shorter. Next time, I’ll talk about the edges, as well as my stairs!
Comments
Comments are handled on my Discourse forum - you'll need to create an account there to post comments.If you've found this post useful, insightful, or informative, why not support me on Ko-fi? And if you'd like to be notified of new posts (I post every two weeks), you can follow my blog via email! Of course, if you like RSS, I support that too.


