
A few months ago I moved to a few acres in the country, and needed somewhere to work - so I built myself a solar powered off grid office out of a Tuff-Shed Pro Studio!
On one side, I’ve built a great desk corner with plenty of power and more than enough AC to keep me cool when it’s over 100F out.

On the other side, I’ve built an awesome lab bench for small electronics projects and battery builds.

It all started with this.

That’s an 8’x12’ Tuff Shed Premier Pro Studio. I spent around three and a half weeks turning it into my very own office.
Highlights include:
- Aggressive insulation for year round use: 3.5” of rock wool (5.5” in the ceiling), plus 2” of foamboard on all walls and the ceiling.
- Plywood interior walls, because I think they look good and they make it easy to mount things.
- 2kW of solar panels on swinging mounts for power.
- 12kWh of Trojan T105RE batteries in a 48v bank for storage.
- A 2kW Aims Power inverter for 110v power.
- A through-wall heat pump for cooling and heating.
- Desk space, wall mounted monitors, a lab bench, and plenty of shelving.
This is a summary of my build, with links after each section to posts that contain radically more information (and way, way more photos) of each build stage.
Keep reading for a summary of the entire process!
Why a shed? Why off grid?
A few months ago, I moved to a beautiful rural location in sunny farm country, and I work from home. I do some generic tech work, some battery pack rebuilding, and some teardown/analysis/reverse engineering of various gizmos (usually cheap stuff out of China).
A standalone structure gives me space to work that’s separate from the house. This is important to me for several reasons:
- If I share work and home space, I have a very hard time separating work from “not-work.” I’ve learned this lesson in the past, and don’t care to repeat it.
- I prefer quiet spaces, suited to concentration, for working. A house with a wife and kid isn’t this. On other occasions, aggressive symphonic metal at high volumes is useful. I’ve worn headphones for a lot of my working life, and don’t want to wear them if I don’t have to.
- Some of my work involves fumes - soldering, spot welding, adhesives, etc. I don’t want these in the house.
- I play with high energy battery packs. A 500Wh pack shorting out is very exciting - I want a separate space for this.
Why solar? This is also a blend of several reasons.
- The property I’m working with has many basalt outcroppings (“lava rock”). This stuff is hard, near to the surface or poking above it, and basically impossible to trench through. You blast it. That’s expensive and time consuming. Worse, trenching power requires going either 1’ deep with conduit, or 2’ for underground feeder. You hit plenty of rock long before that point. So trenching power just isn’t feasible unless I go the very, very long way around.
- I’ve always wanted an off grid solar system to experiment with, and if it’s powering my office it will only annoy me if it’s acting up.
- It provides an amazing real-world testbed for working with cheap charge controllers/panels/etc to see if they’re any good.
Why a Tuff-Shed? They offered me the best price. Why start with a shed instead of building something from the ground up?
- My framing skills are not very good, and a pre-framed structure is faster for me to get up and online.
- They make this really cute Pro Studio that is just perfect for something like this.
- Because I was able to build a level foundation and had truck access to the location, I got a killer deal on a pre-built demo unit (40% off retail).
This is my shed before delivery. It’s an 8x12 Pro Studio, with a nice door, windows, and a workbench (that I’ll have to remove to insulate it). This particular version comes with a radiant barrier on the ceiling, Tyvek Home Wrap inside the siding, and a shingled roof. I’d prefer a metal roof, but for a 40% discount I can overlook a few things.


More details: Solar Shed: Part 1: Overview
Foundation & Delivery
I had to build the foundation quickly. I purchased the shed on a Tuesday and it was delivered Friday. Because it’s a pre-built demo unit, the installers can’t block the flooring like they do with most units. I spent a few days with a shovel, some guide wood, and an absolutely ancient generator to create a level surface for the shed.

Friday morning, the shed showed up on the back of a trailer. Literally.

After spinning it around on the truck with the aid of a driveway and some wood blocks, a pair of absolutely masterful shed movers dropped the shed on my foundation, and I had a shed ready for interior work!


More details on building the foundation: Solar Shed: Part 2: Foundations
More details of the delivery: Solar Shed: Part 3: Delivery
Window & Door Foam
One limitation of a solar powered shed is that of energy - which means energy efficiency is important! This shed is decent built, but has utterly zero insulation - so I fixed the glitch.
To help seal up the windows and door, I used Great Stuff foam. There were large cavities around the window frames and door frame, and that’s just not any good for blocking heat.

The door frame is literally allowing daylight through. I’m fairly confident that will leak during hot summers and cold winters.

To seal these openings permanently and effectively, I filled all the gaps around the doors and windows with Great Stuff Foam.
After letting the foam set up, I needed to trim it back, which is easily enough done with a knife.

After cutting the foam back, the windows and doors are nicely sealed around the edges. If I wanted to put some molding up to hide the foam, I could, but I simply don’t care that much.

Rock Wool Insulation
Instead of using standard fiberglass insulation, I decided to use rock wool (or mineral wool) insulation batts. It’s fireproof, more soundproof, easier to install than fiberglass, and the cost, while higher, isn’t a huge factor on such a small space. I used Thermafiber instead of the more common Roxul, simply because it was what I could find locally.
The insulation value is basically the same as fiberglass - R13 for 2x4 walls, R21 for 2x6 rafters.

The batts are 4’ long, and installation involves pressing them between the studs. They’re friction fit, and easy to cut to length and shape for the other spaces.

After a few hours of work, the walls were done. The stuff is really rather nice to work with!

The ceiling took a bit more work, and involved quite a few false starts (including duct tape - it does not solve all problems) before coming up with a solution that worked. Not using the correct size insulation and trying to cut it to fit contributed greatly to my troubles, but it’s up!

More details on the window foam and rock wool installation, including a discussion on what I learned about vapor barriers during the process: Solar Shed: Part 4: Wall Insulation and Window Foam
Experiments on how not to install rock wool in a ceiling: Solar Shed: Part 5: Roof Insulation
Foam Board Insulation
In addition to the rock wool, I added a full layer of 2” thick foamboard on the inside (both the walls and ceiling). All the corners and joints are taped with aluminum insulation tape. This layer adds additional insulation (another R10 around), and offers a windproof shell to help keep the inside air and outside air separated.
Contrary to popular belief, house wrap on the outside and foam board on the inside does not lead to a double vapor barrier. It’s actually closer to half a vapor barrier. For the curious, I delve deeply into this in the main post on foam board installation.
I cut the foamboard to shape with a saw, coated the studs with a bead of construction adhesive, screwed the foamboard in to hold it, then taped the joints. The red chalk lines mark the stud locations, both for driving the screws, and for later reference when installing the plywood.

It’s like putting together a big jigsaw puzzle where you get to cut the pieces out!

The ceiling was a bit of a challenge to hang solo, but I managed. The layer of foamboard should give me a nice and tight interior, where air exchange is done deliberately, not just because the wind is blowing.

More details on installing the foamboard: Solar Shed: Part 6: Foamboard Insulation
Plywooding the Walls
For my interior walls, I opted to go with plywood instead of drywall. Why?
- Plywood gives me a solid surface for mounting shelves, monitors, charge controllers, etc. Drywall doesn’t. With the studs hidden behind 2” of foamboard, having a solid mounting surface is nice.
- I like the look of plywood interiors, and I can do it here.
- I hate drywalling and mudding. And I’m not any good at it.
- As my structure is too small to require permits or inspections, I don’t need to abide by silly bits of code. I’m not concerned with room-to-room fire spread resistance in a single room office.
The 1/2” plywood goes up similarly to the foamboard, though I’m using 4” screws to secure it to the studs. I tried to use a different pattern from the foamboard, when possible, to help smooth out seams.

After the large pieces are up, it’s back to “puzzle mode.” Measure, cut, install. Like the foamboard, the plywood is glued as well as screwed. I went through a lot of construction adhesive on this project.

The ceiling is three sheets of 1/4” plywood. As I’m not planning to hang anything more substantial than lighting from the ceiling, I didn’t feel the weight of 1/2” was worth it. Also, it’s hard enough to hang 1/4” solo - I’m not sure I could have hung 1/2” by myself. It’s not the best fit, but I don’t spend that much time staring at my ceiling. I can think of ways to do it better if I ever do this again.

My desk will go in this corner!

Details on installing the plywood walls: Solar Shed: Part 7: Plywooding the Walls
Installing the HVAC
A shed, sitting in the sun on 100 degree days, gets hot. A shed, in the middle of winter, gets cold. Even with insulation.
This means I need something to keep it cool in the summer, and warm in the winter.
I found an amazing little unit - a Frigidaire FFRH0822R1. This fancy little window or through-wall unit is a proper heat pump (“reverse cycle” unit) - not just an air conditioner with some resistive elements. It can flip some valves and cool the outside while heating the inside. The advantage? Doing this requires much less power for heat (at least down to the cutoff temperature).
Since I don’t have much in terms of window space, and I have lots of power tools, I installed this unit through my wall.
You’d think that with a hole saw and a reciprocating saw, it would be easy to cut a hole in a wall. It’s not! It took me nearly half an hour to cut this!

With the hole cut, I took my trusty sledgehammer and rammed the frame I built into the hole, trimming as needed to make things fit. And then, of course, screwed it in place. Because if a little is good, a lot is better!

Installing the air conditioner is easier than it looks. The inside guts come out entirely! One mounts the cabinet, then slides the insides into place.

One really cool part of cutting a hole in the wall is getting to see my wall cross section. I’m very happy with it - everything is very tightly secured but not crushed, and the glue works. This wall won’t come apart easily!

With a bit of foam to seal the edges, the air conditioner is in place and sealed up! Now I just need a way to power it…

How well does it work? Nicely! I can keep it around 70F inside the office when it’s about 102F and sunny out. I consider that entirely reasonable.
More details on the HVAC install: Solar Shed: Part 8: Installing the HVAC
My Solar System
My office is solar powered, because trenching through basalt is no fun. I’m not sure what to call this other than my “solar system” - which isn’t really accurate, because I don’t have my own planets.
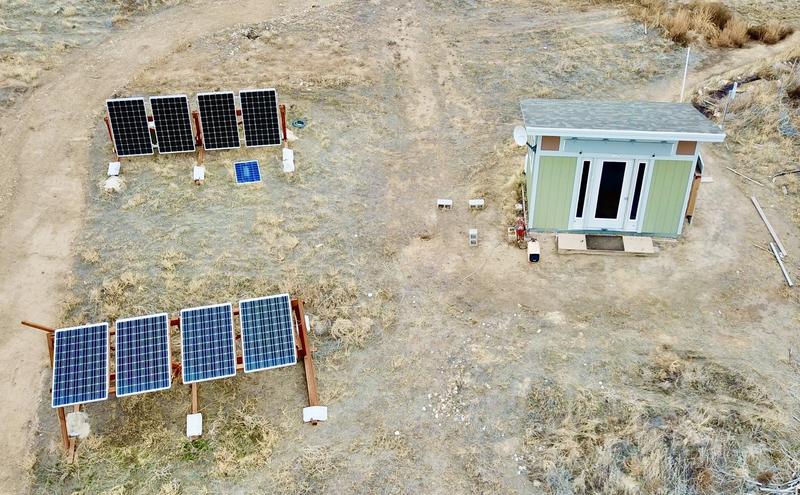
Solar Panels & Mounts
The process starts with my panels. They rudely interrupt photons fractions of a millisecond before they hit the ground, and turn them into photos. I’ve got eight 285W SolarWorld panels mounted - two strings of 4 panels each, for 2280W of nameplate capacity. The panels are around 40v open circuit, 31v at peak power, and just over 9A at peak power.
This means my system will hit 160+v on a cold winter morning, and spends a lot of time around 120v, pushing 18A or so into my charge controller.

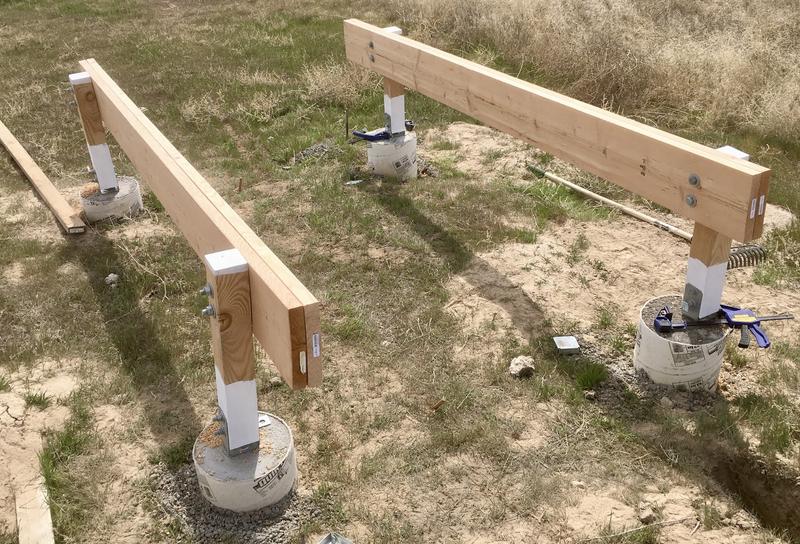
I built my panel mounts out of wood, because I’m in a very dry environment, and wood lasts long enough. The mounts are obviously ground mount. I didn’t use my office roof because it slopes to the north.
The first panel mount is mostly built out of 4x4s. It’s really overkill. As in, the thing is too heavy to easily swing. However, it’s not going anywhere. The combiner box on the right has three breakers, so I can add another string of panels if I need more power in the winter.

My second generation of panel mounts are lower, built more out of 2x4s, and seem to be just as strong. There are more anchors into the ground, and a bit more sand weight. It’s much easier to swing, and is much easier to clean.

Charge Controller
After the combiner box, power flows into my MPPT charge controller - a Midnite Classic 200. This is a really fancy unit that handles getting optimum power out of my panels, and injecting that power into my battery bank.
This controller also handles managing the charge stages for my lead acid batteries - bulk, absorb, and float. It speaks Modbus over TCP, so I can get realtime data out of it.

Battery Bank
My battery bank, despite the rest of my work with lithium batteries, is lead acid. Flooded lead acid is cheap, reliable, and easily available on short notice. I’ve got a 48v bank, with 12kWh nameplate capacity, though realistically I can’t regularly use more than 5-6kWh without affecting cycle life.
I’m using 8 Trojan T-105RE batteries wired in series. They’ve got Smart Carbon for better partial state of charge performance, and a bit more electrolyte capacity than the regular golf cart batteries.
A battery bank needs a place to stay - so I found a deck box and assembled it. $99 at Home Depot. The box is on the north wall for shade.

Inside the battery box are batteries! I used 0/2 gauge wire and copper lugs, crimped on, for the interconnects. The wiring is conservatively rated for around 150A. Absolute maximum power on my inverter is 6kW, so 120A (for about a second before the inverter cuts off). Peak solar power is around 2kW, or 40A. I’m fine. There’s a 250A fuse on the positive side, and a wireless power meter on the negative side (you can see the shunt and circuit board hanging off the top right battery).

Inverter & DC Power Monitoring
My inverter is an Aims Power 2kW Pure Sine Wave unit. In addition to being a reasonably priced off grid inverter ($700-ish), it has a peak power of 6kW for a second, with various overload intervals for the window between 2kW and 6kW. A 3kW surge for half a second as a motor starts up isn’t a problem for this unit, which is important to me.

The other end of the shunt in the battery box is this console that shows me instant power coming out of the battery bank. It works surprisingly well!

Input & System State Monitoring
I’m using The Blackbox Project to monitor the overall state of my system. It runs on my Raspberry Pi 3, gathers data from my charge controller, and graphs it. This is very useful data for an off grid system - I can see, at a glance, the condition of my system, as well as the history over the course of the day.

Operation of the Power Systems
The power system is entirely overkill for the summer. I have more power than I know what to do with - to the point that I’m running BOINC and Folding@Home (as SolarSyonyk) to soak excess power, and still can’t use all of it.
I can pretty much ignore power on any sunny day, and be fine. Cloudy days take a tiny bit more work - I may shut down my F@H box a bit early. Or turn the temperature up (I do like it cold in my office).
The reason I have so much panel hung is for winter power. Keeping myself online during dark winter days may be a bit of a challenge. I’ll report on how this works once I’ve gone through a winter.
More details on my solar system: Solar Shed: Part 9: The Solar System
Interior Finish Work
An office is only useful if you can do work in it - so I built a useful interior!
I do a mix of work that requires sitting in a chair at a desk with computers and work that requires a good lab bench - so I built both.
Lab Bench
The lab bench is is set at around 41” high - this seems a good lab bench height for my height, and I’m not doing heavy work on it, only precision work.
The 3/4” plywood surface is secured to the walls with angle brackets screwed into the studs, and I’ve cut three 2x4s to length to help support the front edge.
Shelves are on both sides, and are designed for light use. Heavier things will either be under the bench, or on the bench under the shelves.
Fire Extinguisher
I’m not entirely sure why, but during the construction process, lots of people seemed concerned about fire prevention in my shop. Something about high energy battery pack work, foamboard, and plywood, I think…
Yes, I have a fire extinguisher. It’s a 20lb ABC unit. The fallback plan, if this doesn’t work, is to rapidly exit the office through the door. At no point in the office am I more than a few seconds from the door, and I have line-of-sight to all points from all points, so I’m not that worried about it.

Shelving
I installed shelves with a highly technical design spec: “Install them anywhere they fit.” Nobody ever has enough shelf space, especially in a compact office like mine.
The upper shelf is put up with heavy duty shelf hangers screwed into the studs - it’s good for quite a few hundred pounds.
The other shelves are all using more standard shelf hangers, and are good for decent but not insane amounts of weight. They’re all secured into the studs as well.
All the shelves are cut from 3/4” plywood, though some of them are cut from plywood that was left in the sun for a few days and had started to curl.


Lighting
Lighting is still a work in progress, but consists of 12v LED strips stuck to angle aluminum. The angle aluminum blocks the light from blinding me, offers a smooth surface for the adhesive to stick to, and provides a good heat sink for the LEDs - some LED strips can run quite hot without a heat sink.
All the lighting is “cool white” - this is an office, so I prefer cooler color temperatures in here. The plywood offers plenty of warmth.

Small Stuff Storage
For small parts storage, I installed a few drawer units on the walls. They offer drawers for storage, as well as another shallow shelf to put things on.
The taped over battery banks to the right are old BionX battery packs from batteries I’ve rebuilt for people. I have plans for them!


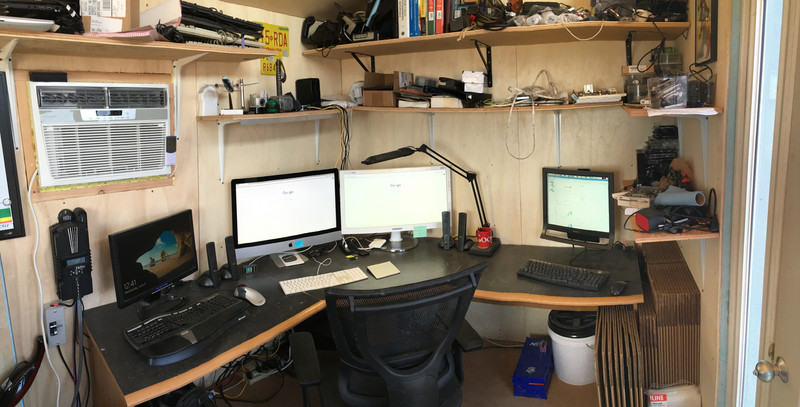
Desk Corner
Finally, my desk corner - the core of my office!
The rightmost monitor is wall mounted, and is attached to a Raspberry Pi that is always on for solar system logging and as a general utility box. It’s also capable of waking the other computers in the office, should I need them remotely.
The center two monitors are a 27” iMac and a random 27” Catleap display attached as a second monitor.
The left monitor is for my Windows desktop. That runs UPS WorldShip, Folding@Home (GPU), BOINC (CPU), and any other Windows-only software I need. Yes, I have Windows, OS X, and Linux in my office. I’m too old for OS holy wars.
More photos of my interior buildout: Solar Shed: Part 10: Interior Work
Costs
Now for the question everyone is asking: How much did this cost me?
Right around $17,000 plus around 150 hours of my labor. The solar power system made up around $6k-$7k of that, with the rest being shed costs and build costs. I probably could have gone cheaper, but I wanted it good and quick, so it’s not cheap.
Conveniently, this is also a separate structure built exclusively for business use - so I have that, come tax-time.
Final Thoughts
I’ve been using this office for a while (my blog posts lagged behind construction by a good bit), and it’s working great for me. I’ve got plenty of power, plenty of AC (70F on a 102F day), plenty of computers, and plenty of bench space. I can work in silence (realistically, the whir of my charge controller fans), I can crank the music, or anything in between. I can Skype, Hangout, take phone calls, and be entirely uninterrupted.
The three weeks to build it were hard work. I built nearly the entire thing solo - I got some help with the second panel mount, but that was it. Were I to do it again, I’d borrow a friend for a few days. Some of the steps would have been radically quicker with multiple people, and if I were to build it again, with what I know now, I think I could do it in under 2 weeks with 2 people. So, you know, if you want a contractor for a shed-to-office conversion…
I can’t say it’s fully done - I doubt it will ever be “fully done.” The joy of having my own space like this is that I can tweak it as I want. I plan to add some filtered air intakes and exhaust vents for soldering fume extraction. I’ve got parts on order to power a DC bus for powering lights/monitors/etc without having to run the main inverter - that will let me power the infrastructure (radios, routers, switches, etc) directly from the pack and will get rid of quite a few little power bricks. I’ve got two more panels to mount at some point. And I’m sure I’ll find other things I want to do over time.
But, it’s up, it’s useful, I’m earning money working in it, and I’m incredibly happy with how it turned out!
If you’re considering doing something like this, or already have - I’d love to hear about it in the comments! And if you have ideas for other things I can do - let me know!
And if you’re sick of solar shed build posts, don’t worry. Next week, this blog will be back to it’s usual business of ripping apart battery packs, analyzing goofy electronics out of China, and doing the math on things that matter.
Comments
Comments are handled on my Discourse forum - you'll need to create an account there to post comments.If you've found this post useful, insightful, or informative, why not support me on Ko-fi? And if you'd like to be notified of new posts (I post every two weeks), you can follow my blog via email! Of course, if you like RSS, I support that too.


