
Construction posts about my off grid Solar Shed are nearly done - there’s just a bit of interior work remaining before the bulk of the work is finished!
The insulation is done (rock wool in the walls and ceiling, 2” foamboard on top).
The plywood walls are installed.
The HVAC is heating, venting, and air conditioning nicely.
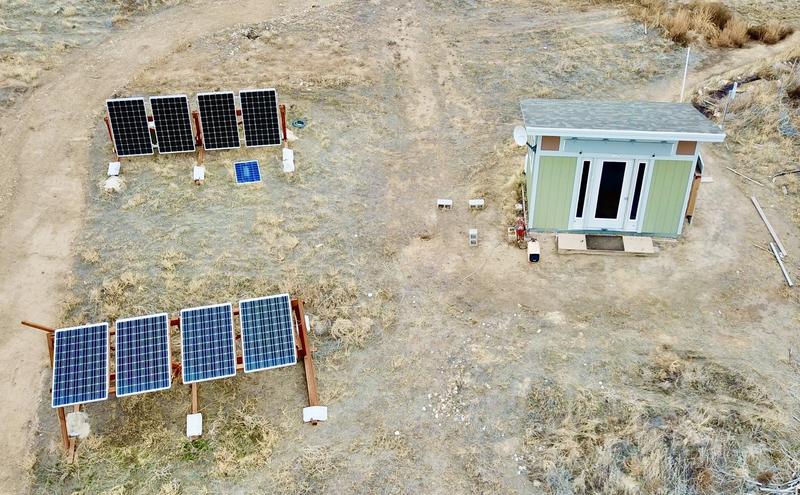
The solar system is rudely interrupting photons before they hit the ground and turning them into electrons.
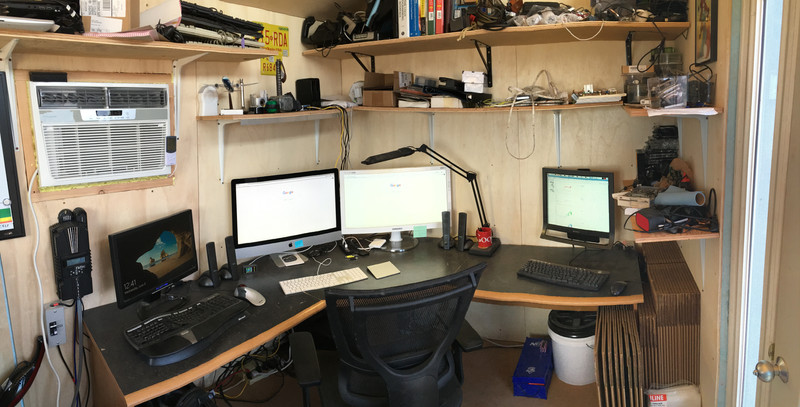
It’s time to finish out the interior, and make myself a useful workspace! Perhaps something like this:

What went into the interior work? Read on to find out!
Installing a Lab Bench
Surprisingly enough, not all my work is at a computer desk. A bunch of it involves battery pack teardowns & rebuilds, analysis of cheap Chinese bike lights, and stuff along those lines.
This requires a good bench. For the type of precision work I’m doing, it’s fair to call it a lab bench (instead of a work bench).
What’s the difference? A lab bench is higher - it’s better for fine work that doesn’t involve much force (like soldering). A work bench is lower so you can apply more force. I’m going with about 41” for the surface height, based on my height. And, if I don’t like it, I can always move it.
I’m using 5 corner braces to support the plywood surface. I had them around from something else, and wasn’t going to use them, so they’re getting repurposed for my bench. Heavy duty shelf hangers would have worked too, but I had these laying around.
The positioning of these, if you notice from the screws in the plywood walls, is such that they’re anchored into the studs. I see no downsides and significant upsides in terms of anchor strength, so into the studs they go.

Once they’re secured, I cut up a sheet of 3/4” plywood for the bench. I’m using 3/4” for the shelves and my bench, because I felt 1/2” (what the walls are made of) is too thin. The bench is 24” deep and the full width of my shop (so about 7’6” long - give or take a bit).
To secure the plywood to the braces, I bought some 3/4” screws. With the thickness of the corner braces added, the screws don’t poke through the top surface, but they do dig through most of the plywood and keep it locked down. The bench isn’t going anywhere.

To help support the front edge, I cut some 2x4s to length and secured them under the bench - one on each end, and one in the middle. It’s not the strongest workbench in the world, but it’s quite overkill for the type of lab bench loads I’m going to be putting on it - so I won’t have to worry about it.

Workbench Shelves
Any good workbench needs storage around it for tools, parts, equipment, etc.
So I installed some. The shelves are, like the bench, just 3/4” plywood, cut to size, and stuck up with shelf hangers. Nothing fancy, but it should get the job done. I didn’t bother with stud finding on these - they’re just screwed into the plywood. None of them are going to be handling anything particularly heavy.

All four shelves are installed and already getting loaded with stuff. The left upper shelf is a bit higher, as the ceiling is higher on that side. This arrangement gives me a full depth central work area with areas on the sides for equipment, parts, and temporary storage space. Since I have a lot of equipment that gets used regularly (bench power supplies, soldering irons, voltmeters, etc), I can put those on the bench under the shelves and have easy access to them.
The space under my bench is deliberately left empty (no shelves or such), and I’ll use it for storage of heavy things and large boxes - it’s a good spot for them, and it’s out of the way.

Yes, I have a fire extinguisher in here. I have no idea why so many people have expressed concern about this. It’s a 20lb unit. If this isn’t enough, my secondary plan involves stepping outside.

Other Shelving
I’d like to claim there was some pattern to my shelving other than “Find places to put shelves, install shelves.” But, really, that’s about what I did. I’m very, very space limited in here, and I have a lot of stuff that needs to go out here so it’s not in the house. I really did just start putting shelves up where they seemed useful.
My desk was covered in stuff, so I put a large, long shelf above it. And promptly filled that with stuff. This shelf is rated for several hundred pounds of stuff, so it’s good for books, power supplies, and other heavy things.

For smaller stuff, there are shelves to the right of the door as I come in.

And yet more shelves above my monitors. And above the HVAC.
The lower shelves aren’t quite as strong, but I don’t have that much heavy stuff that needs to go on shelves. Sadly, I didn’t get to the plywood fast enough, so these shelves are slightly warped. If it really bugs me, it’s not much work to replace them later.

Lighting
Lighting is still very much a work in progress, but after a bit of experimentation and advice-seeking on IRC, I found a solution that seems to work.
Screw angle aluminum under the shelves, and adhere 12v LED strip lights on it. The aluminum adds some strength to the shelves, gives a smooth surface for the adhesive lights to adhere to (they don’t stick to plywood), and the downward facing edge protects my eyes from being blinded by the lights.
Right now, I only have the lights up over my desk, but I’ve got angle aluminum for a few more, and will be lighting the whole shed before winter.
I’ve been cutting the LED strips to length and soldering jumper wire between the segments as needed. They’re surprisingly nice to work with!

Small Stuff Storage
One problem I’ve had is finding places for “small stuff” - random electrical components, crimp connectors, thermistors, nickel strip, XLR plugs, Anderson connectors, Arduino sensors, etc.
On one of my Home Depot runs, I found a solution. There are little wall mounted drawer units one can buy that are almost perfect for stuff like this - and also offer a bit of shelf space on the top!
This one is to the left of the bench, and stores nickel strip, wire, etc. To the right of it, you can see a stack of old BionX batteries - these are the good ones I can still use for storage, well protected from inadvertent shorts.

To the right, I have a larger unit with smaller drawers for smaller items. Crimp connectors, thermistors, wire nuts, XLR connectors (three and four pin), headers, etc.
Also, above it, I installed a whiteboard I’ve been making good use of. The lower right corner has a printout of lead acid battery voltages, with my pack-specific voltages below.
So far, all of this is working fairly well. The storage units are keeping stuff tidy and making it a lot easier to find small parts when I need them for a pack build. I’ll probably add another storage unit or two eventually.

Desk Corner
My desk corner is also up and running! The curved lines are a side effect of needing the panorama mode to get any photos of anything now…
The rightmost monitor is wall mounted. It’s connected to an always-on Raspberry Pi that monitors my power systems and serves as a general utility box.
The center two displays are an iMac and an external display connected to the iMac.
To the left, I’ve got an old monitor attached to my desktop-class machine, which pretty much runs UPS Worldship, Folding@Home, and BOINC - if there’s excess power.
To the right of my desk, I have a bunch of 4G shipping boxes for Class 9 hazmat (large battery packs). I can’t imagine why…
To reduce glare on my monitors, I installed some window tint on the door and windows to either side.
How is everything working?
Wonderfully!
I’ve been using this space for a while now (blog posts are rather behind the actual progress), and the layout is working great. I’ve got plenty of desk space (from my 14 year old desk), my work bench has worked great for building a number of battery packs, and I have an awful lot of shelving space for stuff. Which, admittedly, I have too much of.
This is a great space that’s working exactly as I hoped. I have plenty of space for a variety of projects, everything is reasonably tidy, and as it’s just me in there, the lack of space really isn’t a problem. It would even be possible to have one person working at the desk and the other at the bench, or, if I move some boxes, two people at the bench.
The air conditioner is great at keeping things cold, too.
At least for the summer, I have more power than I can use - which is a great problem to have.
So, is it doing what I wanted? Absolutely! I’m very happy with my solar shed!
This 10th post wraps up the main series of posts about construction. I may post some details on my panel mount construction and lessons learned if there’s interest, but I’ve got plenty of other stuff to write about.
Next week, I’ll be posting a summary of the build process - shorter, with less detail, but with links to each of the relevant posts.
Then, back to posts about electric bikes, batteries, and some new projects I’ve started!
Comments
Comments are handled on my Discourse forum - you'll need to create an account there to post comments.If you've found this post useful, insightful, or informative, why not support me on Ko-fi? And if you'd like to be notified of new posts (I post every two weeks), you can follow my blog via email! Of course, if you like RSS, I support that too.


