
One perk of having kids is that you have an excuse to play with kids toys (and make them into projects)! I try to involve them in the process when I can, because it’s a good set of skills to learn.
This pile of equipment is the last few projects with my kids (though mostly my daughter) - a line following car, repairing an old little radio, and some PowerWheels (which are, in fact, as cool as they seem like they should be).

What sort of fun did this involve? Plenty! And a few custom battery builds!
Teaching Kids to Repair!
I feel very strongly about repair and have talked fairly extensively about it on this blog throughout the years. The start of this blog was based around repairing a broken ebike I got for free and the trend has continued - I talk about repairing things a lot.
This is something I very much want to make sure I pass on to my kids. Knowing how to repair stuff is awesome, and almost everything can be repaired. There are exceptions, but they’re typically few, far between, and best avoided in the first place (the Microsoft Surface Laptop is such an abomination). I’ve fixed a lot over the years, and my kids already expect that I can fix whatever they’ve broken - which, usually, is a fair bet.
One of the other major perks of repair is that you can usually buy a broken something for a lot less money than the working version of the something - and if you know how to repair things, fixing it usually lets you come out pretty far ahead! This is something I’ve tried to explain to my daughter, and will explain to my son as he gets older. It’s a skill I learned far later in life than I really should have.
A soldering iron is a frequent part of any repair job these days, though - so there’s nothing wrong with fun little projects that require soldering either.
Radio Repair
One of the assorted winter projects last year involved an old AM radio of mine. I built it back when I was a kid, and for a “solder together” sort of project, I used an awful lot of what seemed to be scotch tape. Needless to say, after 20+ years, it didn’t work anymore.
My daughter, on learning that this should be a radio, then proceeded to pester me endlessly about why it didn’t work, and how I could fix it, and could she help fix it, and… well, I’m not one to pass up that sort of excitement and opportunity!

We spent an afternoon out in my office, using some neat little wire splices I’d just picked up. They aren’t crimp connectors - they’re a heat shrink tubing with some low temperature solder in the center. Throw a hot air station at the right temperature (around 300F-350F should work) against them, and they shrink nicely without anything getting burned or catching fire!
We went through, cut all the ends off the wires, stripped them, and put the new connectors on. After this, and a new battery, the radio worked! And then proceeded to drive my wife and I absolutely nuts, because the only station it will receive with any real strength is one of those annoying conservative talk radio stations, which my daughter insisted on listening to because it was the only thing she could get on it. At least it would occasionally play a basketball game instead!

If you’ve not worked with the solder seal type wire joiners, order some on eBay - they’re really, really nice!

I might not use them for really high current connections (stick with the crimp type connectors), as they probably won’t deal with high wire temperatures very well (my guess is that they’ll re-liquify and come apart), but for low current stuff? Really, really convenient.
Line Chasing Car
Another random winter evening project with my daughter involved a “D2-5 line following car.” You can get these kits for about $5 on eBay, and build them (with some basic through hole soldering) into a car that will chase a black line around on the floor! It’s a purely analog system involving LEDs, light sensors, and a comparator. The car tries to seek the black line by alternating which motors is running, and the net effect is a zig-zag dance around the tape path. It’s really quite cute.

A not-quite-4 year old isn’t going to be doing the soldering on one, but she’s sure able to fold the ends of components down, stick them through holes, and apply flux. It really is an easy build. Troubleshooting when it doesn’t work is a bit trickier. I eventually worked out that one of the transistor legs had come loose internally (likely while being worked into position by said not-quite-4 year old). You might consider doing the main drive transistors yourself.

It’s a lovably goofy little thing that will chase just about any strip of black tape applied anywhere! As a bonus, you’ll probably get to see a kid chasing around, bouncing back and forth, pretending to be the little car. You can trip it up with certain tape patterns, and it tends to bias one way or the other (I’ve not had much luck getting it to randomly pick the side of a Y to take), but it’s a wonderfully fun little toy for $5!

PowerWheels!
Now I can get to the fun part of this post: Talking about PowerWheels and batteries! Those who have read my various grumblings about winter and the driveway might know that we’ve got a bit of land, and we share a driveway with some other people - so there’s quite a bit of driveway to run around on. I assume most readers are familiar with these little kid-cars of some variety or another - they’re quite a bit of fun, and I have to admit, I’m jealous. I don’t fit in them anymore, but I do get to play with bigger toys these days…
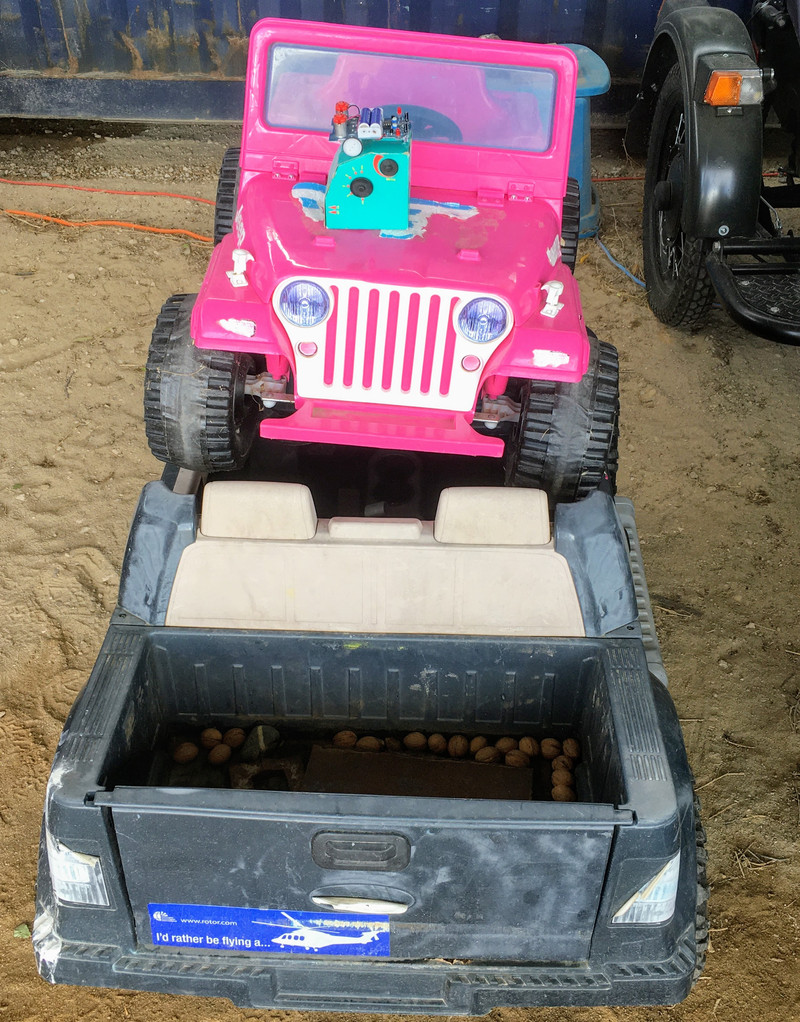
The 6V Barbie Jeep
The first one to show up was a $5 find at a yard sale. Dead battery, no charger… no problem. I can build a battery! Since I didn’t have any 6V batteries laying around, I went ahead and built a pack. It turns out, I really should have done some testing first… The duct tape on the wheels is an attempt at improving traction. It made a small difference, but not enough to matter. Of course, I found this all out after I finished a pack for it.

Building a “6V” Lithium PowerWheels Battery
This little Jeep came with a stone dead battery that, upon further investigation… was in fact stone dead. Rarely do I see a lead acid battery so dead as this, but it’s dead, Jim.
This is a “toddler” type Power Wheels - single seater, and it’s got a 6V/4Ah sealed lead acid battery. Not much power, not much capacity, and certainly not my style of battery. Yeah, I could just buy a replacement (and a charger), but that’s no fun. I’ve got a shop full of battery building equipment - we’re going lithium!

Some research indicated that you can overvolt the 6V cars to 12V or so before they fail. This opened up some options for me. I could nearly replicate a 6V lead acid battery with two LiFePO4 cells in series, but I don’t generally keep those around my office. A pair of standard lithium cells (8.4V fully charged, about 6.0V empty) is a bit more voltage than the stock battery (and certainly an awful lot less saggy under load), but in theory, the motor should tolerate it without burning out. I have a large pile of standard lithium cells laying around, so I may as well use them. They’re new cells, not “recycled junk.” I don’t play with junk lithium, and you shouldn’t either.
The interface between the battery and the vehicle is a large two pin connector. You can find them for sale various places, but the easy option is to chop the connector off the old battery. Even though the battery was stone dead, I took the careful approach of cutting one wire at a time. I may have blown a chunk out of a pair of wire cutters some years back, cutting something I thought wasn’t powered that had a surprising amount of voltage on it with quite a few amps before it detected the dead short. It really gets your attention.

The vehicle didn’t come with a charger - and I don’t care, because I’m going to be charging it to the lithium pack voltage, not lead acid voltages. I keep a supply of pretty standard connector jacks around, and one of them fit the random 8.4V charger I found in my parts bin. I’m pretty sure that charger came from one of my ebike light packs I reviewed many years ago. I ran them from my main battery through a set of DC-DC converters, so had no use for the junk packs and chargers they came with. However, I apparently kept the chargers.

The battery pack I’m using looks an awful lot like a pair of the modules I use in some BionX batteries - mostly because it is. I’ve built these things in bulk, so I have all the pieces for them, and I’m quite good at them. Is it overkill for a toddler Power Wheels? Yes. It absolutely is. This is 13.5Ah of lithium goodness at a nominal 7.4V. You might notice the extra tabs spot welded on the left side. These will hook up to the BMS.

The battery management system (BMS) for this pack is nothing fancy - it’s a random 2S BMS from eBay. This one is rated for 20A, which seemed enough for the little motor in here. This serves two main purposes: Balancing the pack (not actually needed with these cells, since they self balance quite well), and providing high and low voltage cutoff. The high voltage cutoff shouldn’t ever trip - it’s there in case the charger fails. The low voltage cutoff is really important for a kid’s pack, though. If they try to drive it below a safe voltage, the pack will simply shut down until charged. It prevents deep discharging lithium - which is quite damaging, and firmly into the category of battery abuse.
I’ve soldered the two input/output leads on, as well as the “center tap” for checking the voltage between the two cell groups. Why don’t I have wires on the positive and negative pack connections?

Because I’m not bothering with wires there! Instead of short jumper wires between the pack terminals and the BMS, I’m soldering the BMS straight to the terminals! A good layer of high quality rubber ~duct tape~ battery pack tape protects the cells and the BMS from rubbing. The BMS terminals are then soldered directly to the tabs, which bend over the outside of the insulation. This leaves two layers between any possible short, which should be enough for the use of this pack. By skipping the wiring, I get a better connection to the pack, and I save some hassle. Does it really matter? No. But it is easier.

On the input/output side of the BMS, I’m connecting the BMS to a pair of wires - the charge jack and the output jack. Some BMS boards have separate connections for both. This one doesn’t. To connect everything, I’m using those interesting little wire joiners I mentioned earlier.
A bit of heat later, and the terminals are connected. Yes, I did this before assembling on the battery to avoid any risk of short circuits.

A bit more tape and the pack is nicely sealed up. I added a bit of electrical tape to the charge/discharge leads to keep the wires from snagging on anything - and it’s done! Not shown: Proper labeling of the pack, so someone in the future knows what it is and what voltage to charge to.

Does the battery work? Quite well!
Does the pink Power Wheels Toddler Jeep handle even the slightest bit of rough terrain like a gravel driveway? Well… no. Not at all, actually. For something with the Jeep name on it, I’m quite disappointed. It’s absolutely horrible on gravel, and my daughter spent more time getting stuck (and frustrated) than going anywhere. The torque steer is also really bad with 1WD - it only turns one way under power. I should have tested this before I built a battery for it. Fortunately, I don’t have much money in this project!
A 2WD F150 PowerWheels: Much Better!
With the utter uselessness of a 1WD PowerWheels firmly in mind, I looked around on Craigslist and eBay for random 2WD PowerWheels vehicles, and couldn’t find any at a price I wanted to pay. Sure, I could spend $100 or $150 on a fully working one, but what’s the fun on that? I figured if I was patient, I’d find one for far less - and I was right! Eventually, while I was somewhere, I saw this one under a tree, filled with leaves, with a half broken bicycle in it. No battery, no battery connector, but it had two motors, and both rear wheels turned independently with reasonable noises - so the gearbox and motors were intact, and the motors were probably fine! $20 got me the PowerWheels and the bike, since they were just destined for a yard sale.

I got it home, stuck a random motorcycle battery in, tapped the pedal, and got exactly what I expected: nothing. Not a single sign of life. Well, no surprise there for something sitting so long.
PowerWheels electrical systems range from trivial (like the 1WD Jeep - literally, a single throttle switch and a reversing toggle) to “really simple” - a few DPDT switches that, for this one, give you a reverse gear (motors in series), a low forward speed (motors in series), and a high forward speed (motors in parallel). With not even a basic repair manual, I started unscrewing screws and removing pieces. Every screw on this vehicle is identical, which makes repairs really nice! The battery lives under the hood. Power comes back to the shifter, and heads to the wheels.

A few more screws and some fiddling, and I had the entirety of the electrical system between the batteries and the motors out. A tiny bit of testing with a multimeter and I’d convinced myself that power was getting to the shifter, but no further. That means the switches are suspect - so out they came!

Yuck. To quote Jamie Hyneman, “Well, there’s ‘yer problem!” The switches were disgusting. Corroded, rusted springs, filled with debris from sitting in water over the years. Just a mess.
I sprayed them out with some contact cleaner, removed most of the gunk, and while the springs were still a rusty mess, they showed enough signs of life to put the shifter back together and test things.

With everything cleaned out, I reassembled the main parts, tossed a battery in, and… vroom! The wheels both turned! Success!
At which point my daughter decided that it needed some proper testing, and promptly set off down the driveway. No hood, even!

It didn’t take long for my son to figure out that his big sister was driving something. His opinion on things like this is very simple: If someone is driving something and there’s a place to sit, he’d better be riding. True for the Urals, true for the PowerWheels. Getting driven around by your big sister counts as pretty darned awesome in his book!

The Cleanout
Remember how I said this had been sitting under a tree? Even though it ran, it was still gross. The next step was to take it almost all the way apart and clean stuff out. We borrowed a warm fall Saturday and used a combination of hose and scrub brush to clean most of the debris out. These things come apart really easily! I fixed another issue I noticed, which was resolved by bolting the front axle (crossmember?) to the chassis. It was free to flop around, and while gravity did a pretty good job keeping the assembly together, there were bolt holes. I used them. It’s far more robust now.
One of the things I’m trying to teach my kids is that you can get things a variety of ways. You can pay a lot of money to get something that’s all together and works perfectly, or you can pay an awful lot less money and get something that needs some work. If you’re short on cash, knowing how to work on things and fix them is a very, very useful skill. And if you’re four, you can turn a screwdriver!

After a few days, one of the switches started acting up again. You could pick between having both forward speeds and no reverse, or after a lot of fiddling, reverse and no forward. Given the internal state of the switches, I wasn’t surprised, so I just ordered a few replacements. They’re wear items on these devices - if you switch between low and high speed on the run, which is common enough, the switches are dealing with some pretty nasty transients (and some arcing, based on the contact scarring) when they break the power to the motors. Fortunately, switches are cheap!
But that motorcycle battery… it’s no good. It barely gives three full laps before dying!
Fortunately, I build battery packs - and built what may possibly the most overkill battery ever put in a PowerWheels!
Building the “12V” Battery: 14.8V, 27Ah, 400Wh
Actually, I’m sure this isn’t that crazy. People put some giant batteries in PowerWheels, either for extended ride time, or (with far higher voltage) for racing. Drag racing is apparently a thing. But I guarantee nobody has ever put a battery quite like this in a PowerWheels before! Mostly because it’s built of screwball cells that nobody keeps around unless they rebuild old BionX battery packs…
I did some measuring of the battery compartment to make sure what I was going to build would fit, and a four layer battery will fit just fine in the front - with room for some padding to help keep it from getting banged around. 18650s are robust, but I still believe in being gentle with batteries.
Like with the previous battery I built, this is a mild overvolt from the stock lead acid pack. You get a bit more speed, but it’s not high enough to really run the risk of damaging the motors and gearbox (I think - lithium is an awful lot stiffer in power delivery than lead). People who do drag racing and mud bogs with PowerWheels (yes, those are a thing) tend to run north of 24V, and also tend to destroy gearboxes with some alarming regularity. I’m interested in a long-lived unit instead, and it’s plenty fast as-is. If she wants more speed, we’ve got a little motorcycle for her I’ll build into something nice once she gets better at a bicycle.
Like the previous pack, this one starts with these curious 6-cell modules I have laying around in boxes. For increased range, I decided to go with a 12P4S pack - 12 cells in parallel, and 4 groups of these in series. I don’t actually know the Wh/mi rating of a PowerWheels yet, but this is enough energy to drive a Volt over a mile (almost two miles in ideal conditions), and for 30+ miles of useful assist on an ebike. It’s an awful lot of energy for a kid’s toy - which is perfect out here!

The pack goes together just like a lot of the other packs I build. I spot weld nickel strip to the cell terminals (not solder - that’s battery abuse and I respect lithium far too much to abuse it like that), and secure the rows together firmly with a thermoplastic adhesive remarkably similar to hot glue.
I’ve got a generic 4S/40A BMS from eBay. I’d love a better source of BMS boards, but there’s absolutely nothing between these and really high end boards. I don’t care so much about the balancing (this chemistry will typically self balance nicely), but I do very much care about low voltage cutoff. Kids toys get run around hard, and I want to ensure that the pack isn’t fully drained down. That’s also lithium abuse.

Quite a bit more soldering, wiring, and taping, I’ve got a pack! I expect this pack, with some reasonable care, to last the next decade or so - which gets me out of the younger kid fitting in the Power Wheels. It won’t be a full 27Ah in a decade, but based on my experience with BionX packs, I’d expect at least 22-23Ah out of it by then. Still quite useful!

With a bit of care and packaging, the pack nestles nicely in the hood area. After experimenting with bubble wrap and popping a few bubbles, I’m using some open cell foam padding I had laying around to wedge it in place - it should be resistant to getting jolted out of place, and any sharp jolts to the chassis won’t get through to the battery. At least, that’s the theory.

With all that done, I’ve got one lithium ion PowerWheels F150 - matching, nicely, the F350 behind it.
Am I done? Of course not!

On Gauges
The truck comes with a little power meter on the dash - but it doesn’t work. Even if I got it working, it wouldn’t report properly for a lithium pack, and it doesn’t give much in the way of quantitative metrics that can be used to understand the vehicle. So I fixed the problem!
While we’re on the topic of gauges, I’d simply like to mention that I hate the modern trend of car dashboards that show nothing of actual use to understand operation. One downside to the 2012 Chevy Volt we own is that it’s quite short on metrics. Later model years add far nicer information about power to/from the pack, but even that fall short of what I think reasonable. I have to use an external OBD-II gizmo and a cell phone to get useful data about things like temperature, current in/out, etc.
At least they’re honest about not showing the information, though. For a while, which includes the truck I own, there was a trend towards “idiot light gauges.” My truck’s oil pressure “gauge” isn’t a gauge. It’s an idiot light wired to a needle. Thanks, Ford. If there’s “much above zero” oil pressure, the needle is squarely in the middle, but if there isn’t, it goes to the bottom. It pretends to be an analog gauge, while offering none of the helpful information that an analog gauge offers. The good news is that you can fix it - which I’ll get around to one of these years.
Why do I care about this sort of thing? A good analog gauge lets you observe and troubleshoot all sorts of interesting issues long before an idiot light will tell you anything. I’ve got an analog engine thermometer, and I can watch the thermostat operate, watch the cold slug of coolant chasing around the engine until it evens out, and I can tell if I’m starting to get a bit warm on a hard pull up a hill - long before hitting a point where an idiot light would tell me something was wrong about 5 miles ago. And if you’re going to have a gauge, make it honest. I learned, experimentally, that one of my old Subarus had the best fuel gauge I’d ever met. When the needle was aligned with E, the engine quit. No “Oh, yeah, I’ll show you empty, but… hey, you still have few gallons” nonsense. It trusted the driver to manage their fuel, and it was wonderful.
Adding a Gauge to a PowerWheels
If you’re adding a gauge to a PowerWheels, what should it show? The obvious answer is voltage - this tells you the battery state of charge fairly accurately for most chemistries (LiFePO4 is an exception here - it’s flat throughout most of the discharge, so all a voltmeter on that chemistry shows you is “really full” or “Wow, go charge now”). This pack is 16.8V fully charged and about 12.0V empty, so there’s a useful range of voltages.
But you might want to know a bit more - and the next useful metric is amps flowing from the battery to the motors. This is really more for me than her, though I hope to teach her how to tell something useful from it eventually.
Conveniently, one can find quite cheap “volts & amps” meters on eBay! I ordered a few and once they arrived, proceeded to wire up an adapter between the battery and the motor. By putting it on a separate adapter, I can always remove it if needed, and I can use it for other purposes if needed later, though it’s probably going to hang out in the PowerWheels. Anderson connectors are cheap enough that I don’t mind spending a few on something like this.
The gauge is easy enough to deal with. I’ve actually used gauges like this before for various other projects, but none of those would tolerate 50A. Is 50A enough? Probably? I guess? I put a 40A BMS on the system, so I assumed 50A would be fine. It’s actually only barely fine, because with my pack, fully charged, the motors pull a bit north of 50A stalled…
In any case, the core of the wiring is for the shunt. I need a “battery negative” lead, a “shunt sense lead, and, for this configuration, a positive pack voltage lead. Since I have some 4 conductor cable and was being lazy, I just used two of the leads for pack positive - in retrospect, doubling up on the “battery negative” would have been a better idea.
The shunt is a low side shunt. A shunt is just a really low-Ω (and precise) resistor. It turns current into a measurable voltage. I don’t know exactly what this one is, but typically full range on a shunt (so 50A on this one) would be in the 100mV range. The white wire reports this voltage to the meter, which converts the voltage into a current readout.

A bit of testing and calibration got it fairly close - I did have to spin the current adjustment knob all the way to one end to get it to read as high as it does in current. Some larger wires to the shunt might help, but it’s close enough for a kid’s toy. And, no, my camera cannot work out blue LEDs for some reason!

A few layers of tape help keep kids fingers off anything with voltage. I’ll probably regret this in the middle of summer, but this particular duct tape has been holding up to heat fairly well.

You know where a gauge would look good? In the gauge pods that are empty! Presumably, these came with stickers at one point that have long since pealed off and drifted into the wilderness. At least one of them is getting upgraded with a proper gauge. My preferred method for cutting openings in plastic like this is a large drill bit and a few files. Drill holes near the corners, drill the center out to a reasonable extent, then sit down with a file and open it up until it fits. It’s not a particularly fast process, but if it’s a nice day outside, it’s a good excuse to sit in the sun and improve things.
The gauge is just a friction fit in there. It’s tight, but I can get it out if I have to replace the head unit. I considered potting the back with some hot glue, but… that does make repairing it harder. The head unit is about $3 if I have to replace it, so no large loss, though I’d rather it not die. It’s fairly well shielded by the dashboard, and the truck is normally parked under cover anyway.

Why is it on the outside? It’s easier for me to read it while jogging along the truck! This truck cruises, in high, somewhere around 15-18A. Climbing a hill pushes that up a bit. Practically, the pack is good for over an hour of continuous driving. And, horrifyingly, stall current (with both motors not turning) is on the north side of 50A. That’s all on 14 gauge wire. This is a unit that relies on a saggy lead acid battery for current regulation, though I am pushing another 5V on top of the rated battery voltage. It’s probably fine!

But my daughter loves it, and my son thinks it’s pretty darn cool as well - and that’s the important thing here.
Fun Projects!
I’ve enjoyed these random projects over the past months - and, even more importantly, my kids do too! Hopefully they’ve even learned something in the process!
Sorry about the late post - I was up in the mountains yesterday at a retreat, and had no interest in working on a blog post when I got home.
Now that Idaho Power has figured out what they’re doing with net metering (“hourly net metering”), the next post will be a bit of a dive into net metering and various alternatives proposed, with how to work towards optimizing for those in solar!
Comments
Comments are handled on my Discourse forum - you'll need to create an account there to post comments.If you've found this post useful, insightful, or informative, why not support me on Ko-fi? And if you'd like to be notified of new posts (I post every two weeks), you can follow my blog via email! Of course, if you like RSS, I support that too.


