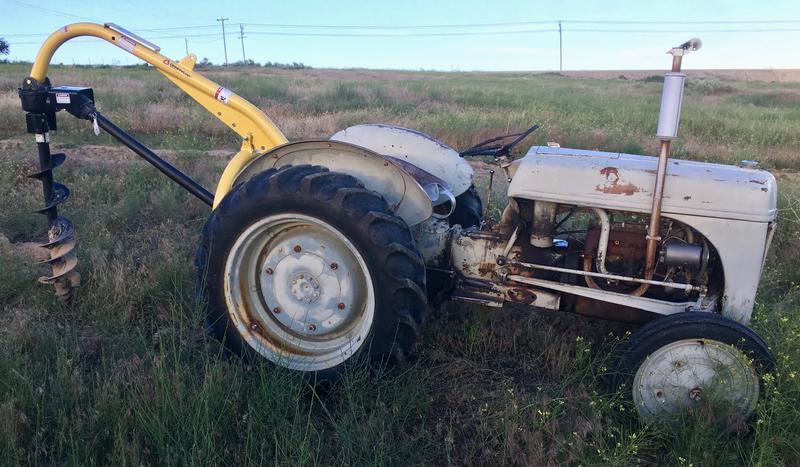

If you need holes in the ground, there are a few ways to do it. You can use a manual post hole digger (one of those clamshell two handled things you slam into the dirt), you can use a multi-person auger, or you can use a post hole digger on a tractor. I’ve got a tractor, and despite my tractor being “not ideal” for running a post hole digger, of course, that’s how I’m digging my holes.
How does it work? How can you make it not an awful experience with an old tractor that doesn’t have a live PTO or modern hydraulics? Well… you can probably guess I’ve got some advice for you!

Yes, two weeks ago I talked about the Chevy Volt and this week I’m dropping back about 70 years - where else will you find that sort of age diversity?
Keep reading for all the borey details!
Three Point Post Hole Diggers
You can find post hole diggers for tractors all over the place. If you live in a rural area, they’re probably laying around in people’s yards (I’m pretty sure I’ve seen a few laying around out here - just not people I knew well enough to ask to borrow them).
A post hole digger is a PTO (power take off - the little turning shaft at the rear of most tractors) driven arm with a gearbox on the end. It turns an auger that, with proper skill, you can use to drill holes in the ground. Precision varies (wildly) based on the tractor, the particular digger, the terrain, and mostly the skill of the operator. If you happen to have a tractor and want holes in the ground (as I do), such a thing is a very useful little gizmo!
By the late 1930s, tractors had a three point hitch. This is a (somewhat) standard method of attaching just about anything to a tractor with (you might have guessed) three connection points. This sort of attachment usually goes up and down with hydraulics, and while there are various sizes, the smaller stuff is all mostly interchangeable. You can usually run a smaller implement on a larger tractor, but I’m just not going to be pulling a 20 bottom plow with my 9N.
Around the time the three point hitch showed up, tractors also got a PTO in the back. This is just a shaft that sticks out the rear and turns based on some set of controls. You can use it for all sorts of things - mowers, seeders, generators, pumps, snowblowers, and even augers to drill holes in the ground!
Of course, modern post hole diggers are typically designed for modern tractors - not 75 year old antiques. But I enjoy the challenge.
Building and Installing the Countryline Post Hole Digger
I went to the local Tractor Supply Company and bought their standard post hole digger, as well as a 6” and 12” auger for it. The contraption comes in a very heavy wooden crate, and is all sorts of fun to get mounted on an old tractor.
Do you like adapters? Tractors have tons of adapters - you can adapt just about anything to anything with the right adapters, and Tractor Supply Company has most of them in stock! You’ll need a few. If you’re not in a hurry, eBay has a better selection.
The first adapter you need is the PTO adapter. The Ford 9N has a 1-1/8” PTO output shaft. Everything modern uses a 1-3/8” output shaft. The PTO hasn’t been used in years, so it took quite a bit of scraping dirt and grease (that black gunk) out of the PTO shaft before I could put the adapter on. Grease the splines with some moly grease to help protect the metal, drive the roll pin through, and you’re good!
Were I to do this again, I’d probably buy one of the concentric adapters from eBay. The PTO angles get a bit excessive for my taste with this adapter hanging off the back and the u-joints clatter pretty badly at full lift. A shorter adapter would keep the angles better - but TSC didn’t have one.

I thought I needed an adapter for the center connection. I spent a while cutting the bushing down to length (and wearing the teeth off a hacksaw blade), then learned that I could actually pivot the ball and find a smaller diameter hole that would fit my pin. However, further analysis indicated that things still weren’t going to fit properly. The surround for the top link is just too big to clear this old top connection point.

I’m not going to say you should shove a random slightly smaller carriage bolt through the bushing and secure the top link that way. It’s probably a terrible idea. It also happens to work - and beats spending a bunch of time with a grinder to modify the post hole digger. I’m not sure exactly how much metal I can remove before impacting the strength, and since the failure of that is both identical to the failure of a bolt (in terms of consequences) and far harder to recover from, I’ll use the bolt. You might consider a Grade 8 bolt here, if you’re buying one.
A modern tractor wouldn’t have these problems. A modern tractor would also cost me well north of $15k. If any Kobota or John Deere dealer wants to donate a small tractor to this blog for review purposes, I’ll make very good use of it for a season and I bet I’ll say very nice things!

Mount the main arm, then secure the A-frame to it with the supplied pin - it’s pretty straightforward. Make sure you crank down the nuts on the A-frame pins - they’re taking some good stresses.
The gearbox is yet another massive (and heavy) bit of hardware. It’s empty - put a quart of gear oil in it. You’ll want a 19mm wrench to get the fill plug out, and as long as you don’t dump a ton of dirt in there, it’s probably good for life with the original fill.

Secure the auger to the shaft, put the PTO shaft in place (the shear bolt is at the gearbox end), and you should have something that looks faintly like a post hole digger! If you look at the various mounting positions for the lift harness, you can see that they select the general lift height and angles. The second one out seems to work right on the 9N - try to keep it more or less vertical.

You need at least one stabilizer bar for this unit. If you don’t have it, the whole thing flops around side to side, and it digs awful holes, gets stuck badly, and will probably bend things up. The stabilizer bar also lets you tweak side to side alignment while digging if you want. It’s not optional - trust me here. If your tractor isn’t set up for stabilizer bars, you’ll have to fix that before you can use this with any success.
Conveniently, the included PTO shaft comes with a quick disconnect at the tractor end. You’ll be good friends with this on any of the Ford N series tractors, as they don’t let you stop the output shaft while the hydraulics work. If you want to pull it free without screwing in deeper, you get off, disconnect the shaft, and then run the hydraulics without the auger turning.

If you take a close look at the business end of the auger, you’ll see a few important pieces. There’s the spiral screw tip, which helps guide things in and helps pull the auger down. Then you’ve got the cutting teeth. How long will they last? It depends on how many rocks you tackle and what kind of soil you have - but, on the plus side, both can be replaced!

Limitations of the Ford 9N
If you’ve got a modern tractor, none of this section matters - the digger will be an awful lot easier to run. You’ll have a position control, independent control of the PTO and hydraulics, and probably a far more stable three point to run things from.
With the 9N? Well… you’ve got some challenges.
The whole “accessory end” of the tractor is either on or off - as a whole unit. The hydraulics run off the same shaft as the PTO, which means that if you want to lift the auger, the PTO output shaft will be turning. There’s no reverse on the PTO, of course, so the auger will be trying to dig in while the hydraulics are trying to dig it out. If this sounds like a prescription for getting things well and truly stuck… yeah. It is.
Better, there’s no position control on the 9N - only the “draft control” - how hard you want it to dig before starting to come up to avoid flipping the tractor. This works great for plowing or blading, but it makes running a digger tricky. Practically, with no load on the draft control, you’ve got a lever that is more or less an “up/down” lever. You can make the three point go up (slowly or quickly), you can make it go down (slowly or quickly), and you can make it more or less stay in the same spot, though it won’t actually stay put for very long.
How this ends up working is that you need to be very, very gentle with the draft control lever. If you feel it move, you probably moved it too far. You can move the auger up and down quite slowly if you’re careful, though at least on mine, the “neutral” control position varies somewhat with the position of the three point to add another point of challenge.
Using the Digger
Before using this for anything important, you’ll want to play around with it - dig holes, fill them up. Or come up with excuses to dig holes in random places that sound legitimate - say, building stands for owls by the garden in the soft soil, or something like that.

You’ll want a bunch of shear bolts on hand while you’re learning, because you’ll almost certainly break a few. If the tractor is really loading up, clutch it and revise your plan - trying to add RPM and power through almost certainly will make things worse (and then probably snap the shear bolt after having made things worse).
A manual post hole digger isn’t optional either. You need it to punch a pilot hole (to guide the tip of the auger down), and you need it to clear the hole out every so often. The auger will pull a bunch of material out, but it doesn’t seem to clear the soil perfectly, at least on my hill. Plus, if you want to straighten out or slightly enlarge the hole, it’s easier to do it by hand. Let the auger do most of the work, then do the finish work by hand.
Trust me, it’s still faster than digging the entire hole by hand.
I highly, highly suggest playing around a bit, because your first few holes will suck compared to later ones. It’s quite the art form to run something like this, and it takes practice to get the details right.
The first step is to figure out where you want the hole. Use your manual digger to create a bit of a pilot hole. It doesn’t have to be very deep, but it should be deep enough to guide the tip of the auger and prevent the whole thing from walking around on the ground. You might be able to skip this if the location of the hole isn’t that important, but for anything precise, dig it.
Next, align the tractor. With the post hole digger pulled up, disengage the PTO mechanism (there’s a disconnect lever on the left side of the 9N) so you can move the tractor without the auger clanking and banging. Position the tractor so the auger is over the pilot hole, and gently let the digger down. Align the tractor as needed so the auger hangs freely over the pilot hole - you should be able to center the spiral tip in the pilot hole with a bit of practice.
Chock the tractor in place - you’ll be digging in neutral. I use random pieces of basalt to keep it from rolling - they’re easily found throughout my property and I want them out of the ground anyway. After a few times, you’ll learn how much rollback to expect on a hill as the wheel settles into the basalt. Don’t be afraid to reset things if the tractor shifts too much.

With the tractor shut down, you can do some final positioning. Adjust the stabilizer bar for a bit of left and right adjustment (don’t let it flop too far to the side though), and as long as the tractor is on fairly level ground, I can grab the top of the tire and fine tune the position by hand if needed. On a slope, it’s a lot trickier. Shutting down in 1st is a good way to hold the tractor in place while setting the chocks. If you’re on level ground, be sure to put something in front of the wheels as well as behind.
Now it’s time to start digging. This part is a literal pain in the neck because of how you have to sit. You need a foot on the clutch, a hand for the draft control lever, and to be able to see the auger. It’s not a very friendly position for long term use, but it does beat digging the holes by hand. All of this beats digging holes by hand. I suppose if you were doing this a lot, you could turn the seat around - but then you wouldn’t have easy throttle access which is sometimes useful.
Engage the PTO, set the tractor to somewhere around idle RPM (I run maybe 200 RPM above the lowest governor setting for the most part), and get ready. You definitely don’t want to be digging at high speed - that’s a quick path to a broken shear bolt and things happening too fast. Low RPM is good.
Start everything spinning, and very, very gently lower the auger down. If you’re not familiar with the fine points of your position control, you will be very soon. Finesse is the key - dropping the auger hard almost guarantees it’ll dig in hard and get stuck (unless, of course, the soil is very hard and you have to drop it in hard to get an initial bite). The right rate of movement is “barely perceptible.” You want the three point holding the weight of the mechanism instead of the auger resting on the dirt. Not only does it help prevent the auger from screwing in and getting stuck, you get a better hole out of the deal. Keep the auger straight - if you have to move the tractor, do so. A serious angle like this? You’re gonna get stuck.

The whole process is done by ear. There are three sounds you’ll rapidly learn to recognize: Unloaded (spinning freely and not doing any useful work), digging (the tractor gears are lightly loaded and things sounds like a Kitchenaide stand mixer working cookie dough), and about to get stuck (heavily loaded, RPM dropping). If you hear the last sound, you’d better be pulling it up.
The auger isn’t doing anything useful unless it’s digging without getting stuck. This takes very, very fine control of the draft control lever. If you have a position lever (the 8Ns get this, and there are various mods to make the 9N behave a bit better), it may work a bit more smoothly. I don’t have one of those, so I just have to be very, very careful. Think barely perceptible movements of a lever around a neutral position that varies somewhat with the three point position.
You’ll be in and out of the hole a lot. As I’ve gotten better, I can dig for longer periods, but don’t be afraid to pull it out. When the auger is out of the hole, clear it off - either bounce the revs up a bit, or bounce the clutch a few times to shake the dirt off. Quite a bit of dirt remains down in the hole, but the more you can get off the auger, the less work you have to do. A square shovel is great for scraping the dirt thrown off away from the hole.

Again, you want the auger hanging from the post hole digger frame - not resting on the bottom of the hole. If it’s resting on the bottom, it will almost certainly screw in and cause you endless trouble getting it out. The teeth should be scraping the bottom and removing thin layers of dirt as you go. The right speed for the vertical movement, again, is “barely perceptible.” If you aren’t quite sure that things are moving, it’s about right. Anything abrupt will cause problems, though you may need to drop it hard if you’ve got really hard dirt to work though.
You might need to gently drop the auger down before letting it start turning. Don’t be afraid to clutch things if it’s banging around in the hole.
Every foot or so, pull the auger up, shut the tractor down, and clear the hole by hand. You’ll have plenty of loose dirt to clear out with the manual post hole digger, but it should come out easily. There’s no need to clear all of it, but I’ve found the auger doesn’t dig as well if there’s a lot of dirt in the bottom it’s having to churn through. On the other hand, the dirt adds weight - so it might be useful if you’re struggling to get things to bite. Like everything else, it depends on your local conditions.

Do this… oh, until the gearbox is against the ground, or you’ve reached your desired depth. Then pull the auger out, clean up the hole, and figure out the next steps. You should be able to dig down most of 36” with the TSC augers, which is sufficient for many purposes. If you need something really deep, you don’t want a post hole digger - you want a well drill.

Using a 6” auger, I end up with a 10-12” hole. I’ve got a larger 12” auger, but I’m not sure what I’ll need it for (maybe deck footings). If I’m putting concrete form tubes down the hole, I just widen the hole with a manual post hole digger as needed. Though… if you need to widen the whole hole, you can sometimes get the auger swinging and bouncing off the sides while not digging. It’s a bit violent, but it does widen a hole very quickly! If you’re not gentle enough letting the auger down (so it’s swinging), you’ll likely get into this condition.
The Problems Arise
You will run into problems with the process - the auger will get stuck, or you’ll hit rock, or you’ll snap a shear bolt, or any number of other things that can happen.
The most common problem will likely be the auger getting stuck. If it bites into something too hard (or hits a large rock), the entire contraption will stop turning. If you have the tractor running at low RPM, this should just stall the engine. If you failed to heed that bit of advice and have the RPM set a lot higher, your first notification that you’ve stopped the auger will be the distinctive metallic ping of your shear bolt head and nut departing from their proper positions at the end of the bolt, and a sudden unloading of the tractor engine. Make sure anyone watching or helping isn’t around the business end of the digger when you’re using it - post hole diggers do kill people on a somewhat regular basis. Try to avoid being involved in that sort of gruesome death.
Trying to power through a stuck auger rarely works, though you’re certainly welcome to try it. Sometimes it will solve the problem. Most of the time you’ll just make it worse.
The best solution, if you’ve been digging gradually, is to shut down, unhook the PTO from the tractor (that quick disconnect sure is handy), and then use the hydraulics to lift the auger out. It comes out, some of the time. If it won’t come easily, the next step (with the controls at full lift) is to gently rock the tractor backwards and forwards. Put it in reverse (or first, whichever is more appropriate), let the clutch out, and try to shift the auger around. This, plus lifting, usually frees it up if it’s not too badly stuck.
Of course, if you’re properly stuck (or have caught a rock that you’re screwing down with), this won’t work - then it’s time to start getting creative.
If you remove the PTO shaft and the guard, you can use a large screwdriver to work the gearbox backwards. This gets you a nice mechanical advantage over working the top of the auger alone, and may be enough to free things up - if it got stuck screwing in, maybe it’ll get unstuck screwing out. Play around, wiggle things, occasionally try to lift with the tractor, and if all else fails, you can unhook the gearbox from the auger, get a giant breaker bar, and go at it that way. Or dig. Try not to break the gearbox, but I’ll mention a large screwdriver fits the input shaft nicely.

Try not to get things that stuck, though. It’s quite unpleasant and no fun at all. Even if you feel like you’re making no headway, it’s still better than being stuck.
You did heed my advice about stabilizer bars, right? Having the whole contraption off at an angle to the side makes it far more likely to get stuck than if you’ve got it centered nice and square behind the tractor. At least on my tractor, there’s a lot of side to side play in the three point hitch, and the auger flops all over the place if I try to run it without the stabilizer attached. You really, really need that in place.
Rocks
One of my big problems out here is that I hit rocks just about everywhere I dig. I remove an awful lot from the surface, but if I go down, I’m going to hit them.
Depending on the hole, I may be able to rip through them, or I may end up finished if I’m squarely on top of a large one. So far, the best approach to rocks seems to be to bring up the RPM a bit, and rock the tractor forwards and backwards (with the auger turning). Sometimes it’ll rip rocks right out of the hole, sometimes not - but unfortunately, I haven’t come up with a great solution yet. It requires adapting to the terrain and trying different things. In general, being far more violent in rocky terrain seems to work - bring the revs up, bang the digger down, rock it around… it’s not how to dig in soft soil, but if you’re banging away against a base of rocks, try what you can. Or just hope the concrete bonds to the rock and call it good.
In rocky soil, don’t expect very nice holes - pulling a 20lb rock out of the side tends to widen the hole into something not at all round. On the other hand, if you force concrete into that gap, it’s not going to pull out easily!
Bang on it until you break something (ideally not the digger) doesn’t sound like good advice, but it sure seems to work…
A Post Hole Digger Stand
All of this works well enough until you try to remove the post hole digger from the tractor. The pieces are heavy by themselves - but assembled? The whole setup is really very, very heavy. You could, perhaps, disassemble the whole thing every time you take it off. Or, you could do what I do and build a stand for it that, paired with a chain host, makes the entire process quite easy!

The great news about buying a post hole digger is that you’ve got a built in first project - putting up a post hole digger stand! That requires two holes, some quick set cement, and a couple posts. I built mine with 4x6 pressure treated lumber wedged firmly in the ground, since that seemed about right for what I want. I’m sure it’s overkill - the best kind of kill! Realistically, I’m trying to ensure anything I build will last the rest of my life, so building a bit stronger than needed helps ensure that this doesn’t come down in 40-50 years (I generally aim for a 60 year service life on things I’m building, as that about matches the outside end of my expected service life).
Bang out a couple holes at the proper spacing. Of course, I decided to put my stand out of the way in a rocky corner of the property, so I spent quite a while banging on rocks and generally drilled some ugly holes. You can rip rocks nicely out of the ground with an auger, if they catch and you have enough force!

With a bunch of bracing from random lumber, I successfully got both poles centered in the holes - vertical, and even aligned with one another! It took a while to get everything lined up just right, but it’s time well spent. Once the concrete is poured, these aren’t going anywhere.

Since this frame won’t be taking much in the way of bending loads and generally won’t be heavily loaded, I went with Quickrete’s “fast setting” cement mix. No mixing! Just pour the dry mix in the hole and add a gallon of water per bag. The water percolates down through and somehow gets everything sorted out. I expect the mix pulls moisture from the soil as well over time. However it works, it seems to work well - the posts are very firmly fixed in the ground.

The instructions say to keep a few inches between the top of the mix and the ground. This appears to be so the water can pool properly and percolate down. Fill it in with dirt after the cement hardens. Overnight is more than enough time.

With the cement hardened, I cut the top beam to length, drilled a couple holes for some long lag bolts, and spent far, far too long with a socket set driving the lag bolts home. With the beam on top, all the lag bolts do is keep it from falling off, so of course I drove in some massive 10” bolts.
Wrap a bit of chain around the top, attach a chain hoist, and you’ve got a handy little lifting point for the post hole digger. Lifting the center of the digger makes mounting it a whole lot easier. The hole on the A-frame is about the center of balance without an auger attached.
Now, if you want to get really fancy, you could build some wheeled carts to let you use this to attach multiple different implements to the tractor…

Can You Run a Post Hole Digger on a Ford 9N?
Yes - absolutely.
Is it as easy as I think a modern tractor would make it? Certainly not. But, then again, modern tractors are quite expensive, and my 9N wasn’t.
Every time I think a modern tractor would be awfully nice, I just go price them on Craigslist - and then find ways to make my tractor do what I want.
An Update on Solar: Argh.
I get the occasional question about my solar project. I’m making progress, just slow. National Electric Code 2017 and my house don’t get along to make for an affordable off-grid/load shifting capable system, so I’m having to rethink just about everything.
Historically, my advice for those who want solar and backup power has been, “Put solar in, and get a backup generator.” I’ve tried to do something more complex, and… yeah. Not happening without the costs spiraling well out of reasonable. So, I’m probably taking my own advice. Just, the generator won’t be a normal generator.
I’ve learned a ton, I’ve been trapped in the NEC for the past 6 months, and I’m making slow headway, but there’s just nothing much to talk about yet.
Comments
Comments are handled on my Discourse forum - you'll need to create an account there to post comments.If you've found this post useful, insightful, or informative, why not support me on Ko-fi? And if you'd like to be notified of new posts (I post every two weeks), you can follow my blog via email! Of course, if you like RSS, I support that too.


