
Urals! Crazy Russian motorcycles with sidecars. And, sometimes, a source of some crazy failures that just leave you scratching your head.
I’ve been riding a 2005 Ural for about 3 years now, and I recently ran into some issues that required replacing one of the cylinder heads. Screwing up a cylinder head is fairly rare, and I’m not even certain how the failure happened in the first place - but such is life with a Russian clone of an old BMW, upgraded slightly through the years, and put into modern service.

You’ve probably either cringed in pain after that photo or have literally no idea what it is and what it’s even supposed to look like in the first place. Keep reading, and I’ll explain most of it!
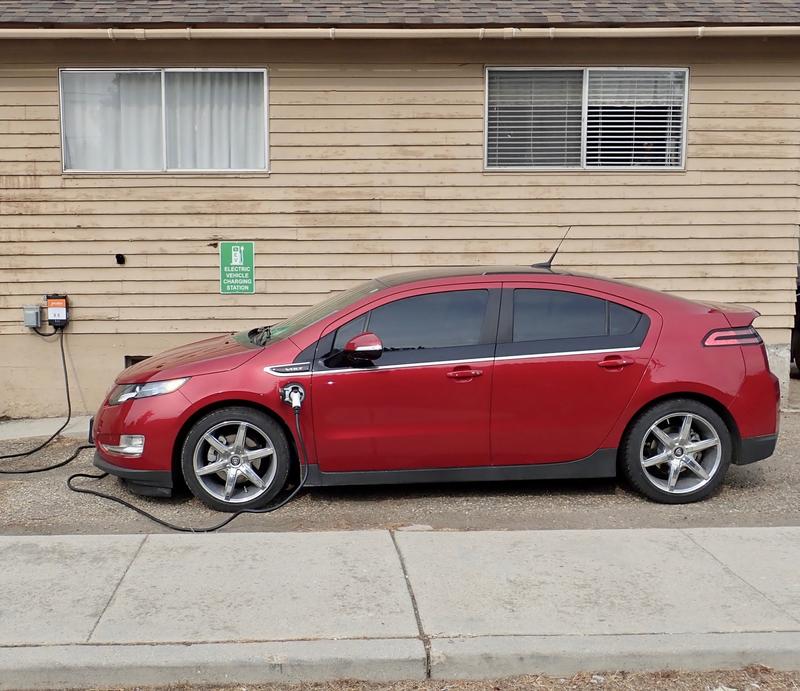
Yes. We are whiplashing from Electric Vehicles in the Treasure Valley and Adding an EV Charging Station to repairing an 80 year old engine design that happens to be my daily driver. Enjoy!
Urals: For When Modern Motorcycles Are Just Too Modern
I’ve been riding motorcycles for north of 15 years. I started with an old Honda CX500 from the late 1970s, rode Buells for a few wonderful years, and for the past three years have been putting most of my miles on a Ural. I’ve talked about them before, but they’re basically Russian copies of a 1939 BMW, evolved minimally throughout the years. They got fuel injection in 2014, along with rear disc brakes (prior to that it was rear drum brakes, mechanically operated - and the front when to hydraulic discs long, long after the rest of the motorcycle world). “Traction control” is in your right hand, “Antilock brakes” are your right and and foot, and the transmission… well, I think my Ford 9N has a nicer transmission sometimes. With a sidecar, handling is best described as “vile.” Acceleration and yaw are coupled, the bike doesn’t lean, and if you hit a corner more than a little bit too fast, it’ll roll over and kill you.
But there’s something to be said for this quirky form of transport. There’s a sense of accomplishment of getting from point A to B that’s missing on newer equipment. Winter isn’t a time to put the bike away - it’s a time to lock in 2WD and giggle hysterically as you slide around with the throttle, spinning up the wheels on every corner and sliding sideways through a cloud of snow. You can make a $200 Costco run while wearing a motorcycle jacket, and - importantly for me - you can carry kids!
The original plan for the Ural was to learn to ride it, keep riding two wheels, and use the Ural for transporting kids. I mean, who would want to ride some crazy ill handling Russian rig when they could ride a normal, well behaved motorcycle? Given all that, who would ride one for a few years and then buy another one so his wife could ride as well with the other kid?
Well… me, apparently.

The Buells sat in the shed after I got the first Ural and haven’t gone much of anywhere anywhere. I’ve actually sold both “Big Buells” since they just didn’t move after the Ural showed up. An early morning impact with the bumper of a car hanging off the back of a flatbed (didn’t knock me down, did mess up my shoulder for a while - gear works) didn’t really improve my desire to ride two wheels out here.
They’re old tech. They’re slow. They’re cranky. The handing is vile. They’re hysterically fun. And they’re just worth riding.
But they also have their quirks, and can demand parts at times. Just like anything else, really. But it’s a uniquely old style of engine that’s quite interesting!
Makin’ Metal
I sat down to adjust the valves on the 2005 because it was running a bit rougher than the 2013. I figured the valve clearances were a bit sloppy, the carbs might need some syncing… you know, the usual on a bike with 25k km and change. Step one is to pull the valve covers to adjust the valve clearances, and… well. That just ain’t right!

Engines are supposed to make power. They’re not supposed to make metal. That’s a lot of metal in the valve cover, and that’s never a good sign.
A bit more investigation revealed something else that didn’t look right. Everything is supposed to be aligned nicely, and that metal fragment sticking out isn’t aligned with anything properly. Maybe it’s just a shim that needs to be tapped back in?

Eeenh. I tapped it back in. One isn’t supposed to see jagged metal edges in an engine, and that’s not a good sign at all. That sort of jagged edge means something has gotten badly chewed up (as if the pile of metal wasn’t good evidence of something being chewed up). Time to poke further.

Pushrod Overhead Valves
Before I go too much further, I want to make sure everyone understands the parts and pieces involved, because otherwise this post won’t make much sense. The Ural is a pretty old engine style. It has pushrod actuated overhead valves, two per cylinder. What does that actually mean?
Most of the complexity of an internal combustion engine, and most of the actual variety in design, relates to the valves that let air (usually with fuel, but not always) in and let the exhaust out. The core of the engine? A piston that goes up and down in a cylinder, turning a crankshaft via a connecting rod? That’s been roughly the same for the past century and change (if you ignore the oddballs like the Wankel rotary engine). But the details of getting air in and exhaust out have undergone quite a few changes in that time.
On any four cycle internal combustion engine (the vast majority of engines out there), the valve timing is managed by a camshaft that turns at half the speed of the crankshaft. The crankshaft makes two complete rotations (intake, compression, power, exhaust, or the more casual suck, squeeze, bang, blow) for every “cycle” - so the camshaft, rotating at half speed, is well set to handle the valve timing for this. A camshaft has lobes that correspond to valve timing for these stages, and some sort of mechanism converts the rotary motion of the cams into linear motion of the valves.
A lot of earlier, low speed engines (like my tractor) included used side valves. On these, the cam typically rotated below the valves, pushing on them directly. It’s simple to build, works tolerably well at low speeds, and flows terribly at higher engine RPMs. The flow is just restricted as you try to build up engine speed.
After side valves went out of style, most engines switched to overhead valves. The most common configuration, for an awfully long time, was to have a cam located centrally in the crankcase. The motion of the lobes was transmitted by pushrods (which are literally rods that are used to push) to the valves that are above the piston - overhead valves. This allows far, far better airflow to the engine than side valves, and doesn’t take nearly the vertical room that overhead cam engines require. The upward motion of the pushrod is converted to an inward motion of a valve by a rocker arm. Below, you can see the pushrods extending at the top of the head (they go into slack adjusters with the nuts on them). The rockers are the things that look like big pivots with arms on them, and the outside of the rocker presses down on the valve stem to open them.
If you ever hear someone with an older motorcycle talking about “doing their valves,” they’re almost certainly talking about adjusting the clearances in this sort of system. You fiddle with the adjusting nuts and screws until the cold clearances are as specified - on a Ural, it might be 0.002” or 0.004” depending on the age. A feeler gauge (a precisely-thin piece of metal) is used to set the gap between the end of the rocker arm and the valve stem, and then you go on your way. Depending on a wide variety of things, valves will either loosen up over time or tighten up. Valves that are too loose are just annoying (and can cost a bit of power), valves that are too tight will hang open. A valve that doesn’t close fully is a valve that won’t last long - combustion gasses will rip it up in a hurry and it will overheat because it can’t cool against the cylinder head. Tappy valves are happy valves, or something like that!
Of course, if your valves are too loose, other bad things can happen. The higher impact speed could mash up the pushrod ends and let them jump out, or bang up your rocker arms, or the valve stem… look, just check your valves every now and then, OK? I’m bad at that, which is probably why I’m doing this particular project…

In the late 1930s, when the Ural engine was functionally designed by BMW (since Urals are a clone and independent evolution of a 1939 BMW), that’s what they used - so that’s what I have today!
Getting Inside
With the amount of damage that seemed to be the case, I debated between just pulling the valve springs with the “rope trick” (stuff the cylinder full of rope to hold the valves up) and pulling the head. Wise advice suggested that pulling the head was probably the easier option, and that also the head was probably pretty well banged up anyway. Oh, were they right…
To get the heads off a Ural, you’ll typically need to pull the exhaust system on that side. The whole thing is just a mess of clamps, so start unscrewing them until you can wiggle pieces off. These mufflers have seen far better days (someone spent a while trying to find the limits of a Ural off road, and succeeded in banging them up pretty badly along the bottom), but they’re still mufflers. Off they come.

The exhaust on a 2002-2005 Ural is just slip fit - it slips into the head and is held in by friction and the rest of the exhaust system. To remove it, you use a BFH - Big Fine Hammer. I’ve got a plastic head dead blow hammer (it’s filled with lead shot and delivers one heck of a whomp) that I use for things like this. If you don’t have a soft hammer, use a 2x4 or something to avoid banging up the exhaust pipes too badly. Just bang on it until either it comes out or you break something and have more work on your hands. Conveniently, mine came out more or less easily!

With a bit more fiddling, the carburetor comes off. I’ve stuffed the carburetor with newspaper to help keep insects and dust out. If you have a normal fuel tank petcock, make sure it’s off or you stand a solid chance of draining your tank out when you pull the carburetor. I’ve got the stock vacuum actuated petcock, so should be fine. I hope.

On the Ural, four big studs (metal dowels with threaded ends) go from the block, through the cylinder, through the head, through the rocker arms, and the head bolts tighten onto them. I’ve removed them here - you can see the bare threads on all four corners. When pulling the rocker arms off, be prepared to catch the pushrods - they’ll come out in an awfully big, oily hurry. Banging them into the dirt, gravel, rock, or onto concrete is not wise - they’re strong in many ways, but fragile in others. Grab them as the whole stack comes out and keep them with their appropriate rocker. They start out identical, and ideally remain identical, but treat the pushrod and rocker as a matched set.

Poink! With the rockers and pushrods out, wiggle the head until it comes off (CAREFULLY). If needed you can use a bit of persuader (that dead blow hammer I mentioned is a perfect persuader), but they probably will come off with some wiggling. The head gasket will either stay with the head or with the cylinder. Mine decided to stay with the cylinder. You shouldn’t reuse it, but I probably will… just to see how it works out. With the head off, you can see the piston and cylinder. If you have some vision of an engine as a spotlessly clean shiny place inside, go pull apart a few engines. They’re usually gross. I don’t pull engines apart that often, though I was prone to hosting rotary engine teardown parties for a while. Drink beer, pull apart a Mazda 13B rotary engine of some condition or other. Great fun in a living room of an apartment not-so-affectionately known as “The Pit.”
You can see the cutouts for the valves in the top of the piston - they’re the semi-circle shaped divots. These help provide clearance for the valves at the top of the exhaust/intake stroke when both valves are open.

Just in case some of you thought I was kidding about tearing down rotary engines in the living room - I wasn’t. This was a thing I did more than once. Wonderful wobbwing wotors! Yes, I have seen that Mazda is planning on using a Wankel rotary as a range extender in their upcoming EVs, and yes, I’m uncomfortably excited by that! I hope to not have to replace our Volt any time in the next decade or two, but if I have to, I hope to find used Mazda EVs on the market!

Where was I? Oh, right, goofy vehicles with lots of quirks you had to be aware of that involved a good chance of becoming familiar with the inside of your engine. Wait, I’m still confused…
Seriously, I miss my RX-7s. They’re absolutely not the right car for me at this point in my life, but there’s a red FC I see rolling around every now and then, in very good condition, and I’m jealous.
With the head off, you can see the valves. The Ural has two valves per cylinder, which is about the fewest you can have in a four cycle engine. The one on the left is the exhaust valve and the one on the right is the intake valve. The oily smear on the right is just oil from taking the head off. It gets everywhere. Both valves are in good shape and both seem to seal properly, though you can see they run hotter than the cylinder head (the valves are clear of carbon buildup).

I apologize for not having good photos of the process of removing the valve springs and retainers, but it was a two handed process and I didn’t have a third hand for a camera. I remove the exhaust valve springs by hand (which you’re not supposed to be able to do), and the intake valve springs took some large clamps and a bit of creativity to free. I wandered up the hill for that, because there’s many decades of accumulated engine experience living a short walk from me.
Urals use two valve springs - an inner and an outer one. There are a wide variety of reasons for dual valve springs, and the relevant one here is “handling a failure of one spring.” If the spring fails, it can drop the valve into the cylinder - which would then contact the piston and lead to catastrophic engine damage.

The main problem is that my inner valve spring is in two pieces. This has, far as I can tell, led to the failure observed (and I’ll talk through my theory of the failure more at the end).

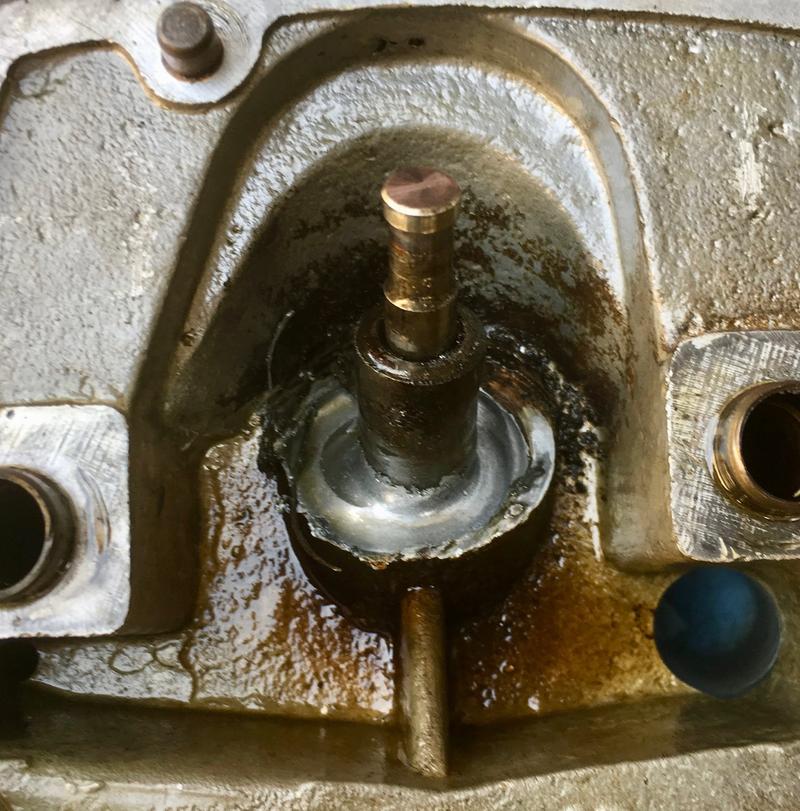
I was able to remove the valve spring stack with my bare hands - which you shouldn’t be able to do. The horror show below involves metallic remains of the valve lower retainer, and an aluminum head that’s badly, badly chewed up. Some of this is likely impact from the valve springs, some is from the lower valve retainer disintegrating… I’m not entirely sure what caused what, but this is definitely not right.

What should it look like? Look on the right. That nice smooth flat surface? The lack of jagged metal fragments? That’s what the left is supposed to look like. It doesn’t.
The discoloration doesn’t concern me terribly much. The left side is the exhaust side, and will just run hotter than the intake side on the right. Over time, that causes some discoloration from hotter oil.

Reassembly is the Reverse of Disassembly
I know that’s not a popular phrase, but it’s true. Putting things back together is the reverse of taking them apart.
I found a used head of the proper generation online, which simplifies things a lot. There are some newer heads that would work, but they require redoing the exhaust system in the process (slip in headers versus flange headers). Finding this is quite useful!
Some pieces have to move from one head to the other - the various locating bushings for the rockers, as well as the big center stud that holds the valve cover on.

Stick the head on, slide the pushrods in, attach the rockers, torque the head bolts to 40 lb*ft, set valve clearances, reattach the carburetor and exhaust, break a fuel filter stem off, ride into town to get a new fuel filter and fuel line, reattach the fuel system, and go test riding!

It runs and drives just fine, though the valve cover gasket is leaking a bit. I’ll replace it when the new ones show up. I’m also going to change the oil when the new oil filter arrives, because I expect the filter has been filling up with metal. Will I drop the oil pan? Haven’t decided. Anything heavy will just sit down there, and anything light should come out with an oil change or get caught in the filter.
And I’ll check valve clearances again, because they’re somewhat annoying to get dialed in perfectly on a Ural.
What on Earth Happened?
So what happened here? How did an engine fail so substantially, yet with so few external signs of a problem? Good question. But I have a theory.
First, let’s look at a valve spring stack that’s actually got all the pieces. This is what a valve spring stack should contain on a Ural. On the right, the lower spring retainer sits against the aluminum head and prevents the spring from wearing the aluminum. The external and internal valve springs come next - they’re supposed to nest and not make contact. Finally, the upper valve spring retainer takes the forces from the top of the spring stack and transfers them to the valve stem. This stack is supposed to always be under solid control of the cam. The springs, in all cases, should be exerting sufficient force on both ends to keep them tight, and to keep the valvetrain firmly pressed against the cam.

If this doesn’t happen, it’s called valve float - and it leads to all sorts of bad things. Broken springs can cause float. What causes broken springs? Oh, just about anything.
But in my case, I’ve got some significantly symmetrical wear on either side of the break on the inside spring - and I tend to think it’s unlikely that the wear happened symmetrically like that after the failure. I think it happened before, and was the cause of the failure.

What would cause that sort of wear? If the spring was wound just a bit wide on that coil, it would rub on the outside valve spring. Over time, that rubbing would cause heat and stress that leads to a fracture like this. Valve system tolerances are actually insanely tight. At full lift, most engine builders aim for about 0.060” (1.5mm) of clearance before bind (where the stack is fully compressed and will compress no more). There are similarly small gaps between the inside and outside springs. It doesn’t take much for rubbing.
In any case, the internal spring spent a while rubbing on the exterior spring and eventually broke. I didn’t drop a valve because of the dual springs, but the system was now operating with reduced valve spring pressure and started floating at high RPM (RPMs I actually use, because the system is designed to operate up there). Without enough spring pressure, the whole valvetrain can unload - the rocker is no longer in contact with the valve or the pushrod. This also means that the lower retainer can float freely and come up away from the head. When the spring catches up, it slams the lower retainer down - hard. Steel is strong, but it won’t take repeated abuse and this qualifies as abuse.
Eventually, that retainer comes apart into fragments (either all at once or over time), and the valve springs are riding directly on the aluminum head. With the internal springs free to slide up and down, the hardened steel springs slam repeatedly into the head, digging that circular groove. The remains of the lower retainer wander around and chew up the head, creating some of the larger fragments.
What amazes me is just how well the bike continued to run. I really didn’t notice a problem except in comparing it to the newer Ural we have - it just wouldn’t pull as hard when wound up, which is consistent with valve timing issues. Will it now? Seems like it!
Final Thoughts: This Ain’t a Tesla!
I know I’m a bit of a broken record about repairability at times, but this bike? This is repairable. The only thing that didn’t come with the bike toolkit (which is oddly complete - take from that what you wish) was a torque wrench. No software, no VIN sync, no crypto handshakes… just something that’s easy to work on by the side of the road - but that doesn’t need to be worked on by the road, because it got you home. I don’t generally mind vehicles that require maintenance, but I do mind vehicles that leave me by the side of the road. Despite driving a fleet of ultra-beaters (my cheapest car was $100, and I owned a bunch that weren’t much more expensive), I’ve only been left by the side of the road bumming a ride or a tow a few times. Most failures can either be repaired on the side of the road, or will still get you home.
Even if you have zero interest in doing your own work, something that’s easy to work on means the shop fees are lower. Less time, less complexity, less specialized tools.
I still hear, quite regularly, from BionX system owners with some dead part or another. BionX is out of business, and there’s just not much in the way of parts availability at this point. They made very nice, entirely unmaintainable systems, and the buyers of those systems are the ones left holding the bag.
Let’s make (and buy) things that we can repair!
Comments
Comments are handled on my Discourse forum - you'll need to create an account there to post comments.If you've found this post useful, insightful, or informative, why not support me on Ko-fi? And if you'd like to be notified of new posts (I post every two weeks), you can follow my blog via email! Of course, if you like RSS, I support that too.


