
The past few weeks, I talked somewhat in depth about kerosene lanterns and why you should buy one. This week, I’m covering a related technology - kerosene heaters. They’re a very useful thing to have around for when the power grid goes down in the winter, and you’d like to avoid freezing. I’m also going to do a teardown of a reasonably modern one, just so you can see what makes them tick inside. They’re quite simple!

Emergency Heat and Light
The power grid goes down. Power goes out. This is an inconvenient truth of modern life, and I’m aware that many people try to avoid thinking about it too much. But I remain a pessimist by disposition and by trade, and so it’s something I spend time pondering and preparing for. It’s a good idea to be able to weather at least a couple days of power outage in the winter without dying, as gets demonstrated regularly enough.
But beyond that, kerosene heaters are useful in a range of other conditions. In the winter, outdoors especially, radiant heat is just a nice thing to have around. People can warm their hands and bodies on the heaters, and if you live somewhere with an actual winter, there’s no shorage of events that are improved by the addition of some heat. Think of the warmth of a campfire - you can have that, in far more portable, far cleaner burning form!
Kerosene vs Propane
There are a range of options for storing energy around your property - but when it comes to the options that are safe enough to use indoors, store well, and have a range of appliances that can use them, you’ve pretty much got two: kerosene and propane. Yes, batteries exist, and if you don’t care about heat, they’re an option as well (especially paired with LEDs), but they’re awful for heat, and I know it.
Most people are familiar with propane from grills. It lives as a liquid at reasonable temperature if you contain it under pressure, and will self-feed from that pressure (yes, Alaska, I know you exist, get cold enough to keep propane from working, and I don’t live anywhere nearly that cold). You can run heaters on it, can run mantle lanterns on it, and it works fine. As long as the tank doesn’t leak, it should store just about forever - it doesn’t go bad.
Kerosene is what used to light the world (actually, it still does in a lot of countries). It’s a liquid at ambient temperatures and pressure, though it will also freeze and stop working around -40. Sealed up, you can store it for years as well, though if you’ve got it in anything open, it would be a decent idea to use the fuel gradually over time. You can use it in a range of wicked lanterns for light, and there are a range of wicked heaters that will turn kerosene into a variety of forms of heat.
If you’re looking for “infinite storage without worrying about it” sort of fuel, propane is probably better. It should last just about forever in a tank. But if you want something more convenient, and, in my opinion, nicer to deal with, kerosene is worth considering. I really like the lanterns you run on it, I like the radiant heaters, and I just don’t like how propane smells in operation. For lack of anything more precise, kerosene is a “warmer” fuel. Also, I’m a pilot, so I may have some minor bias towards something that smells like Jet-A exhaust, even though I only fly stuff that burns 100LL (the world’s best cologne). Anyway.
Radiant vs Convective Heaters
There are three main classes of kerosene heater: Convective, radiant, and forced. They all produce heat, and about the same amount for a given BTU value, but the nature of how that heat is distributed is somewhat different.
A convective heater will look like a large cylinder, and just puts out hot air - run through the wick, spread out, and heated. This is great for heating rooms - but it has to be in the center of the room, and you won’t get any real warmth off it until the room has heated up. They’re cheap, easy to find, but I don’t find them particularly useful in as many cases as I’d like.

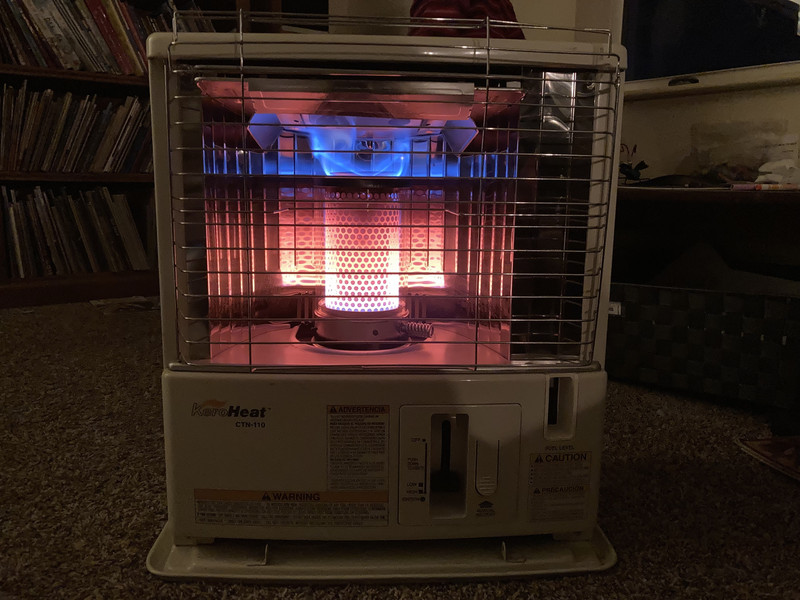
The alternative, which I own and am doing a teardown of, is the radiant type. This not only heats the air, but puts out a focused beam of IR heat that works even without the room heating up. Not only do you get the heat in the air, you also get the beam of heat before the air heats up - which can often keep you warm without having the room as hot. In addition, you can put a radiant heater back mostly against a wall - because the back and sides of it don’t get hot, with the hot air rising out in front. If it’s got a polished metal arc behind a cylinder, it’s a radiant heater.

Of course, if you really want to crank out the heat (for warming a shop or something in the winter), you want what’s variously known as a torpedo heater, salamander heater, or forced air heater. Most of these will run on a range of fuels, put out hundreds of thousands of BTU per hour, and aren’t the slightest bit suited to “inside a house” use.

Seriously. Get a radiant heater. It’s simply better.
Teardown of a Kerosene Radiant Heater
After a slightly smokey Saturday in the wind with one of mine, I wanted to pull one of mine apart for cleaning - which, of course, means a teardown! This is a fairly recent heater design - though I will also suggest that “kerosene heaters,” as a class of equipment, are an exceedingly mature technology that doesn’t change much as time goes on. We have them, they work well, and while every now and then someone goes about putting digital controls and a fan on the heaters, the core of them remains the same, and I’ll suggest that a digital controller does not do anything to improve a mechanical kerosene heater. The only electronic bits in this one are the igniter, and that’s an entirely optional piece if you have something else on fire to light it with.

The interface here is really quite simple. There’s a lever. It has an “off” position (much like autothrottles, you don’t get anything useful out of the heater in OFF mode). There’s a “Low” burner position, a “High” burner position, and then the “Ignite” position, which buzzes furiously as the electronic igniter tries to start the fire. Finally, there’s an “off” button that slams the lever back to the top. That’s it.
Off to the right, there’s a fuel level indicator that is only valid as the tank runs almost empty - I’ll show some details on that later in the fueling section, because it’s a dual use indicator!

Lift the right side of the protective grate if you want to open it, and the bottom bit pops out. Then lower it, and the whole thing opens. Round bit in the center gets hot, shiny bits in the back reflect the heat out towards you - the joys of parabolas! If you need to light the heater without the electronic igniter working, open it, lift the catalytic element out, light the wick. The “spring” on the side of the cylinder is a handle - you can rotate the cylinder if needed (perhaps to resolve some weird flame spike issues), or to remove the cylinder.

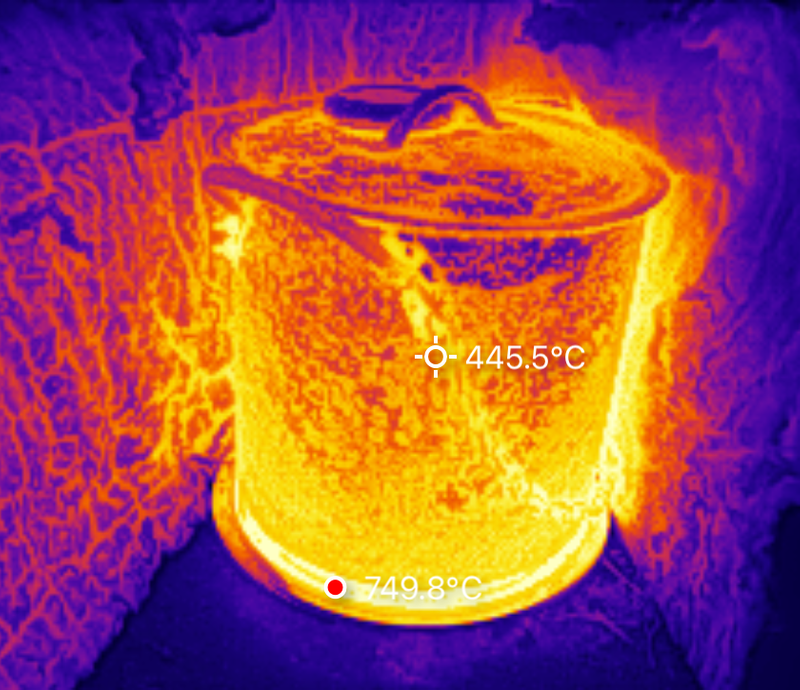
The actual heater catalytic bits lift out easily - it’s a series of loosely nested cylinders inside a glass outer shield. This is a catalytic type heater, which means that the bulk of the heat comes from the fuel reacting along these metal cylinders, without needing much in the way of flame. I can’t find much in the way of details of how this works, but in operation, the cylinders glow orange, and copious amounts of heat come off them. There are some older radiant heater types that use just a flame-heated element, but unless you’re into antique heaters, everything you’re likely to find is a catalytic type. They burn quite clean, and you want one.

The top of the burner is simply a gas deflector plate that spreads the exhaust heat out before it hits the top plate of the heater and exits. I’m not actually sure why it’s not heat-tinted all the way around - I suppose the front or back of the burner runs a bit cooler.

With the catalyst out, you can see the (rather sooted up) core of the burner - the wick comes up around the edge, and air holes around the side and in the center provide for combustion air. On the left is the igniter, which I’ll also cover later. Here, the wick is fully retracted down into the slot, which is the “Off” position. No air can get to it, so the flame rapidly goes out. There’s a lot of soot in the lower left, which is related to why I’m pulling this one apart to clean.

If you look closely here, you can see the top of the wick sticking up. This is the wick in the “high” position, but not yet lit. The “burning bits” of the wick are fiberglass - while lantern wicks are cotton, kerosene heater wicks are cotton at the bottom and fiberglass at the top. The fiberglass handles the heat of the catalytic heater far better, and doesn’t degrade (as much…) with the heat. A pure cotton wick would be rapidly charred out of existence under these conditions.

Push the control lever further, and you get ignition! The igniter is just a high temperature electric arc between two electrodes pressed into the wick, and it creates enough heat to light off the kerosene. Press for a few seconds and you should see some flickers of flame through the clear glass - though it will take some time to spread around the entire wick (stinking the entire way).

Spread around, if you don’t have the catalyst installed, you just get a nice orange flame, around the entire wick, reflecting out. If you want ambiance, this isn’t a half bad mode - though I’m pretty certain it’s far from a “clean burning, low particulate” mode. We have a lantern here, without any of the design features that go into a competent lantern. Close the grate and it should be safe enough like this, but… please don’t.

The top of the heater has, in addition to stamped bits and pieces, a door on the right side. The fuel tank goes down that opening.

Flip the door up, and you get a warning about fuels for this thing. Only Fill With Kerosene! No, really. I expect it blows up on gasoline. I don’t care to try it.

This is a view down the right side, with the fuel tank removed. The thing at the bottom you see is the heater font, routing kerosene to the wick. There’s a pokey bit up the middle of it that prods a valve in the bottom of the fuel tank to let fuel flow into the font.

The fuel tank, meanwhile, pulls out from the heater for refueling. It’s a metal tank, with a level gauge at the bottom. It holds kerosene. It has a lot of warnings about not putting gasoline in it. If you recall the last post, you’ll remember that gasoline has a flash point (combustible vapors) of around -40 - and kerosene is around 140F. Don’t fill this tank with gasoline.

And on the other side, more warnings. Seriously, do not fill a kerosene heater with gasoline. Get the point?

That dealt with, the back of the heater has a little battery container for a set of 4 “D” batteries. This drives the igniter and is entirely optional.

There’s no good reason to pull the top of the heater off. Should you do so, you’ll find this - the top of a multi-layer heat deflector that routes combustion gasses out to the front. Yes, it will soot up in the wind. But there’s no reason to remove the top of the heater unless you’re cleaning it off after some outdoor use.

However, the lower front panel? You’ll need to remove that to get further in. Two screws should pop the panel free, and after you remove the handle from the control lever, you should be able to lift the front panel up and see something faintly resembling this! The weird little tube off to the left is a vent from the font below - there’s a lightweight flapper on it that allows any excess pressure to vent.

In here, on the right, you’ll find the controls for the burner - which is to say, the lever mechanism. Push the lever down, wick goes up. However, there are two things worth mentioning down here. In the lower left, you’ll see the green microswitch that triggers the igniter. It’s a simple “Put voltage on the boost converter that makes the arc!” sort of system, and seems mostly reliable. And in the back, the black bubble-thing is a level sensor. Move the heater too far off level, and that will trip, dropping the control lever and turning the burner off. The white lever in the front is behind the “off” switch, and will do the same thing - turning the burner off.

Three screws around the base (one on each side, one on the back) should free the entire top of the heater, if you’re working on the wick or anything down below. After those are out, the entire top just pulls off cleanly!

Leaving this: The wick and controls, an air deflector plate around the wick, the font, the igniter, and the base plate. This is all the complexity of the heater - the top part is just sheet metal to route heat and gasses. Over on the right, the white depression in the font has a pin in the center to depress the “let fuel out” button in the fuel tank when it’s fully seated.

It’s not immediately obvious how to get the air deflector plates off - you “cone” them a bit up and it creates the slack needed to free the tabs. Pop one free, and the plates rotate enough to free the other side. Installation really is the reverse of removal here.

With these plates clear, you can see the main burner assembly. The wick slides up through the gap between inner and outer cylinder, air comes in the sides and up the center. Yes, it’s pretty carboned up here - again, part of why I’m cleaning it out. There are four wingnuts around the corner to remove the outer shell of the burner.

Cleaned up, you can see, far better, the air holes through it. I don’t know exactly what the air deflector in the center is, but I can reasonably assume that it wouldn’t be there if not required to direct airflow in some way.

With that removed, you can see the cylindrical wick. The top part is fiberglass to tolerate the heat, which is why heaters can tolerate being dry-burned every now and then. Around the outside is a nice big rubber gasket. Between this gasket and the flapper on the side, there should never be enough oxygen down in here to support combustion - though with the flash point of kerosene being as high as it is, you shouldn’t get the vapor buildup either.

With the lever moved for the “up” position, you can see the wick holder - it’s the round metal bit with the orange wick run through it. You can also see, down below, the cotton “fingers” that spread out into the font and absorb the kerosene up. There’s a circular depression in the bottom that kerosene flows into - so there’s really not that much kerosene down in the font. It looks like a large container, but if you look at the actual level of kerosene and the shape of it, it’s not huge amounts. This is useful for transport!
There are notches in both side levers for the pins - and if you want to remove the holder for wick replacement, simply put the side levers more or less level and twist the wick holder out. The old wick comes off, new wick goes in. This is also useful if you want to adjust the level of the wick slightly as it ages, or to fine-tune the flame height. For a replacement wick, the black mark goes level with the top of the wick holder.

Here, you can see the business end of the lever mechanism - pushing down on the lever rotates the rear lever that pushes the wick up. The entire rest of the mechanism, on the other side, relates to the catches that keep the wick up when the heater should be running.

The other side contains various releases and catches. On the left, the white lever is the “off” button from the outside and will drop the wick when pressed. The curved tab with some grease under it is the fuel tank lever - the tank presses down on it when installed, and if you remove the tank, the wick pops down. Finally, the weird black cylinder took some time to work out, but it’s an angle sensor. Tip the heater too much in any direction, that trips, and also drops the wick. So, lots of ways to have the wick drop when normal operating parameters are exceeded.

It’s hard to see the angle here and the fluid level, but I have the heater tipped 20-30 degrees to the right. Even that isn’t enough to spill kerosene from the font (at least without the fuel tank in). Initial transport of these was a bit of a challenge, because I didn’t fully understand the mechanisms involved, and the kerosene would slosh enough to let the tanks drain more in - which then proceeded to spill out and into the base trays. The right answer, verified by the teardown, is to transport them with the fuel tank end uphill if possible, and the fuel tank out. Do this, and they don’t seem to leak in transport. At least on mine, the fuel tanks seal quite tightly when out of the unit.

Finally, if something goes wrong and a bit of kerosene does leak, there are various channels to help route it to the deep well around the edge where it can pool and, ideally, evaporate uneventfully. A bit of paper towel will also mop up anything around the edge, should you have any reason to. But short of transport, I just haven’t noticed any problems with spilling.

Finally, there’s the igniter. This system starts with the batteries in the back, through the microswitch, to this boost converter that jumps the voltage… rather high. How high? I don’t know, but it makes a nice solid arc!

This voltage is run to the igniter pressed through the outside of the burner - it arcs between the wire and the jagged point. This is enough energy across the outside of the wick to heat and ignite the kerosene in a few seconds of running, at which point the fire spreads through the rest. The colder it is, the longer you’ll need to press the igniter before things light - but as soon as you see some orange, the wick is lit and you can let off. How long does a set of batteries last? No idea!

After you’ve done what you need to do, put it back together the opposite of the way it came apart!

Fueling the Heater
While the heater will burn for 10+ hours on a fill, eventually you’ll need to refill it. There are several ways to do this, of various levels of “messy” and involving funnels, but the best method, as far as I’m concerned, is a big 5 gallon tank - and a kerosene pump. The metal container will hold kerosene in a usable state for longer than plastic, and the kerosene pump just sucks kerosene out and squirts it into the fuel tank without much in the way of a mess at all! I pump until the fuel level gauge is full, and then drain the hose into it - there’s enough room left for that.

I mentioned the fuel gauge - and it’s useful both while burning (though it only shows the hour or two of fuel), and also while filling (because it shows you when the tank is almost full). I’m not always a fan of the “random liquid” sort of gauges, but this one seems to be well designed and works as hoped. Here, there’s no kerosene in it (except that tiny curl at the bottom from surface tension).

Here, the fluid level is halfway up. Black, full. Silver, empty. Even in operation, a quick glance reveals the state of the fuel level. Simple and effective - I like it!

Outdoor Operation Notes
You’ll notice that these are mostly sold as indoor heaters. Why? Because outside, if there’s any wind, they tend to get a bit… interesting. Which is to say, they blast flame out the top and bottom of the heater column. You’ll hear a lot of “fwoomph” noises, and see blats of flame out the top - but, if you look, also out the bottom.

Just try to keep them out of the wind. Any shelter you can provide is worth it. If you find it doing this too badly, dropping the control to “low” should help, at the cost of heat. But they’re simply not designed for heavy outdoor use, and if you’re outdoors constantly, you might consider a propane radiant heater instead.
Indoor Operation Notes
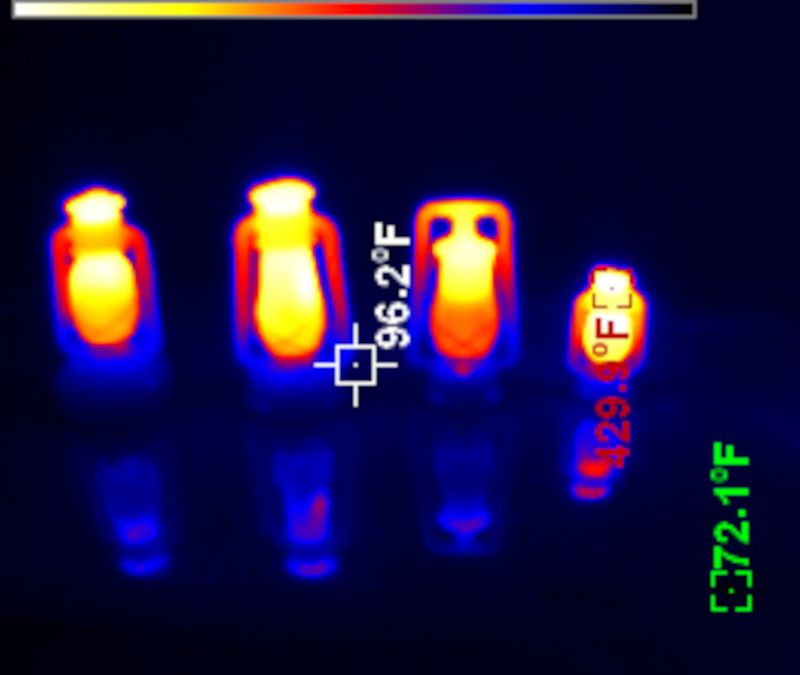
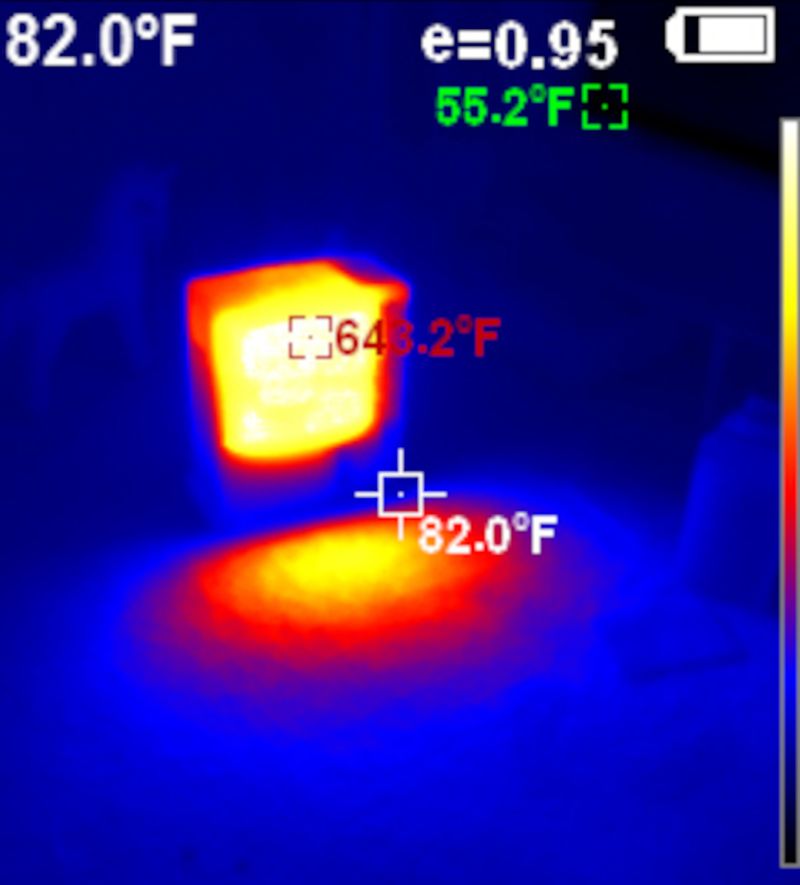
The heaters are really designed for indoor use, and it shows. They are far, far better behaved indoors. Also, when you take pictures of them when properly hot, you’ll learn that cell phone cameras rather overstate the “orange” in the heaters. They capture into the IR, and these show it off in full glory. They’re not this vivid in operation (at least to the eye).
Cranked up, you should see something like this: A solid orange central column with a touch of blue flame out the top. The bulk of the fuel is being catalytically reacted in the cylinder, and a huge amount of radiant heat comes out the front.
In the “Low” position, you don’t get the full orange column - the bottom half is orange, tapering off beyond that. No flames out the top. I’m not sure what this works out into BTU, but it’s less aggressive than high.

Try to go from low to high, and you’ll notice an awful lot of blue flame licking out the top until the cylinder heats up! Fortunately, the blue flame is low carbon and doesn’t tend to soot up the top of the heater.

Cost Considerations
Sure, this is nice heat, right? But kerosene is just staggeringly expensive! It can’t be cheaper than electric heating… and in most cases, it probably isn’t.
But kerosene is 131,000 BTU/gal. Or, 38.4 kWh. That’s an awful lot of energy. It’s not going to beat a heat pump (mostly…), but at $10/gal, that works out to $0.26/kWh. If you can get it for a far more reasonable $4.50/gal, it’s $0.117/kWh. How’s that compare to your electric rates? If you never use a resistive heater, well, OK. But if you do use resistive heaters for aux heat, consider a kerosene burner! They’re not half bad, really…
Final Thoughts
I really like these heaters. They’re a wonderful addition to a backup heat solution for a home. Wonderfully radiant, and just nice in a way a central heater isn’t. Kerosene stores well, and if you don’t have a backup solution, these are as good as any other!
I like mine. You should consider some!
Comments
Comments are handled on my Discourse forum - you'll need to create an account there to post comments.If you've found this post useful, insightful, or informative, why not support me on Ko-fi? And if you'd like to be notified of new posts (I post every two weeks), you can follow my blog via email! Of course, if you like RSS, I support that too.


