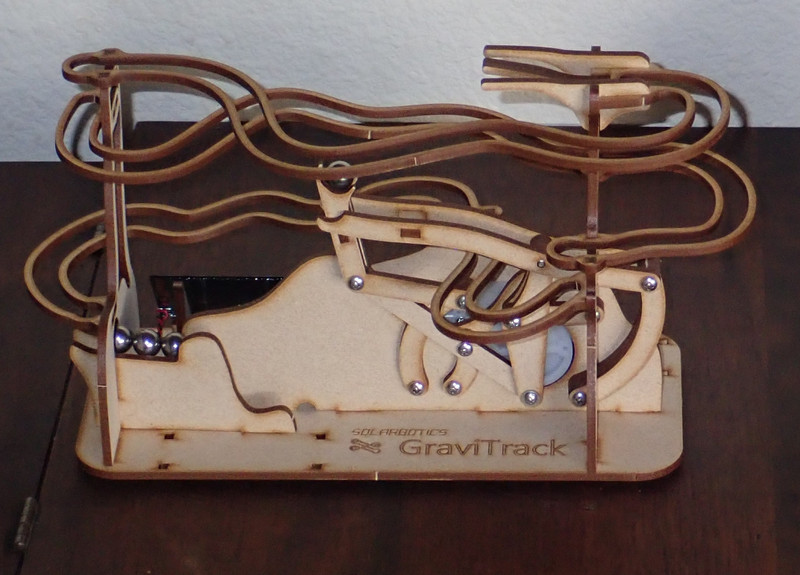

This week’s post is nothing more than a love letter to SolarBotics and their wonderful GraviTrack marble kit. It’s my second SolarBotics kit I’ve put together (the marble spiral on the right is a few years old), but unlike the other one, I took pictures of this one, because I knew what to expect, and was quite happy to find exactly that - a wonderfully designed kit that’s pure joy to assemble, leading to a beautiful piece of “counter art” - these are on display, because they’re just so well thought out, and, even better, they don’t require any batteries - which leads to some very, very useful behaviors, too!

Let’s get started!
Laser Cut Wood
The core structure of the kit is all laser cut wood - it’s got a distinctive smell out of the box (sort of like your grandpa’s wood workshop) that I happen to really enjoy, because it means a whopper of a fun little build is about to happen. There’s a range of laser cutting options, and these are absolutely top notch. The large pieces are almost but not completely cut (they typically have 2-3 tiny “tabs” holding them in place), and the smaller punch out holes are fully cut - you can see that some of the holes have already had their cores fall out, and the rest punch out with no effort at all. The boards are labeled, the pieces are labeled where needed (which I’ll show later), and it’s a world class example of how to do laser cut wood kits.

It would be easy to skip the logo on the wood, but they don’t - not only is it present, it’s a wonderful partial depth cut that will last. The single etch “SOLARBOTICS” looks good, but the actual logo has the edge cuts, but then some material blasted away in the middle as well - the center bits are lower and rougher than the surface of the wood.

And again with the “GraviTrack” logo - it’s just a really, really nice effect that leads to a solid logo that’s still wood, but stands out. And, yes, I did sort out the “focus stacking” feature on my camera, so I can do angled macro photos like this with everything in focus! Woo!

The SolarEngine
The most novel part about these is that they’re powered by a SolarEngine - which solves the problem of “small solar panel, big motor draw.” If you’ve ever played with small solar panels indoors, they simply don’t create enough power to run a motor - not even slowly. The motor windings will sink all the current the panel can provide, and nothing happens. You can put larger panels on, but it rapidly gets absurd, and even then, modern indoor lighting is quite efficient - which means “not much for solar to work with because all the energy is in the visible spectrum.”
The solution, implemented here, is simple enough: Store energy from the solar panel in a big capacitor, and when the capacitor is charged, dump all the charge at once into the motor - so it runs for a quick “bzzzt” of motion. It works. It works very, very well, and, more importantly, it doesn’t work at night. I’ve had a range of kinetic sculptures over the years that tend very annoying at night - they keep swinging, and make noise. A battery powered version of this track would be faster running, by far, and fun to watch for a short period of time, but wouldn’t remain turned on, on the counter. The “Absorb room light and occasionally move, with even less frequently a marble falling!” behavior is just wonderful, and I really, really like the end result!
My SolarEngine, assembled and ready to go. It’s just a couple leads worth of surface mount soldering and hooking up the motor properly. Panel is added later.

Unless you were to do something nuts like build your SolarEngine onto the back of the panel…

No, seriously! The back of the panel has the traces and diagrams to let you build a basic SolarEngine on the back of the panel! How cool is that? I didn’t, because I had the separate PCB and putting the parts here would interfere with how the panel was supposed to sit, but it’s such a nice touch, and speaks to flexible design options.

Building the Mechanism
“Follow the instructions.” The build starts with the mechanism, which is stacked up on the back plate. Everything is held together by screws which thread into the wood, but this also means that the screws have to be tight enough to prevent things from wobbling, but not too tight to prevent the arms from moving. I found that once they were tight (don’t apply a lot of torque, you’ll strip the wood out - you can feel when they tighten!), backing off 1/8 to 1/4 turn was more than sufficient to free things up without making pieces wobble. Play around, you’ll find it.

The attention to detail just continues on down. Are these two parts identical? At first glance, they look it - but they’re not. The top hole in the left one is smaller than in the right one - so the piece on the left has the part letter etched on it, to allow you to tell them apart after they’ve been popped out. This, of course, is on the inside, where it won’t be visible when assembled.

A bit more assembly, and the mechanism is almost complete. The manual describes where to shave or sand the edges to allow pieces to pass, and I’ll suggest that being a tiny bit more aggressive than you think needed will keep things nice and smooth - I had to re-sand a few corners to make things slide smoothly. The alignment isn’t perfect (because the screws have to be a bit loose), so rounding the edges means the arms can pass through each other easily.

The final step of the mechanism is the rotary wheel! Again, screw it in tight, but not too tight. The glob of what looks like wood glue above is, in fact, a glob of wood glue. Some of the pieces need to be glued (the spacers on the arms are one such part), and I’ve found that a bit of TiteBond and a toothpick work perfectly for this sort of project. They suggest white glue, but I see no problems with wood glue - other than, perhaps, making it slightly harder to pop apart if you have to change something later.

Building the Tower
Once the mechanism is done (yes, you can play with it “loose” like this, no, it doesn’t work very well at all), it’s time to build the towers. Get the base down, install the mechanism, and then the motor gets installed (it’s not possible to mount it backwards - the two output shafts are shaped differently). If you’re careful, you can make the connection to the solar panel by holding the wires on it - this is a good way to validate that everything works (a 60W incandescent light bulb does a great job of moving the mechanism along if the panel is almost against it). It’s probably worth fiddling with the screws now, rather than after everything else is installed - though all the joints are easily accessible after full assembly as well.

Assembly proceeds, following the directions, and getting to remove the wonderfully serpentine marble tracks. They’re just satisfying to free from their wooden cages! this part uses a decent bit of wood glue to hold everything together - and while there’s a lot of flex in the tracks, try to avoid bending them too much as you install them.

The top track goes on last, with the neat little marble catcher assembly in the top.

This is the marble catcher - and, the instructions report it takes some fiddling to get fully assembled. I agree. Everything should seat like this, and you can get there eventually, but it will involve some wiggling of pieces. The outer edges splay out somewhat to help guide the marble lifter into position to drop out from under the marble. There’s a good bit of play in those long arms when they’re fully extended, and it looks a bit sketchy with the marble, but it sure works well in practice! You really get a sense of the color difference between the laser cut edges and the flat surface of the wood pieces here - I do like the contrast.

With that done, the only remaining question is, “Where to mount the solar panel?” There are three different mounting spots, and there are wire channels to let you neatly route the wires to the desired spot, but here’s a tip: If you use the back spot, you don’t have to route the solar panel wire under anything, so you could solder the panel on and play with things more easily while assembling it! This also happens to work well for the place I’m putting mine - so, back panel mount it is. The front spot would look good too, and if it were a classroom display or something, I’d probably put the panel up there to make it easier to show off how things are powered.

A bit of the provided double sticky foam adhesive holds the SolarEngine in place (I trimmed it to fit better), wires tuck back under the motor, and it’s done!

The alternate locations for the panel are in the front, on the left, or on one of the sides with the panel mounted vertically. I probably could have left the cutouts in those holes - if I recall properly, they were faintly tabbed and so would have stayed in place, had I not gone gleefully poking out all the little cutouts I could find…

Once you’re done, you’ve got a nice little pile of wood scraps you can turn into igniters for your Solo Stove!

Mechanism of Operation
If you’ve ever grabbed something with one hand, tossed it to the other hand, and then put it up high (with both hands doing their independent things simultaneously), you’ve got an idea as to how this operates. If you really want video, SolarBotics has a battery powered version on YouTube.
The first step is to pick up the ball - this receiver holds all 4, and while it sure looks like the far ball is going to get shoved out when the arm starts lifting, it doesn’t. Again, you can see the nice contrast between the glossy laser cut edges and the main surface of the wood here.

The lower arm lifts the ball until it meets the upper arm, which comes up from below and picks the ball up out of the lower arm.

At this point, the upper arm continues up, as the lower arm continues back down to grab another ball for the transfer. The support between the arms ensures that, while the marble is riding low in the arms, they can’t spread enough for it to fall out. Yes, that one needs glue on it!

Finally, at the end of the travel, the marble is lifted above the receiver, and the arms drop out from under it, freeing it to…

Wheeeeee! And everything lines up for another go! It’s really not that loud in operation - even with the marble rolling freely, the wood damps a lot of the noise. But, as noted before, it’s solar powered, so it won’t be running at night while you’re asleep. It’s such a great little design!

My Marble Art Installation
I like my little marble art pieces. They get a prominent display on the counter, where they get plenty of ambient light to work, and just make for interesting pieces - this one, moreso than the other one, is visibly in a different position every time you walk past.

The pair just looks good together!

Seriously. Go buy one. They’re awesome!
And, yes, if you’re curious, they do work fine by lanternlight!

Comments
Comments are handled on my Discourse forum - you'll need to create an account there to post comments.If you've found this post useful, insightful, or informative, why not support me on Ko-fi? And if you'd like to be notified of new posts (I post every two weeks), you can follow my blog via email! Of course, if you like RSS, I support that too.


