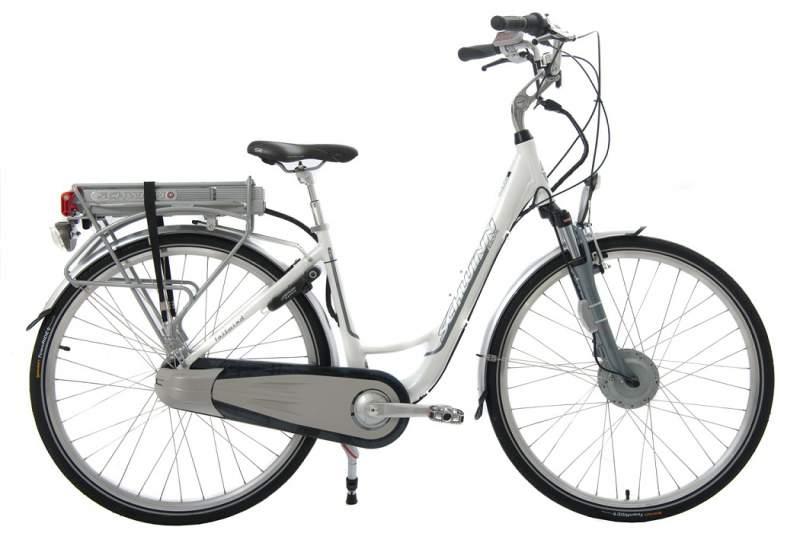

Schwinn Tailwind. The name rolls off the tongue. The bike… well, we’ll get there. But in 2015, it probably doesn’t roll at all, because it probably has a dead battery pack. An incredibly built, radically over-engineered, insanely beautiful battery pack.

It’s one of the earliest lithium powered electric bikes out there, and it was reasonably expensive - $3200, in early 2009! It was also one of the earliest uses of the Toshiba SCiB (Super Charge ion Battery) technology - a very fancy Lithium Titanate battery, capable of some truly impressive recharge rates - 6C charge rates were well within it’s capability (a 10 minute recharge time)!
The battery pack is removable, and slips easily into the back of the bike. That’s what I’m tearing apart today.

Keep going if you want to see inside. After the teardown, there’s more information, including some attempts to revive it. And some complaints about Schwinn & Toshiba.
Teardown
This pack, as is the usual story, sat without being charged for some length of time, and now won’t charge. It’s pretty much “how production ebike packs die.” I do prefer this over some of the cheap hobby lipo pack deaths, though… “dead and won’t charge” does beat “flaming death” every time.
The end of the pack contains a power meter with a button. Unsurprisingly, it doesn’t show anything when the button is pressed. I really like packs that show their charge, especially if they’re removable.

The label informs us that we’re looking at a Schwinn Tailwind - it’s Advanced Lithium Ion Powered. No, it’s not powered by anything right now, but I suppose it was when it came from the factory. And, as always, I’m going to “attempt to open, disassemble, or service the battery.” All three, actually.
Nicely, this label tells you how to store it, and that it should be charged regularly if in storage - which, of course, is never done.
Also of note is the claim that it’s a 24VDC 4.2AH pack - that’s barely 100WH! They can’t have released a bike with such a tiny pack, can they? That has to be some sort of error… I hope.

The bottom of the pack contains 8 screws. A running theme in this pack is the number of screws - it’s insane. I think I had nearly 40 screws out when I got all the way in, and there were plenty left that I didn’t remove…

The back of the pack contains the +/- DC power connections, and the charge port.
The power output plates don’t have any significant voltage on them, and are simply pressed into the power connections on the bike as the pack slides home. The whole thing is built for quick removal, and for a low power 24v bike, it’s probably just fine.
The charge port is a bit interesting - there’s an inner plug (that the normal charger plugs into), a few small connections, and then two very large, high amperage outer plugs. The large plugs aren’t used for at-home charging, but they seem to be connected straight to the battery - they’ve got pack voltage on them, as I verify later.

With the first wave of screws out, the back pops off, and… there’s another case inside. Held in by 8 more screws. That’s 14, for those keeping count. This is a very, very well protected set of cells. The little circuit board that runs the LEDs is visible as well, on the right.

Looking at the back, the main connection plates are visible - they’re actually fairly large!

Once the inner pack is out, the label is visible, and the capacity checks out. 100WH of Toshiba Lithium Ion Battery. The pack is 7 years old and a month. I’d say I was impressed, but I’d only be impressed if it was still working, which is entirely possible, had it not been drained.
Of course, this model number doesn’t turn up anything in Google (until now).
The pack:
Toshiba Rechargeable Lithium-Ion Battery Pack
Model: TBPEB001*S
Date: May 5 2008
Capacity: 4.2AH
Voltage: 24V DC

The underside of the inner pack has a very serious looking metal plate on it, held down with yet more screws (8 - up to 22 screws). Don’t worry - I’ll pop it open and see what’s hiding in there! You can also see the “Do not throw in the trash” label.

The other side of the pack is the same thing that was visible with the outer case separated. There’s a black plastic outer shell, and then the blue plastic that feels like some sort of cell casing. So far, I see no evidence of any cylindrical cells in here. If they’re in there, I can’t feel them.

My handy Radio Shack voltmeter (yes, it’s cheap, but it’s accurate and was upstairs) is useful to find out what the pack voltage is. I previously mentioned that the big charging sockets were apparently connected to the pack. They’re showing 7.13 volts. On a 24v pack with a ~2.3-2.5v chemistry… this isn’t good. That’s very definitely a drained pack.

The two main power connections don’t have pack voltage on them, but they’re not quite zero either - they’ve got 0.013v across them, which stays fairly consistent. I’m not sure if there’s some sort of signaling that goes on from the bike or not, but they definitely have a voltage across them.
I should note at this point that I don’t actually have the bike - only the battery pack. So I can’t reverse engineer the signaling, if there is any. I was hoping it just put out a nice 24v when charged… *sigh*

More screws. Another 7 screws (29) gets the side off. Wow. This is a fancy battery pack! That’s some serious computer-grade interconnect - though I’m suddenly less optimistic about getting the cells out. There are definitely 10 cells, though, in a 10S1P configuration.
A while with my voltmeter clears up what this is (a lot of 0.65-0.8v cells). The exposed metal is the cell terminals, with the raised loops connecting the two terminals. You can trace the cells - starting at the left main terminal (which happens to be the negative terminal), the cell path goes left, down, all the way over to the right side, up a layer, the diagonal connect is used to go up another layer, then two left, down, and two left again to the positive terminal. It’s very well done, and overkill in the best kind of way. I suspect the raised loops are used to deal with any thermal expansion of the pack, but whatever it is, the metal is very thick. There’s no question about this pack’s current carrying ability.

Checking the voltage on the main terminals of the pack gives me the same voltage I saw on the charging ports, confirming that they are directly attached (for high current charging). This is later confirmed by visual inspection of the BMS.

Two more screws (up to 31) for the main terminals, slide a ribbon cable out, and the BMS comes out. And… wow. This is a serious BMS, but annoyingly, the good stuff is potted over. The center fuse is a 32V/60A fuse, and I don’t doubt for a second that this BMS can take the current.

I’ll get back to the BMS. For now, I want to get in and look at the cells. There are a few screws on each end, and then two in the middle (so another 6 screws - 37). They come out with a bit of work.


Under the BMS is an off white sheet of plastic. It’s adhesive, so I pull it off, hoping for some more insight into the pack. Not so lucky. Just more cells.

At this point, I’ve got all the screws I can find out. It’s time to split the two plastic halves of the pack, and look at the cells to see what’s in there.
This is my plan. Unfortunately for my plan, Toshiba also used copious amounts of a very high quality adhesive to stick this pack together. After about an hour, I gave up - I cannot get the inner pack apart beyond this point without destroying it, and I’m not going to do that. So this is as far as I can get.
The pack seems to have 10 prismatic cells, nicely stacked.
The BMS takes another 2 screws to get apart (39), though there are plenty more to take out if you feel like it (the thing has screws going through the board into soldered joints - “belt and suspenders” does not begin to cover the construction here - it’s capable of handling some serious current).

On the backside of the BMS, the heavy conductors are overlayed on the board, and are genuinely massive. I think this BMS is capable of handling well beyond the 10A or so the bike claims to need. I’m fairly confident the 60A fuse is conservative for this BMS. I’m not sure what the pack can source, but the BMS is, by far, the most overbuilt unit I’ve ever seen.
If you look at the outer charging terminals, you’ll see continuity from the positive lead, through the fuse, to the pack. While the negative lead doesn’t obviously connect to the negative terminal, I think there’s a ground plane in here somewhere that connects everything together - the grounds are all tied together.

The metal cover alone is a serious piece of work.

Attempts at Recovery
My end goal here is a functioning pack. As replacing the cells wasn’t going to happen (I literally cannot find anything resembling those cells for sale), the next best thing is trying to bring them back up, voltage-wise, to a level that makes the BMS happy.
Lithium Titanate is supposed to be an incredibly safe, dimensionally stable, robust chemistry that can handle deep cycling without problems. The batteries weren’t totally dead, just a bit low - if 1.5v is empty, than 0.8v is not ideal, but isn’t awful. I wouldn’t do this with a 4.2v lithium ion cell, but I feel more comfortable with these cells (after a lot of reading discussing the deep discharge behavior).
My approach was simple: Bring the cells back up, individually, to a balanced state. The BMS had been disconnected for over a week, and my hope was that it would see the cells as “within range,” and start doing it’s BMS-thing again.
The first step, since the cells were a bit unbalanced, involved bringing the cells up to 2.0v per cell. This, after a bit of rest, led to a voltage of 1.95-1.97v per cell. No luck with the BMS.
I bulk charged the pack for a while longer, and after getting the pack up to around 23.2v (2.32+/- 0.01v/cell), the BMS still wanted nothing to do with the pack other than throwing errors on the LEDs.
After around 3 hours of playing with a variable voltage power supply, the pack, and the BMS, I gave up. Even with the cells obviously in the middle of their charge range, the BMS wanted nothing to do with the pack. Plugging in charging power would trigger the status LEDs to flash (a “full down to empty” walk, then all the LEDs flashing), so the BMS was online, but I could not get the BMS to take a charge from the “normal” charge ports, nor could I get it to put any voltage on the output plates.
There are some solutions to this problem, but they involve fully bypassing the BMS for output, and bulk charging with the high amperage ports. I’m not sure if the BMS will still balance the cells or not if things are done this way, and I’m not going willing to do that on someone else’s pack. So, sadly, I was not able to restore this pack to functionality.
However, there are some interface ports on the BMS (two small 4-pin ports on the side). If I can get some information about how to talk to the BMS, I might be able to figure out what’s going on and how to make it happy again. The chemistry should be just fine after a minor discharge, and it’s just a problem with the BMS.
Another possibility is to replace the BMS with a more generic unit that handles the voltages involved. This would be more work, but if I can get the charge/discharge curves for these cells, it’s entirely possible. Right now, though, I don’t have enough time or information for either. And I can’t strip the BMS potting off, as it’s not actually my pack. Yet.
Analysis
I don’t really understand this bike, or this battery pack.
As near as I can tell, the bike was released in early 2009 for Schwinn & Toshiba press coverage. There’s a lot of glowing press coverage about this Amazing Schwinn Electric Bicycle with an Incredible Toshiba SCiB Battery Pack, and not much else. It apparently sold very poorly, as a year or two later, there were some insane closeout sales on the bike.
After that? Not much except people trying to replace or repair broken battery packs.
There’s a lot about this bike that doesn’t make much sense to me.
The first is the battery capacity. People are claiming an honest 10-15 mile range with some assist. The battery pack is only 100Wh, though, and most pedal assists involve 15+WH/mi - so the bike shouldn’t go beyond 7 miles on a charge, if that. Unless the pedal assist is seriously weak, or the pack is actually more than 4.2AH, I can’t figure out the disconnect between rated pack capacity and range.
On the other hand, the Schwinn page claims it’s a 29.4v 10Ah pack. This makes for a 300Wh pack, which makes a lot more sense for the observed range. Except… the inner pack label claims it’s a 4AH pack as well. So I really have no idea what the actual capacity is, and I don’t have a load bank to test it. Nor do I know what the fully charged voltage is. *sigh*
The second is the battery pack chemistry. Schwinn is using a somewhat exotic chemistry in a pack, and the only real advantage over other available chemistries seems to be the fast charging capability. I’m not sure why you need to charge a pack at a 6C rate (10 minute recharge), but this pack can do it without breathing hard. If it’s actually a 4AH pack, it can fast charge at almost 15C - the internal fuse is 60A, which is sort of nuts for a pack like this. The pack can, in theory, source 1.5kW on a 250W bike. I have no idea why. It’s radically, radically overbuilt for what it’s being asked to do, and the BMS seems to be very sophisticated.
The stock home charger is a 29.4v, 8.4A charger - so a 2C rate, with a charged voltage of over 29v.
The only thing that makes any sense is that Schwinn wanted this bike to be used for delivery services or something, in which having a selection of packs charged would be useful. This isn’t mentioned in any of the press releases, but it’s the only thing so far that makes sense of the pack design and chemistry.
The pack is insanely overbuilt physically as well, and I’m not sure why.
The whole thing feels like it was built, not to be a useful electric bike, but as a show-off project, by a company (Schwinn) that then got cold feet about the whole ebike thing. Toshiba also seems to have contributed an exotic battery and a fancy BMS, with no documentation. Schwinn don’t seem to have any electric bikes for sale currently, despite the increasing popularity, legality, and the fact that they were one of the first with an electric bike for sale.
Schwinn Scrap
Currently, there are an awful lot of Schwinn Tailwind bikes that are basically scrap. Nobody sells a replacement battery pack for them, and the stock battery pack is not easily convinced to operate again. They’re a very heavy bike without a motor.
This is unacceptable.
Request for Information
Schwinn. Toshiba. Your complete lack of information on this battery pack is turning what should be perfectly functional electric bikes into scrap. You’ve picked an incredibly safe, high cycle life chemistry that, if drained slightly below what the BMS likes, is then unrecoverable due to the BMS. Please publish some information on the packs and the BMS such that people can get the bikes running again.
Or don’t. Keep the Schwinn Tailwinds with dead batteries in garages, collecting dust, until they get scrapped as bad purchases by people who paid up to $3200 for one of them. They carry the Schwinn name.
If you have information on these bikes, especially on the battery management system and how to communicate with it/reset it, I would genuinely like to hear from you. Please, comment below.
Or if you’ve got a dead Tailwind, feel free to chime in and let me know how much you paid for it so you can join the voices saying, “This is absurd.”
SCiB Battery Information
I’ve been able to obtain a bit of information about the Toshiba SCiB cells through various sources and a lot of reading.
The chemistry is normally set up with a low voltage cutoff of 1.8v/cell, a nominal voltage of 2.4v/cell, and a fully charged voltage of 2.8v/cell. This pack, while charging, behaved in a reasonable manner for such voltages.
While it’s not recommended, and obviously the BMS doesn’t like it (or this post wouldn’t exist), the chemistry will apparently recharge with no damage from a fully discharged state of 0v. Don’t do it often, and be careful while you do it, but being dimensionally stable, it should handle it just fine. Which also means that charging from 0.5 or 1.0v is fine as well.
And Toshiba doesn’t make the 4AH cells anymore.
Comments
Comments are handled on my Discourse forum - you'll need to create an account there to post comments.If you've found this post useful, insightful, or informative, why not support me on Ko-fi? And if you'd like to be notified of new posts (I post every two weeks), you can follow my blog via email! Of course, if you like RSS, I support that too.


