
Back in May, I made my first post about a set of window fans I’d built to deal with the Seattle summer weather in a rental with no whole house fan or whole house AC - these gizmos.

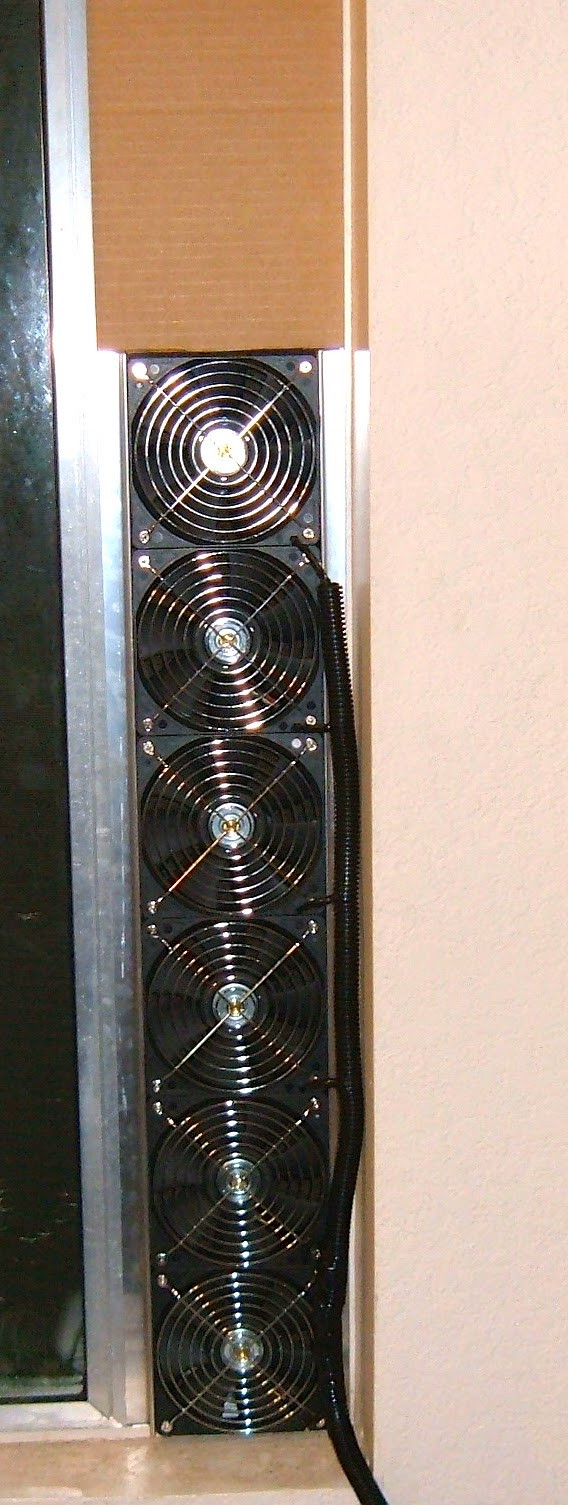
The fans are some high quality (ball bearing) Delta 120mm computer fans, secured with automotive trim tape (quite sticky double sided foam tape) into a frame made of aluminum L angle. Due to their rather high RPM, they’ve got fan guards on the front to keep fingers, papers, ferrets noses, and other things out of them.
For those unfamiliar with why I put together such a contraption: I live in the Seattle metro area. Houses out here generally don’t have whole house attic fans or whole house air conditioning. Window units are common enough, but window units don’t work well with side-opening windows (they slide sideways, instead of up). In previous summers, the whole upstairs just got hot, stagnant, and very uncomfortable. This summer looked like it was going to be a really hot one. And it was.
It’s now December. I’ve run them all the way through our long, hot summer, in a house I’ve been in for nearly 4 years - so I’m quite familiar with how hot the house was previous years.
This summer was, by far, the hottest Seattle summer I’ve been through. It was also, by far, the most comfortable in the house - entirely due to these fans. And they’re rental house friendly!
The fans ran perfectly. I had literally zero issues with them. After a month or so of playing around, I set them up with a lamp timer. They turned on automatically around 3PM (that’s about when the upstairs started getting warmer than outside), and turned off around 7AM. In the afternoon, they were venting hot upstairs air, and at night, they sucked cold air through most of the house. I could adjust airflow by which windows were open, but I also set up a default path that handled the common case (cooling down the whole house).
Read on if you’re interested in how things ended up.
Fans

The fans in the window remained exactly as I built them. They tuck nicely in the vertical window opening, with the power run down the right side. A chunk of cardboard blocks the gap above them so they don’t just recirculate air through the window, and the L angle slips nicely into the window frame to secure them.
I went through a few cheap power bricks that overheated and tripped their internal thermal breakers before I found a unit that worked reliably. Basically, assume any sort of power conversion device out of China can sustain less than 50% of it’s rated capacity (maybe less), and you’ll probably be fine.
A cheap mechanical lamp timer switched the 110v to turn the fans on and off. I could also turn them on with the switch on the timer if I were working on something that needed venting (they are great for venting solder work!), and I could unplug them if I wanted them off. It was nothing fancy, but it worked perfectly.
The Inlet Corner

Downstairs, in the far corner from the stairs, I installed my inlet. The idea here was to suck cool air through as much of the house as possible if I didn’t have other windows open. This is also where I put the air conditioner, since we use it for cooling the living room, and if it’s extremely hot, the AC unit will slightly cool the air getting sucked through the house.
This corner is generally a great place to pull cool air from because it’s a heavily shaded corner with some plants around it - so it’s about the coolest air I can find outside the house, even on a hot day.
However, if you just leave a window open, you get lots of dust, and a disturbing amount of wildlife. Flies, bees, the occasional wasp, a lot of mosquitoes, and very nearly a small bird or two. If the air conditioner is on, it’s also a great way of sucking hot exhaust air from the air conditioner into the house, which rather defeats the purpose of the air conditioner.
So, I built an intake duct! It’s duct taped in to the left of the air conditioner. Those of my readers who work on cars may think it looks oddly familiar. You’re right.
The Intake Duct
I needed an intake to do several things:
- Filter the wildlife out of the air. Ideally, it should filter the dust out of the air as well, but mostly, just the wildlife.
- Keep whatever filter I was using free from rain. Most filters stop flowing if they get wet, and it does rain in Seattle. Though, admittedly, not much during the summer.
- Collect the coolest air possible, and specifically block hot exhaust coming from the air conditioner.
Being the type of person I am, my first thought for a filter that met these requirements was a car air filter.
So, I measured the opening, and went to my local NAPA.
Did you know the staff at a car parts store can’t look up filters by general dimension? They can’t!
After a while of poking around in back (where I learned that box size has basically no correlation with filter size), I found a filter that was close enough. I’m not actually sure what car it’s from, but it’s a decent size filter, and it flows enough air.
The filter could just be duct taped in the window, but that doesn’t solve rain, or hot air recirculation. I needed a cover. It needed to be waterproof, at least for the summer. And I wanted it to be cheap.
Those who knew me in college knew that I solved many problems with duct tape back then. And some problems still just call for duct tape.
If you cover some cardboard in duct tape, you get something that’s remarkably waterproof - at least for the length of a summer. So, of course, that’s exactly what I did. I grabbed some cardboard that was out for recycling, a roll of duct tape, a carpet knife, and I made a Thing!


This is what it looked like at the end of the summer. A bit dirty, but pretty much exactly how I built it, and still holding up perfectly.
The top panel isn’t exactly horizontal - it’s angled to drain rain away from the window. And the tape is shingled such that the water won’t run under it. I never had any problems with rain seeping through the window.

The inside shows that it didn’t leak a bit during the summer. The filter isn’t even very dirty!
Maintenance included redoing the tape I used to secure it in the window once or twice over the summer. I didn’t use enough duct tape the first time. Or, more accurately, I didn’t realize that the local birds would use it as a landing pad and knock it out.
Results
How did it work?
Wonderfully.
Instead of being uncomfortably hot upstairs for large parts of the summer, the house was mostly cool and livable. Sucking cold air through at night makes a huge difference, and being able to exhaust the hot, stagnant air from upstairs in the middle of the afternoon makes a big difference as well. The house simply couldn’t build up a week’s worth of heat like it did in the past.
Despite the significantly hotter summer, we used the air conditioner a lot less. It just wasn’t needed.
The wildlife intrusions from the open window stopped entirely.
And the fans are still going strong. They should last quite a few more years.
What I Would Change
If I had to do this again, what would I do differently?
I’d probably bolt the fans onto the bracket instead of using tape. The tape works great, but the maintainability of the fan rack is basically zero. I can’t swap out a failed fan easily. This didn’t prove to be a problem, and I specifically chose high quality ball bearing fans because I didn’t want issues, but I could do it with some nuts, or drill & tap holes, and I’d have the same result with much easier maintenance down the road.
I’d add a variable fan speed controller. The fans were loud enough that I didn’t like to have them running if I was at my desk. If it was really hot, I let them run, but often I turned them off to save my hearing. A variable speed controller would let me turn them down while I was there, while still keeping airflow going.
And I think that’s about it. I’m incredibly happy with how the whole system worked this summer, and I’ll be using it in the future!
If you’re struggling with a house that simply won’t stay cool in the summer, you should strongly consider building something similar!
Comments
Comments are handled on my Discourse forum - you'll need to create an account there to post comments.If you've found this post useful, insightful, or informative, why not support me on Ko-fi? And if you'd like to be notified of new posts (I post every two weeks), you can follow my blog via email! Of course, if you like RSS, I support that too.


)