
A Ural without a sidecar windshield is like… a Ural without a sidecar windshield! Great for dogs, less-than-ideal for kids, and an awesome cargo hauler. But, if you want something that’s still great for dogs, becomes great for kids (or wives, siblings, etc), and is only slightly less awesome as a cargo hauler, you really, really want a windshield.

Unfortunately, if you order a Ural Sidecar Windshield (I got mine from Ural NE), what you get is a box of parts. There are no instructions or anything useful like that, and internet advice on assembly is sparse, so you get two items in one - a windshield, and a puzzle!
If you find yourself in this situation, fear not! I’ve done some puzzling for you, and have a guide for turning your box of parts into a shiny installed Ural windshield on your sidecar!
Windshield Overview
The biggest problems with the windshield assembly is figuring out which way all the parts are supposed to go. There are several different ways you can align several different pieces, and if you don’t have any idea as to which way things go, it can take a very long time to boggle out the details.
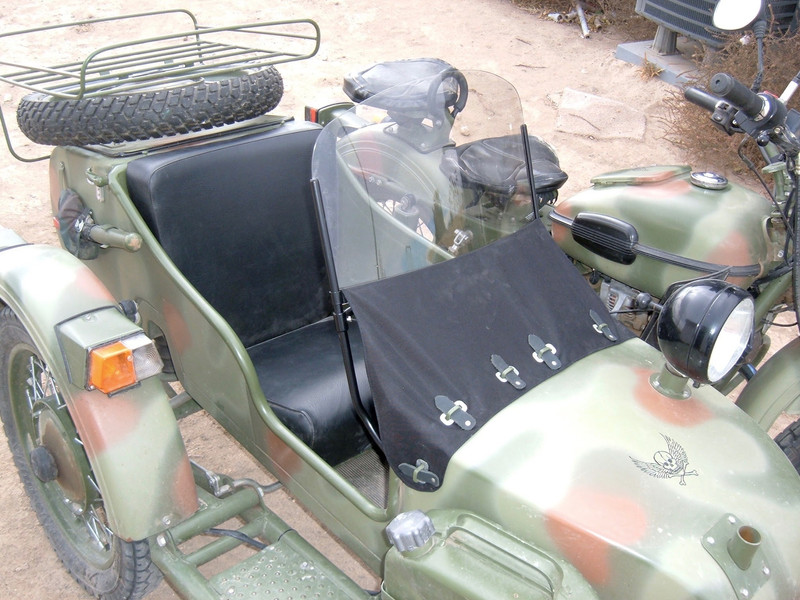
There are two important things to remember that make the rest of the assembly easier: The side arms hook forward to connect to the sidecar, and the grab handle goes towards the passenger.
You can see the arms curving forward to make a connection with the sidecar in the photo above. The windshield curves forward (obviously), and the grab bar curves backwards. That, right there, should help clarify the process quite a bit.
Sorting the Hardware
The hardware (probably) comes in a few different bags. The first bag you’ll need is the hardware for assembling the sidecar windshield. You should do this somewhere soft - carpet is great, but if you’re working in a shop, throw a towel or blanket down to help protect the plexiglass.
This is the hardware for assembling the windshield assembly. Notice that there are two different lengths of Phillips head screw - that’s important! If you don’t notice this, and assume they’re all the same, your install is likely to be very frustrating.
The two flat head screws are for securing the grab bar, and the six Phillips head screws are to secure the windshield and apron. The two longer ones go on the outside edges, for reasons that will soon be obvious!

Next, there’s the sidecar mounting brackets and associated nuts, bolts, and washers. You don’t need this until later.
However, the observant reader may have noticed that there are six bolts of various sizes, and only two nuts. What, exactly, holds the other bolts in? Well… at least for mine? Nothing. I had to make a hardware store run to get the additional nuts. So check your kit. You may need to do the same thing.

Finally, there’s the windshield and the associated hardware. A windshield (I opted for the lightly tinted aviation grade plexiglass, though you can’t tell it’s tinted on the bike), the apron that holds it in place, a couple flat metal pieces, and some bars. I also obviously went with the powdercoated version, because I think it looks good. The other option is stainless steel. Black shows dirt less… I think.

Assembling the Windshield
The first step is to get the major frame members assembled. The hand grip curves down towards the floor in this photo, and the bottom mount ends are curving up - this is looking at the frame from the front.

If you have things lined up right, there should be some bored holes for the slot head set screws to seat into - they don’t just press against the frame. There should be some holes for the set screws (not threaded) that line everything up and make sure that the hand grip doesn’t go sliding around. Make sure your screws are in those holes, or the vibration of riding will set your hand grip sliding down (and scratching up) the frame in short order!

These two flat pieces (or possibly slightly bent pieces, depending on how they arrived) are used to hold the apron on the windshield and to secure the windshield in the frame (along with the grooves on the side). You’ll bend them to shape around the windshield with the bolts.

The apron connects to hold the windshield up while riding. It connects under the mounting bar (above) and flips over to hold the windshield up. If the apron is flattened out on the installed windshield, the leather tabs end up facing the front side of the windshield plexiglass - keep that in mind as you assemble things.

Finally, there’s the windshield. I opted for the tinted plexiglass because I thought it would look cool. It certainly does, but you can’t tell that it’s tinted when installed, and I’m not sure the cost difference over the stock plastic is worth it. Up to you!
There’s a stern warning about nut torque on the windshield. It’s worth obeying! The windshield nuts are nylon lock nuts, so they aren’t going to come off while riding - you don’t need to clamp down that tightly, and it’s always easier to tighten things up a bit down the road than it is to replace a cracked windshield. Pay attention.

With that clear, the mounting bar for the bottom of the windshield comes in two pieces - one with some bent ends, one straight. You’ll bend them to match the windshield as you install things.
The orientation of the bars is up to you (things should assemble either way and work), but I chose to have the wrap around tab facing forward (away from the direction of the hand bar) - with how the apron connects, the front of the bar is totally covered, so I think it looks tidier that way.
This connection sits at the bottom of the slots in the side, right above the grab bar. Make sure it’s curving in the proper (forward) direction before moving to the next step!

Now you’re ready to start bolting the windshield in place. If you haven’t removed the protective coating, now is a good time to do this.
First, slide the windshield into the grooves in the side arms. You’ll want to have it curving forward, obviously. This should match the curve of the metal bar set in place previously.
Next, lay the apron on top - it should have holes in the bottom that more or less line up with the holes in the plexiglass and mounting bar. Be sure the leather strips are facing the windshield - the apron folds down over the front mounting bar, so this is the correct orientation.

Now, take the shorter mounting bar, lay it on top of the plexiglass (and on top of the bent ends - see a few pictures below if this isn’t clear), and use one of the short Phillips head bolts and a nylon lock nut to secure it in place. Don’t tighten it down yet - get all the bolts in place before tightening them, and recall the proper torque from above - “not much.”

The four short bolts go in the four center holes - they’re the easy ones. Get them all in place, then go for the end ones.

The only way I found to get everything to fit properly is with the front side bar over the curved ends - like this picture shows. I tried with this bar under, and couldn’t get things to line up properly.
With that said, getting the two longer bolts through and connected is hard. This is probably the hardest part of the process - I had to use a pair of pliers to squeeze things enough to get the bolt through far enough to get the nut started. This bit of stack doesn’t like to compress much at all.

With an awful lot of work, you should be able to get both bolts through and started.

With all six bolts through and the nuts started, all the bits should be lined up, so you can tighten things - gently!
The nuts are nylon lock nuts, so they shouldn’t come loose (once the nylon has bit in), and the windshield is held by the grooves on the side - if you’re not sure, looser is better than tighter here. You can always tighten the down a bit if things rattle, but with how this is assembled, it shouldn’t rattle.

And that finishes the assembly of the windshield bits - now on to mounting it!
Installing the Windshield on the Sidecar
The installation hardware here is missing a few nuts. If you are missing said nuts, go to your local hardware store and make sure you find some that fit the hex headed bolts (the set of 4).
The two larger bolts, washers, and lock nuts are the pivot bolts. The four smaller hex keyed bolts and the stack of smaller lock washers are for holding the windshield mounts in place.
If you look on either side of the sidecar, just below the front of the opening, you should see conveniently placed holes for, say, mounting a windshield!
The two holes on the left, on my setup, have zip ties through them for the spotlight wiring.

On the right, they’re just open and ready to use!

The mounts simply bolt in place. You should use a lock nut or a lock washer.
And at this point, all I can offer for advice is, “Try it and see what fits.” There are a wide range of options for how to mount the windshield on the sidecar at this point - the mounts have threaded holes, you have lock nuts for the bolts, you can flip the mounts over to gain a bit of adjustment, and you can mount the windshield on either side of the mounts. Find something that works for your setup - the tolerances on this whole assembly are loose, at best.

You can run the bolt through the threads and put the nut on the outside if you want - I decided that I wanted the bolt heads on the inside so there was less to catch people’s legs.

In any case, I got things mounted. Here’s a detail of the inside of the corner of the windshield - you can see I opted to have the Phillips heads inside, and the smooth unbroken mount bar across the inside where you can see it.

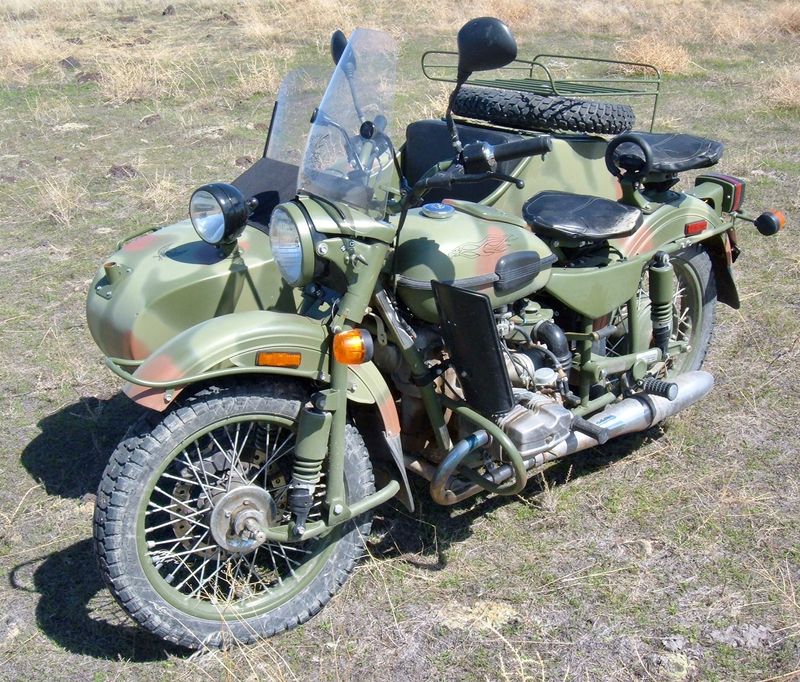
That should pretty much complete the installation!
Stow and Go Windshield
One of the nicer features of the windshield is that, if you don’t have a passenger, you can fold it down, tarp the sidecar, and have significantly reduced wind drag. The windshield is a very draggy thing when up.
I cover mine with a towel when down, just so the tarp flapping around doesn’t scratch it too badly (also, this protects the wall of the sidecar from getting scratched by the bars).

Deploying the windshield is easy - pull it up, pull the apron over the proper mounts, and shove the leather through!
Notes, Thoughts, and Alterations
I dug through quite a few threads about windshield installation when I was trying to get all this figured out, and, of course, different people have different opinions on how things should go (though I’d argue that mine is more or less “correct” per the intended design).
A few people argue that you should install the hand grip backwards (facing the front of the sidecar). This prevents people from using it as a grip, obviously. The major advantage of this is that people won’t be tempted to use it when getting in or out - this can pull on the apron and rip it free given enough abuse. Another advantage is that with the windshield down, there’s more cargo room. So, something to consider.
Another common modification (especially for people who remove the windshield regularly) is to replace the pivot bolts with something more easily removed - clevis pins or something with a cotter pin. If you do that, it’s easier to remove the windshield - but apparently it does clatter something awful.
My solution to people using the grab bar to get in and out is to fold the windshield all the way forward and ask them to hold onto the sidecar body, not the grab rail. It hasn’t been a problem so far. I have no real desire to take the windshield off regularly (just fold it), so the bolts work just fine for me!
Riding with a Windshield (and Passengering with a Windshield)
The biggest difference with the windshield up is the drag! It really makes a difference - and if I’m running without a passenger, and need to do anything higher speed or on a windy day, I stow the windshield and cover the sidecar. It’s a serious improvement in performance with the windshield down. Other than the performance difference, though, I barely notice the impact on handling. I can tell, if I pay attention, that the rig tries to turn right a bit more than usual, but it’s well within the normal error bounds of roadway crown.
However, with it up, my passengers report that it’s like riding in a car with the windows open - really not bad at all, wind-wise - and much improved over having no windshield.
Another important difference to note: The UDF is about 25% worse with the windshield up. I’m not sure people really recognize the sidecar for what it is with the tarp over it - but with the windshield up and the seat exposed? There can be no doubt!
Final Thoughts
If you take passengers, you should have a windshield. It makes a huge difference, it’s not that expensive (compared to the rest of the bike), and it just looks cool. A sidecar without a windshield is scientifically proven to be 43% less cool than a sidecar with one - so get one! And install it!
Suggestions or other comments on Ural windshields are quite welcome in the comment section below.
Comments
Comments are handled on my Discourse forum - you'll need to create an account there to post comments.If you've found this post useful, insightful, or informative, why not support me on Ko-fi? And if you'd like to be notified of new posts (I post every two weeks), you can follow my blog via email! Of course, if you like RSS, I support that too.

