
Oh, my, my, my. It’s been one of those weeks again. I’ve found myself traveling through yet another series of time vortexes, and have found myself quite in the future, in “2017.” Which, obviously, is nonsense, as the world is clearly going to end in the year 2000, when the mechanical computing devices cannot understand the year change, as the number of gears and cogs required to store a 4 digit year “cost too much,” or so say the clueless carrot counters in charge of driving the engineers to cut every single non-essential component in our sophisticated computational machines.
But, time vortexes being as they are, I did find myself in what, for all the world, appeared to be some time past the year 2000, when mechanical computational devices have been replaced, almost entirely, with “transistors” and “microchips.” How these replace a proper computer consisting of cogs and cams is beyond me, but, suffice it to say, they appear to have succeeded. Admirably. Everything has these “transistors” in it. Even radios!
And, again, I go on about irrelevant things. My purpose in posting today, in the time I find myself, is to offer some advice to those who may find themselves driving “antique cars” of the Willys-Overland brand, focusing on their superior Knight - my vehicle of choice, of course, with the silent sleeve valves instead of those clattering, tapping, and generally irritating and always out of adjustment poppet valves used in inferior engines.
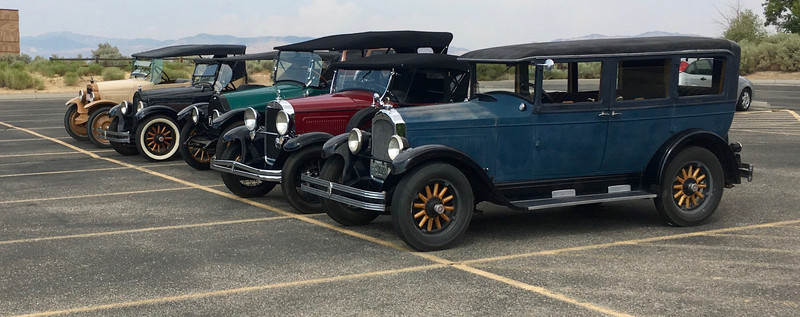
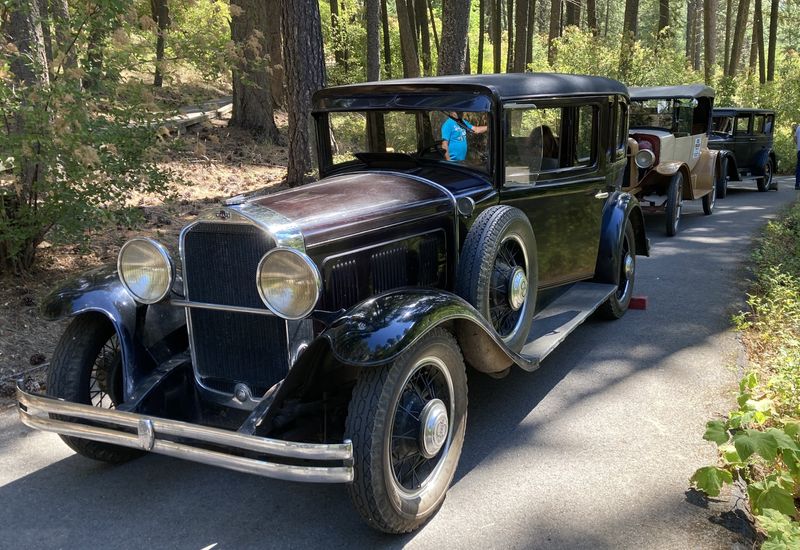
Fortunately, I stumbled across a group driving what, to them, were “antique cars.” And I was able to join right in and have a grand time exploring southwest Idaho with them! Though, sadly, one of them had a 1926 Knight, before they added the rectifier - and he did, in fact, smoke like a Knight without a rectifier!

But, if you, as a modern operator of such a vehicle, desire some advice - read on!
The Willys Knight
My car of choice, that I find joining me frequently through these odd time vortexes, is a 1927 Willys Knight. This is a quite reasonable choice for the moderately well off individual, though I do admit a burning desire to one day obtain a Stearns Knight. Those wide, wire spoked wheels, and such luxury! After much confusion, I was able to obtain “old timer” plates for this car with a modern expiration date. I simply had an acquaintance claim they found it in a barn. Nobody asked too many questions at that point in time.

Sleeve Valve Engines
Since it seems that this particular point in history is not at all familiar with sleeve valve engines (after some discussion, it appears that the poppet valve troubles have been mostly resolved, though many modern engines are still quite clattery to my ear), I suppose I shall begin with an explanation of this particularly novel and silent engine valving system. It’s not particularly relevant to vehicle operation, but it is superior, and is apparently very poorly known.
Instead of having the two poppet valves (intake and exhaust) that are smacked repeatedly (and loudly) by a cam and pushrod actuated rocker arm to open the cylinder for breathing, the sleeve valve consists of two sleeves moving relative to each other and relative to the cylinder block. These sleeves have openings on both sides, corresponding to the intake and exhaust ports in the cylinder block. By moving up and down relative to both the cylinder block and the other sleeve, these smoothly (and silently) snap open and closed the intake and exhaust ports. The two sleeves are needed to obtain the rapid actuation that leads to precise timing and powerful operation.
Unlike the perpetual problems of carbon buildup in poppet valve motors, carbon buildup in this design improves the seal between the sleeves, creating more power and even quieter operation as the motor runs through many tens of thousands of miles!

In place of a series of cams smacking against the valve system, the Knight sleeve valve system uses what looks like a miniature crankshaft to actuate the valves. Here, the valve actuation rods are visible - if they look like a standard connecting rod, it’s because they are! These ride on the camshaft (cushioned by a proper oil film, of course) and positively control the sleeves in relation to each other and the rest of the engine. This allows for smooth and high speed operation without the problems of the poppet valves - specifically, there is no noise from excessive tolerances, and as the sleeves are fully controlled at all points in time, there can be no valve float limiting revs!

The sleeveshaft is visible here, on the left. It looks like a miniature crankshaft, and is precision machined just the same.

In place of the troublesome head gaskets that must seal combustion pressures on a poppet valve engine, the Knight motor uses a superior “junk head” - named, unfortunately and quite inaccurately, by comparison to the sealing on the ends of steam locomotive cylinders (as this sealing does not move, it is often accomplished with oakum or rope or whatever the shop has laying around). This head, one per cylinder, uses traditional piston rings to seal the cylinder as the sleeves slide up and down. The spark plug is optimally placed in the exact center of the head, allowing for an ideal flame front to efficiently and quietly convert the properly carbureted fuel mixture into pressure and power.

Operating Notes - Engine Compartment
Before starting out on a day’s travels, it is quite wise to inspect the engine compartment for any abnormal fluids or damage - and, besides, turning the fuel on helps substantially with prolonged running! There are those who don’t shut the fuel off at night, but those people often discover, the hard way, about hydraulic lock when their carburetor doesn’t shut off fuel and fills a cylinder with incompressible liquid.
The right hand side of the engine compartment is opened in the usual way, with the clasps on the side. Fold up the cowling and turn the fuel on. The fuel valve is on the bottom of the vacuum tank on the firewall, which, as you will read about later, is not entirely compatible with the eldrich abomination your time calls “gasoline.” The normal operation applies - turn the petcock to the right to shut off the fuel, left all the way to turn it on.

While you’re here, check the sediment bowl for any abnormal accumulations in the bottom. Less reputable gasoline sellers do not often maintain properly clean fuel tanks. If there is sediment, simply turn off the fuel valve, remove the sediment bowl, discard the contents, rinse the bowl out with some gasoline (turning the fuel valve a half turn should suffice), and reinstall, ensuring that there are no leaks after installation. Done skillfully, you shouldn’t even smell of gasoline afterwards!

Continuing forward, inspect the water pump packing for leakage. If the packing is leaking, a small twist on the packing nut with the proper wrench should tighten it up and stop the leakage. Very minor weeping shouldn’t be an issue in operation, as the shaft rotation will force the water back inside.

In what, I do grudgingly admit, does seem a better system, cars of your era appear to have a sealed coolant system and a gauge on the plastic dashboard for reporting engine temperature. However, I have no such luxuries. Instead, I have a beautiful and entirely functional temperature gauge above the radiator.

If you’re unfamiliar with this style of temperature gauge (it seems many people are), this gauge simply indicates the temperature of the cooling system in the style of a normal thermometer. The red line goes up to indicate increased heat, and if it gets too near the top, slowing down is advised. If possible, avoid stopping entirely and shutting down, because that will simply allow the coolant boil to over and make a mess. Running under light load, even if you’re at partial throttle in 1st, is going to let things cool much better than stopping entirely.
The circle is ideal for efficiency, though operating slightly below it is quite reasonable if you’re in hilly terrain (as the engine will heat up when climbing). If it won’t warm up enough in the winter, put some cardboard or something in front of part of the radiator.

While you’re walking around the car, check your coolant level. You’ll learn how much water it goes through. Filling to the top is wasteful, as it will simply vent the excess out the overflow tube (barely visible on the far side). An inch or so down is about right, and if you can see the radiator tube support, add water. You’ll learn. This is not one of the fancy pressurized systems, so as the water expands, it will simply drain out.

Passing around the other side of the engine compartment, ensure that the carburetor rods are all securely attached, and look for excessive gasoline leakage from the carburetor that might indicate a sticking float valve. That’s a path to hydrolock, and you might want to consider cranking the engine over with the crank instead of using the electric starter if you suspect this is the case. Excessive resistance is bad news, and you should pull the spark plugs if this happens - that’s easier than replacing a bent piston rod!

Operating Notes - Driver’s Seat and Entering
If you’ve not gotten into a car of this age before, and are used to the hideously huge doors on “modern cars,” getting in and out is a bit different. I suggest getting in backwards - open the door, sit on the seat, and then swing your legs in. It’s not any trouble at all once you get used to it!

In the center of the steering wheel, there are two levers, both properly marked. On the left is the timing retard control (which operates by physically rotating the distributor body). For normal driving, leave it fully advanced. For electric starting, consider retarding it slightly (though this may or may not be needed if your starting system is properly maintainted). And for crank starting, retard the timing fully if you value your arms. It seems nobody is familiar with adjustable timing today, and apparently crank starters are no longer a thing. How on earth do you deal with a partially dead battery that won’t turn the engine over? Though, nobody seems to water batteries anymore, so perhaps you’ve solved that problem.
On the right is the hand throttle. This sets the minimum throttle setting you can command with your foot throttle. Some people drive with the foot throttle, some people drive with the hand throttle, and most people alternate depending on conditions. The hand throttle is perfectly suited to purring smoothly along a scenic country road, and the foot throttle is better suited to dealing with heavy nonsensical traffic that cannot maintain a steady pace.
Pushing on the center, of course, engages the wonderful horn! It sounds as a horn ought, not this modern “meep meep” nonsense.

The foot controls are finally standardized, unlike the earlier Overlands (with the throttle button in the center). The left pedal is the clutch, the right pedal is the four wheel mechanical brakes, and the silver button to the right of the brake is the foot throttle. The wooden button to the lower right is simply a foot rest - you operate the foot throttle by rolling your foot sideways, not by mashing down on it. And, to the upper right of everything else is the starter switch. This always engages the starter - it appears some of your era’s cars are cranky about not starting unless they’re in neutral and the clutch is in, which does eliminate the ability to move a malfunctioning car to the side of the road with the starter. Seriously, you’ve gotten rid of so many useful features it’s a wonder the cars work at all!

The three speed transmission has the standard shift pattern - up and left is reverse, down and left is first, up and right is second, down and right is third, which is the cruising gear. The handbrake, to the right, is pulled towards the seat to set the brakes. Squeeze the lever to release.
And, if you wish to lock your car to prevent someone from driving off, there is a transmission lock below the shifter that will lock the transmission in neutral.

On the dashboard, you’ll find the normal controls for ignition and lighting - toggle the left lever to turn the ignition on, move the right to the proper position for your lighting.
The knob on the bottom is the choke - pull it briefly when starting while cold, but if the car is in proper tune, it shouldn’t be needed much at all. In the cold weather, pull while starting and hold it out until the engine lets you release it (it will stumble and die if it’s not ready yet).

And, finally, the actual performance instrumentation. The ammeter on the left shows charge and discharge (a slight charge while running is desired to properly maintain the battery), a fuel gauge that leaves much to be desired in terms of accuracy, an oil pressure gauge (should run around 30 pounds at normal operating RPMs), and a clock.

And, also, your speedometer (80 is quite a bit optimistic) and odometers.

In addition to the side windows, the front window opens for airflow. Even on a hot day, one should be quite comfortable with all the windows down and the front window open! Unscrew the knobs on either side, push the window into the desired position, and tighten the knobs.

Starting, Shifting, and Stopping
Once you’ve turned the fuel on and verified coolant levels, start the engine. Ensure the transmission is in neutral, retard the timing an inch if you feel like it, and press the starter. If the engine is cold, opening the hand throttle half an inch and pulling the choke as you tap the starter should help it light right up. Release the choke as soon as it fires unless it’s extremely cold out - the need for longer choke is obvious by the engine stopping as soon as you release it.
With a slightly high idle, let the oil begin flowing and warming, then set the idle back down, release the handbrake and set off on your way!
The transmission predates these “synchronizers,” which requires a slightly different approach to driving than is the case for the modern cars with synchronizers in the transmission. When stopped, hold the clutch in for several seconds to let the transmission spin down before you attempt to engage a gear or it will make quite the racket as things grind together before meshing. Conversely, if a gear will not engage because the parts are not correctly lined up, letting the clutch up briefly (only slightly) will start things moving and allow you to slip the transmission into gear. Be firm with the shifting, especially when things are moving at the correct speed.
Starting off is done just the same as any other standard transmission car - apply a bit of throttle and let the clutch out. When starting on a slope, the hand throttle is a convenient way to apply power while preventing rollback. The handbrake is a useful tool as well if someone is nearly in your back seat.
All shifts should be double clutched - up and down. If you time things just right, you can upshift without double clutching, but the shift will be much slower.
Since it seems this is a foreign concept to many drivers, double clutching is named that because you push the clutch twice for each shift. As an example:
- Press the clutch when engine revs are appropriate for an upshift. Pull the transmission out of gear and into neutral (if you struggle to find neutral, wiggling the shifter back and forth slightly will ensure you are in the proper neutral).
- Release the clutch and the throttle with the transmission in neutral. The engine (and transmission input side) revs will drop. When they have dropped sufficiently,
- Press the clutch again and shift into the new gear. If you’ve matched revs properly, this will be a quick and silent affair. If not, well, you’ll hear and feel it. Match revs better next time.
The same is true for a downshift, with the exception that you press the throttle while in neutral to bring the revs up to the proper point for the lower gear.
First and second gear on the Knight are straight cut gears - and they make the expected noises. Third is straight through and comes with nearly zero transmission noise. Paired with the lack of poppet valve clatter, third is very quiet indeed while cruising along!
Once in third, you can remain there until you’re coming to a full stop. Even normal corners can be made in third - the engine will accelerate smoothly from very low RPM. You may need to downshift for steep hills, at which point you simply use the proper double clutching procedure to downshift while moving.
Steering, while purely mechanical, is reasonable at speed. It’s certainly a heavier car with a slower steering ratio, but the wheel is solid and firm in the hand, and there should be no issues maintaining control. At low speed, the wheel is much heavier, and creeping forward (or backwards) slightly while turning reduces the effort significantly.
Coming to a stop, remain in third while applying the brakes (on all four wheels!) until the engine drops to idle RPM, then press the clutch and come to a complete halt. It may take a moment for the transmission to stop spinning - if you try to engage first again before this has occurred, the transmission will audibly grumble.
Shutting down is quite simple: Simply turn the ignition switch off! If you’re stopped for a long period of time, I’d suggest shutting the fuel valve as well.
Cautions About Modern “Gasoline”
It’s tempting to call the liquid you get out of modern “gas pumps” “gasoline” - but it is most assuredly not gasoline, at least not by any reasonable definition! It’s corrupted with a tenth of perfectly good alcohol! They really put 10% of alcohol in their gasoline!
This is, of course, a problem. The vacuum fuel bowl on the firewall works perfectly fine with real gasoline, but it struggles to suck this waste of perfectly good alcohol from the rear tank - especially in the common situation found climbing a hill. The fuel has to come uphill to the firewall, the engine is working hard (so the radiator and exhaust manifold are hotter than normal), and therefore this fuel bowl is quite hot from the air blast. In addition, the manifold pressure is high for the climb, so there isn’t as much vacuum available. This system struggles to keep the ethanol-addled gasoline in a liquid form, and sometimes fails. If this occurs, climbing slowly in 1st (with a partial throttle) is a solution. There are also the occasional stations that still sell real gasoline, without any alcohol, and this should help a lot!

Be warned that the modern fueling nozzles do not do a good job of automatically shutting off when the tank is full. Keep your eye on it, and dipping the tank before you start to get a good idea as to how many gallons you need is wise!

The modern fueling stations have all variety of processed rubbish foods for sale inside as well!

Parting Thoughts
Hopefully you’ve found this guide useful! I certainly enjoyed rolling around the state of Idaho!
It’s quite possible to drive these cars in your absurdly heavy traffic, though I suggest finding light traffic times - closer to the traffic it was designed for. Rural winding roads, dirt or paved, are a much better place than trying to maneuver in heavy traffic and tight spaces!
Comments
Comments are handled on my Discourse forum - you'll need to create an account there to post comments.If you've found this post useful, insightful, or informative, why not support me on Ko-fi? And if you'd like to be notified of new posts (I post every two weeks), you can follow my blog via email! Of course, if you like RSS, I support that too.


