
If you keep up with the Mavic Pro firmware changelog, you may have noticed that v1.04.0000 adds a pair of new features - QuickShot and Dynamic Home Point. These are new to the Mavic Pro, so I decided to give them my usual treatment!
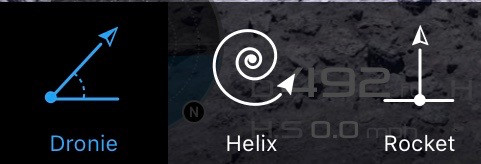
QuickShot adds a few more automatic flight modes for taking videos - Dronie, Rocket, and Helix. And Dynamic Home Point resolves a somewhat annoying issue for longer distance Active Track work related to “Where the drone thinks home is” versus “Where it’s reasonable for the drone to think home is.”

So, if you have a Mavic Pro (or are just interested in the new capabilities), read on!
Mavic Pro Missing Handbook
What is this series of posts? This is my attempt to provide a comprehensive look at all the various features of the Mavic Pro - in text form. I find video tutorials to be generally lacking in actual content, as well as truly frustrating to skim (you have to suffer through 10 minutes to find out that, no, it doesn’t actually talk about what you were wanting to learn). So, I’ve written my own guide. This has involved over a dozen flight hours, and if you find things that are missing or incorrect, I’d appreciate a comment letting me know!
DJI Mavic Pro: The Missing Handbook: Basic Operations Preflight checks, gimbal locks, takeoff, landing, basic flight operations.
DJI Mavic Pro: The Missing Handbook: Intelligent Flight Modes Tripod, Cinematic, and Sport Modes. Terrain Follow. Home Lock. Course Lock. Pretty much everything that requires you to still move the sticks to move it.
DJI Mavic Pro: The Missing Handbook: Waypoints In depth coverage of the various waypoints modes supported in the DJI Go app, as well as how to use DJI’s Ground Station Pro for more advanced waypoints features.
DJI Mavic Pro: The Missing Handbook: Active Track, Follow Me Mode, and Gesture Mode Active Track has quite a few modes of operation, and I delve into all of them. This post also covers the GPS-based “Follow Me Mode” and how to look less silly using Gesture Mode for dronies.
DJI Mavic Pro: The Missing Handbook: Wifi/Remote Only, Tap to Fly, Fixed Wing, Point of Interest, Attitude Indicator Finishing out the series on flying modes with the remaining modes, as well as discussion about the attitude/orientation/power indicator, flying with only the remote or only a phone, and some of the degraded flight modes.
Requirements for QuickShot and Dynamic Home Point
In order to use these two new features, you need at least firmware v1.04.0000 - which is the brand new shiny firmware released Sep 19, 2017. This is the first feature release in a while - some other features added in firmware updates included the DJI Goggles, and Cinematic Mode.
Checking the firmware and app version is pretty straightforward in the app. Tap the right half of the titlebar to get to the menu, tap the “…” at the bottom, and scroll to “About.” This option should show the firmware of the Mavic Pro and remote (both should match, and be 01.04.0000 or greater), and the app needs to be 4.1.0 or later. Note that most Mavic Pros are on the 01.03.x000 versions - this version is newer than the 01.03 series.
If you don’t have both of these, you won’t see the new features. Yes, this firmware is past the revised NFZ system, so if you want this, you’ll get that as well.
When you’re first playing with this, if you enter the DJI Go app before you have the aircraft and remote connected, you might not see the QuickShot icon. Kill the app and restart it once connected to the aircraft, and you should see the proper icon in Intelligent flight Modes.
QuickShot
QuickShot is, by far, the most exciting new feature here. The Mavic Pro gets three QuickShot modes: Dronie, Rocket, and Helix. These are some automatic flight paths that focus on the target of interest and automatically record video for you. When it’s done, it will fly right back to where it started from! Prepare for a huge wave of videos on social media that were taken with this mode…
Be aware of what’s around you! All three of these modes involve the Mavic Pro flying sideways, backwards, or straight up. There is no obstacle detection available in any of these modes (due to the direction of flight), so be sure the area is clear!
Since QuickShot is an Intelligent Flight Mode, you enter it the same way you enter others - tap the robot icon on the left, then find the new QuickShot icon in the center of the first pane. Annoyingly, if you’re used to where things were, they’ve now moved. I guess showing off new features is more important than keeping existing users happy…

Once you tap the QuickShot icon, you’ll see the following two tips on screen - if it looks like ActiveTrack, that’s because it is! All three of these modes are using ActiveTrack, so if you try to lock onto something that ActiveTrack struggles with (say, a pile of rocks), you’ll get weird results. It’s far better suited to working with a human or vehicle target than random contrasts against the background that change with angle.
The slider on the right selects the maximum speed, but it’s safe to ignore for the QuickShot modes - they’re flown far slower than the maximum ActiveTrack speed, and sliding it all the way down seems to make no difference either. This seems like just an Active Track display legacy item.

Once you select a target and click “GO,” you’ll see a popup video for the first mode - Dronie. So, let’s look into that mode first.
Well, unless you’re too low. Then you’ll get a warning and QuickShot will refuse to activate. You should be able to figure out an appropriate resolution to this warning. Once you take that action, it will turn green and give you a “GO” prompt.

Dronie
Now an even more overloaded term! And still a term I despise. However, DJI does use this term, so I’m stuck with it.
The Dronie mode is pretty simple: It backs away and up while filming, automatically, then flies back to where it started. All of the QuickShot modes will return to the start point, which is a pretty neat feature. In DJI’s words, “The aircraft will fly backward and upward, with the camera constantly tracking the subject. Tap Dronie icon to check flying distance before tapping Go.”

Once you click through this (or disable it permanently), you’ll see the list of icon types across the bottom. You can select one of the various modes, or tap on the selected mode to bring up a distance slider.
How far out would you like it to go? Select it here! For the Dronie mode, the maximum distance is 200m (default is 60m). Annoyingly, even if your drone is set to Imperial units (feet), the sliders are still in metric. I really wish DJI would fix this throughout their app - I don’t think in metric!

When you’re ready to take your Dronie video, tap “Go.” You’ll get a countdown timer on the screen and through the audio, a bunch of overlapping text, then the drone will fly off to take the video. You can tap the screen during the countdown to cancel the shot, if you change your mind.

Once the sequence starts, the Mavic Pro begins recording video with your previously selected video settings (check this if you’ve recently upgraded the firmware, or you’re probably shooting in 4k). You’ll see the record icon switch to indicate recording, and you’ll see a percent gauge under the record icon. This shows how far through the shot the drone is - when it hits 100%, it stops recording and returns home.

After the shot finishes, you’ll see the popup indicating that the drone is returning to the start point - and, if all goes well, the drone will return in forward flight (with obstacle avoidance working) to the start point.

A quick look at the map after a successful Dronie capture shows what happened. It backed straight up (gaining elevation in the process), stopped, and returned forward to where it started. Perfect!

If you’re paying attention, you might notice a mark on the screen that indicates more or less where the drone is going while returning to the start point. In my testing, the drone is pretty good at getting back to where it started. If not exactly, quite close.

Helix
The second option you can pick is “Helix.” Per the description, “The aircraft will fly backward while spiraling up around the subject. Tap Helix icon to check flying distance before tapping Go.”
It’s a pretty cool effect, really. This is the neatest of the options, because it’s hard to do smoothly with just the remote. You can make it happen with Point of Interest or some of the other Active Track modes manually, but this is flying sideways, backwards, and rising all at once, and doing it very competently!

If you tap the Helix icon again, you can select distance (out to 150m, default is again 60m) and pick which way the drone spirals around - clockwise or counterclockwise.

Verify your settings, tap “Go,” and after the countdown, the drone will fly a very nice spiral out, then head back to the starting point. Or, perhaps, it won’t, because it can’t actually track the rock pile you selected, and flies a weird shaped thing as it tries to track something it can’t actually understand.
If you don’t have a solid ActiveTrack target (person, vehicle, etc), it’s unlikely that this mode will do what you want - the nose will wander all over trying to reacquire the target, or tracking random things. You really, really need the solid target understanding for this mode to work. I couldn’t get anything useful against a rock pile, but it worked fine tracking me standing in the same field.
The Mavic Pro will indicate “I know what this target is!” with a little icon - a person, a bicycle, a car, a boat. If you don’t see this and you’re trying to select one of those classes of targets, try again - or, often, you can simply tap on the person or car and have ActiveTrack automatically identify the target.

Rocket
The final QuickShot mode implemented on the Mavic Pro is Rocket. Or, “Go straight up, take video.” In DJI’s words, “The aircraft will ascend with the camera pointing downward at the subject. Tap the Rocket icon to check flying distance before tapping Go.”
It does what the box says. Fly up, take video.

Tap the Rocket icon again to select the maximum height - the max here is 120m, or 393 feet. Good for DJI - they didn’t set it above the US maximum. This is not determined by the maximum flight altitude (mine is normally set to 150m since I fly in hilly terrain somewhat often, and the 400’ limit is above the current ground level, not above the launch point).

The interesting thing here is that, even with the drone off to the side, it will fly directly over the target as it ascends. The first 20’ or so of rise involve the drone moving forward as it rises to be directly over whatever you’re filming, and then it ascends vertically over the target. So, be aware that you might have issues if you try to use this mode while tracking the base of cell tower.
Once it finishes, it makes a beeline back towards the starting point.

QuickShot and Stick Input
In QuickShot mode, the control sticks are mostly ignored. However, if you move a stick in the opposite direction of motion, QuickShot will cancel and the drone will hover. So, during a Dronie shot, forward and down will cancel QuickShot, and the rest of the inputs are ignored. In Helix mode, the stick opposite the rotation will cancel things. You can also cancel QuickShot mode with the pause button. That said…
Warning: Look Around!
I said it at the top, but this really needs its own section for emphasis. All three of these modes involve the Mavic Pro flying without obstacle avoidance. There is no obstacle avoidance for flying backwards, for flying sideways, or for flying straight up, since there are no sensors pointing that way. The Mavic Pro cannot identify obstacles in these flight modes, so it will just run into anything in the way.
Helix is the most dangerous mode in terms of “running into things,” as it’s flying a widening circle out away from the point of interest. Be sure the entire area around you is clear when you use any of these modes. I expect a wave of “My drone crashed using QuickShot!” posts on the various Social Medias soon - don’t be that person.
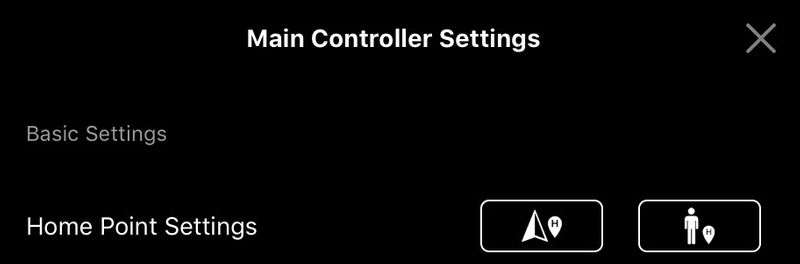
Dynamic Home Point
The other feature that DJI added in this update is “Dynamic Home Point.” This is a mode that’s only useful in the various ActiveTrack modes, and it solves one of the annoying issue with long range/one way ActiveTrack use.
This setting is up at the top of the Position menu - so tap on the “Phantom from above” icon in the menu bar, and you should see it. If not, scroll - it’s in there, somewhere. Or check your firmware version.

Why would you need this? Consider tracking yourself jogging down a beach. Without this mode, the drone’s home point is where you took off from (unless you’re updating it in flight). When you get some distance down the beach, the drone is going to look at the distance home and decide that it needs to RTH now in order to make it back to the home point with the remaining battery - but you, the person flying it, has been moving down the beach, and the drone proceeds to scoot in a hurry away from you to get to where it thinks home is. Annoying!
This mode solves that (while adding a few other wrinkles). If the drone is actively following a person or object, it will periodically (every 10 seconds or so) update the home point to be the current position of the drone. Not you! The drone. This is important!
To demonstrate what this looks like, I started off at one side of my property and set the home point to the aircraft location, then tracked myself walking more or less along a fence line.

After I’d walked a bit, the drone has followed me, and the home point updates to the drone location while it continues to follow me along.

And, after wandering further, here’s the map. If I didn’t have Dynamic Home Point enabled, the home point would still be over on the right side, and the drone might be considering returning to home due to low battery. But, since home is right near the drone, it’s happy to fly along at 22-23% battery (my low battery warning is set to 20% for flying around my property), and it doesn’t complain.

How could you get yourself into trouble with this? If you’re doing something like walking along a beach, using Profile Mode, and the drone is flying out over the water, the home points will be recorded over the water! If your controller suddenly dies, the drone will go to the recorded home point and try to land - which, of course, is in the ocean. So be careful.
On the other hand, if you’re on a boat, and the drone is tracking the boat, it’s much less likely to suddenly decide it needs to go back across the lake right now to where it launched from. I can’t say I entirely trust my Mavic Pro over deep water, but this is a perfect case in which Dynamic HomePoint is likely to save an awful lot of hassle, and more than a few drones.
I think this is a great addition to the firmware. It’s more useful than not, and makes “One Way Active Track” much less annoying. My suggestion would be to turn it on, and only turn it off in particular situations where that makes sense. Say, you’re tracking a kid running around a field while you stand in one place. Having it return to you is probably the right thing to do in that situation.
All that said, this really only matters if you happen to trigger RTH during ActiveTrack, and if you’re paying attention to the battery, that shouldn’t happen.
Final Thoughts
Are these features a good reason to upgrade to v1.04.0000 if you’ve been holding off? No, probably not. They’re nifty, but they’re nothing radical. If they sound like fun, upgrade away, but if you’ve been avoiding upgrading for whatever reason, you’re not really missing out on that much.
And they’re pretty much only useful for “lifestyle drone shots.” If you’re a Social Media Character, yeah. You’ll probably make a ton of use of these. If you’re a Part 107 remote pilot filming rooftops or fields, doing property mapping, and generally using your drone to take pictures for other people, you’ll almost never need these modes.
With that, hopefully this finishes out the Mavic Pro Missing Handbook series for now. I thought that a month ago, but, hey. Firmware marches on. I should be getting back into the swing of weekly posting now, at least for a while. This has been a rough summer on me, physically, and I’m not particularly optimistic that winter is going to be any better than last winter (where I spent just about every free hour moving snow). But, I also intend to start working in more posts about what I’m doing on our property. So look for some homesteading type posts coming up in the mix!
Comments
Comments are handled on my Discourse forum - you'll need to create an account there to post comments.If you've found this post useful, insightful, or informative, why not support me on Ko-fi? And if you'd like to be notified of new posts (I post every two weeks), you can follow my blog via email! Of course, if you like RSS, I support that too.

