
So, you bought a Mavic Pro? What a coincidence! So did I!

And if you’ve done much reading on it, you’ve probably determined two things: The manual covers the bare minimum, and there’s a serious lack of non-video information on how to use these - or, even with the videos, details of operating modes and limitations. This series of posts (probably 4, possibly a few more) is my attempt to resolve this problem - to write a useful operating manual for the Mavic Pro (and other DJI products with similar operating modes, though this is purely focused on the Mavic Pro).
If you have one, or even if you’re just curious about drone operation, read on!
Why I’m Writing This
Those who follow my blog (I know there are at least a few of you!) know that I prefer the text-and-photo style of communicating - I’ll use video where it makes sense, but the vast majority of things I see video used for are things video is fundamentally bad at. Reference manuals for how to operate equipment are firmly in this category - if I want to find out some detail about operation or confirm my understanding, I want to skim through text until I find what I’m looking for, not suffer through someone’s 10 minute “tutorial” that doesn’t actually answer the question I had in the first place (and I don’t know it doesn’t cover it until I’ve suffered through all 10 minutes).
The drone tutorial videos on YouTube are especially bad at this. I’ll offer my generic “drone tutorial script,” if you wish to film yet another worthless tutorial:
Hey, wow! I’m so stoked you’re watching this! I love you subscribers, and if you’re not a subscriber, you really should subscribe! You’re awesome!
This is Dude McDroneBro, and today, I’m going tell you all about Active Track on this drone - you’ll be an expert by the time you’re done watching this!
Follow this with 10 minutes of bumbling around with controls, fighting with video cameras, out of focus shots, and concluding with “following something” - a car, truck, bike, whatever. In a very basic, Wow, look, I’m not touching the controls and it follows them! Isn’t this amazing? mode of operation. At the end, you’ve watched a bunch of video, seen a bunch of someone else’s car, and not actually learned much about using the mode you’re interested in.
So, forget that. I’ve spent a month flying around and exploring the modes of this drone, and I’m going to cover things in more depth with this series of posts. If there’s anything I’ve missed, please, let me know in the comments.
The Disclaimer
I am not a DJI employee. This series of posts is not a replacement for reading and understanding the manual provided with the Mavic Pro, or any of the other relevant safety material provided. I am operating in a “sparsely populated” area for my tests, under Part 107 rules and regulations (I have my cert and can provide it on request). I believe all my operation falls under the requirements and regulations for Part 107 remote vehicle operation. These may not apply to you and your operating environment, and “But I saw Syonyk do it!” is not going to hold any water if you bust FARs.
The DJI Mavic Pro
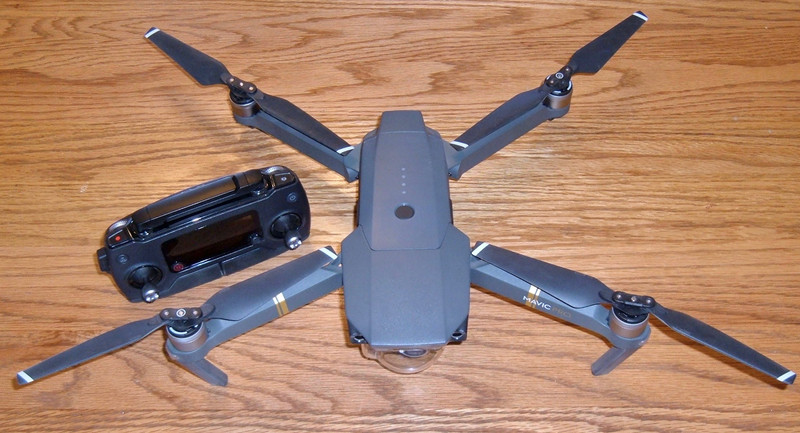
The Mavic Pro is a folding 4k video and photography drone (I’m comfortable calling it a drone instead of a quadcopter because it’s capable of autonomous flight, automatic target tracking, obstacle detection, waypoint missions, etc). It’s designed to be much more portable than most of the other camera platforms - and you pay for this in reduced image quality compared to the Phantom 4 and similar. But, it folds up and you can carry the Mavic Pro, remote, and an hour’s worth of flying battery in a bag significantly smaller than a 35mm camera bag. That’s a regular iPhone 6S, for size comparison.

What do I have in my bag? The Mavic Pro, the remote controller, three batteries (one installed, one in each of the side pockets), spare props, a sun shield, and a few USB cables for connecting things. It’s easier if you put the drone in the bag front-down, but this just looks cooler…

Read the manual for a detailed description of all the parts of the Mavic Pro and the remote controller. You should be familiar with all the various external sensors and what they do - the main camera is obvious, but the smaller stereo imaging cameras are important for landing and obstacle avoidance. It’s worth mentioning that they are often covered with a plastic protective cover during shipping, so remove those before flight.
Setup and Preflight
Setup is pretty simple - unfold the top/front arms (they swing forward), unfold the rear/bottom arms (they swing “down and out” to flip around), remove the gimbal lock and (probably) the gimbal cover, then unfold the props (they don’t have to be perfect, just more or less straight).
Then it’s time for the preflight.
You do preflight your drone before you fly it, right? There are a few things you should check before every single flight - period. You can’t catch everything on the ground, but the failure mode on a 4 motor drone is remarkably simple: Anything related to flight fails, it will probably crash. Hard. You might get lucky, but probably not. So check this stuff! You should perform the checks before you power it on - leaving it powered on with the gimbal lock in place can fry the gimbal motors.
Motors, Propellers, and Arms
Spin the motors - they should spin freely, with no sign of binding, rubbing, or anything other than the normal cogging you find on a brushless motor. This is one of those things where the best approach is to do it regularly and learn what “normal” feels like - you’ll know if something isn’t right.
The propellers should be in flawless condition - no nicks or significant scratches. The “full size” airplane standard is that if a nick catches your fingernail, it’s a problem. I’d offer that on a multirotor setup like this one, any visible damage on the leading edge is too much. If there’s a question, replace the propeller. They’re cheap - $10 on eBay. Falling out of the sky isn’t cheap. Throwing a blade into someone or something isn’t cheap. While you’re inspecting the props, wiggle them and make sure the pivots in the center are tight - the blade should not be loose at the pivot. A barely perceptible amount of vertical motion at the pivot seems to be within tolerance on blades, but if you’re not sure, replace the propeller.
Before takeoff, the blades have to be unfolded - they will find their proper flight position once spun up, but they need to be pointed away from each other before you spin them up or it won’t work.
Inspect the arms - wiggle them. Are they securely in position and able to support vertical thrust for flight? This is especially important after any crash or hard landing.
Gimbal Lock Removed
You removed the gimbal lock, right? If you leave this on, not only do you not get stabilized video (the gimbal can only work in the roll axis), you can burn out the gimbal motors. That’s not a cheap fix (you basically replace the whole unit).
I’ll talk about the gimbal cover below, but one good reason not to fly with the stock clear one is that it makes it a lot easier to forget to remove the lock. You might also consider painting the lock red - that should be a bit more obvious than clear plastic.
Post-flight, if you’re doing any significant transport (beyond hand carrying), you should re-install the lock. This unloads the support rubber strips, and prevents the gimbal from slamming around.
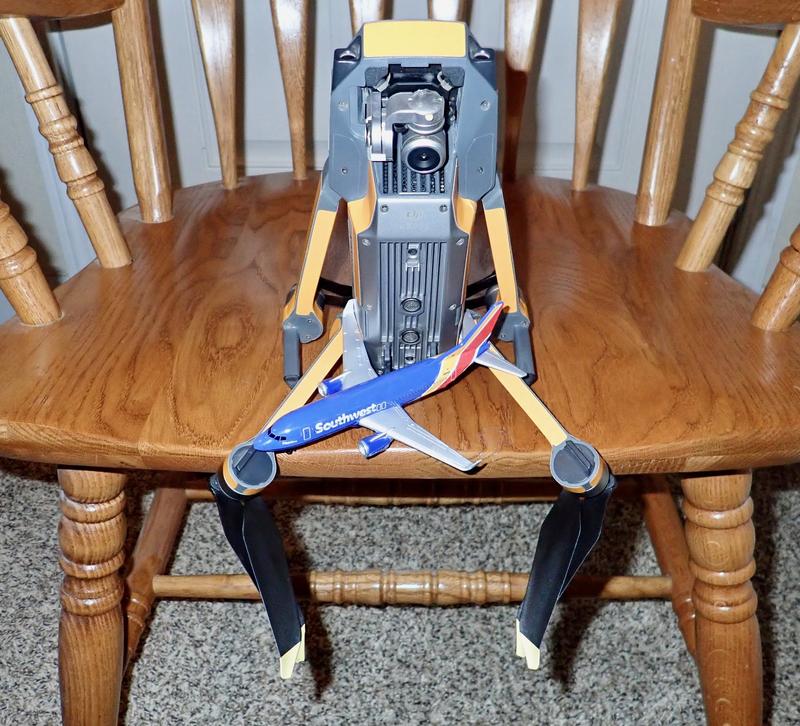
If you’re not sure how the gimbal lock installs after flight, it goes behind the camera - like this! The notches line up as shown, and it’s reasonably obvious if you don’t have it installed properly.

I strongly suggest operating with a policy of, “If the arms are folded, the gimbal lock is installed. If the arms are deployed, the gimbal lock is removed.” This should help prevent taking off with the lock installed, or transporting it without.
Sensors Clear and Clean
There are seven sensors you should check and clean if needed. There’s the main camera, which shouldn’t have smudges or bugs on it (fly enough, you will take bug hits). There are the two forward facing obstacle detection cameras which need to be clear.

And there are the two downward facing cameras, plus the two ultrasonic altitude detection openings. Clean them off with soft cloth if needed.

Battery Locked Firmly
Hold the Mavic Pro from the bottom half of the chassis. Grab the sides of the battery (not the buttons) and firmly pull to ensure the battery is fully seated and locked. The battery is one of those many “critical systems” that will lead to a serious crash if it comes out in flight (for, perhaps, obvious reasons). While you’re there, press the button once and ensure that all 4 LEDs come on - you wouldn’t want to take off with a partially filled battery by mistake.
Gimbal Shield and Lock
There are two different plastic pieces up front - the gimbal shield (the clear plastic dome with the rubber protector) and the gimbal lock (the smaller piece that goes behind the camera and prevents it from bouncing around on the rubber bands when in transport - shown above).

There’s no ambiguity about the lock: Remove before flight. If you leave it in place, the gimbal doesn’t work in two of the three axis, and you stand a good chance of burning out the gimbal motors if you do this for long.
The clear plastic dome is a bit more ambiguous. DJI has plenty of photos of the Mavic flying with with it on, and other than somewhat reduced image quality, it flies just fine with it on. The only real concern is that the drone runs hotter with the cover on. The main air intake for cooling the chips and power electronics is the grille right behind the camera, and with the shield in place, this is restricted. There are some slots and openings for airflow, but tests have demonstrated that things run hotter with it in place. Is it enough hotter to be a problem? Probably not, but heat and electronics don’t get along amazingly.

I wouldn’t be particularly concerned about flying with the gimbal cover on during colder weather, but I wouldn’t fly with it during hot weather. DJI specifies an operating temperature range of 32F-104F (0C-40C), and the full shield is probably a bad idea above 70F or so.
There’s a better option, though! I usually fly with a “sun shade” gimbal cover - also about $10 on eBay. This isn’t a complete cover (there’s plenty of opening for airflow), but it extends below the gimbal, provides some protection, helps keep the sun off the lens, and doesn’t interfere with the image like the full cover does. The one downside to this type is that you’ll occasionally see it in the edges of the live feed while maneuvering aggressively or fighting gusting winds. If you’re filming in conditions where you’ll see the sides, just fly without it for that shot. But for most filming and all photography use, it’s not a problem at all.

Remote Device Selection: Don’t Use Android
One of the ways DJI keeps the cost of their drones down is by using a standard phone or tablet as the remote video device (and operating mode selection console). The remote is very limited in what it can do - it handles flight controls and basic camera operation, but the whole system relies on the DJI app running on a phone or tablet for live video and most of the advanced operating modes.
And this app doesn’t run well on Android. Some people have found some ways to get the app to mostly behave for a while, but it simply doesn’t work reliably on Android. If you don’t have a suitable iOS device (still supported, Lightning connector), budget the purchase of one with the purchase of the Mavic Pro. You can use an iPhone, an iPad Mini, or (with a rather goofy looking adapter) a full iPad. Use one of these. You’ll be able to focus on flying and not have to fight with the app constantly crashing.
If you are using an iPad Mini or full iPad, you can use any Lightning USB cable you have laying around. Unplug the normal cable in the top left of the remote, plug your cable into the USB port on the bottom, connect the iPad, and things should work as expected. If the top left connector is still inserted, the lower USB port won’t work.
In extremely sunny areas, you should get a shade for the screen - these are also cheap on eBay. The shade will help you see the screen better, and will also let the screen run a bit dimmer. In hot conditions, phones tend to overheat (iOS devices will dim the screen fairly rapidly), and less power to the screen helps the phone run a bit cooler, a bit longer. It’s enough of a problem in hot conditions that I’m working on a better fix, though…

Controller Notes and Operation
The controller, with your remote video device inserted, is a bit cumbersome to hold, but it works well enough. Obviously, both antennas need to be flipped up. They can fold away from the body as well if you are doing work straight overhead, but that’s not a particularly common use case. When you fold the antennas back against each other, they’ll clip to each other to stay put.
To charge the controller, any random micro USB cable works - remove the device cable in the top left corner and plug the micro USB cable in. Boom. Charging.

You can select a number of stick modes, but I fly in the default “Mode 2” (because it matches my other RC aircraft). This means that the left stick controls vertical speed and yaw, and the right stick controls translation. All of the subsequent instructions and flight mode descriptions will assume you’re in Mode 2 - so you may have to translate if you’re using a different flight mode.
Note that you’re flying “Airbus style” - playing “Mother, may I?” with the computer. You are not directing power delivery, you’re just requesting that the Mavic do something, if it feels like it can. This is insanely obvious in some of the other flight modes that I’ll describe in future posts.
If you have the Fly More Combo bag or are putting the controller in a bag regularly, you should invest in a controller guard. These protect the joysticks and screen while in transport. They joysticks are pretty robust, but there’s no reason to bang them around.

Menu and Status Access
In the app, the top menu bar is actually a set of shortcuts to status and settings. If you tap on the top left (in the green bar), you’ll see the status menu. If you tap on the top right, you’ll go to the settings menu - and, if you tap on a particular icon, you’ll go to that settings menu. It’s pretty obvious how it works once you play with it a bit.

It’s a good idea to check the aircraft status before you fly. The system should warn you if it detects a problem, but it’s your aircraft, and your responsibility to make sure it’s happy - and ensuring that everything reports “normal” is a reasonable check to make.

The menu system is complex and deep, but the options are reasonably well described. It’s worth spending some time with your drone on the ground (the cooling fans will turn on, and this is fine) to explore the menus and see what’s in there. You won’t need to use most of the options at this point, but it’s good to know where things are.
One option I’d suggest setting before you fly is the measurement units. If you tap the top to get to the menu, and tap the three dots along the bottom (or just tap the three dots in the top right), the top setting is “Measurement Unit.” You can set this to Imperial (feet and mph), Metric (m/s), or Metric (km/h). Set this to what you’re comfortable with - there’s no reason to be doing unit conversion in your head while you’re flying.
Preparing for Takeoff
So, after all that, you’re ready to fly! Find a flat and clear area to fly from, set the Mavic Pro down, finish your preflight (I suggest “Bears Go Pee” as a mnemonic - Battery secure, Gimbal free, Props extended), and then start powering things on.
Get your phone or tablet powered on, running the DJI Go 4 app (and in the device control screen), and physically secured into the controller. Power the controller on (short press, long press), and then power the Mavic Pro on. It’s the same as the controller - press, then long press. You’ll see the LEDs on the battery light up in sequence, and then after a few seconds, the props will quiver (you did unfold the blades, right?), something or other will make a chime sequence, and the controller will connect.
If you’re outside (which you should be), you now sit and wait for the Mavic Pro to get a GPS lock. You can see the number of satellites being tracked in the app, and the controller will show “ATTI MODE” or “OPTI MODE” - you don’t want to fly in either of these if you can help it (and definitely not before you’re comfortable with the Mavic Pro). So, wait for that GPS lock. It shouldn’t take longer than 30 seconds or so.

You can also see the status of the GPS lock in the app. In this first screenshot, the Mavic Pro has found some GPS satellites (you can see the “7” above the GPS status bar), but it doesn’t have a lock yet (there’s no signal indicated, the title bar is yellow, and the indicated mode is “(Vision)”).

Wait a tiny bit later, and the Mavic Pro has a full GPS lock. It’s tracking 9 satellites, you can see the signal bar shows a pretty good lock, and the title bar is green with “(GPS)” indicated as the mode.

Once you get that GPS lock, you should see that the home point is updated - it’s that little green notification on the left. This is important, because this drives the RTH (Return To Home) functionality. If anything happens to the controller/Mavic link, the drone should return to the home point. If you don’t wait for this to update, there’s a very good chance that if something happens, your drone will head off towards the last place you flew, which is not what you want to happen. So, wait until you see the Return to Home location updated notification (you’ll also hear a message if your phone audio is on)!
You’ll also want to check the return to home altitude - it’s 40m (131’) here, which is sufficient for my area. Remember, this altitude is altitude above your takeoff position - not above the ground. If you’re flying from the bottom of a valley, be sure you clear the terrain at the top!
Before you take off, it’s wise to check the map and ensure that the location looks correct. If all is working properly, you should see yourself (round blue dot), the Mavic Pro (red triangle), and the green home point marker all on top of each other. The default “lost controller” setting is to return home, but if you’ve gone messing around in your menus, verify this. It’s in the main menu (tap the “Position” icon at the top of the screen under the Advanced submenu. Options are “Return to Home,” “Hover,” and “Land.” Unless you have a very, very good reason to change it, leave it as “Return to Home.”
If you’re not sure that the home point is recorded, you can manually set it (or you can set a new home point while flying or walking around).
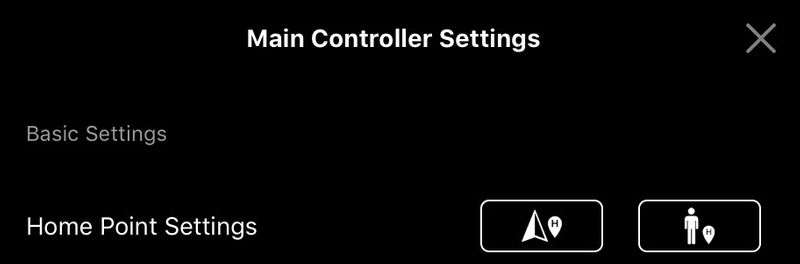
Tap the “Position” text along the top of the screen to get to the position menu. The top options here are for setting the home point - the left icon sets the home point to the current aircraft location, and the right sets the home point to your currently location (assuming you have a GPS in your phone or tablet).

Once you tap the left icon, you’ll see a verification dialog asking you to confirm that the aircraft position is what you want to set as the home point, and it will report your failsafe altitude.

Takeoff
There are two ways to take off once you have the GPS lock. The first is to hit the “up” button on your control device (along the left side). When you tap it, you’ll see a screen inviting you to slide a slider to confirm takeoff. If you do this, it will spin up the motors, take off, and hover at chest height.

However, if you check the “Precisely record takeoff point” box, the prompt changes. In this mode, the aircraft will take off and ascend vertically to 18-20 feet in the air. While it’s climbing, it’s storing images of the takeoff location that it uses for precision landing (so it can land exactly where it took off from). As long as there’s nothing above the takeoff point (which there shouldn’t be), this is a preferred mode - it gives you more options for landing, and “Return to home and land exactly where it took off from” is a pretty impressive little demo to have around.

The other way is to start the motors by pulling both sticks down and towards each other. This should start the props. Listen to them for a few seconds to make sure everything sounds normal - if you hear anything unusual, shut down (down and towards each other again) and go inspect the props and motors again.
Once the motors are spinning, you can push the left stick up (assuming you’re using Mode 2 controls) and take off! If you’d like the takeoff point precisely recorded, ascend slowly to about 20’ before you head off horizontally.
Even if you are planning to use the automated takeoff modes, it’s a good idea to spin the motors up by pulling the sticks down and to the center. Let them run for 5-10 seconds, listen to them, and make sure everything sounds normal. Again, I can’t describe exactly what you’re listening for, but just make sure it sounds normal. You’ll need to use that motion again to shut the motors down before you can perform an automated takeoff, or you can simply take off manually.
Return to Home and Landing
Assuming the home point has been properly updated, if you wish your drone to return, you can press and hold the “RTH” button on the controller. This should start the drone returning back to where you took off from, and if you performed a precision takeoff, and the surface is suitable, the Mavic Pro should land where it took off from.
One important thing to check, especially after firmware updates, is the “return to home altitude” setting. This is the altitude the Mavic Pro will ascend to when returning home, and you’d better make sure this is above obstacles in the area. It does have the forward obstacle detection system, but that won’t reliably detect things like power lines and tree branches, so make sure you’re above them.
I understand the safety aspects of having the RTH capability, but you shouldn’t be using it that often. If you don’t know where your drone is, you’re flying beyond a useful definition of “line of sight,” and you shouldn’t be doing that.
During RTH, you can still control the drone to some extent with the control sticks. Play around and see how they work in a safe area - but if RTH is about to do something stupid, you’re far better off just turning off the RTH mode (you can hold the button again, or tap the red X on the left side of your display screen) and flying it manually. Yes, I understand that RTH is supposed to have obstacle detection, but trusting that for anything but a backup is a bad idea if you like your drone in one piece.
Once you’re back over a safe area to land, you have two options as well. The first, and easiest, is to push the “land” button on the controller and it will auto-land and shut down. The second option is to hover over the landing spot, then bring the left stick all the way down and hold it. The Mavic Pro won’t descend below a few feet above the ground until you hold the stick all the way down.
Even while it’s descending below the minimum hover altitude, you can still control it to fine tune the landing location.
I do not suggest trying to catch it in the air. People do it, but it’s a good way to get yourself cut sooner or later. Those props have a good bit of energy in them, and the drone sounds very unhappy as it tries to regain the hover it had been in.
Beginner Mode
For your first flights, the app should ask you about “Beginner Mode.” If it doesn’t, go enable it - it’s in the flight mode menu (tap the icon that looks sort of like a Phantom drone from above). You may need to scroll to see it depending on your device.
Beginner mode slows the Mavic Pro down, reduces the control sensitivity, and only lets you fly in a 100’ radius cylinder, up to 100’ above you. It also requires a GPS signal to fly. This is a very, very good idea, and you should spend quite a bit of time in Beginner Mode as you learn to fly and control the drone. It’s not impossible to lose or damage the drone in Beginner Mode, but it’s a whole lot harder.

While you’re learning, you should fly outside, in a flat and clear open area with no obstructions or other people around. I’d suggest flying around 10-20’ above the ground - this means that you shouldn’t hit anything, including yourself. How long should you practice with beginner mode enabled? That depends heavily on what you’ve flown before. If this is your first remote control flying thing, probably a few batteries worth. If you’ve been flying ill behaved RC helis for years, maybe a few minutes to get the feel for the handling, but you already know how to fly things that are a whole lot harder to fly.
Basic Flight Operations
Once you’re in the air, it’s time to fly around and learn to work the controls smoothly, in all orientations. While looking at the drone, not the camera! Visual contact means “Look at the drone,” not stare at your screen. The screen is for composing shots, not flying.
Hovering is simple: Let go of the sticks! In the normal flying modes, letting go of the sticks will bring the Mavic rapidly to a halt in the middle of the sky, and it should simply sit there until you tell it to do something else - even in the wind. If you’ve flown non-GPS or vision assisted quads or helicopters before, this is nothing short of magical. The Mavic Pro uses a combination of GPS and downward facing vision sensors to chill out at one spot in the sky, regardless of wind. It’s actually a bit creepy if you’ve flown CP RC helis before (collective pitch - so just like a full sized helicopter) - you can take your hands entirely off the controller and it won’t immediately crash.
Translation Flight & Smooth Sticks
Once you’re in the air, stand behind the drone (or turn it so it faces away from you) - this makes the right stick motions more or less directly translate to the drone directions. Push it away from you (up), the drone moves away from you - and all the other directions correspond again.
Focus on making smooth starts and stops. Yes, there’s a mode that will do this for you, but you should be able to manually fly smoothly. The Mavic Pro, if you just let the stick snap to center, will hurry up and stop right now - it’s hard on the motors, loud, and while the gimbal will do its best to keep the image steady, at least some of the time you’ll get a jerk in the video if you do this. There’s just no reason to fly like that - practice starting smoothly and stopping smoothly. Once you’re good at this, you can jam the sticks around for repositioning if you want, but it’s better to be smooth. Another advantage of being smooth on the sticks is that your drone makes a lot less noise flown that way. If you’re flying up at 300’ for some wider area shots, a steady noise out of the props doesn’t attract that much attention. Slamming the sticks around makes a lot of weird and rapidly varying noises that will attract more attention and make it easier to find in the sky.
Practice making shapes. Decide the shape you want to make, where you want to make it, and then go fly it. The goal here is to work on “desired action to muscle movement” skills - you shouldn’t have to stop and think about how to move the sticks to make the desired action happen. You should be able to think about what you want the drone to do, and make it happen without thinking about the actual motions. This is easier to do when you’re low and slow in beginner mode, which is why you should be practicing like that.
Orientation and Controls
Once you get decent at flying with the drone facing directly away from you, it’s time to work on how to control it facing other directions! The biggest one you’re likely to use is facing you - so both red LEDs are roughly equal brightness. In this orientation, the translation controls are exactly opposite from what you used above. Pushing the stick up brings it closer to you, left and right are swapped, etc.
Work on flying the same patterns you did above, but with the drone facing in. Again, the goal is for you not to have to think that much about the controls when you’re flying.
And then do some practice with the drone pointing different directions, and even diagonal. Regardless of where the nose is pointed, you want to be able to make it do what you want.
One neat trick for seeing how you’re doing is to use the map view after a pattern! If you tap the map icon in the lower left, you’ll see your track (it’s often easier to see over the satellite view than over the road view). The little button that looks like an old two tone eraser (or an eraser on the end of a pencil) is, in fact, an eraser - so erase the track, fly a pattern, and see how you did! The feedback is quite useful. The corners won’t be perfect on the map, but you can get the idea.

I wouldn’t say there’s a need to be quite as skilled as the competition RC heli pilots who can fly a perfectly straight line with the helicopter corkscrewing around sideways through the air, but you should be able to make it do what you want, smoothly, regardless of how things are pointed.
And, once you’ve gotten good at level patterns, throw some altitude changes in for fun!
Why does all this matter? A Mavic Pro is a pretty expensive piece of hardware. The drone is around $750 to replace if you crash it badly enough or lose it, and several hundred dollars to repair if you do serious damage (plus a long wait time to get it back). Flying your drone into a hard object because you had the controls backwards for the orientation you were flying in, or you ascended into an overhanging tree instead of sliding out from under because you used the wrong stick, is flat out stupid. And, if you are flying under Part 107 rules and do at least $500 of damage to something else, you have to report it to the FAA. So spend the time, work the stick skills, and make it do what you want!
Basic Camera Operation
And, yes, I will talk about the camera - even though you should get a few flight hours of messing around in before you start doing much with video.
The remote has two wheels on the front. The left one tilts the gimbal up or down (left is down, right is up), and the right one plays with the exposure (by default). You’ll notice that the right wheel clicks between positions and the left one is smooth with a center point - this is exactly how they work. The left one moves the gimbal slowly based on how far away from center you are, and the right one clicks up and down through the detents.
I’d suggest sticking to still shots for the first few hours of operation while you’re learning the controls. The lower left button on the controller (under the click wheel), by default, is an auto focus for the center of the image. Getting into the habit of tapping that before you take a picture (the upper right button by the antennas) will save you a lot of blurry photos.
I normally take pictures in AEB-3 mode (Automatic Exposure Bracketing). You have to set this each time the drone powers on (click the “settings” icon along the right, tap the middle icon along the top, and select AEB as the mode), but it will take a set of three photos, one at the default exposure, one at +0.7 EV, and one at -0.7 EV. For aerial work, this often gets you a better shot than the default exposure (I usually find the -0.7 has more detail in my area), and you can also do some nice HDR merging with the set (or, if you upload them to Google Photos, it stands a pretty good chance of automatically making an HDR image from them for you).

Shoot in JPG unless you have some particular reason to shoot in RAW and are experienced with RAW processing, but you should be aware that there is a “JPG + RAW” option - if you’re doing work with professional photographers, they’ll thank you for the RAW/DNG files to work with. Lightroom handles the Mavic Pro files just fine.
Batteries
Finally, it’s worth mentioning the batteries. They’re 3S lithium ion batteries, have a smart battery management system that will also drain them to a storage charge after a specified number of days (by default 10 days), and they clip in. There’s not a huge amount you can do to hurt them, short of dunking them in a lake or something, but it would be a good idea to let them cool down after flight before you charge. Otherwise, make sure they’re fully secured before flight, and let them do their thing.
Final Thoughts
The Mavic Pro is an amazing little portable camera drone. The camera isn’t amazing, but it’s pretty solid, and being able to fit the whole contraption into a small bag instead of requiring a large Pelican case is absolutely incredible.
This week’s post covered basic setup and flying. Next week, I’ll cover some of the various intelligent flight modes. Following that, I intend to spend a week exploring Active Track and Point of Interest - those are sufficiently complex to be worth a full post. And then I’ll wrap up with the remaining features. And then, if I feel like it, a full exploration of the Mavic Pro menus.
If there’s something I’m missing, let me know in the comments!
Other Posts In This Series
DJI Mavic Pro: The Missing Handbook: Basic Operations Preflight checks, gimbal locks, takeoff, landing, basic flight operations.
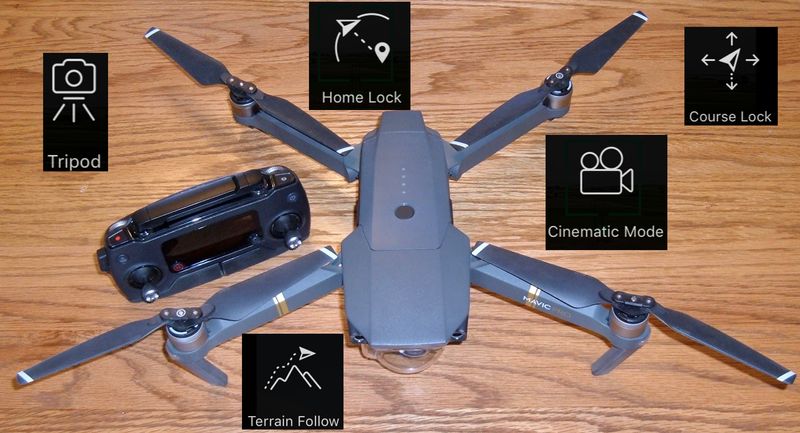
DJI Mavic Pro: The Missing Handbook: Intelligent Flight Modes Tripod, Cinematic, and Sport Modes. Terrain Follow. Home Lock. Course Lock. Pretty much everything that requires you to still move the sticks to move it.
DJI Mavic Pro: The Missing Handbook: Waypoints Using the DJI Go app supported waypoints to fly better routes for filming, and a brief summary of using the DJI Ground Station Pro application for more automated flight capabilities.
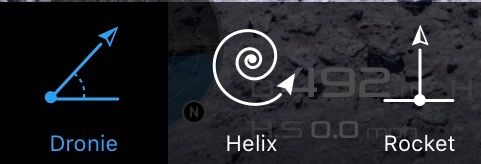
DJI Mavic Pro: The Missing Handbook: Active Track, Follow Me Mode, and Gesture Mode Using Active Track, Follow Me, and Gesture Modes properly - much detail on how the various Active Track modes work and how the controls work, and a few ways to avoid waving like a fool at your drone in Gesture Mode.
DJI Mavic Pro: The Missing Handbook: Wifi/Remote Only, Tap to Fly, Fixed Wing, Point of Interest, Attitude Indicator Finishing out the series on flying modes with the remaining modes, as well as discussion about the attitude/orientation/power indicator, flying with only the remote or only a phone, and some of the degraded flight modes.
DJI Mavic Pro: The Missing Handbook: Comprehensive List of Menu Options A list of all the menu options and camera menu options with notes on what they do, when you should change them, and how to use them for effective flying.
Comments
Comments are handled on my Discourse forum - you'll need to create an account there to post comments.If you've found this post useful, insightful, or informative, why not support me on Ko-fi? And if you'd like to be notified of new posts (I post every two weeks), you can follow my blog via email! Of course, if you like RSS, I support that too.


