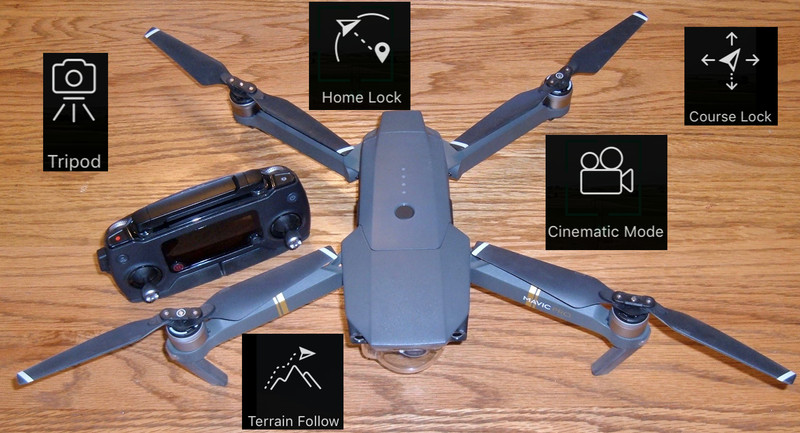

Continuing my Missing Handbook series for the DJI Mavic Pro, this week I dig into a number of the “Intelligent Flight Modes” - Tripod, Cinematic, Sport, Terrain Follow, Home Lock, and Course Lock.
If you missed last week’s post, I covered preflight checks and basic operation. It would be a good idea to read that if you haven’t, because I build on that this week.

All the modes I’m covering this week are still “manual flying” modes - the drone won’t move unless you command it to, though some of the modes radically change how control stick motions translate into movement through the sky!
So, join me as I dive into some of the various Mavic Pro operating modes!
Mavic Pro Missing Handbook
What is this series of posts? This is my attempt to provide a comprehensive look at all the various features of the Mavic Pro - in text form. I find video tutorials to be generally lacking in actual content, as well as truly frustrating to skim (you have to suffer through 10 minutes to find out that, no, it doesn’t actually talk about what you were wanting to learn).
I’ll be updating this list with more posts as I write them. My blog updates every Saturday.
DJI Mavic Pro: The Missing Handbook: Basic Operations: Preflight checks, gimbal locks, takeoff, landing, basic flight operations.
DJI Mavic Pro: The Missing Handbook: Intelligent Flight Modes: (This post)
DJI Mavic Pro: The Missing Handbook: Waypoints Using the DJI Go app supported waypoints to fly better routes for filming, and a brief summary of using the DJI Ground Station Pro application for more automated flight capabilities.
DJI Mavic Pro: The Missing Handbook: Active Track, Follow Me Mode, and Gesture Mode Using Active Track, Follow Me, and Gesture Modes properly - much detail on how the various Active Track modes work and how the controls work, and a few ways to avoid waving like a fool at your drone in Gesture Mode.
DJI Mavic Pro: The Missing Handbook: Wifi/Remote Only, Tap to Fly, Fixed Wing, Point of Interest, Attitude Indicator Finishing out the series on flying modes with the remaining modes, as well as discussion about the attitude/orientation/power indicator, flying with only the remote or only a phone, and some of the degraded flight modes.
DJI Mavic Pro: The Missing Handbook: Comprehensive List of Menu Options A list of all the menu options and camera menu options with notes on what they do, when you should change them, and how to use them for effective flying.
Flight Behavior Modification Modes
The first three modes are what I’ll call “Flight Behavior Modification” modes. They don’t impact how the control sticks translate into flight direction, and the drone won’t do anything you don’t ask of it - but these modes significantly impact the responsiveness and smoothness of the flight. The three modes here are Tripod Mode, Cinematic Mode, and Sport Mode.
For any of the “Intelligent Flight Modes,” you can exit them in two ways: The red “X” on the left side of your phone/tablet screen, or a long press of the “pause” button on the remote controller. Either way works, though the pause button is a bit easier to find in bright light.
I’ve included some performance numbers for each of the modes so you can get a feel for what they do. The speed number on the remote is GPS speed - there’s a large difference in acceleration time based on wind, but the Mavic Pro will eventually get to the target speed if it can do so. I tried to do some acceleration testing, but it’s a windy time of year here and the numbers were all over the place.
I also recorded the time for a full stick deflection 360 degree rotation in place (and did the math for degrees per second).
In the normal, GPS enabled normal flight mode, here’s the baseline:
Top speed: 20mph
Full 360: 4 seconds (90 degrees per second)
Tripod Mode
Think “Roger Rabbit Steamroller Scene.” And if that means nothing to you, well, you’re on my lawn and I wave my cane at thee and all that. Tripod mode is this mode for the Mavic Pro, minus the squashing someone to death.
This mode radically slows the drone down - the maximum speed in Tripod Mode (as of firmware .900) is 2mph. That’s full stick deflection - and it takes a little while to get there. The controls are quite slow to respond, but it makes it easy to fly with the full positioning precision the Mavic Pro is capable of. Even with gusting winds, the Mavic Pro will stay amazingly well parked in the sky and let you inch it around. Be aware that the slow acceleration is matched by a slow deceleration - it will not stop immediately when you center the sticks.
Top speed: 2mph
Full 360: 13.5 seconds (27 degrees per second)

Entering and Exiting Tripod Mode
To enter Tripod Mode, you can either use the Intelligent Flight Modes icon on the left side of the screen (the blue thing in the screenshot below - I’ll also use “alien” to refer to it), or press on the 5D button (the stick to the right of the screen on the physical remote). You’re clicking the button into the controller, not moving it in a particular direction. Either way will get you to the Intelligent Flight Modes menu, from which you can pick Tripod Mode. You may have to tap “agree” on a NFZ warning the first time you do this (basically, that it won’t fly into a no fly zone, and you’re not going to be an idiot).

Once you’ve selected Tripod Mode (and clicked through the explanation above, if you haven’t disabled it), you’ll see both the controller screen and your phone screen update to reflect the current mode.


There are two ways to exit Tripod Mode (and most modes): Long press the pause button to the bottom left of the controller screen, or tap the red X along the left side of the phone. If your phone is acting up, the pause button might be a good bet. If that fails, consider holding the RTH button for a few seconds, or toggling Sport Mode (see below), but if this is the case, you’re having a bad day.
If you exit with the red X, you’ll see this prompt. You can either tap the buttons on the screen, or you can use C1/C2 (the buttons on the bottom of the remote) to accomplish the same thing. Helpfully, C1 is on the left and C2 is on the right! While this prompt is up, those buttons won’t perform their normal tasks.

When to Use Tripod Mode
Tripod Mode is a useful mode for high precision flying, very slow pans (rotating the camera) or slow translation (moving about the sky - though waypoints are also well suited to this). With the maximum flight speed of 2mph, you won’t go anywhere in a hurry, but you can also get very, very smooth footage. The combination of slow and muted control response with the very slow yaw means that this mode is perfect for those lazy scenery shots. The control sticks on the remote are quite good near center, but if you’re making very, very small movements, you’ll probably find Tripod Mode is both smoother and easier to control.
I’d also suggest using Tripod Mode if you’re maneuvering close to trees or a building - or for indoor flight, if you must. I really don’t suggest using the Mavic Pro indoors anywhere smaller than a school gym, but for indoor flying, Tripod Mode makes it a lot harder to hit something by accident.
It’s worth noting that you can land in Tripod Mode - if you have a particularly tight landing spot (not recommended when you’re starting out, but after you gain some experience it’s a very useful skill), you can line up with Tripod Mode, descend with the left stick, and still manipulate the location very, very precisely. At that altitude, optical positioning is seriously awesome. I regularly land on a 4’x4’ platform that I’m standing on.
Cinematic Mode
If you read last week’s post, you might recall that I talked about being smooth on the sticks and practicing gradual acceleration and deceleration. I also mentioned that there was a mode that would do this for you. Cinematic Mode is that mode - it’s synthetic smoothness with the sticks for the lazy.
The easiest way to think about this mode is to imagine it makes the Mavic Pro a super, super heavy drone without much excess thrust for acceleration or deceleration - sliding around on ice. It smooths everything out - acceleration is slow, yaw is slow, and deceleration is slow. It’s no slower at full speed than the normal mode (20mph), but it takes longer to get there, and takes longer to slow down (the pitch-up braking is significantly reduced).
It also feels like the stick curves are modified - small deflections in Cinematic Mode have less of an impact than they do in normal mode. This helps you fly smoothly.
Top speed: 20mph
Full 360: 8 seconds (45 degrees per second)

Entering and Exiting Cinematic Mode
Cinematic mode is exactly the same as entering and exiting Tripod Mode - either press the “5D” button (the top hat in the lower right corner of the screen), or tap the alien. Then pick Cinematic Mode, click through the information, and you’re good!
Exactly like in Tripod Mode, you’ll see the mode listed both at the top of the phone screen, and on the controller display.


When you’re done, either tap the red X on the left side of your phone screen and agree to the dialog box, or hold the Pause button (lower left corner of the display) for a second or so. Either way will drop you back into normal flight mode - this is identical to how it works for Tripod Mode.
When to Use Cinematic Mode
If you’re filming and flying freehand, you should be in Cinematic Mode. It smooths things out nicely compared to the normal mode. Rotation is half the speed, and smooth stick operation in Cinematic Mode makes the Mavic Pro fly like butter. There’s no reason to be using full stick deflection when you’re doing most video work, and using this mode will help you avoid the jerky movements seen in some videos - especially when rotating around. Ease the sticks around the center, be smooth, and this mode smooths stuff out even more. It’s hard to describe exactly how it differs, but you’ll notice the difference immediately in the response. When slowing down, if you’re gentle with the sticks, the Mavic Pro shouldn’t do the “brake tilt” at all - you should be able to come to a smooth and gentle stop without the abrupt braking action.
Cinematic Mode Warnings
It’s easy to have the Mavic Pro get away from you in Cinematic Mode if you’re flying quickly. The turns are slower, it takes a lot longer to stop, and it feels somewhat like you’re flying on ice. This isn’t a problem at all for filming (it makes for great aerial footage!), but be careful that the radically increased stopping and turning distance doesn’t crash you into something.
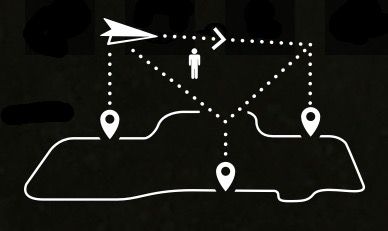
I did a back to back comparison of normal mode and Cinematic Mode, shown in the map below. For both modes, I hovered in place, accelerated forward at full stick (for demonstration purposes - don’t to this while filming!) for 5 seconds, turned 90 degrees to the right, and waited until the flight path stabilized. The lower trace (with the much tighter turn) is in normal mode, and the upper trace is Cinematic Mode. Not only does it turn slower (which impacts the turning radius), but it takes longer to scrub off the now sideways momentum and head due south.
Keep your speed down, make sure you’re above obstacles, and you’ll be fine!

Sport Mode
Sport mode! Rocketing through the sky at silly speeds! Sport Mode gives you more speed, more power, and radically more responsive controls. The Mavic Pro is not a racing drone, but it’ll do a solid impression of one, and a standing start to a 40mph dash is pretty impressive to watch.
Sport Mode also disables obstacle detection, and it takes the Mavic Pro a lot longer to stop from 40mph than from 20mph. The handling is downright twitchy at times, and you will turn a lot more than you intended until you’re used to it, because it just snaps right around in response to yaw commands.
Top speed: 40mph
Full 360: 1.9 seconds (180+ degrees per second)
Entering and Exiting Sport Mode
Unlike the previous two modes, Sport Mode is entered with the toggle switch on the right side of the controller. It’s not an “Intelligent Flight Mode,” but it has the same sort of impact on how the drone flies (it’s still entirely manually controlled, but the controls respond differently), so I’m including it here since it makes the most sense.
Once you flip the switch, you’ll see the normal indicators of a different flight mode - the title bar will change, and the controller will inform you of the new mode.
You see that red icon in the title bar? That means that obstacle detection is disabled. As in, you can fly directly into a tree at high speed and it won’t complain.
If you look at the lower display, you’ll notice that the “Vision” indicator (normally to the right of the remote battery percent) is gone, and the “Sport” indicator has lit up over in the lower right corner. Again, this is telling you that you don’t have obstacle detection. Fly accordingly!


To exit Sport Mode, simply toggle the switch back the other way.
It’s worth mentioning that enabling Sport Mode will drop you out of any other modes as well - I personally prefer the “pause” button for getting out of other modes, but toggling Sport Mode will do it as well. Sorry, you can’t use Sport Mode in combination with Home Lock (though the separate icon on the controller for it implies that this may have been considered). Sport Mode is Sport Mode, period.
When to Use Sport Mode
Sparingly. It’s an impressive flight mode, and really shows off what a decent sized quadcopter can do, but it’s almost entirely useless on the Mavic Pro for any sort of filming work.
Where it can be useful is in rapid repositioning. If you want to get out to 500 yards in a hurry, Sport Mode will get you there quickly, though I’m not sure about the power efficiency of doing this (there’s a lot of drag, but it also takes a lot of power to maintain flight, so, play around and let me know?).
It’s also useful as an emergency, “Woah, the wind really picked up…” mode - when you’re fighting a strong headwind, flying faster is beneficial. If you’re struggling to get back because of winds, consider Sport Mode, but you could also consider descending - and then you should also reconsider what you were doing flying in those conditions in the first place.
Sport Mode Warnings
Would you like to destroy your Mavic Pro? Sport Mode gives you a wide variety of ways to do so! Obstacle detection is disabled (I don’t believe the Mavic Pro can stop from 40mph in the useful range of the vision system anyway), it will take a good while to stop (especially downwind - the Mavic Pro mostly lets you ignore wind, but acceleration and stopping distances are seriously impacted by the winds aloft), and it’s much harder on the motors, props, and power electronics. The rapid rotation rate also makes it very hard to control heading precisely. Be very, very gentle with your yaw commands.
I would also suggest that using Sport Mode below about 40-50% battery is a decently bad idea. If the cells are older and don’t have quite as much capacity as the battery management board thinks, you could easily sag the voltage enough to start causing problems. This will be dependent on power required, so if you do need Sport Mode to get home on a low battery into the wind, don’t try to climb and accelerate at the same time (yes, both sticks forward is impressive, and you should only be doing that on a full battery - that’s working everything as hard as allowed).
Use it if you want, but just understand what’s going on - and understand that it’s a risky way to fly. It’s hard on the power electronics, it’s hard on the motors, and it chews up a lot of sky in a hurry.
I don’t support modifying the limits of drones in firmware either - power electronics take a lot of abuse, right up until they fail. If you feel the need to do that, please don’t fly your modified drone around people - ever. Even at lower speeds. Stress on components is cumulative.
Terrain Follow
Another Intelligent Flight Mode you can use is Terrain Follow. This mode uses the downward facing sensors to detect the distance from the ground, and allows you to set a new minimum AGL (Above Ground Level) altitude for flight. If the ground rises up, the drone will rise up to maintain that minimum clearance. It doesn’t automatically descend if the ground falls away, but you can pull down on the left stick to descend back to that minimum altitude (unlike normal flight modes, holding it down does not cause the Mavic Pro to land - it will just hover at the programmed AGL distance).
Regardless of the set height, you can manually ascend higher. This mode just sets a floor on your ground clearance, and will enforce that floor in the face of rising terrain.

Entering and Exiting Terrain Follow
Like the other Intelligent Flight Modes, select the flight mode menu with either the icon on the left of the screen or by pressing the 5D button. Terrain Follow is, as of this posting, the first item on the second screen of options.

When you enter it, you’ll get a prompt on the right with an “Apply” button at the bottom. Fly to your desired height above the ground, click “Apply,” and you’ll (hopefully) see this status screen.

If you click “Exit,” it will do what you expect. If you click “Hide,” this screen will slide out of the way to the right to show the full video feed. You can get back to it with the icon in the lower right corner of the screen (next to “Playback”) - and this is true for any of the modes with this right side pane.

Much like the other modes, you also get a status bar indication that you’re in Terrain Follow mode, and the controller display will say “TERRAIN” as well.

In my testing, Terrain Follow only works up to around 25 feet - maybe a bit higher. If you try to engage it when you’re too high, you’ll see the following error - and it won’t engage.

When to Use Terrain Follow
If you’re manually flying close to the ground on varying terrain, this mode is a good safety backup. If you set enough of an altitude buffer (I’d suggest 10 feet as a minimum, and more would be good), it should prevent you from flying into the ground - though the default mode tries to keep you out of the ground as well.
Where I fly, there are a lot of taller weeds and scrub such that the stock minimum altitude isn’t going to keep me out of things. Terrain Follow lets me set a higher floor altitude that keeps me from having a flying weed whacker, but I really don’t use it much. If it combined with some of the Active Track modes, it would be a good bit more useful.
Terrain Follow Warnings
If you’re relying on Terrain Follow to save your drone, you’ll eventually have a bad day. The main limitation is that this mode can only detect terrain directly below. If you set an altitude of 6’ above the ground and fly towards a 7’ pile of dead trees, the only thing that will keep you out of the pile is the forward vision system. Rapidly rising terrain (or something that rises vertically over a short distance) is beyond what this system can deal with, though the forward vision system may be able to help you out if you’re flying forwards.
I really don’t like relying on the vision systems that much. They’re useful as a backup, but relying too heavily on them will eventually put your drone into the ground or an obstacle when you get too used to them and do something like fly sideways or backwards into something.
According to the manual, “The Downward Vision System is utilized in Terrain Follow Mode to maintain a height above ground between 1 and 13 meters (3 and 42 feet). This mode is designed for use on grassland sloped at no more than 20 degrees.” Abide by those suggestions and you’ll probably be fine. Ignore them, and, well, there’s always DJI Refresh.
Home Lock
Home Lock is the first of the modes I’m discussing that fundamentally changes how the control sticks operate the Mavic Pro. Instead of flying relative to the current drone heading, this mode flies relative to the direction from the recorded home point - and entirely ignores the heading of the Mavic Pro.
Obviously, if one is flying relative to the home point, the home point matters. You should check it on the map before engaging this mode and make sure that it’s where you expect (ideally, where you’re standing with the controller, because otherwise it’s going to be quite challenging to make sense of things).
Altitude control works as normal - push up on the left stick to ascend, pull down to descend. Yaw also works as one expects - push left on the left stick to rotate to the left, push right to rotate to the right. But, unlike all the other modes discussed so far, the Mavic Pro heading has no impact on how the right stick moves it through the air!
In Home Lock mode, pushing the right stick up (“forward”) will always move the Mavic Pro directly away from the recorded home point. If the Mavic Pro is off your right shoulder, this will move it to the right - away from you. Behind you, it will move backwards. Pushing the right stick down (“backwards”) will always move it directly towards you. It won’t come closer than 20 feet or so, but no matter where it is, pulling down on the right stick brings it closer to the recorded home point.
Left and right translation requests (left and right on the right stick) will move it counterclockwise and clockwise around the home point - no matter where it is on the circle! If you are facing the drone, pushing left will always move it to your left - but it will (theoretically) maintain the exact same distance from you.
What does this look like in the air? Kind of weird, really. To get this shape around the home point, I held the control stick to the right for a while, then pushed it forward, then pushed it left (and brought it back in a bit because it was wandering out further), then pulled it straight back towards me.
No matter which way the Mavic Pro is facing, that set of control sequences will give this shape. It can face towards you, away from you, or you can hold the left stick over to one side and let it spiral along the route. It will fly the same shape for the same right stick inputs.

Entering and Exiting Home Lock
Home Lock is an Intelligent Flight Mode, so you enter it the same way as all the others (push the 5D button, tap the icon on the left of the phone screen). This mode is also on the second page of the menu, so swipe over if you haven’t.
When you first select it, you’ll see the description pane on the right. You are not yet in Home Lock mode! This just describes the mode, and shows you the current distance from the home point. It needs to be greater than 20 feet or so - if the number is red, fly away from the home point until it turns blue, then you can engage it.

Once you click “Apply,” the Home Lock flight rules go into effect and the Mavic Pro flies as described above, with stick movements being all relative to the home point. If this pane is up, you’ll see the distance from the home point, which is rather redundant as the bottom of the screen also shows this.
Exiting is the same as other modes. Hold pause, click the “X”, or click “Exit” on the right pane.
When to Use Home Lock
Uh… well, you should use it… when… hm… *drums fingers*
Really, the only use I can think of for Home Lock is that it’s a manual Return to Home type capability. If you’ve been naughty, flown your drone out to the limit of visual range, looked away, and cannot figure out where in the sky the spot is (human eyes don’t naturally focus to infinity against a background like a clear blue sky, which is why this is so hard on a clear day), engaging Home Lock, verifying that your home point is where you’re standing, and pulling back on the right stick should get it heading towards you - and you can spin it and wiggle it in the sky to make it easier to see against the background.
Otherwise, I have no idea where this would be useful. It’s sort of a manual “Point of Interest” mode, except that the point of interest is fixed, and the heading of the Mavic Pro does not rotate to the center - it stays pointing the compass direction you left it as it flies around.
If you’ve found something more interesting for this mode, please let me know in the comments, because I’m only covering it for completeness. I find it entirely useless for the flying I do, and the only reason I’m familiar with it is for this post.
Home Lock Warnings
Be careful! While obstacle detection is not disabled, it’s really easy to be flying sideways or backwards, and the Mavic Pro doesn’t have sensors pointing anywhere but forward. You can easily fly sideways into a tree, tower, power line, etc. Ensure that your path is clear, or, at least, that the Mavic Pro is pointed in the direction you’re traveling.
Also, I’ve noticed that if you’re trying to describe a rapid circle, the drone will tend to push away from the home point - sometimes significantly.
It’s a weird mode, and beyond manual RTH type controls, it’s probably not one you should use particularly often. Unless you can think of uses I’m not!
Course Lock
Course Lock is another mode that involves changing around how the controls work - but it’s at least a bit more reasonable and useful than Home Lock.
Course Lock involves setting the current heading of the Mavic Pro as “forward” - and then you can freely control yaw while the translation controls (right stick) remain fixed relative to the locked course. If you lock the course as facing away from you, forward on the right stick will always move the drone way from you, right will always move it right, etc. This is entirely independent of which way the camera is pointing - you can spin in circles with the left stick and nothing changes for which way the right stick moves the drone.
In the map view, you’ll see a red line indicating the locked course. Just past the aircraft position marker, you’ll see an arrow on one end. That’s forward. No matter how the drone is pointing, moving the left stick up will always move you in that direction.

One rather annoying issue with Course Lock is that the “heading” field in the pane seems to be relative to the direction the Mavic Pro was facing at power on (or takeoff). It’s not the true heading, and it’s not the magnetic heading. If you take off facing to the south, the info pane will show a heading of 0.0 facing to the south. Personally, I think that’s about the worst of all options to pick - I would much prefer either magnetic or true (and it certainly has enough information to work those out). But, if the heading field makes no sense, that’s why.
Entering and Exiting Course Lock
Course Lock is another Intelligent Flight Mode, on the second page - so enter it the same way you’ve been entering all the other modes.
Like Home Lock, when the Course Lock pane shows up, you are not yet in Course Lock Mode! This shows you your heading (relative to the direction at takeoff), and lets you fly around to pick a heading and a start location. ”Free Mode” just means that it flies normally.

Once you click “Apply,” the pane will change. While the wording doesn’t change, you get a new “Reset Direction” clickable link and the normal “Exit” and “Hide” buttons.

If you’d like to change the locked direction, the “Reset Direction” button is your friend. I started out in this situation - flying with one course locked, and the nose of the Mavic Pro 90 degrees to the left of my locked course.

If I tap “Reset Direction,” the locked course updates, and I see a message pane indicating that the new IOC (Intelligent Orientation Control) has been reset. The wording is weird, but this just means that the new heading has been locked, and your controls now operate relative to this new heading.
It’s a good idea to use the map display to verify what you’re doing and which directions things are locked to. Otherwise, this mode can be dreadfully confusing.

When to Use Course Lock
Course Lock is useful if you want to fly a mostly rectangular pattern while being able to freely aim the camera - or if you want to fly a straight line while freely aiming the camera. It’s effectively a rotating camera gimbal like the Phantoms have, but it restricts you to a particular course while you’re rotating things around.
With Course Lock engaged, it’s easy to fly a rectangular pattern while inspecting whatever you want (though it takes a bit of thinking to fly like this). Doing something like a manual camera survey of a field would benefit from this mode as well, though why you’d do that by hand is beyond me.

If you want to follow a long, straight path (say, a fence line, a railroad track, a powerline, a pipeline, etc), this mode might be useful as well. You can go barreling along the locked route while looking around, and if you’re following something like a train, the position of the right stick will affect how fast you’re flying. You can slide back and forth across the track as well, and generally separate your flight path from your camera angle.
One problem you might run into is that the course locked isn’t exactly following the fence line, rail road track, road, or whatever. If it’s only a slight difference, there’s no need to stop and adjust the course. You can simply push the right stick a bit to the right or left to maintain the correct drift relative to your locked course, and still track a mostly straight line.
However, if you really want to fly a straight line between fixed point A and fixed point B, Waypoints are a better way of doing this. I’ll talk about them in depth next week.
Course Lock Warnings
Like any other mode in which you can be flying around sideways or backwards, obstacle detection will not work. The Mavic Pro will happily crash into anything to the side or behind it, and Course Lock makes it easy to fly sideways or backwards. Even though obstacle detection is not actually disabled, it’s of very, very limited use.
Also, you have to remember you’re in this mode. If the course is away from you, the drone is facing towards you, and you’re pushing forward on the right stick trying to get it to come back, it’s not going to come back. No matter how long you try. Anything that changes the operating characteristics like this can be a danger from a confusion perspective if you let it. Remember what mode you’re in, and when in doubt, hold down the pause button for a few seconds to revert to “normal, does what you expect” flight mode.
Practicing With Flight Modes
Like last week, I’m going to finish this discussion with some thoughts on how to practice with these modes to better understand them.
Tripod mode is a fun one to play with - it’s super slow, super precise, and if you have a GPS lock and are flying low enough for a solid optical lock on the ground, the Mavic Pro is absolutely anchored into one spot in the sky. It’s super smooth, and can generate some great footage with “barely motion.” If you’ve flown RC helicopters or older (non-GPS/non-optical) quadcopters outside, it’s just comical how rock solid the Mavic Pro is in any mode - but Tripod really highlights it.
With Cinematic Mode and Sport Mode, the best way to work out the details is simply to fly around with them and get a feel for how they respond. For Sport Mode, keep your battery over 50% and make sure you’ve got a lot of space to fly. Fly above the obstacles. And keep your eyes on the drone. Fast flying from the screen does not give you nearly enough awareness about what’s around to keep your drone out of the trees/power lines/etc. I don’t care what the indoor FPV racers do - they’re flying in a totally different environment than you are (and, yes, I apply this to the DJI Goggles as well - you need a separate spotter to legally fly with them, and they’re a bit silly).
With all three of these modes (and the normal operating mode), make sure you get a good feel for how the Mavic Pro rotates - yaw is the biggest difference between these modes, and there’s almost an order of magnitude difference between the yaw rate from Tripod Mode to Sport Mode.
I wish I had advice for Home Lock, but beyond playing around with it a bit in an open field, I simply don’t have much to offer. It’s not a totally useless mode, but it’s mostly useless.
Course Lock is a lot more useful, but it takes practicing to be able to wrap your mind around how it flies. I’d suggest locking the course directly away from you and practicing that way for a while, since that makes the translation commands directly correspond to aircraft movements. It’s a bit disturbing to have the drone facing towards you and moving “backwards” compared to the normal modes, though. Play with it, learn it, and figure out how not to crash if you’re using it.
Otherwise, fly slow, fly safe, and burn through some batteries playing around and learning to control your Mavic Pro!
Comments
Comments are handled on my Discourse forum - you'll need to create an account there to post comments.If you've found this post useful, insightful, or informative, why not support me on Ko-fi? And if you'd like to be notified of new posts (I post every two weeks), you can follow my blog via email! Of course, if you like RSS, I support that too.

