
Continuing my series on Mavic Pro operations, this week involves a deep dive into the Waypoints feature of the DJI Go 4 app. It’s quite powerful, but it also has some significant things it can’t do. Once you understand the capabilities and limitations, though, the built in Waypoints feature is a wonderful tool for capturing some very interesting shots in the sky, because it allows you to focus on capturing the scene and not flying the drone.

So, join me for a pre-plotted trip through Waypoints!
Mavic Pro Missing Handbook
What is this series of posts? This is my attempt to provide a comprehensive look at all the various features of the Mavic Pro - in text form. I find video tutorials to be generally lacking in actual content, as well as truly frustrating to skim (you have to suffer through 10 minutes to find out that, no, it doesn’t actually talk about what you were wanting to learn).
I’ll be updating this list with more posts as I write them. My blog updates every Saturday.
DJI Mavic Pro: The Missing Handbook: Basic Operations Preflight checks, gimbal locks, takeoff, landing, basic flight operations.
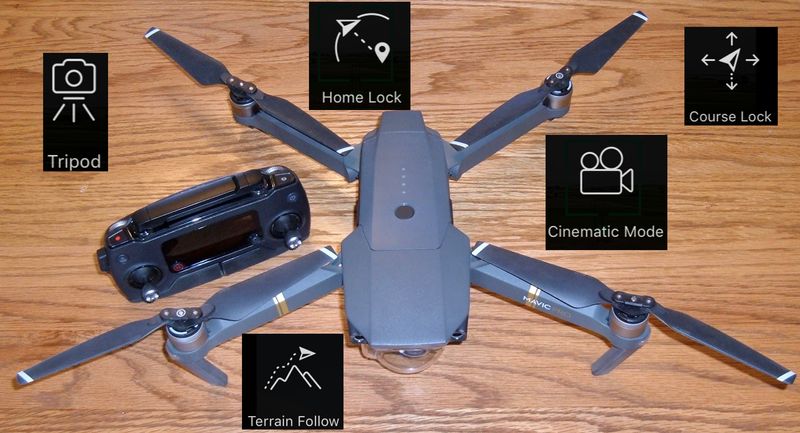
DJI Mavic Pro: The Missing Handbook: Intelligent Flight Modes Tripod, Cinematic, and Sport Modes. Terrain Follow. Home Lock. Course Lock. Pretty much everything that requires you to still move the sticks to move it.
DJI Mavic Pro: The Missing Handbook: Active Track, Follow Me Mode, and Gesture Mode Using Active Track, Follow Me, and Gesture Modes properly - much detail on how the various Active Track modes work and how the controls work, and a few ways to avoid waving like a fool at your drone in Gesture Mode.
DJI Mavic Pro: The Missing Handbook: Wifi/Remote Only, Tap to Fly, Fixed Wing, Point of Interest, Attitude Indicator Finishing out the series on flying modes with the remaining modes, as well as discussion about the attitude/orientation/power indicator, flying with only the remote or only a phone, and some of the degraded flight modes.
DJI Mavic Pro: The Missing Handbook: Comprehensive List of Menu Options A list of all the menu options and camera menu options with notes on what they do, when you should change them, and how to use them for effective flying.
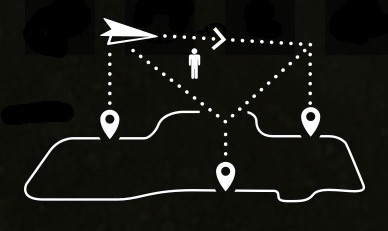
Waypoints Mode
One of the nice capabilities of the Mavic Pro (and the other DJI products) is that they are capable of fully autonomous flight between points in the sky. I’m totally fine calling them a drone instead of a quadcopter because of this capability (and things like Active Track). You can upload a list of “places in the sky to be,” and it will go to those places, even if the controller loses connection (something to be aware of).
What this means, practically, is that you can specify a route in the sky to fly and then go fly that route repeatedly and consistently. Further, because the Mavic Pro is handling the actual flying, you can focus on composing your shot.
Warnings & Limitations
If you are, as suggested above, focusing on composing your shot while flying in Waypoints mode, you need a second crew member as a visual observer to keep an eye on the drone and alert you if there’s something coming close to it (airplane, bird, UFO, etc). The FAA is pretty clear on what “visual contact” means - occasionally looking away for battery status and the like is fine, staring at your screen for a minute while filming is not. So, don’t be silly here. Use a spotter.
Also, the DJI Go 4 Waypoints mode has some serious limitations compared to some other software packages for handling waypoints - I’ll cover the main limitations here, and if they’re an issue, address them towards the end of the post.
No Gimbal or Camera Control
One of the main limitations is that the DJI Go app cannot program in gimbal or camera control commands (“Fly here, take a photo in this direction, fly here, set the gimbal like this, start recording video, etc.”). It will let you fly a route repeatedly, but you must handle the camera and gimbal operations manually. This isn’t a big problem for a lot of flying, but it does mean that you won’t be using this app for field surveys or long time lapse videos of construction sites or anything like that.
This is more designed for short range/short term flying automation to allow you to focus on a shot.
No Preplanned Routes
To fly a Waypoints route with the DJI Go app, you have to physically put the drone at the points in the sky you wish to use as waypoints - and then there’s no way to edit those after the fact. You can’t change the altitude, heading, etc. So, make sure it’s what you intend when you record the points.
Location and altitude are the important ones - while the heading may be useful, it’s easy enough to fly the route with one of several manual heading control modes.
No Automatic Routes
Since you can’t plan a route ahead of time, there’s also no way to say, “I want to get photo coverage of this property, you figure out the details.” Since the app can’t take photos or manage the gimbal anyway, there’s no real loss here - but it’s something other apps offer.
Range and Distance Limits
The DJI Go app won’t let you create waypoints outside a 500m (0.3 mile) radius of the home point, or a mission longer than 3 miles (5 km). Since the Mavic Pro is capable of (in ideal conditions) flying 8 miles (13 km) on a battery, this is an abnormally short restriction. However, again, this app isn’t intended to be used for field mapping.
Creating a New Waypoints Mission
To create a new Waypoints mission, enter the Intelligent Flight Modes menu by tapping the alien icon along the left of your phone screen, or by pressing the 5D button (the button to the lower right of the controller screen). Agree to the restrictions notice if you haven’t on this flight.
You’ll need to swipe over to the next screen to find Waypoints - it’s in the lower left.

Select that option, and a pane will pop up on the right side of the screen. This gives you two options: New Mission, or Favorite Missions. The second option is a bit misnamed - I would call it “Favorite and Recent Missions” instead, because the last three missions flown are automatically saved - in addition to any Favorites.

To create a new mission, tap on “New Mission.” This will bring up a new screen for creating a mission. Before you’ve recorded the first waypoint, you’ll see a status screen indicating no waypoints and zero total mission distance - which does make some amount of sense!
To record waypoints, you can either tap the “Record” button on the screen, or use the C1 button (left button on the bottom of the controller - not the video record button). Personally, I find using the C1 button to be easier as I don’t have to take my hands off the remote. If you don’t like the waypoint you just recorded, you can tap “Delete” or press C2 to remove the most recent waypoint. If you’ve accidentally created a bunch of waypoints at the same spot, you’ll have to remove all of them.
It’s a good idea to have the map up for waypoints - the layout of the course is much easier to see and you’ll get realtime updates about the path you’re proposing.
Fly to where you want to start the mission, pick your desired altitude and heading (if needed), and click C1! Congratulations, you’ve stored your first waypoint!

Now, just keep doing that. Fly to a position, set your altitude and heading, record the waypoint, and go on your way.
I’ve created a box with some sharper and shallower corners here (to demonstrate corner rounding). Since I’ve recorded my last waypoint, I click “Done.” This moves to the next screen, where I can actually go fly the recorded mission.

But, before we get there - let’s consider the other way to get here.
“Favorite Missions”
The other way to load a mission to fly is by loading up Waypoint Mode, and instead of clicking “New Mission,” click “Favorite Missions.” This will bring up a list of the last few missions flown as well as your saved favorites. You can see that I have the top mission highlighted. If you’re within range of them on the map, they will show up on the map as well - useful to ensure you’ve selected the proper mission and that your drone won’t head off on a cross country trip to find a waypoint in the next state.
Select a previous mission by clicking on the timestamp on the left (tapping on the right side doesn’t do anything). The missions will show you the date & time you created them, the location, distance, and waypoint count. If you select one and click “Apply,” it brings you to the next screen where you can fly the mission - same as if you’d just created it.

Flying a Waypoint Mission
Regardless of how you get here (creating a new mission or loading a saved one), this is how you’ll start flying a waypoint mission!
If you’d like to save a mission as a Favorite, tap the star in the upper right corner of the screen - this will turn yellow and the mission will be saved separately from the last three flown.
Phrasing here is also a bit weird - “Control the aircraft fly to Start Point” seems to imply that you need to manually fly to the start point, but this isn’t correct. The Mavic Pro will automatically fly straight to the start point before flying the waypoint mission (so, ideally, you should have it somewhere around that point to start with, and a clear path between the current location and the start point).
There are three things you need to set before letting the Mavic Pro set off on a mission. The first is the “Head to:” setting - which, again, is misnamed. This should be the “Heading Mode” setting. There are three options here: “Adjustable Heading,” “Route-Linked Heading,” and “Free.” I’ll cover these in detail later, because there are some major differences between the three modes worth diving into.

The second option is the “Mission Complete” setting - and the options here are “Hover” and “Return to Home.” These should be pretty self explanatory - the Mavic Pro will either hover at the last waypoint, or will proceed to return to the set home point (which you did properly set before heading out, right?).
Finally, there’s a slider for the initial speed. This is adjustable during the mission flight, and you can modify it with the control sticks as well should you need to, but this sets the initial value. I generally find that the default speed is too fast for most of the stuff I want to do. If you set it to 0.0, the drone will head to the first waypoint and await further instructions.

Once you click “Apply,” you proceed to a “Return-to-Home Altitude” screen in which you can set the return to home altitude. This is in meters above your takeoff location - not above the ground, not above the trees. So make sure it’s high enough!
The default 40m is 131 feet, which covers a lot, but you may need to set this higher.
Even if you set the drone to hover at the end of the mission, if the battery gets low enough, the drone will abandon the mission and attempt to return home. So be sure this is set properly for your environment. When in doubt, raise it higher. A setting of 100m (328 feet) gives you pretty good ground clearance and won’t bust the 400’ limit unless the ground is seriously sloped.

Once you click “Apply,” your Mavic Pro will proceed directly to the first waypoint and will fly the specified route - and, as noted, it should do this even without the remote link. So, maybe, set the last waypoint to somewhere close - or set the end of mission action to “Return to Home,” just in case.
The “Speed” slider at the bottom does exactly what you would hope - it sets the travel speed along the route. At the low end, this is 0.0 - hovering in place. It’s not as useless as it sounds, but I’ll cover the later. At the high end, you can set 22.4mph, which is absurdly fast, and I have no idea why you’d be flying a waypoint route that quickly. Worse, if you set the speed particularly high, the Mavic Pro is utterly incapable of taking a corner. It swings wide, can’t hold a line particularly well, and just flies sloppily. This is downright dangerous if your waypoint mission takes you near any sort of obstructions.

Route Flying and Rounding Corners
The Mavic Pro will fly the waypoint route, but not exactly. It rounds the corners! This is visible in the map below - the blue lines indicate the straight lines between waypoints, and the inner white lines shows the route as flown. Notice that it cuts the corners and rounds them out. This is the designed in behavior, and I haven’t found a way to change it - so be aware of it. If your planned route goes very close to an obstruction on the inside of a corner, there’s a good chance that the actual route flown will fly into the obstacle. If the Mavic Pro is facing forward, it may avoid crashing into it. If you’ve got the nose facing away from the actual route of flight, well… crunch. Don’t do this. It’s loud and expensive. And if you’re flying the route fast, it will go wide. So, basically, don’t plan waypoints near obstructions. If you must, don’t fly a tight corner around the outside, and keep the speed down.

Flight Controls While Waypointing
One might assume that on a waypoint mission, the flight controls would be totally useless - and one would be wrong! Only some of them are - but the others are poorly documented.
Altitude change requests (typically left stick up or down, unless you’re not flying in Mode 2, at which point you can translate) are ignored. The drone flies the path, including altitude, “as instructed,” and tries to fly a straight route between waypoints (including altitude).
Yaw requests? These either work or not, depending on the “Head to:” value chosen. And I’ll cover these later.
Left/right translation requests (normally right stick left or right) are ignored, just like altitude.
But - forwards/backwards translation requests (Mode 2: right stick up or down) are translated into “Move along the waypoint route or move backwards along the route” requests! This is an interesting mode, and explains why setting the speed to 0.0 isn’t useless.
If you’re moving forward with a programmed speed, and you push the stick forward, the Mavic Pro will accelerate along the route. If you pull the stick backwards, it will either slow down or reverse.
But, if you set the speed to 0.0, you have full manual control over the route flown and can move the Mavic Pro forwards and backwards, at will, along the “cable in the sky” defined by the waypoints! This opens up a lot of options for filming along a complex pre-defined route without having to actually fly the route at filming time. If you set the route, watch out for the corner cutting behavior, use “Free” heading mode, and then set the speed to 0, you have absolute control over where the Mavic Pro is and where the camera is pointing at every moment! Filming a scene with variable timing becomes much easier, as long as it takes place on a fixed route. This is a hugely useful mode, and I expect one could capture some very impressive shots with it!
When in doubt: Pause! The pause button works as expected during waypoint missions, and will rapidly lead to a Mavic Pro hovering in place.
Heading Modes
Finally, I’m going to explain all three heading modes. These are the options selected when starting a waypoint mission - “Adjustable Heading,” “Route-Linked Heading,” and “Free.” They’re all quite different, and it took an awful lot of flying waypoint missions to work out all the details.
When you start a waypoint mission, the drone will fly in a straight line to the first waypoint. While doing this, the heading is freely controllable - it starts out facing the waypoint, but the left stick will spin the drone freely while not changing the actual course. However, as always, if the Mavic Pro is not facing the direction of flight, obstacle detection won’t work. Once it arrives at the start of the waypoint mission, the selected heading mode takes effect.
“Adjustable Heading”
This mode is badly named. It should be called “Variable Heading” or “Interpolated Heading” or something along those lines. Each waypoint along the route includes the location, the altitude, and the heading. When flying the route, the Mavic Pro will smoothly rotate to the heading of the next waypoint while traveling along each route segment. So, if the first waypoint has the Mavic Pro facing north, and the second waypoint has the Mavic Pro facing east, the Mavic Pro will slowly rotate from north to east along the line segment.
It does not record the actual rotations made between waypoints - only the headings at each waypoint. And, it will always rotate the fewest degrees between the headings while traveling. If you’re facing north at the first waypoint, and rotate left 270 degrees before the second waypoint to face east, the Mavic Pro will rotate clockwise (right) when flying the route.
Here’s an example of “Adjustable Heading” in flight for a very simple route. The left waypoint (#1) is facing north, and the right waypoint (#2) is facing south.


With this mode, you have no manual control over the heading - it does what’s recorded. You can still control the gimbal tilt, and forwards/backwards translation requests will still slide you along the path, but the other controls don’t do much.
The left stick isn’t totally locked out, though. Moving it left and right will change the framing on the image very, very slightly (this image shows the difference between full left and full right). When moving the left stick, the gimbal moves very slightly before the Mavic Pro starts to rotate. You can observe the same behavior by moving the left stick side to side when on the ground - even though the drone can’t rotate, the image will shift slightly. There’s not much adjustment, but there is a tiny bit. It will snap back to center if you release the stick.

When to Use Adjustable Heading
If you want to fly an absolutely determined route and heading, only having to manually adjust the gimbal, this is your mode! The Mavic Pro will fly pretty much exactly what you recorded, and you just have to keep an eye on it. It would be awesome if this mode could operate the gimbal and camera as well, but, unfortunately, it can’t. You’ll need third party apps for that.
However, if you want to go film some video along the same route, and are willing to manually set the gimbal (straight down might be a good one to use), this will work just fine!
“Route-Linked Heading”
The next mode listed is “Route-Linked Heading” - and this is a reasonable enough description of the mode. In this mode, the recorded headings of the waypoints are ignored, and the default direction for the drone is “Facing the direction of travel.” If you fly the mission without touching anything, the Mavic Pro will always face in the direction of flight. Useful for obstacle avoidance, and because the software rounds the corners out, the heading changes are nice and smooth.
If you fiddle with the heading command (normally the left stick), the Mavic Pro will rotate as it travels along the route - but what you’re doing in this mode is setting an offset relative to the direction of travel. If you adjust the heading 45 degrees to the right, it will always point 45 degrees to the right of the direction of flight. If you face backwards, it will fly the entire route facing backwards.
For a concrete example, I flew one of my waypoint missions, and turned the drone 90 degrees to the right during the first segment (so, facing due east). As it rounds the corner at waypoint #2, it maintains that 90 degree offset, even while going around the corner.

As it continues to the next segment, the heading is still offset 90 degrees to the direction of flight.

And, after going around the next corner, it’s still 90 degrees to the direction of flight! It holds this offset, regardless of the squiggling of the waypoint mission, until you tell it to do something different.

When to Use Route-Linked Heading
Route-Linked Heading gives a lot of interesting options for filming. With the default heading, filming will always be “forward” for the direction of flight. Throw in a fairly high speed (being aware of the wide turns), a low altitude (enough to avoid crashing, obviously), and you could put together a neat tour of somewhere (though I’ll suggest flying it slowly and speeding up the video in post-production, because that’s so much safer than actually flying quickly). The manual control of the offset lets you look left and right during the flight to capture a wider field of view, and if you’re looking for a profile video of some fixed route, setting up a route, angling to 90 degrees, and flying with the left stick (to run you forwards on the route at a variable speed) could be a lot of fun.
If you have other nifty uses of Route-Linked Heading, please - share in the comments! I mostly do photo work as opposed to video work, so I’m sure I’m missing some interesting use cases.
“Free”
Finally, the last heading mode is “Free” - which is exactly what it sounds like! You set the heading, and the Mavic Pro holds that heading as you fly the route.
It starts aligned with the initial heading, but then the Mavic Pro will not rotate at all unless you request a heading change. If you’re facing north at the start of the mission, you’ll face north the entire mission.
I flew my existing waypoint mission with “Free” heading mode, and the behavior is obvious. Shortly after starting, I rotated 90 degrees left to face west.

After rounding the first corner, while on the next segment, I’m still facing west.

And, after rounding off the second, while moving south, guess which way I’m facing! West! You get the idea by this point, hopefully. It doesn’t rotate unless you tell it to.

When to use Free Heading
This is my favorite mode - by far. I have full control over which way the camera end of the Mavic Pro is pointing, and it won’t rotate on me during flight without my explicit command. With this mode, you have two controls - yaw and gimbal angle. Or, if you set the speed to 0.0, you have the position along the route as well.
In my opinion, this is, by far, the most useful mode. The others are interesting, but the Free heading mode gives you full control over the heading (and the position, if you set things up that way). This is the full “cable in the sky” mode - you can slide the drone along the cable, point it how you wish, aim the gimbal how you wish, and take whatever photos or videos you want during the process. It’s the most flexible mode, and this is how I fly most of my waypoint missions (at least with the app).
Filming with Waypoints
I’ve found the best use of the DJI Go app waypoints to be for “cable in the sky” type work. Define where you want the drone to be at the ends, perhaps in the middle, and then set the speed to 0.0, the heading to Free, and fly the cable manually. Free heading is the most useful mode, as even if the path snakes around a bit, the heading will not automatically change going around corners like it will in the other modes. Other than for playing around, that’s how I use Waypoints.
“But I Just Want to Fly to Points and Take Pictures!”
Going through this guide, you likely have noticed that while DJI Go waypoints give you a path in the sky the Mavic Pro can rocket along, everything involving actually taking photos is a manual process, and can’t be easily repeated if you wanted to do something like take a bunch of shots at the same point in the sky, at the same gimbal angle, for construction time lapse or scenery shots.
Or, perhaps, you want to take a bunch of shots of a field to stitch together into a single large image, and you don’t want to fly this manually (dreadfully boring and you can’t fly as accurately as is helpful for large field surveys).
If you have an iPad, there’s a free solution that will do much of this for you - DJI Ground Station Pro.
This app (for iPad only, which isn’t a problem because DJI’s Android support is terrible) will let you design missions, upload them to the Mavic Pro, and then fly them. Of particular use are the area maps (this calculates a route to get the specified photo coverage of an area of land) and the “WayPoint Route.” There’s a paid upgrade to do mapping of tall objects, but I haven’t had a need to mess with that yet. This post isn’t a full overview of Ground Station Pro, but it should point you in the right direction for creating a waypoint mission, taking photos or video, that you can fly repeatedly.

When you go to create a new waypoint route, there are a few options you can pick from.
“Tap” lets you create a mission on a map with your fingers, configure the details, and then go fly it. ”Aircraft” is pretty much the same as the stock DJI Go app waypoints program, except you can then edit things and specify actions. And, “Aircraft Record Altitude” will let you specify waypoints that include the altitude - exactly what the DJI Go app does.

Once you’ve created a set of waypoints, you can then move them around, edit the details of them (heading, gimbal tilt, altitude), and assign actions to them (like taking a photo).
When editing the mission, certain attributes can be assigned to either all the waypoints (things like speed and altitude), or edited on a per-waypoint basis (heading, actions, etc). Aircraft Heading can be either set up as course aligned (which can be offset with the yaw commands), defined per point (you specify the heading for each waypoint), or manual - just like “Free” in the main app, where the Mavic Pro does not turn unless you command it.
If the rounded corners of the DJI Go waypoints missions bother you, fear not! You can set the corner radius, or tell the drone to fly exactly to each waypoint before moving on.

Waypoint Actions
The most exciting bit of Ground Station Pro is the Waypoint Actions. There are lots of them - and they’re incredibly useful!
Hover is what it sounds like - this allows you to specify a hover time at a particular waypoint. The range is 0-30 seconds. If you need longer, just add more waypoints at that point in space.
Photo Capture should be pretty self explanatory. Take a picture! The same goes for Start Recording and Stop Recording. These, obviously, start and stop the video capture.
Aircraft Rotation and Gimbal Pitch Rotation let you adjust either the aircraft rotation or the gimbal pitch at a waypoint. You can also manually specify the exact gimbal pitch at a waypoint, though (annoyingly) this is not recorded if you record a mission using the drone.

Flying a GS Pro Mission
There are a few tricks involved with getting Ground Station Pro to work properly and do what you want, and if you don’t know them, you’ll probably find yourself very frustrated.
The first important point is that you cannot use the lower USB port on the Mavic Pro controller with the side cable plugged in. It simply won’t work. Use any Lightning cable you have laying around to hook the iPad up to the bottom USB port, but then disconnect the side port (like you do for charging). That should hook things up.
The second gotcha is that, for longer missions (exceeding the non-logged-in range limits, or the controller only limits, or… some sort of limit), you need to connect with the DJI Go 4 app first - and then switch over to GS Pro. A warning about mission range means you need to load DJI Go and that then switch back. You can switch freely between the two apps, though it takes the video a few seconds to catch up. Unfortunately, camera settings (like setting up Automatic Exposure Bracketing and such) don’t seem to stick between the apps. Once you have GS Pro loaded up, tap the “settings” icon below the right side “take picture/record” button, and verify that you have the photo and video settings where you want them. It has a subset of the options from the main DJI Go app, but it should cover your needs.
Ground Station Pro has some automatic takeoff features, but I normally fly off the ground manually and then let GS Pro take over once I’m in the air. Load the mission you want to fly, and click the little “airplane/fly” button in the top right (because labeling buttons is sooo 2010…), and you should get a preflight status screen. If you’re doing filming, and you know the route is clear, I would disable obstacle avoidance - it serves no real purpose on a predefined course that you’ve checked out, and I do occasionally get clear air detected as obstacles in flight. I suspect it’s either my sun shield or sun glinting off the forward facing obstacle detection cameras. But turning it off will prevent a sudden stop in the middle of a run.

Once you’re in the air and on the mission, a few of the remote sticks still work. The yaw command will rotate the Mavic Pro (setting an offset to the course if you’re in the course locked heading mode), and the forward/backwards translation stick will either speed you along the route, or stop you and make you fly backwards. If you set the speed for the mission to manual, you’ll need to use this control to do anything at all. Note that the speed set for manual control is the maximum - there’s no need to set a 33mph max speed (50% faster than you can set in the DJI Go app) for a slowly moving film capture, and setting it slower will help you be smoother.
Once you start the mission, the Mavic Pro will ascend to the start point altitude, fly to the start point, and then go fly the mission! What’s left to do is up to how you set things up - if it’s fully automatic, you can kick back and just visually observe your drone flying. In the event of some sort of emergency, the pause button in the upper right will abort the mission, as will the pause button on the remote.
It is a good idea to check the camera image and tap the center once to auto-focus (if the icon is round instead of square, that’s auto-exposure, and you should change it in the camera status bar). The camera controls are substantially similar to the DJI Go app controls.

When the mission is done, the Mavic Pro will do what you commanded in the setup. Hovering is my default, since I don’t really trust RTH and auto-land to do the proper things (flying off a small elevated plywood platform may have something to do with this).
The consistency of captured images is decent, but not perfect. If you wanted to do a time lapse of images captured, it would take some post processing to line everything up. But it’s a good start, and the center 90% of the images should match. It might help to hover for 10 seconds at a waypoint before capturing an image - that may let the GPS and compass catch up a bit.
Oh, and if you don’t have an iPad? Or even if you do - Lichi should do something similar. I just haven’t used it yet, so I can’t say anything about it.
Do Something Awesome!
That pretty much covers waypoints! They’re a great way to frame more complex shots and let you focus on the image capture part of filming, as opposed to the flying to specific points in the sky part. Be sure you have a spotter if you’re heads down in the camera, but this guide should get you pretty well sorted out as far as how to use waypoints and how to make the Mavic Pro do exactly what you want. If there’s anything about waypoints I’ve missed, please - let me (and everyone else) know below in the comments section.
Comments
Comments are handled on my Discourse forum - you'll need to create an account there to post comments.If you've found this post useful, insightful, or informative, why not support me on Ko-fi? And if you'd like to be notified of new posts (I post every two weeks), you can follow my blog via email! Of course, if you like RSS, I support that too.

