
Another week, another deep dive into some Mavic Pro operations! This week is particularly exciting - I’m talking about Active Track, which is one of the big standout features of the DJI products. It tracks things, and can automagically follow them around! This set of modes allows for some really interesting action shots as the drone can fly like it’s tethered to a moving object. Since they’re related, I also cover Follow Me (GPS-based Active Track), and Gesture Mode (waving at the drone in a manner that convinces it to take a photo).

And, as is usual, these modes are very poorly documented beyond “Hey! They exist!” The video “tutorials” aren’t much better (I’ve yet to find one that exercises the full range of capabilities in Active Track), and watching first person video doesn’t do a great job of explaining how the various modes work.
So, me being me, I’ve spent far too long (I have over 11 hours of flight time logged on my Mavic Pro at this point) experimenting with the various modes, understanding them, and, of course, documenting them! Interested? Keep reading!
Mavic Pro Missing Handbook
What is this series of posts? This is my attempt to provide a comprehensive look at all the various features of the Mavic Pro - in text form. I find video tutorials to be generally lacking in actual content, as well as truly frustrating to skim (you have to suffer through 10 minutes to find out that, no, it doesn’t actually talk about what you were wanting to learn).
I’ll be updating this list with more posts as I write them. My blog updates every Saturday.
DJI Mavic Pro: The Missing Handbook: Basic Operations Preflight checks, gimbal locks, takeoff, landing, basic flight operations.
DJI Mavic Pro: The Missing Handbook: Intelligent Flight Modes Tripod, Cinematic, and Sport Modes. Terrain Follow. Home Lock. Course Lock. Pretty much everything that requires you to still move the sticks to move it.
DJI Mavic Pro: The Missing Handbook: Waypoints In depth coverage of the various waypoints modes supported in the DJI Go app, as well as how to use DJI’s Ground Station Pro for more advanced waypoints features.
DJI Mavic Pro: The Missing Handbook: Wifi/Remote Only, Tap to Fly, Fixed Wing, Point of Interest, Attitude Indicator Finishing out the series on flying modes with the remaining modes, as well as discussion about the attitude/orientation/power indicator, flying with only the remote or only a phone, and some of the degraded flight modes.
DJI Mavic Pro: The Missing Handbook: Comprehensive List of Menu Options A list of all the menu options and camera menu options with notes on what they do, when you should change them, and how to use them for effective flying.
Active Track
What, exactly, is Active Track? It’s DJI’s term for “Follow That Bird!” - you can specify a target to follow (car, truck, bike, person… something that contrasts with the background, within reason), and the drone will follow that target. There are a few different settings for “Follow that target!” you can use, and the controls of the drone operate radically differently from normal in Active Track mode.
Without using the controls, it’s an interesting mode of operation, but somewhat limited. Once you understand how the modes work, and how to use the controls, it opens up a huge range of interesting footage to capture!
I’ve been mostly using my daughter as a target while learning the modes. It turns out that a 2 year old against weeds higher than her is a bit tricky to capture and track. This leads to all sorts of interesting understanding about what the system can and can’t do. It won’t track things that hide behind other things for a while - if it’s a brief occlusion, it will probably mange, but it simply won’t understand more complex “hiding” events. Another thing it struggles with is objects that change shape. If it’s tracking a person, and that person bends over, or sits down in the weeds, the system is likely to loose the lock. I can’t really fault it - it’s a computer, and a toddler is a really weirdly behaving target.
That said, this feature is quite useful for an awful lot of things - and it’s useful for a good bit more than is often described. I’ve spent a good bit of time understanding how Active Track works, how to control it, and how you can use it to get good shots.
There are three “Active Track” modes - “Trace Mode,” “Profile Mode,” and “Spotlight Mode.” I discuss all three. Then, “Follow Me,” which is GPS based, but behaves very, very similarly to Profile Mode.
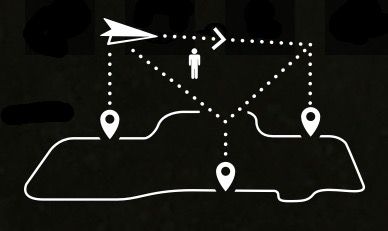
Test Course
I worked out a lot of the behaviors using a test course I cut in my hillside (fun with cheatgrass and a string trimmer). This course is roughly a square, around a hundred feet on a side, and contains both a walking path around the edge and a diagonal path through the center.
If you wonder why I went with an off grid office, this gives you an idea as to the property. Each black or otherwise off color blob is basalt. Some of it is small and on the surface. Some of it goes down deep and this is just the bit poking through the surface. Trenching through this type of field is nearly impossible.

I cut this course mostly to be an easily reproduced path to work with for understanding Active Track. Also, because I need some extra firebreaks in the cheatgrass - it’s that time of year. And I hate tromping through cheatgrass without mowing it first. I love my ancient string trimmer, as much as the motor isn’t generating anything like the rated 5hp (and burns more oil than I’m entirely comfortable with). But, DR Trimmer still supports their 30 year old units and sells most of the replacement parts, which is entirely awesome!

Right. Drones. This course lets me walk the same path, repeatedly, with different modes of operation. It’s a clear area with no obstacles, so I can let the Mavic fly freely and not worry about it hitting anything. And I contrast nicely with the background, so it can track me walking around without any problems.
Active Track Controls
In the three Active Track modes, the controls behave rather differently than in the normal flight modes - elevation is the only one that works as expected.
Elevation control works entirely normally - push the left stick up (if you’re in the default Mode 2), the Mavic will ascend. Push it down, the Mavic descends. The sensitivity is significantly reduced compared to the normal flight modes, so don’t expect it to rocket up in a hurry. When you ascend or descend, the gimbal will automatically follow the target - no need to manually adjust things. Don’t expect a perfectly smooth ascent or descent, though. At least on the current firmware (.0900), it may rock back and forth a bit as it climbs or descends.
The yaw control (left stick side to side in Mode 2) is no longer a yaw control - it’s a framing control. Deflection of this stick will turn the Mavic, but only to the extent that the subject is still in the main camera frame. Left and right turn the Mavic to the left and right as usual, but they move very slowly, and it stops at the end of the frame - it won’t allow you to move the subject out of frame with yaw commands. It also won’t allow you to shove the subject all the way to the end of the frame, because that would make it fairly easy for a rapid subject acceleration to move it out of frame. So, these are your limits. Yes, I’m tracking a torn up tree here - Active Track can track a surprising number of things.


In “Trace” and “Profile” modes, the translation controls are substantially revised. Forward and backward translation commands move the Mavic Pro towards and away from the currently tracked target. Left and right translation commands circle the target in the requested direction - relative to the current orientation of the drone. Left will always move it left (clockwise), right will always move it right (counterclockwise).
Translation controls in Spotlight mode are totally different and operate relative to the locked course. I’ll discuss this in more detail in that section.
The gimbal control will move the gimbal up and down (in addition to the automatic movements for altitude or tracking), but you can also move the gimbal beyond the range of the target and lose tracking. Try not to do this. The Mavic Pro will then go about hunting for the subject again, and will take whatever’s close (perhaps not what you intend). If you lose the target, cancel Active Track (or hit the pause button) and reacquire. I’ve seen some pretty funky gyrations when it loses the pile of basalt it was tracking on a hillside full of basalt…

Active Track relies on the DJI Go app for functionality. If your phone shuts down or disconnects, or the app crashes, Active Track stops working and the drone will hover in the sky in normal GPS mode.
This also seems the proper place to mention that Active Track is not terrain aware - so keep it out of the weeds!
Entering and Exiting Active Track
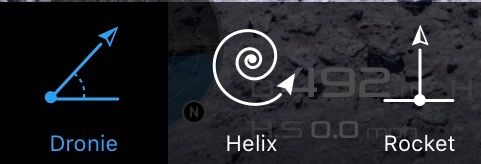
Entering Active Track is just like any of the other Intelligent Flight Modes - tap the icon on the left or push the 5D button (“into the remote”). Select ActiveTrack.

Now, you’ve got the Active Track icon on the left side and an otherwise normal looking screen. Go find your target and draw a box around it with your finger! A green box will appear, and if it’s something the Mavic Pro can recognize as contrasting with the background, you’ll get a pulsing “Go” logo and a menu along the right side.
If you just tap “Go,” things automatically enter Trace mode. Entering the other modes requires tapping the proper icon on the right.

If you select something the Mavic recognizes (person, car/truck, bicycle, and a bunch of other things), you’ll also see an icon next to the object indicating the type of object. I assume this adds some reasonable algorithms about how those objects typically move (cars turn, people’s legs move, etc).

However, there’s not much of a limit on what you can track. I’ve tracked stumps, barrel composters, toddlers, antique cars, my office… pretty much anything that contrasts with the background can be tracked. I’ve even tracked basalt outcroppings in a background of cheatgrass, though it struggles a bit with those.
Once you’ve entered a mode, the screen will change to indicate the object being tracked. There’s a circle in the center with a pair of brackets around what the drone thinks is the extent of the object. Most of the time, these will change to reflect the object as the drone or object move. If they’re flickering back and forth and changing size a lot, the drone is quite unsure about the details of the object, so it’s likely to lose tracking if things change.
I’ve circled the current mode icon in the lower right. This reflects the current Active Track mode. If you want to change modes, you’ll have to pause the current tracking (the pause button on the remote works well here), then select a different mode - but this is pretty rare for actual tracking, in my experience. If you use the red X on the left, it will cancel the whole tracking process (you’ll have to redraw the target box), but tapping the pause button will let you select a new mode without having to reacquire the target.

The red X on the left will always cancel Active Track, as will holding the pause button.
Trace Mode
The default Active Track mode is Trace Mode. If you don’t select another mode (and just tap the green “Go” box), this is what you get.
Trace Mode operates like “Mavic on a string.” Pretend you’re pulling a balloon behind you on a string (and said balloon will stay at one point until you tug on it) - that gives a good idea of how things work.

The Mavic Pro will stay facing the target (with the framing specified by the yaw controls), and if the target moves away, it will move forwards, directly towards the target. This means that the obstacle detection features may still work (as well as they ever do, which means you shouldn’t be relying on them). If it’s chasing a target from behind, this works as is seen in pretty much every drone Active Track video - “Look! It’s chasing a car/bike/person/horse!” And it works pretty well in this mode of operation - but, if you’ve been reading my posts, you know that I don’t let things go with that!
There are two additional on screen controls in Trace Mode - a speed control slider, and an arcing slider under the tracked object. Both of these are visible here. The speed slider sets the maximum speed that the Mavic Pro will fly when following an object. The arc under the object is much more interesting. This sets a translation offset - it’s functionally similar to holding a left or right translation request on the remote.

Slide this to the left or the right, and the Mavic Pro will begin to orbit around the target. The icon in the center resets this to zero.
Against a stationary target (say, a solar shed), this isn’t particularly interesting - it just orbits the target. Think of it as an alternative to “Point of Interest” that actually tracks a target.

It becomes much, much more interesting with a moving target, though! When following something that moves, this serves as an offset to the side. Instead of just following directly behind a car, setting this to one side or the other will offset the Mavic Pro so it trails off to the side. If the vehicle is changing speed, the amount of offset will change with speed, which can make for some interesting video as well.
A warning: If you are using significant amounts of offset, obstacle detection is functionally disabled, as the Mavic Pro is slicing through the air sideways. So make sure there’s nothing to hit!
As mentioned above, the yaw control adjusts framing, forwards/backwards will move towards or away from the target, and left/right will attempt to orbit the target. All of this happens in addition to whatever motion comes from tracking.
Trace Mode Map
If you recall earlier, I cut a pattern in my hillside for testing out the various modes. Trace mode follows me as I walk around the course, rounding out the corners massively. As I round a corner, the Mavic Pro hangs out, rotating to follow me, before eventually deciding that it needs to chase me again, but it comes at me from inside the square. The path flown doesn’t resemble the path walked, though if you’re always moving away the path flown may faintly resemble the ground path. I walked from the top left corner clockwise around the square, back up to the top left corner, and then down the diagonal.

Trace Mode and Reverse
What happens if you’re in Trace Mode and walk directly towards the Mavic Pro? It depends on a somewhat obscure setting buried in the Obstacle Detection menu. There’s a setting called “Enable Backward Flying.”

The default is off. If it’s off and you walk towards the Mavic Pro, it will hover in place, facing you as you approach (if you walk directly under it, it sometimes gets confused, but if you’re off to one side, it will turn and follow you). Think of this mode as “pushing on a string.” It just doesn’t do anything. Once you get far enough away in the other direction, the drone will start following again.
However, if you turn on “Backward Flying,” that string suddenly becomes rigid and behaves more like a stick. The Mavic Pro will back away from you as you approach, though it’s likely to swing off to one side or another (think “pushing on a long stick”). Of course, there’s no obstacle detection to the rear or sides, so it’s on you to make sure there’s nothing to run into. This mode is useful for maintaining a distance from the subject, but the actual flight path of the drone when you’re walking towards it is a bit random. It will hold the distance, somehow, but the details of where it goes tend vague, and I wouldn’t rely on it doing anything in particular. Play around, and if you work out the algorithm, please, let me know!
Uses of Trace Mode
Since this is the default Active Track mode, it’s the one that gets the most use. It’s also the safest mode, because forward obstacle detection is mostly operational (unless you’ve got the offset dialed in or are manually whipping it around to the side, at which point your eyes should be on the drone).
It’s a good mode to play with and understand, and if you don’t mind footage of the back of an object (or, at best, rear quartering angles), it’s pretty good! The ability to set the framing of the subject and move around to the side of a slowly moving subject is useful, and you can even move ahead if you wish (be aware of how the backward flying setting interacts with this).
However, if you try to pull the normal YouTube stunt of “Hey, I’ll just have this thing follow me on a mountain bike/motorcycle/car/horse/whatever, it’ll be fine!” - you’re likely to discover the limits to obstacle detection. Also, under Part 107, the FAA explicitly says you cannot be piloting a vehicle and controlling a drone at the same time (as you cannot be paying enough attention to both). Does this apply to a bicycle? No clue. But that’s why I walked my course for all these tests. I don’t think Active Track and obstacle detection are good enough to trust for anything along those lines - have someone paying attention to the drone.
Profile Mode
Profile Mode is yet another mis-named mode. This should be “Constant Bearing Mode” or something along those lines. What this mode tries to accomplish is holding a bearing and distance from the tracked object. You can use it for profile shots, but you can also use it for trailing shots, shots ahead of the target, or remaining off in one direction as the target moves around (if you’re tracking 100 feet to the west, the drone tries to remain 100 feet to the west, regardless of what the target does or how it moves).

Profile Mode involves the Mavic Pro moving around in all directions, not just forward. As such, obstacle detection is mostly worthless, and is entirely disabled in this mode. It’s on you to make sure it doesn’t fly into anything!
Entering it is much the same as for Trace Mode - enter Active Track mode, draw a box around the target, and then tap “Profile” on the right (the pulsing green “Go” will not put you in Profile Mode, so don’t bother with it).
“Forwards” and “Backwards” still move the Mavic Pro towards and away from the target, and “Left” and “Right” still swing around the target. The difference is that if you swing around the target, that new bearing holds - and it will try to maintain that as the target moves.
It’s not perfect, but it does a pretty good job of staying at the requested angle and distance!
Profile Mode Map
Like before, I set up Profile Mode, and then walked my course (with the Mavic Pro to the south of me). This time, while a bit wiggly, you can see that the path flown is the same as the course I walked. Clockwise around the square, then down the diagonal. This is very, very close to the course as cut, and I’m actually pretty impressed by how well it flew the course.

I then held the translate stick left and swung the Mavic Pro around to the north of me (the arc in the bottom right) - and then walked the course again (starting in the southeast corner instead of the northwest). I walked the same path, and the Mavic Pro flew the same pattern, but offset to the north this time (since it was starting north of me). Again, the path flown matches the path I walked, with an offset. Note that the obstacle detection is totally disabled.

If I wanted to, I could have swung it to the west or east and gotten another square off in that direction.
Uses of Profile Mode
I really, really like this mode. It gives me more control over what the Mavic Pro is doing when tracking a target. It holds range and bearing, but I can change both of those at will, and the drone keeps following right along. It’s useful for getting profile shots (as the name implies), but you can also swing around and watch from ahead, trail off to the side behind, and generally have more control over where in the sky your flying camera is.
Spotlight Mode
Finally, the last of the visual Active Track modes is Spotlight Mode. This is totally different from the other two modes.
Spotlight Mode combines the auto-yaw of Active Track with the fixed control headings of Course Lock. When you enable this mode, the current heading of the Mavic Pro is latched, and all translation actions are relative to this heading. This means that if you start tracking a target facing north, “Forward” always moves north (regardless of which way the nose is pointing), “Right” always moves east, and so forth.

In the map view, the latched heading shows as the red line with an arrow under the center of the drone’s icon. The heading of the Mavic Pro is indicated by the tip of the arrow (with the rough field of view indicated). Here, pushing forward will move east-southeast, even though the nose is pointing southwest.

If you’re familiar with the attitude/orientation indicator (tap the “target” icon on the top right of the mini window), this also shows the locked course. If you line up the red line with the white triangle at the top, the drone moves like it’s facing away from you. I’ll talk about this indicator in much more detail next week, but this mode is a great use of it.

Uses of Spotlight Mode
With the controls course locked and the camera automatically whipping around to follow the tracked target, this mode is very useful for following someone who is moving around a contained area. If you’ve got someone doing motorcycle stunts, or drifting, or autocross, you could chase them around the course without having to worry about the camera tracking - and you can keep the drone from going over unprotected people (flying directly over a person in a car with a roof is allowed under Part 107, though you can’t do it under hobbyist rules).
Think about those cameras on cables used for football games - this is something like that mode. Sit along side the field, the controls always move it in the same direction, and the camera tracks the target automatically.
It’s not particularly use for wide open chases or anything along those lines, as it can be tricky to remember how the controls map to direction of travel if there are a lot of changes. But for a closed environment with a lot of random motion inside? It’s worth playing with!
Follow Me Mode
Another mode that is similar to Active Track is the “Follow Me Mode.” This is basically the same thing as “Profile Mode,” but driven by GPS instead of visual images. The Mavic Pro will fly a constant distance and bearing relative to you, but this is maintained by the difference between the GPS in your phone and the GPS in your drone. If your tablet doesn’t have a GPS signal, this mode won’t work.
Why would you use this? There are a few reasons. The first might be that you want to track from too far away (or too high up) for the normal Active Track modes. I’m not sure why you would actually want to do this for filming, but this can track from a much further distance away. There is still a limit, but it’s a good bit further.

Another reason might be that, if you have a good GPS in your phone, it tracks the course somewhat more accurately than Active Track can. From 200’ in the air, it flies a smoother and somewhat more accurate representation of my test course than a much lower altitude Profile Mode can (also, I can’t use Profile Mode from 200’ up).

And, finally, this mode will handle target occlusions without issues. If you dodge behind something and come out the other side, the Active Track modes will generally lose tracking. That’s not an issue here unless you lose the GPS signal for a long period of time (which probably means there are other problems as well). Remember, you can’t drive the car and fly the drone, but if you’re a passenger in a sparsely populated area, this might be worth messing around with to see if it works more smoothly than the visual tracking modes. Were I messing around withs someone in a side-by-side, I’d almost certainly use this mode to maintain relative position.
And if said side-by-side were to, say, be doing donuts out in the middle of a sandy area, the optical tracking wouldn’t work with the vehicle in the center of the dust cloud, but Follow Me Mode should still track!
The flight controls, of course, are yet again different from anything else. Elevation control works slowly but normally, much like in the other Active Track modes. Yaw control will rotate around a full 360 degrees - as the tracking isn’t visual, you can point the drone any way you want. And translation controls are simply disabled. You cannot reset the relative position once this mode is active, and twiddling the translation stick endlessly does nothing.
Entering Follow Me Mode
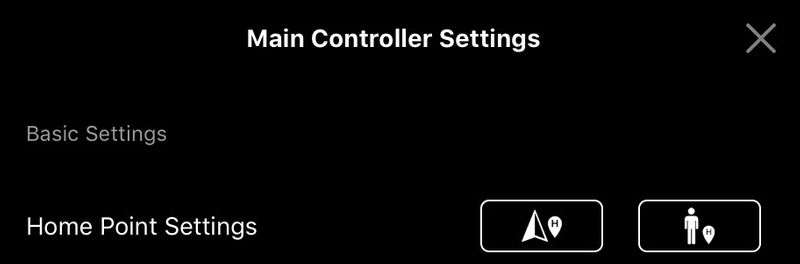
Like the other Intelligent Flight Modes, Follow Me Mode is entered through the normal path. Tap the icon on the left or press in on the 5D button. Once you select the mode, you’ll see the intro slider on the right - ensure that the GPS signal is “Strong,” and fly up high enough (this mode doesn’t work at really low altitudes). The position relative to you when you tap “Apply” is the position it will attempt to hold. Once you tap “Apply,” the drone starts moving relative to your GPS position, and the buttons along the bottom switch to “Hide” and “Exit.” Feel free to hide it to see your full view again.

Exit it like any other mode, with the “Exit” button, the red X on the left, or holding the pause button on the remote.
Gesture Mode
Finally, the last mode of this week is “Gesture Mode” - for all your Dronie needs! Yes, it pains me to use that word. This mode accomplishes one of two things: allows you to take photos without the remote in your hands, or makes you look like a dangerously insane lunatic, waving and gesturing frantically at a drone that’s hovering in mid-air.

The way it’s supposed to work is that you enable Gesture Mode, point the drone in your general direction, wave your arms up and down to get the drone’s attention, and then make a “Take a photo!” hand gesture around your face. This starts a several second countdown timer before the drone takes a photo.
What often happens instead is that you’ll try to enable Gesture Mode, point the drone in your direction, and spend a while waving frantically at the drone, looking more and more foolish. Finally, you get it’s attention, take a photo, and end up with a series of blurry photos.
It’s worth practicing with this mode a good bit before you use it around other people…
Assuming you haven’t turned the front LEDs off, when you enable Gesture Mode, the front LEDs are glowing red. Once it finds you from waving, the LEDs turn off. And, once it recognizes the “Please take a dronie!” gesture, the LEDs will start blinking more and more rapidly until it takes the photo (it’s about a 3 second timer).
I’ve found a few things that are important for getting this to work properly, without making yourself look silly.
- Make sure that your whole body is in the frame. If the drone can’t see your whole body, it’s unlikely to recognize you as a human that’s waving.
- Auto-focus on yourself before you start the process. Otherwise, blurry photos are quite likely.
- Shoot with the sun at the drone’s back. It really struggles trying to shoot into the sun.
If you watch the remote during the process, you’ll see it recognize you as a human initially with the green bounding box. Don’t press “Go” or you’ll engage Trace Mode, which is probably not what you want. Once it recognizes you like this, it will turn to keep you in frame.
And, once you make the silly gesture, it should recognize that you’d like a photo taken and begin the process. I’ve found that making an over sized frame works best.
Image quality from a distance really isn’t amazing in terms of shots of humans, though I think this is slightly out of focus as well.

Also, I’ve been entirely unable to convince the Mavic Pro that a toddler is a human for the purposes of Gesture Mode.
Really, though, Gesture Mode is often more trouble than it’s worth. Just manually frame the shot, focus it, and pose with one arm behind your back to hide the remote. It’s so much more reliable, and gives you that kind of “I’m a badass” pose if you do it right.
Final Thoughts & Suggestions
Active Track is a seriously, seriously cool set of modes. It sets DJI apart from a lot of other vendors, and they work surprisingly well - most of the time. Keep the contrast high, and understand the limits. Play around a lot. As I mentioned at the start of this post, I have over 11 hours of flight time (just in the DJI Go app - plus another hour or so in Ground Station pro) that consists almost entirely of messing around with modes. I’ve done a bit of photo work, but 90+% of that is playing. I feel like I understand most of the drone’s modes fairly well at this point, but it still surprises me on occasion (shuddering around the sky trying to find the right patch of basalt, as a recent example).
This is an incredibly complicated piece of machinery to understand and fly. It’s radically more complex than an awful lot of full size airplanes, because it has so many modes, so many weird corner cases, and the behavior changes with a firmware update. I don’t have to worry about the starting procedure for a carbureted O-470 changing from month to month - but the Mavic Pro? A firmware update (or app update) can change literally anything.
So, fly, play, and understand. My hope is that this series of posts will shortcut some of the time required to fully understand the modes and make you more productive and safer, sooner.
I’d initially expected this to be a 4 post series. We’re at 4, and I’m nowhere near done. There are another two posts coming, and the last one is going to be massive. So stick around for another few weeks!
Is there anything I missed? Suggestions? Please, let me know below in the comments!
Comments
Comments are handled on my Discourse forum - you'll need to create an account there to post comments.If you've found this post useful, insightful, or informative, why not support me on Ko-fi? And if you'd like to be notified of new posts (I post every two weeks), you can follow my blog via email! Of course, if you like RSS, I support that too.

