
This sixth and final post in my “Mavic Pro Missing Handbook” series explores all the menu options in the app and explains what they are, what they do, and how to use them!

The main set of menus is accessed by tapping the top bar - tap the “Position” icon for the position menu, “Obstacle Detection” icon for the obstacle detection menu, etc.
If you want to change a menu item, you have to have the drone on and be connected. Some of them will show up in the app without the drone, but they won’t stick, and you won’t see all the options.
All of this should be current as of the DJI Go 4 App 4.1.5 (2952) on the .0900 firmware. If it drifts badly, please let me know.
And, with that, let’s dive in!
Mavic Pro Missing Handbook
What is this series of posts? This is my attempt to provide a comprehensive look at all the various features of the Mavic Pro - in text form. I find video tutorials to be generally lacking in actual content, as well as truly frustrating to skim (you have to suffer through 10 minutes to find out that, no, it doesn’t actually talk about what you were wanting to learn).
I’ll be updating this list with more posts as I write them. My blog updates every Saturday.
DJI Mavic Pro: The Missing Handbook: Basic Operations Preflight checks, gimbal locks, takeoff, landing, basic flight operations.
DJI Mavic Pro: The Missing Handbook: Intelligent Flight Modes Tripod, Cinematic, and Sport Modes. Terrain Follow. Home Lock. Course Lock. Pretty much everything that requires you to still move the sticks to move it.
DJI Mavic Pro: The Missing Handbook: Waypoints In depth coverage of the various waypoints modes supported in the DJI Go app, as well as how to use DJI’s Ground Station Pro for more advanced waypoints features.
DJI Mavic Pro: The Missing Handbook: Active Track, Follow Me Mode, and Gesture Mode Active Track has quite a few modes of operation, and I delve into all of them. This post also covers the GPS-based “Follow Me Mode” and how to look less silly using Gesture Mode for dronies.
DJI Mavic Pro: The Missing Handbook: Wifi/Remote Only, Tap to Fly, Fixed Wing, Point of Interest, Attitude Indicator Finishing out the series on flying modes with the remaining modes, as well as discussion about the attitude/orientation/power indicator, flying with only the remote or only a phone, and some of the degraded flight modes.
Position Menu
The Position Menu controls most of the features related to actually flying the drone. This includes controller sensitivity and gain, general flight sensitivity, range and altitude limits, etc.
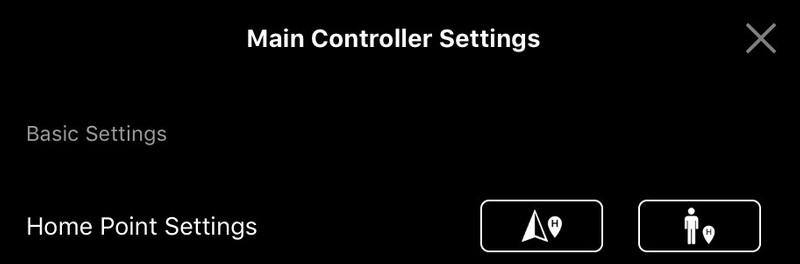
Home Point Settings
The two Home Point Settings buttons set the home point (for RTH and related functionality) to either the point of the aircraft at the present time, or the location of the controller (assuming the controller has GPS). If you’re not sure where the home point is set, use these buttons!
Enable Dynamic Home Point
I touch on this more in the post about QuickShot and Dynamic Home point, but this setting, if enabled, will set the home point to the actual aircraft location, every 5-10s, when in Active Track. This is quite useful for “one way” tracking trips where you’re cruising along, following a person/bike/car/etc, and don’t want the drone to turn around to fly back to where you started.
You should leave this on unless you have some good reason not to.

Multiple Flight Modes
In order to use any of the “Intelligent Flight Modes,” this has to be enabled. Without it, you can’t use any of the extra modes. Sport Mode is considered one of these, as described below. Without this enabled, Sport Mode does not work either - you simply get a warning about being unable to change flight modes.

Return to Home Altitude
This option specifies the minimum return to home height in meters above the takeoff point. Since relying on obstacle detection is a reasonably bad idea, be sure to set this above any obstacles. This is not height above the ground - it is height above the takeoff point! If you are flying in a valley, this can get you into the trees if not set properly.
If you specify “Return to Home” as the loss of signal behavior, it’s vital to make sure this is a reasonable value. There’s no real harm in setting it up as high as you’re allowed to fly (120m is a hair under 400’, if you’re in the US).

Beginner Mode
Beginner Mode limits altitude to about 100’ above the takeoff point and the radius to 150’. It requires GPS working to take off (this improves stability), and somewhat reduces the sensitivity of the controls and the maximum flight speeds. Great for learning to fly, especially if you happen to have a clear area 150’ in all directions - that makes it fairly difficult to crash while learning to fly!

Set Max Flight Altitude
This does exactly what it says on the label - sets the maximum flight altitude (in meters above the takeoff point). If you’re flying in the US, 120m is just under 400’ and is a good value to use for most flying.

Enable Max Distance / Set Max Flight Distance
If Max Distance is enabled, a field pops out for setting the maximum distance. This configures the maximum distance from the home point the drone will fly - it refuses to fly further away. Once you learn the maximum range you can see your drone reliably, this will help ensure you don’t fly beyond that range. It’s also helpful if you are flying near controlled airspace - setting it to the distance between you and the surface airspace will prevent you from flying into the controlled airspace by mistake.

Position Menu / Advanced Settings
Advanced position settings are related mostly to how the control stick movements translate into actual drone motion through the air. Some of them are subtle, but they can allow you to fine tune the drone behavior to your desires. These may be reset on a firmware update, so verify them after you install a new firmware on the drone!
Position Menu / Advanced Settings / EXP
The settings under EXP control how stick deflections translate to “percentage of full deflection” in terms of the request to the drone flight computer. Full deflection is always full deflection, no matter what curve you use - but anything less than full deflection will be subject to these curves.
Adjust these by tapping on each window and dragging up or down. A value of 0.5 is “perfectly linear” - the requested movement is exactly proportional to the stick movement. Lower values damp the movement near the center of the stick movement (allowing more precise control), and higher values make things more aggressive (small deflections on the stick make for large requested changes in drone performance). The default is 0.25, which is fairly sane.
The X axis (left/right) is the physical stick deflection, and the Y axis (up/down) is the translated request (as shown with the yellow dot).
In this image, the throttle curve is the default. The rudder curve is as aggressive as allowed, and the translation curve is as soft as allowed. The rudder and translation stick are deflected the same amount (I used my controller stick protector to accomplish this), but nearly full right rudder is requested, whereas barely any translation is actually being requested.
If you tweak this any, I’d suggest tweaking down slightly (0.20 or so) to provide finer control around center stick. Full deflection will always get you full deflection regardless, but there’s less requirement for fine control at 50% or greater stick deflection (usually).
The “Normal” caption (slightly above this capture) indicates that you’re setting the values for the “normal” flight settings. If you toggle the Sport mode switch on the side of the controller, that label will switch to “Sport” and you’ll be changing the values for Sport Mode.

Position Menu / Advanced Settings / Sensitivity
Sensitivity adjusts how rapidly the drone responds to various situations.
Attitude controls, slightly, how fast the drone will tilt when receiving translation requests. There’s a difference, but it’s subtle - and this only seems to take effect for very rapid stick movements. Smooth stick movements make this a non-issue.
Brake impacts how rapidly the drone will come to a halt in the sky when the sticks are centered. With this set high, the drone brakes very aggressively and comes to a stop quickly. With this set low, the drone doesn’t brake nearly as aggressively (it doesn’t “rear up” to try and stop nearly as much), and will take a much longer distance to come to a stop in the sky.
Yaw Movement affects the sensitivity of the yaw controls. Lower will slow down the maximum yaw rate, higher will increase it.
How you set these depends on what you’re doing. For video, lowering them is a good idea, though smooth use of sticks accomplishes the same thing. Tight in photography might want to turn the brake value up a bit for faster stopping.

Position Menu / Advanced Settings / Gain
As near as I can tell, these settings relate to how the drone reacts to external events (wind gusts and the like). Unless you know far more about drone tuning than I do, you should leave these at 100%.

Reset Gain & Expo Tuning
This resets the values for the previous three menus to defaults. If you’ve been playing around and your drone flies weird, tap this and fix everything! Also, lose all your changes.
Position Menu / Advanced Settings / Sensors
Would you like to find out what your IMU and Compass sensors see in terms of quality of signal? This is your menu! This shows the bias on the IMU (it should be quite low, or you may need to recalibrate), as well as the interference on the compass.

If you’re seeing a lot of compass interference, consider moving to another location to launch.

Cinematic Mode Gain
This slider controls the aggressiveness of the translation controls in Cinematic Mode The higher is is, the faster the drone responds. The lower it is, the “lazier” the drone flies when in Cinematic Mode. If the stock settings for that mode don’t satisfy you, turn this up and it will respond faster.

Yaw Sensitivity in Cinematic Mode
This slider controls how rapidly the Mavic Pro will yaw in Cinematic Mode. Again, the default is all the way down, but if you (for some reason) need faster yaw when filming in Cinematic Mode, turn this up a bit and the drone will turn faster. I don’t see a particular need to play with either of these settings (as the whole point of Cinematic Mode is smooth acceleration, deceleration, and yaw), but they’re around if you need them!

Remote Controller Signal Lost
What happens when the Mavic Pro and your remote suddenly stop talking? Well, it depends on this setting! There are three options here: “Return-to-Home,” “Landing,” and “Hover.” They’re pretty self describing. Of these, “Return-to-Home” and “Hover” are the most useful. Landing wherever it happens to be is likely to end poorly, even with the downward firing vision sensors working. I tend to leave this on Return-to-Home and make sure my RTH altitude/location is set properly, because if I’ve lost connection due to interference, coming back towards me should eventually resolve this. Hovering may be useful in certain situations where you’d then hurry towards the drone, but I consider loss of controller signal an emergency situation and would like it resolved as quickly as possible. This would be one reason to do precision takeoffs regularly - if the controller flat out dies, the Mavic Pro can return to home and land.

Turn On Front LEDs
Do you want the pair of red LEDs turned off? Turn this option off and they’ll go out! It doesn’t turn off the rear status LED, but the front LEDs? Gone.

Propeller Cage
If the optional (and stunningly expensive) propeller cages are installed, turn this option on. It comes with a handy warning about using it without cages (apparently it doesn’t fly right). Obviously, if you don’t have propeller cages, don’t turn this on.

Stop Motor Method
This option determines when the CSC (Combination Stick Command) command will turn off the motors: “For use in emergencies only,” or “CSC Maneuver” Unless you have a desire to turn the motors off in midair (for rapid and extremely unwise descents), leave this in the “emergency” setting. Nobody actually knows what qualifies as an emergency, but it means that in normal operation, pulling the sticks down and together won’t turn off the motors. It will in the “CSC Maneuver” setting. That’s probably a bad idea.

Visual Navigation Settings
The Visual Navigation Settings menu (the second down) controls obstacle detection and avoidance. This involves the use of the Mavic Pro’s 4 visual positioning cameras (2 facing forward, 2 facing down) and the downward firing ultrasonic sensors to avoid crashing into objects. It also controls, to some extent, what is “permitted” - backwards flying in the Active Track Trace mode, precision landing, checking for a flat surface on landing, etc.
I’ll say as much about these as I’ve worked out, but I simply don’t rely on the obstacle detection that much (mostly because I don’t trust it, and I’m not about to try and fly my Mavic Pro into something just to see if it crashes).
Enable Obstacle Avoidance
This is the main toggle for trying to avoid obstacles in normal flight, and everything else in this menu is gated on these settings. If this is off, the lower options (except radar) disappear. And, if this is on, you can’t remove the obstacle radar display.
If all is working properly, this should prevent you from flying forwards into something. You can still fly backwards or sideways into something or ascend into something, but this covers the forward case. If you attempt to fly into a wall, it will refuse to do so and just hover.
In the normal flight mode, this setting also controls the maximum flight speed. Normally, the Mavic Pro will do 20mph over the ground. With obstacle avoidance off, it will do about 30mph (31.4 in my test). And Sport Mode is good for about 40mph.

Enable Horizontal Obstacle Avoidance in TapFly
In theory, this mode will allow the Mavic Pro to slide smoothly around obstacles if you’re using the TapFly mode. In reality, since there’s no sideways obstacle detection, it’s likely to find something else to fly into. I believe if this is turned off, the Mavic Pro will hover if you try to fly it into an obstacle, but I’m not about to risk damaging my drone and my office to find out. I’d suggest turning this off.

Enable Backward Flying
Unfortunately, this does not give you Mater-like skills automatically. This setting impacts the Trace mode in Active Track. If this is turned off and you walk towards the drone in Active Track, it will simply sit there and follow you visually. If this is turned on, the drone will back away from you (in some direction or other). This chances Trace from “drone on a string” to “drone on a stick” - only relevant if you’re closing the distance. I’ve not found this to have an impact in any other mode.

Enable Obstacle Avoidance in ActiveTrack
This is another option for ActiveTrack Trace, since obstacle avoidance is turned off in Profile mode. If enabled, this will try to navigate around obstacles in ActiveTrack. If disabled, the drone will simply hover. Again, there’s no side obstacle detection, and it’s quite likely that the drone will lose track of you if you’re behind something. This is another good one to leave off - and if you’re relying heavily on obstacle detection for ActiveTrack, you’re likely to have a crash sooner or later.

Display Radar Chart
If “Enable Obstacle Avoidance” is enabled, there’s no way to turn this off. However, if avoidance is disabled, you can turn the chart off if you so desire.
Even with avoidance off, the obstacle sensors are still running, and the radar display will still show useful information.

This controls the “How far away are things?” display you’ll see across the top of your controller feed. It shows the distance and general direction of the detected obstacles.

Visual Navigation Settings/Advanced Settings
The Advanced Settings for obstacle avoidance mostly relate to the downward firing sensors. The pair of downward firing cameras and the ultrasonic distance sensor are used for precision hovering at low altitude, as well as landing related checks.
Enable Vision Positioning
This is the master switch for the downward facing sensors (two cameras and a rangefinder). At low altitude, this allows for incredibly precise hovering - if you’ve wondered why you can park the Mavic Pro in front of you and it just sits there, regardless of wind, this is why. With this disabled, the drone relies on GPS which is significantly less precise for positioning.
Why would you want to disable it? Surfaces that it doesn’t work well on. The manual (you did read it, right?) mentions some situations in which the sensors have problems. Repeating textures, monochrome colors, and water are the ones people will mostly likely fly over - and water is especially dangerous if the sensors get confused and try to land in it. Turn this off before you do any low altitude work over water!

Landing Protection
Landing Protection relates to the drone trying not to land on top of something. It scans the surface below and will complain if it doesn’t feel comfortable landing (when in automatic landing mode). If you’re landing manually, this toggle mostly impacts the “minimum height above ground” behavior. I fly onto a raised platform regularly, and if I come in low over the edge, the Mavic Pro will rise to about 2’ above the platform before it lets me land - if this setting is on. If it’s off, I can come straight over the edge at a few inches and plop down without it rising up on me.
If you land automatically a lot, keep this on. If you’re doing more complex manual landings on a regular basis, I expect you’ll be slightly less irritated with it off.

Precision Landing
Precision Landing is that super-slick feature where “Return to Home” will land back exactly where you took off. In order to use it, you have to take off and ascend vertically to about 20’, but when it works, it’s incredibly cool. I don’t use the RTH functionality except when playing around, so it doesn’t really matter to me (I don’t trust it to pull off landing on the raised platform), but there’s no real reason I can think of to turn this off.

RTH Obstacle Check
If you are using RTH, this tries to avoid running into things by ascending over them. If that happens, it also means you badly misjudged your RTH height (since you should set that above obstacles). In any case, this is a good one to leave on as well.

Remote Controller Settings
These settings relate to the remote controller (and the occasional flight mode).
Remote Controller Calibration
The controller calibration only works when the remote is not connected to the drone. If the sticks don’t report that they’re centered when they are, the drone will refuse to hover in place.
If the sticks all show 0% when centered and 100% when pushed to the limit, there’s no reason to recalibrate anything.

Stick Mode
If you’re unhappy with what controls is mapped to which stick, this is your menu! There are three built in modes as well as a custom setting that lets you map things however you want.
The default is Mode 2, and most people will fly in that mode because most other flying things work in a similar mode.


Set to Fixed-Wing Mode
If you want to enable the “Fixed Wing Mode,” which I cover in detail in a previous post, here’s your option. Why is it in the remote settings and not flight modes? I have no idea!

Button Customization
The C1 and C2 buttons are both configurable - and they can be configured here!
Options include “Battery Info,” which will bring up the battery stats, “Navigation” (toggles the map), “Playback” (brings up the recorded media), “Center Auto Focus” (does what it sounds like - centers the auto focus point and auto focuses), “Right Dial ISO/Shutter Control” (toggles the right dial between ISO and shutter speed in manual camera modes), and “Not Defined” (does nothing).

5D Button Customization
The next menu item sets what the “5D” button does - and these are your options for each of the various directions. Pushing in always brings up the Intelligent Flight Menu.
“Camera Forward/Down” will toggle the camera between directly forward and directly down. ”Zoom In/Out” does what is implied, but there’s just no reason to use this digital zoom - you can always enhance in post-production and it will look better. The camera has no physical zoom lens. ”Portrait Mode” rotates the gimbal from the normal wide screen mode to a vertical portrait mode - useful for taking photos, or, perhaps, earning “You shouldn’t shoot vertical video!” ragehate comments on your videos. And “AE Lock” will lock the focus and exposure - a good idea before long video shots to avoid the auto focus or exposure control from messing around in the middle of a video.
Configure these as you wish - the proper options will depend on what you’re doing!

Remote Controller Type / Linking Remote Controller
If you’re using two remotes, this will show which is which, and let you link new remotes. Consult the manual for this feature, as it’s actually well described (and I don’t have two remotes to mess around with, though if you’ve got a spare, the contact form is over there on the right).

Remote Controller Settings / LCD Screen Introduction
If you have no idea what the various parameters on the LCD screen are, fear not! A guide is built into the menus!


Image Transmission Settings
The Image Transmissions Settings menu doesn’t actually give you that much to set, but if you’re having link issues (glitching video, low frame rate video, or total loss of video), this is a good place to look for information!
Channel Mode
This option allows you to either select the 2.4GHz frequency range used for transmission automatically, or manually set it based on interference in the area. If you set it to “Custom,” you can select the frequency range on the provided graph, and if you tap “View Status” in automatic mode, you see the same graph (just without the ability to change it). Leave this in Auto unless there’s a very, very good reason and you know an awful lot about the wireless access points in an area.

The frequency status display shows the current noise floor in the area (I’m not sure if it’s at the remote, the drone, or a combination), as well as an indication regarding the expected maximum range at given noise floors. Yes, I live in an RF-quiet area…

Downlink Bandwidth
In “Auto” channel mode, this simply reports the channel width - 10MHz or 20MHz. However, if you’re in “Custom” mode, this option lets you choose between a 10MHz and 20MHz channel width (and shows the change on the interference chart above). The 20MHz option offers more bandwidth (for higher quality video feed), but the 10MHz option lets you fit in a tighter chunk of spectrum - useful if the 2.4GHz region is really crowded. Your video feed won’t be as high resolution, but it should let you punch through interference a bit better.

Transmission Quality
This item simply shows the current bandwidth being used for the video feed.

Image Transmission Settings
There are three settings for image transmission: “Normal Mode,” “HD Mode,” and “Smooth Mode.”
The default, obviously, is “Normal Mode.” Playing around a bit, “HD Mode” seems to improve the transmitted image resolution, and the difference is obvious on an iPad sized display. ”Smooth Mode” may increase the framerate a bit - I can’t really tell the difference (whatever the difference, it’s subtle).
Note that there are some limitations on high resolution/high framerate recording when in “HD Mode” or “Smooth Mode.” I expect that these take more CPU on the Mavic Pro, and that impacts the recording capabilities.
For the vast majority of flying, “Normal Mode” is the right option to use. Play with the others if you want, and if you’re flying with a tablet, “HD Mode” might be worth playing with, but not at the cost of lower resolution filming.

Aircraft Battery
The battery menu provides a useful bit of information about the state of your battery. The Mavic Pro uses a 3S battery (three cells in series). Fully charged is around 4.35V, you really shouldn’t run them below about 3.2-3.4V for longevity reasons, and they should be identical in voltage (or, at worst, around 0.01-0.02V off). You can also see the total capacity of the pack (this will drop over time as the cells age), the remaining power, and the charge count.

Critically Low Battery Warning and Low Battery Warning
These sliders let you change what the Mavic Pro considers “low battery” (for the purposes of beeping at you). The proper setting for these will vary based on your flight profiles. For longer range flight, I’d consider 30% a good low battery point (though I might set the slider a bit lower since I don’t care for my controller beeping at me), but for the local flying I’ve been doing for this series of posts, I have it set at 20%. I’m rarely more than a few hundred feet away from my landing pad, so I may as well get the extra flight time.

Smart Return-to-Home
If you’ve properly set your home point, and the winds aren’t particularly unfavorable, the drone will try to fly home when it considers the battery low enough that all it can do is fly home. Leave this on! It’s not a guarantee, but it’s a lot better than miscalaculating it yourself.

The estimated battery required to return home also shows up on the battery bar as the round “H” icon. Cutting this close is a bad idea - and if you don’t know the area winds, you’d better leave yourself even more slack. Far too many drones are sitting in water as a result of people misjudging winds.
Flight Time
“How long you’ve been flying on this battery charge.”

Aircraft Battery / Advanced Settings
Show Voltage On Main Screen
This setting toggles showing the per-cell voltage on the main screen, next to the battery percent. If you’re used to lithium battery voltage ranges, you’ll find this quite helpful (it shows the per-cell voltage, not the full pack voltage). Somewhere around 4.35V is fully charged, and 15% is around 3.60V. You’ll notice that 50% is around 3.7V, which just goes to show the non-linearity of lithium ion state of charge versus voltage. There’s no harm to turning this on, and it’s useful flight information, so I’d suggest turning it on and leaving it on.

This is where the voltage display shows up on the screen with this option on. It’s unobtrusive and quite useful if you work with lithium a lot!

Time to Discharge
If the intelligent flight batteries are left untouched at a full state of charge for longer than this time, they’ll self-discharge to a better storage charge for longevity reasons. This (per battery) setting determines how long they’ll wait to begin the process. When the battery is self discharging, it will be somewhat warm.
Lithium batteries are stressed when fully charged and fully discharged. The middling state of charge (below about 4.0V/cell) is best for long term storage. If you’re flying regularly, don’t worry about this. I think the 10 day default is reasonable, though if you aren’t flying as often and don’t mind charging batteries before flight, 2-3 days may give you marginally better battery longevity.
Or, if you fly to about 50%, just store them like that and charge before flight.

Aircraft Battery / Advanced Settings / Details
This information screen simply shows the battery serial number, status (“Normal” for all mine), and the charge count.
Gimbal Settings
In what should be somewhat unsurprising by now, the Gimbal Settings menu lets you configure gimbal behavior!
Gimbal Mode
Gimbal Mode lets you pick between “Follow” and “FPV.” The default is “Follow,” which behaves normally for a drone (the horizon stays level when the drone is banked). The alternative is “FPV,” which banks the horizon relative to the left/right translation request. It doesn’t bank when yawing around. Between this and how oddly “Fixed Wing Mode” works, I seriously wonder if anyone at DJI has actually flown in a fixed wing airplane. Anyway, if you’ve got goggles and want the horizon to tilt when you’re sliding to the left or right, use “FPV” mode, and for all other use cases, “Follow” is the mode you want.

Centering Camera/Adjust Gimbal Roll/Gimbal Auto Calibration
The “Centering Camera” option seems to toggle the gimbal between “straight forward” and “straight down.” It may reset it to center as well if it’s wandering, but the behavior of this option is somewhat unclear to me. If you know more about this, please let me know in the comments.
“Adjust Gimbal Roll” pops up a pane that lets you tweak the roll, if your horizon isn’t level. This might be needed if you take off from an inclined surface or if the gimbal seems to get lazy with flight and roll over to one side or another.
And, “Gimbal Auto Calibration” will exercise the gimbal through a range of motion and store the settings. You’ll need to run this from a level surface, in bright light, or it won’t complete. Also, be sure nothing is obstructing the gimbal while you’re running this - it goes through the full range of motion!

If you’ve opted to adjust the gimbal roll, you’ll see this handy dialog pop up. The rotational arrows are correct - the left side rotates the gimbal to the right. Personally, I think they’re on the wrong side, but… it’s obvious what they do when you play around.

Gimbal Settings / Advanced Settings
Yet more useful gimbal settings live under “Advanced Settings.” I don’t entirely see why they hide so many things under various levels of “Advanced” menus.
Gimbal Pitch Speed
The pitch speed setting controls the maximum pitch rate of the gimbal. Set this to 0 and the gimbal won’t move. Set it to 50 and it rockets right along. The actual speed is proportional to the pitch wheel deflection - so if you want finer control over the pitch angle, set this lower. For photo work, there’s no harm in leaving it high, but if you’re doing a lot of video work, drop this down for smoother tilts.

Enable Upwards Gimbal Tilt Limit to 30 Degree
If you are annoyed that you can’t shoot above horizontal, turn this option on and you can tilt the gimbal up. This will probably get some propeller in your shot, and limits how hard you can accelerate without impacting the video (if you tilt the gimbal all the way up and accelerate, it runs out of adjustment room and tilts the camera down). There’s no real harm in turning this on - but if you’re tilted above horizontal and filming video, be gentle with acceleration or you’ll see the camera snap down in the video when it hits the limit.

Gimbal Pitch Smoothness
The pitch smoothness setting controls the gimbal inertia, or rate of tilt change. At 0, the gimbal does exactly what you command with the pitch wheel. At 30, it takes a long time to start moving, and a long time to slow down (it will overshoot the point at which you request it stop moving). If you’re shooting mostly photos, leave this at 0 so the gimbal reacts instantly. For video, somewhere between 15 and 20 seems to be ideal - it depends on your needs. A setting of 30 is comically laggy, though, so I wouldn’t push it that high. You’ll have to remember to center the gimbal pitch wheel before you hit the target pitch if this is turned up, though.

Enable Synchronized Gimbal Pan Follow
This setting controls the gimbal yaw leading the aircraft. If this is on, the gimbal will yaw slightly when you request the drone yaw, and will then smooth out the stop slightly. This is noticeable on the ground - if this is on, yaw requests (with the drone sitting firmly on the ground) will yaw the video feed slightly. With this off, the gimbal is locked forward and follows the nose of the drone.
In terms of video, I can’t tell a huge difference between having this on and off. In either mode, the gimbal will slow the yaw slightly and smooth it out. If you find yourself dealing with weird gimbal yaw drift, turning it off might help, but I’m not exactly sure why this setting is here.

Reset Settings
Resets all the gimbal values to factory default.
General Settings
Finally, General Settings is sort of the catch-all for everything that does fit anywhere else.
Measurement Unit
What units do you think in? Set them here! ”Imperial” uses feet and mph, “Metric (m/s)” uses meters per second, and “Metric (km/h)” uses meters for feet and km/h for speed. Use whatever happens to make the most sense to you - there’s no reason to add doing unit conversion to your mental load while flying.

Long Press Action
Since DJI wants there to be half a dozen ways to do everything, this option picks what a long press on the screen does. You can adjust the gimbal, or adjust the focus.

When you long press, you’ll see a small blue circle and as you move your finger up or down, it will adjust the gimbal position or focus.

Select Live Broadcast Platform
In theory, there’s a way to live broadcast a drone stream to various platforms. I only recognize three (RTMP being a generic realtime streaming format), and I haven’t played around with them. Not something I have the upload bandwidth for - sorry! If you want to play with them, good luck.

Show Flight Route / Calibrate Map Coordinates / Cache Map in the Background
These options relate to maps. ”Show Flight Route” will show the flight route on the map (as I’ve been using throughout this series of posts). You probably want this on. The “Calibrate Map Coordinates” option doesn’t matter unless you’re in China - China does weird things with maps. ”Cache Map in the Background” is useful on wifi devices to store the map tiles for offline use - connect to the internet, scroll around the area in the map, and it should cache them for offline use. This is of less use if you’re flying with a cel phone and data connection.
In yet another way to do things, “Clear Flight Route” will clear the map track. Just like the eraser on the map.

Cache During Video Shooting / Maximum Video Cache Capacity
If you’d like, your device can cache video from the drone during shooting. This isn’t the same quality as is recorded on the SD card, but could be useful if you lose your drone and want to trace its steps (or want to access video without having to pull the SD card, which I think only works on Android). This enables that video cache and sets the cache capacity. If you’ve got a lower CPU power device, turning this off may reduce stutter.

Clear Cache Automatically
Instead of simply stopping caching when the cache is full, this will clear out space as needed. Turn it on if you’re using the video cache.

Record Audio with Video Cache
This copies ambient audio from your phone mic to the video cache.

Unlocking List
If you unlock restricted regions with the DJI Geo Unlock interface, you can confirm that the region is successfully unlocked on your controlling device with this menu item.

About
Versions of everything (except the battery)! Make sure your aircraft and remote controller versions match after a firmware update or really weird things can happen (none of them good).
For unlocking, you’ll need the Flight Controller Serial Number - here’s where you find it!


Camera Settings
With the main menu settings finally finished, it’s time to discuss the various camera settings.
The camera menu is accessed with the “settings” icon to the right of the circular “record” or “take photo” button. The vast majority of the settings and options apply to both still photography and video.
Viewfinder Based Settings
A few settings show up in the viewfinder while shooting - as well as some status information. This overlay shows the camera settings, estimated capacity for current settings, and two toggles. The AFC/MF toggle will switch between autofocus and manual focus (with a slider for setting focus), and the “AE Lock” symbol will lock exposure if tapped.
Exposure Settings
Exposure settings are the the leftmost menu in the image settings (indicated along the top by an old iris aperture). This lets you choose between automatic exposure and manual exposure, and, in manual exposure mode, the effective ISO of the sensor and the shutter speed. These concepts are incredibly well documented elsewhere on the internet by people who are far better at explaining photography concepts than I, so if you don’t know what this is, do a bit of searching.

Auto mode, obviously, automatically sets the shutter speed and ISO (and, mostly, sets the ISO to 100 and then sets the shutter speed). In Auto exposure mode, you can set the EV (Exposure Value) correction manually if desired (though the right wheel on the remote also does this and doesn’t require tapping through menus). Setting this to + values brightens the image, and - values darken it. I’ve found that, in general, the Mavic Pro tends to mildly overexpose images in my area (a lot of desert sand and dirt), so I drop things a bit to bring the exposure back to what I like to see.

Common Capture Settings
Next, because they’re common to both video and photography, I’m going to discuss the various capture settings one has. This is the right-most pane of camera settings, indicated by the gear.
Histogram
If you turn on the “Histogram” option, you’ll find a new floating window on your main view screen that shows the range of brightness in the image.

It looks something like this (obviously dependent on your image). On the left are fully dark pixels. On the right are fully bright pixels. You can use this to fine tune exposure (if you’re using auto exposure, the EV compensation dial is useful) to stretch this to your full range, or push it up or down if you want to capture detail in highlights or shadows. Turn this on - there’s no reason to leave it off, since it helps you get exposure right.

Front LEDs Auto Turn off
If you’d like the front LEDs to turn off when taking a picture or filming, turn this option on. This avoids putting red LED tint in your images and reflections. One downside is that it can make visually observing the drone orientation a bit more difficult. If you find that to be a problem, turn this off.

Lock Gimbal When Capture
Some types of capture (exposure bracketing, burst, long exposures) benefit from having the gimbal remaining locked even if the drone body is moving around. This setting enables that - it tries to keep the gimbal aimed the same way, even if the drone is moving or rotating during capture. This is incredibly useful, is almost certainly what you want it to do, so leave this on!

Enable AFC Mode
When you’re flying around, you may notice that the autofocus is working (you’ll see the green auto-focus square and notice focus changing every now and then as it tries to find focus - especially if something close comes into the frame).
If that bugs you, and you’d prefer focus to remain locked unless you explicitly request it change, turn this off. This enables the auto-focus mode. Even with this on, exposure will still be adjusted automatically (if you’re operating in automatic exposure mode).

Portrait Capture
Yet another way of toggling the camera into portrait mode, for taking photos or videos that you’d prefer be taller than they are wide. You can also get to the toggle for this by swiping left on the main app screen, and can configure one of the 5D button actions to toggle this.

Over Exposure Warning
If you’re concerned about over exposing the sky and blowing out detail, turn this option on. This enables a visual indicator (in the display - it doesn’t capture in photos) for areas of the image that are overexposed.

The overexposed indicator is a diagonal zebra stripe across the sections that the drone feels are overexposed (obviously, I’ve pushed the EV up here to get a better demonstration). A tiny bit of overexposure in the sky probably isn’t that bad, but if you see large regions of this, you’d better reconsider your exposure settings.

Auto Sync HD Photo
How many times have you gone flying, taken some great photos, pulled out your phone to show them off, and realized you forgot to download them after you landed?
Fear not! If you’d like all the high res images copied from the drone to your phone, turn “Auto Sync HD Photo” on - and all the photos you take will get synced over to your phone or tablet.
On the other hand, if this is cluttering your photo feed on your phone up (and you mostly work off the SD card), turn this off and manually copy a few highlights before you shut down.
I don’t have a recommendation for this setting - it’s really going to depend on your workload. I’d guess that many hobby fliers will turn it on and most professionals will leave it off, unless they fly with a dedicated tablet (at which point turning it on may be useful).

Long Exposure Preview
If you never do long exposure shots (1+ second), this setting will have no impact on your life at all. However, if you find yourself taking longer exposure shots (which on a calm night, work far better than you might think - ignoring the legality of flying at night without exemptions), you’ll want to turn this on. After a long exposure, if this setting is on, you’ll see a few seconds of the captured image before going back to the live video feed. This is helpful for checking exposure while you’re flying (since getting exposure right on long shots is tricky).

Video Caption
Turn this on. It stores all sorts of useful information in the subtitle track of your video (or in a separate SRT file). This information includes things like the home GPS coordinates, the current GPS coordinates (to 4 decimal points), the altitude (BAROMETER) in meters, the current ISO, the current shutter speed, the EV correction, and the F-stop (fixed to F2.2 on the Mavic Pro).
If you don’t need the information, fine - you don’t have to use it. But the SRT file is tiny (less than a meg for a nearly 500MB 2.5 minute test video I took), and you can rebuild a lot with this information.

Grid
If you’d like a 3x3 grid overlayed on your live feed for framing purposes, here you go - and, if you further want two diagonals, you can do that as well!

Center Points
By default, there is no indicator of “center” in the viewfinder. The focus/exposure boxes are often in the center, but you can move them around by tapping. If you’d like a dedicated center icon, you have many options. Use them if you feel so moved! You can also set the color, if you’d like.


Anti-Flicker
If you’re shooting with fluorescent lights or something else that’s driven by the AC waveform directly, you might want to mess with this - options are 50Hz and 60Hz. In North America, use 60Hz, otherwise use 50Hz. Or leave it on auto. This shouldn’t matter outside.

File Index Mode
If you want to reset the file index counter (the number in DJI_0123.JPG) after you clear the content from the card, leave this at Reset. Otherwise, it will keep counting up. Which you prefer is up to you.

Peak Focus Threshold
This is another interesting option that I suspect rarely gets used. If you turn this on (options are “None,” “Normal,” “Low,” and “High”), you’ll get a bunch of red points along edges in the viewfinder images. These indicate sharp edges that are in focus. For manual focusing, play with the focus until you see the most red - that indicates peak focus. This is mostly useful for manual focusing, but it’s a useful sanity check for auto-focus.
That said, I don’t really use it much.

You can see the edges around the shed are marked as “in focus,” as well as the edges of the shadow. I promise nobody went nuts on my shed with a can of spray paint!

Format SD Card / Reset Camera Settings
These also do exactly what they sound like - format the SD card (wiping all data on it), and reset all the camera settings!

Video Format Settings
Since all the above relates to both video and photos, this last section focuses on the differences - which are all in the center “camera” setting pane.
Video Size
What resolution and frame rate would you like to shoot your video in? You can set them here!
When you tap on a particular resolution, the available framerates appear underneath, with the selected one in blue. Of particular interest, you can shoot 720p at 120fps…

Video Format
Would you like your output in MP4 or MOV? Hint: MP4.

NTSC/PAL
Do you want to shoot in NTSC or PAL format? Does it matter in 2017 with HD video? Probably not. Leave this in NTSC unless you have some reason to change it.

White Balance
The Mavic Pro has a lot of options for setting white balance. The default, AWB (Auto White Balance) is OK for casual use, but you should set it manually if you’re capturing for anything more than just messing around.

Options include “Auto,” “Sunny,” “Cloudy,” “Incandescent,” “Fluorescent,” and “Custom.” I expect that “Sunny” or “Cloudy” will cover most of the Mavic Pro uses.

Style
The “Style” menu controls minor post-processing that the Mavic Pro can apply to video and photos.
This has a few defaults, but lets you control sharpness, contrast, and saturation independently.

This is definitely more relevant in video, as it’s much easier to shoot photos in raw/dng format and do this in post-production. Again, there are plenty of good writeups about the details of these settings floating around the internet, from people who have focused far more on the details of the image processing system. Triangle is sharpness, the circle is contrast, and the square is saturation.

Color
This is another control for post-processing of the image data. There are lots of color filters that can be applied, though be cautioned that just because high end movie cameras capture enough data for some of the D-Log modes does not mean that a cell phone sensor (which is what this is) can capture enough data. Again, I’ll point you to other people who have done a lot more work with the color modes than I if you want a lot of details.

Photo Format Settings
Finally, while photos share a lot with the video settings, there are a few unique options.
Photo
The “Photo” option selects what sort of photo (or set of photos) you’d like to take. DJI is particularly annoying here in that they don’t use the same names for modes as the rest of the photography world.

Options are “Single Shot,” “HDR Shot,” “Multiple,” “AEB,” and “Timed Shot.” A better term for “Multiple” would be “Burst,” and “Timed Shot” should be called “Time Lapse.”
“Single Shot” is what it sounds like - take one picture with the current settings.
“HDR Shot” will do an automatic bracket and some HDR processing. Be aware that the viewfinder does not show any video until the processing is done - if you take an HDR shot and then move the drone, it will look like you’ve lost your video feed. There will be a spinner around the photo button on the right until the processing is done, at which point the video will pick up again. It’s quite annoying, and a bit disturbing if you’re not expecting it.

“Multiple” is what’s normally termed “Burst” - take 3, 5, or 7 photos as rapidly as possible.

“AEB” (Automatic Exposure Bracketing) will take 3 or 5 shots, adjusting the EV compensation up and down for each of the shots. With 3, you get -0.66, 0, +0.66 (2/3rds EV step), and with 5, you get -1.32, -0.66, 0, +0.66, +1.32. This is a great mode to shoot in for a lot of work - even if the auto exposure is a bit off, you’re likely to get something with solid detail you can work with.

“Timed Shot” should be called “Time Lapse.” This takes a photo automatically at the specified intervals. You’ll see a countdown timer on the screen indicating the seconds until the next shot. This is not a standard single shot timer, though I suppose you could use it as such.

Image Size
You can shoot in 4:3 or 16:9. I have no idea why you’d ever use 16:9, because the sensor is a 4:3 sensor and you can always crop later.

Image Format
The “Image Format” option simply selects what gets recorded to the SD card. Options are “RAW” (record only the DNG file), “JPEG” (record only the JPG), and “JPEG+RAW” (record both). For any sort of work with a professional photographer doing processing, get them the RAW (DNG) files. They’ll be able to do a lot more with it. For casual photography, or things that won’t be heavily post-processed, JPEG is fine. The JPEGs are much smaller - a typical JPEG off the Mavic Pro is about 1.5MB, while the RAW file is closer to 25MB.

Final Thoughts & A Break
By my count, I’ve written over 35,000 words about the Mavic Pro in this series. At a standard speaking rate of about 120 words a minute, that’s just about 5 hours to narrate it. This series of posts has gone radically beyond what I’d initially intended to do - and I am quite happy with them. I feel that I understand the drone deeply, which was my goal, and hopefully you find it useful as well.
However, this series has consumed far, far more time than I generally let my blog consume - and as a result, I’m quite behind on some work I need to get done around the property before winter (most significantly, a lot of work on my 75 year old tractor), and I owe my wife and daughter quite a bit of time as well.
Plus, there’s this eclipse coming up soon…
In light of all of this, I’m going to take a break from posting for a month or so. I still have plenty to talk about and quite a few interesting builds and teardowns, but I need to catch up on the rest of life for a while. So, enjoy the eclipse, and if the world doesn’t end I’ll see you sometime in September!
Comments
Comments are handled on my Discourse forum - you'll need to create an account there to post comments.If you've found this post useful, insightful, or informative, why not support me on Ko-fi? And if you'd like to be notified of new posts (I post every two weeks), you can follow my blog via email! Of course, if you like RSS, I support that too.

