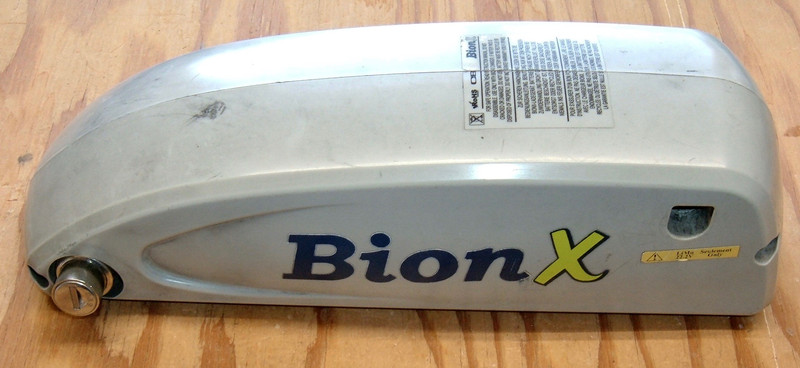

I thought I’d covered all the older BionX battery packs in my various previous posts, but I was wrong! I recently found out that there’s an absolutely adorable little pack I’d never heard of before! This is a 22.2V 6.6Ah BionX battery, which is notable for being under the 300Wh limit that makes shipping really irritating. I’d never heard of it before, and the capacity is as cute as the pack (not even 150Wh), but it’s here for a rebuild - which requires pulling it apart first!

So, what’s inside this tiny little pack? Read on to find out!
External Connections
The normal 4 pin XLR connector is used for the 26V and 37V packs, with this smaller connector style serving for the weirder voltages (the 40V Trek Ride+ packs, and, as I now learn, the 22.2V packs). And I forgot to get the pinout, but if you have one of these, it’s not hard to probe it out. You should find positive, ground, and a thermistor pin.

On the back is the standard 7W2 D-sub connector. This is a Canbus pack, so the standard Canbus pinout applies (which I’ll cover in more detail in a later post). This should work with any of the Canbus systems, so if you happen to want to ship a battery pack around a lot, this might make your life easier.

The bottom is bog standard BionX downtube pack. There’s no differences here. It lines up with any of the BionX downtube brackets. I can’t imagine this provides much of an assist, but it should work with any Canbus system.

Opening the Pack
Most BionX triangular packs use 4 bolts - this one uses only two. They’re the standard 4mm hex heads, and are otherwise identical to the normal bolts.
With the bolts out, the pack starts prying apart, and… aw. Come on, guys! The black gasket (environmental seal) should be in the groove to help keep water out (this is an improvement I’ve seen on a few of the newer pack designs and I quite like it), but it jumped the groove during the initial install and has been flapping around freely inside the pack since then - most assuredly not doing its job of sealing the pack better. You can see the crushed spot a bit to the right of the clip (and see where it got crushed slightly by the clip). This is not the type of quality control you’d hope to see out of such an expensive system. Of course, most of the BionX systems don’t have this gasket, so it’s not that big a loss. But on a high priced system, I expect a lot, and this is missing the mark.

Well, the side still comes off - and we’ve got what is, by far, the weirdest looking pack layout I’ve seen in a BionX pack. The cells are staggered instead of square, and there’s a bump on the top with an extra three cells! I’m counting 24 cells, which implies something like a 4P6S layout. We’ll see. The foam rubber bumpers that are common on most newer packs are here as well.
Of note, the pack is shrink wrapped in white instead of black, and the BMS has apparently been banging around a bit - look at how bent those pins are on the diagnostic connector on the top right of the board. I’ll fix that when I put it back in - the board isn’t properly seated in the groove.

The BMS is nothing fancy - just the normal Canbus board. I haven’t decided if the boards are actually identical, or what the difference between boards for different voltages is. And I don’t have enough spare boards to really be able to compare/contrast, or try them on different pack voltages.

The usual charging thermal cutout is up against the pack - no surprises here. This is a thermal cutoff that shuts down charging if the pack is excessively hot. I’m not sure exactly where it trips, but I know that a soldering iron is too hot, that they reset (yay), and that the whole casing is live to pack negative - in case you were wondering. My general practice is to wrap this whole thing in tape the moment I break it free, so it won’t flop around and short out on random things. Until you’ve disconnected the pack, it’s connected to the negative side of the pack with enough wire for a lot of amps (briefly), so any contact with the pack (except the very negative strip) will cause Excitement. So I hear. If you’re lucky, it won’t spot weld to the pack, but there’s more than enough energy to do that.

Battery Details
Peeking through the end of the shrink wrap, I see the normal label for the BionX pack cells - Sony US18650V. This is a 1600mAh cell that BionX uses in everything prior to the new 48V packs. This is a quirky lithium chemistry (spinel LiMn) that exhibits a rather strong (for lithium) self balancing behavior. This lets BionX get away without a normal battery management system. Does it work? Well, yes. Very well, actually.

Like almost all the other old gen packs, this pack is built by BMZ. And, the label confirms it’s a 6S4P pack (though, really, I call this a 4P6S pack - the groups are in parallel first, then serial). It’s cute! 138Wh. Well, we’ll fix that.
What’s interesting from this label is that BionX calls it a 22.2V pack - and BMZ calls it a 21.6V pack. BionX tends to round up - their 26V pack is, per the label, a 25.2V nominal pack. Rounding to the nearest whole makes sense, but rounding to 22.2? Weird enough to do some math…
The difference seem to be that BionX considers the cells 3.7V nominal, and BMZ considers them 3.6V cells. Calling them 3.7V cells is perfectly reasonable, and the 26V pack, with that logic, is a 25.9V pack, so I’m OK with that. Just an interesting side note.

Out of the shrink wrap, the layout is obvious. It’s a BionX pack, for sure (as if I had any doubt). All their BMZ batteries are hand built - glued together cells and hand spot welded. Much like my rebuilds! I’m kind of surprised how long BionX went with BMZ, but the packs hold up and don’t fail if properly maintained. Each cell has two spot welds on each end (a single spot weld leaves two weld marks), and the pack is constructed from 10mm wide 0.15mm thick nickel strip - same as my rebuilds.

And, the other side - some nice insulating tape along the contact side. I’d love to talk to people who built these packs - if anyone happens to know a BMZ pack builder employee, could you put them in touch with me? I’m curious as to the welders used, and in general what it’s like building batteries all day, every day. I get bored after a few packs…

With the insulating tape off, the connections are a bit clearer. Positive, negative, and the thermistor. That’s a bog standard 10k 25C NTC thermistor, if you’re wondering - same as, yes, all the other BionX packs. I keep a bunch of spares around, because sometimes they come out of the pack (like for this pack), and sometimes they don’t (most of the newer 37V packs). I don’t like how they solder to the nickel strip between cells (this could damage the shrink wrap and lead to a short), but empirically, it works - really, really well. I’ve never seen an issue with it, so perhaps they use a lower temperature solder or something.

Someone was in a hurry on this pack with the hot glue gun. Those diagonal streams of glue are what happens when you work fast. They’re not a problem, really, but only happen when you’re working quickly. I try to avoid them, but I also don’t have industrial hot glue guns. Only a pair of 100W units - they generally keep up, but I can outrun them if I try.
Worth noting here: If you have a hot glue gun and it starts getting “drooly” - replace it. That means the heating element is wearing out, and the cheaper guns certainly wear out after a half dozen or so large bags of glue sticks. The high end glue guns are a really nice treat to work with if you’ve only ever worked with the cheap hobby store ones. I use the SureBonder Pro2-100 units now, and they are nice. Interchangeable tips, too!

Reference shots for the wiring, if you have use for this. Given that this is the only instance of this pack I’ve ever even heard of, I’m documenting it well!


The Rebuild
Will I rebuild it? Absolutely!
My rebuild is a 9Ah rebuild - the normal upgrade for my packs. I rebuild with Sony US18650V3 cells, which are the same chemistry, just upgraded in capacity (presumably some thinner separators or such) to 2250mAh. They’re a drop in replacement. The rebuilt capacity is a nice even 200Wh.
The other thing I’ve changed in my rebuild is the solder points - if you look over on the right side, you’ll see that the ends are folded over. I can solder to these folded over tabs (over the insulation) and not push as much heat directly into the cells. BionX solders between cells, which is better than soldering directly over a terminal, but hanging a tab off the end and using that puts even less heat into the cells. This also reduces the risk of melting the shrink wrap on the positive end - nothing good comes out of doing that.

A bit of cutting later for my insulating paper, a wrap of a thick rubbery tape variant for protection, and the pack is soldered up and ready to go back in.
I installed it with the foam blocks, but also with some of the GE Silicone II the newer packs use - it just helps keep things in place. The BMS had been rattling around because it wasn’t in the correct groove, so I fixed that. And the black gasket is properly inserted into the groove for environmental protection.
It’s better than new! ~Maru

Final Thoughts
This pack is cute. It’s tiny. It weighs nearly nothing. It offers, well, very little power.
But I’m glad I got to see it. I thought I’d seen all the older BionX packs out there, but every now and then a new one surprises me! This was a fun little rebuild, and if you have one, I’ll happily rebuild it for you. The contact form is over there on the right!
Comments
Comments are handled on my Discourse forum - you'll need to create an account there to post comments.If you've found this post useful, insightful, or informative, why not support me on Ko-fi? And if you'd like to be notified of new posts (I post every two weeks), you can follow my blog via email! Of course, if you like RSS, I support that too.


