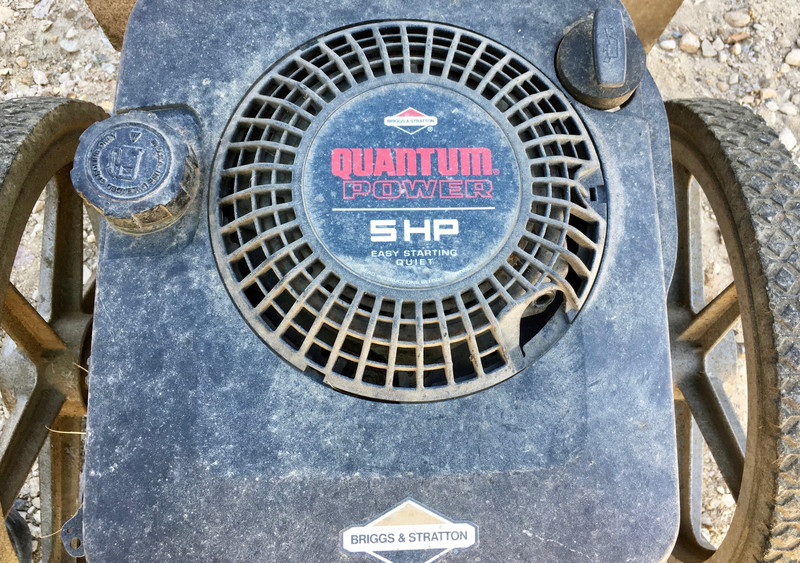

A few weeks ago, I implied that I would be doing more “homesteading” type posts - talking about property, improvements to property, and the equipment related to doing such. And this week delivers! I’m covering how to replace the pull starter string in an old Briggs & Stratton Quantum Power 5HP motor - part of my walk behind string trimmer that was given to me from the back corner of a relative’s shed.
You’ll notice that something very important is missing from the top - the starter handle!

Now, there’s an “official” way to do this stuff, and it doesn’t involve rewinding the recoil spring. Of course, since my rope snapped, there was no way I could make the official way happen, so this post, fittingly for my blog, goes all the way down into the recoil spring and how to rewind that little hunk of evil. So read on!
My DR String Trimmer
What, exactly, is this gizmo? It’s a walk behind string trimmer. Think “weed eater on steroids, with wheels.” This is an original DR Trimmer (large frame), somewhere in the 25 year old range. Maybe more. I got it from a relative with a broken tire (the rubber had split and come off the wire wheel), but it had been sitting for years when I got it. Fortunately, it was out of gas when stored, so the carburetor wasn’t too badly gummed up.

After a bit of puttering around with it, I managed to get it started. And it proceeded to smoke out my property. It was burning a ton of oil. Toss some seafoam in the oil, toss some seafoam in the gas, run it more, and eventually it quit smoking quite as much. I’m pretty sure it had a stuck ring (or, probably, all the rings were stuck), and I’m not convinced all the rings are free even now, since it still smokes a bit and the compression is iffy. But, it can get through a tank of gas without needing more oil, and the price was right.
A new set of wheels, some new string (it goes through a lot and you replace it manually), and it was good to go. I’ve put a lot of hours on it over the past year, since this is one of few mower-type devices I can safely use. My property can safely be modeled as “a hill of basalt, with some dirt tossed on top.” There’s basalt everywhere, in the ground, sticking out of the ground, and piled on the ground. As a result, I can’t safely use a blade unless I’ve cleared the area - either I’ll destroy the blade on the rocks, I’ll lob high speed rock bits everywhere, or I’ll manage to set the property on fire (probably all three). Dry weeds, a metal blade, and a hunk of basalt have started at least one fire around this area. String is a much better option.
This device flings some nice thick string around at a very good clip, and does a solid job on most of the weeds on the property (except for the stuff with a really thick woody stem - that stuff is string trimmer resistant). It’s old, cranky, does tend to beat me up pretty good with rocks and such, but it cuts weeds and doesn’t start fires!
Replacing the Pull String
Unfortunately, the starter string in this was also 25 years old - and, eventually, decided to separate on me. Of course, a pull string will part immediately after filling the tank, which makes replacement a bit interesting. Perform the process outside (ideally on a breezy day), or siphon the gas off before you start, because you will make a mess if you try this with a full tank.
But, assuming you decide to replace the pull string yourself, it’s a pretty easy process. This whole thing, end to end, took perhaps 45 minutes - and that was with a toddler helping. She was swinging the ratchet, running off with the cords to pretend they were snakes (I didn’t mind her running off with the old cord, but she ran off with the new one also…), and generally being herself - I can’t complain about teaching small engine repair to a 2 year old! She’s certainly curious about the process!
The first step is to remove the plastic cover on the top. It simply pulls off - there are three clips around the side. Tug on it, and they should be fairly obvious. Once it’s off, you’ll need to identify the three hex top bolts that hold the fuel tank assembly on. They’re probably covered in grass or dirt or whatever that fluffy dander that collects in mowers is, so dig the bolts out. If you haven’t found all of them, keep removing fluff.

Once you’ve found the three bolts, you’ll need a 5/16” socket of some variety or other. I had this laying around, so grabbed it with a pair of vice grips to make a socket driver. It works, and I couldn’t find a small 1/4” drive socket of the right size - it turns out that owning metric vehicles for years means you don’t have a good English socket collection. At least it’s not Whitworth.

Remove all three bolts - but you’re not done yet! There’s a 3/8” bolt down on the side of the motor (below the starter, if you have such a thing - I have no idea if mine works or not because the battery is a boat anchor). Remove that bolt before you start tipping the gas tank off!
Once the three bolts up top and the one on the side are removed, remove the fuel line (which, of course, will make a nice mess), plug the fuel tank with something handy (a pencil works great in a pinch), and remove the fuel tank. You may find it necessary to pull the oil dipstick out before you pull the tank - it depends on the clearances. I had to remove it, but it looks like it was pretty close to fitting.

Set the fuel tank off somewhere away from you, especially since it’s almost certainly full and is leaking a bit from the outlet. If you’re working in a garage, it’s a really bad idea to put the fuel tank between you and the door in case something ignites the fumes. Just put the gas tank outside, away from anything else. Easy, if you’re already working outside…

With the fuel tank off, you’re staring down at the metal housing, air duct, and crud collector. You think I’m kidding about the last part? Just wait!
There are four bolts that hold this housing on. Two are on the rear, on the left and right of the cylinder (have you replaced your spark plug? Now might be a good opportunity).

The other two are on the front. All four bolts are 3/8”, so grab your socket and go to town. Once they’re loose, a toddler can swing the ratchet just fine - and, depending on the toddler, may insist on doing so.

There’s no need to remove the oil fill tube and dipstick from the top - but be aware that as you pull the top up, the fill tube will separate from the base. If your motor looks like mine does, clean down there before you pull the tube out, and I’d stuff something in the hole to keep too much other debris from falling in.

With all four bolts out, pull the cover off. You’ll have to wiggle it a bit to clear the governor cable bracket, but it should come right out.
With the top off, you’ll probably find an absolutely disgusting mix of grass, dirt, dust, grit, and unrecognizable fur. Or, at least, that’s what I found (and is what I’ve found in just about every mower I’ve ever taken apart). It’s gross. Clean it out while you’re in here.
For those unfamiliar with the stuff around the edge of the flywheel, this is about as basic an ignition system as you can get. A permanent magnet in the flywheel whips around and creates the surge of current that’s run through the ignition coil to trigger the spark. Fixed timing, and somewhat simpler than your average magneto. I love it!
The fins make up the fan that packs grass firmly into the corners of the engine assembly. Theoretically, it’s for cooling air, but I don’t think much air was getting through my cooling fins. Seriously, clean this stuff out.

With the top off, it’s time to start working on the mower cord!
Mower Recoil Starter Assembly
The top part directs air (and a lot of plant bits) to the cooling fins, but also contains the all-important recoil starter assembly. This consists of a large pulley, a rope, a very strong spring, and a one way ratchet.

Pull the rope (or spin the pulley, because if you could pull the rope you wouldn’t be this far into the mower), and the one way ratchet pegs extend out. If you look back up at the motor flywheel, you’ll notice four square notches in the stamped metal bit bolted to the flywheel - this engages with those and turns the crank when you try to start the mower! As the pulley winds the rope back in, these tuck back inside and stay out of the way.

Now, if you read the official instructions, they’ll tell you to use a dental pick or something to fish the rope out, and to absolutely not remove this screw so you can get at the rope (which is almost certainly jammed into the pulley). Well, if that works for you, great. And, if not, you’ll either have to follow the recommended advice (which is to take your engine to a small engine technician for them to work with the spring), or follow my advice, which is to get yourself a long sleeve shirt, possibly a sweatshirt you don’t care about, a heavy pair of gloves (leather is a good idea, but you need more dexterity than welding gloves will offer), and to go in and deal with the spring. It’s not magical, but it does contain enough energy (when wound) to cut you up pretty nicely. It’s basically coiled razorblades and hate - treat it with respect.
Once you’ve decided that you need to pull the whole thing apart, take the bolt in the center out, pull the top and the starter pawls out, then carefully pull the pulley up. Slowly. Keep a good hold on it, a good hold on the housing, and slowly move things apart. At some point, you’ll hear a very disturbing sounding metallic shwucking and pwinging. This is the spring coming rapidly uncoiled, ideally while still contained by the housing. If you have small children helping, removing the screw is when they should probably start standing further back. The noises will eventually stop, and if you pull the pulley up, you’ll be greeted with the uncoiled remains of a spring.

Once the spring has sprung free, pull the pulley out and deal with your torn up rope. For mine, the fibers had wound behind another loop, and it was pretty well wedged in there. There was no way I was going to pull this out without taking the whole assembly apart - I had to pull the rope out with a pair of needle nose pliers. It was quite stuck!

It’s an old, gross, broken rope. Just pull it out from the inside - cut it if you have to. My toddler proceeded to run off with this, shrieking gleefully about her snake (I can understand why). She’s been playing with the other broken half of the rope the past few days as well.

Reinstalling the Spring and Rope
Before your kid runs off with the rope, cut the new rope to length. I got a pretty generic Briggs and Stratton replacement pull start rope from my local D&B Supply. Any home improvement or hardware store should have these parts, though you may have better luck with that if you live in a rural area. Worst case, you can find them on eBay (or Amazon).
After cutting the rope to length, make sure the ends are melted so they don’t fray (the rope is typically nylon). If you’ve never done this before, you stick the ends of the rope in a lighter to heat them up, then roll it between your fingers (gloved, perhaps?) to round it out into a rope shape instead of the ball of plastic it tries to become. Don’t burn yourself. I generally don’t bother with gloves, but I’ve done this to an awful lot of ropes in my life.
Count how many turns the rope takes to wind fully around the pulley. It will probably be 5 turns or so.
Alright. The next part is the trickiest part of the whole process, and also the part most likely to lead to blood. Remember what I said above about long sleeves, multiple layers of long sleeves, and good gloves? If you ignored me there, listen to me now. Especially the part about gloves. Get a good pair of gloves before you start on this part, because the spring can and will cut you up badly if given half a chance.
You need to get this spring (which, by the way, has about another two feet hanging off out of frame), which is incredibly happy to be relaxed and straightened out for the first time in decades…

Wound, firmly, into this tiny space in the center of this pulley.

This is the end result you’re looking for - note that it only fits one way, and if you try to put the outside hook the other way, it doesn’t line up right and generally looks wrong.

I don’t have photos of the process - sorry. It’s a two handed job, ideally with nobody else in the immediate area in case it rapidly uncoils.
What you’re doing is coiling the spring into the opening. Hook the end over the outside hook, and start pushing the spring into the center of the pulley - it spirals in from the outside. As it goes around, it’s vital to keep a lot of pressure on the already wound spring - it’s really easy to have it sproing free. So, use two fingers to keep the wound spring pressed in place, and either rotate the pulley to get the spring coiled in, or rotate the spring wire around the outside. It’s quite a few turns, the spring is quite stiff, and the pressure you need to use to keep it from popping free is substantial, so don’t be surprised if your hands are a bit sore by the end.
What happened, at least for me, is that I underestimated the force needed to keep the spring in place, and it popped free a few times. This gets your attention in a hurry the first time - but if it’s only a wind or two in, there’s not that much energy. Ideally, by the time you’re more than a few turns in, you’ll have worked out what keeps everything in place. Once you’re to the end, you’ll hit the prewound coils that catch on the center. After everything is pushed firmly into the center, it should stay put without you holding it - but, keep your fingers holding it, just in case. Fully wound, there’s enough energy to do some serious damage to flesh.
As long as all the coiled bits are pressed firmly into the opening, they shouldn’t come free - but if a winding that’s already been wound starts to pop out, it will continue and cause the whole thing to unwind. The pressure on the already wound segment is key.
Installing the Pulley and Winding the Rope
With the spring of doom coiled in the center of the pulley, it’s time to reinstall the pulley. Note that it has to go under the guide tab in the corner. You do not need the rope installed at this point, and if you’ve installed the rope already, go ahead and remove it. I got ahead of myself and had to undo some steps. When you’re installing the pulley, the rope is not yet installed.
Flip the pulley over, set it down on the shaft in the center, and ideally the spring stays sprung. Once it’s down on the shaft, everything should stay in place. But you’re not out of the danger zone yet.

Install the two pawls in their proper location. It’s easiest to work with them fully closed.

Then, install the cover. There are grooves on the underside that run the pawls, so just line it up when you install it. Put the center bolt back in place, and everything should stay put - you’re no longer at risk of the spring popping free, but there’s still a step or two that can get you in trouble left.

Test the assembly - rotate the black plastic cover one way, the pawls should come out. Rotate it the other way, they should go back in. If this happens, you’ve put things back together properly and can go onto the next step. If not, double check those grooves on the bottom. It’s fairly hard to install incorrectly, though.

Before installing the rope, you need to tension the pulley and spring so it will pull the rope back in when released.
Wind the pulley counterclockwise (while you’re looking at it from the underside) 7 full rotations or so (depending slightly on the number you counted above for turns). You want it to hold the rope in firmly when retracted, but not be overly tight. Seven was the correct count for mine, and if you’ve got the same motor, it should be right for you. Wedge the wheel in place somehow (again, if this slips, the wheel will unwind, very rapidly - keep your fingers out of the way).

Now, work the rope through the outside housing, and through the rope hole in the pulley. A long pointy rod (think a wire coat hanger) can help here, or you can just fiddle with it until you get it through. The rope wants to go around the outside if things aren’t lined up. Once it’s through, give it a nice overhand knot to keep it in place.

Once the rope is secured in the pulley, deal with the other end (so the rope doesn’t just get wound all the way in). A knot is usually the right solution for the handle side as well.

Now, carefully remove your screwdriver, vice grips, or whatever, and let the rope wind in fully. It should fully retract and be tight against the housing, but not overly tight. Basically, it should feel normal for your engine - if not, redo it with more or fewer twists. One twist too tight is probably better than one twist too loose (the rope bouncing around inside is likely to tangle eventually). And that ends the dangerous bits you’re not supposed to do!

Reassembly
Reassembly is the opposite of disassembly. I hate that phrase, though, so I’ll actually cover a few details and tips.
Once you’ve got the whole starter assembly assembled, the entire metal shroud (and oil dipstick/filler tube) go back in place. Make sure the pawls are retracted, and the top should slide into place (once you get around the governor cable mount). If you’re wondering, the cable isn’t actually the throttle cable - it requests an RPM out of the governor, which (attempts) to manipulate the throttle plates to control the RPM. Hopefully.
The shroud should eventually settle into position and the 4 bolt holes line up - install them.

The next (and messy) step is to reinstall the fuel tank. It’s easier if you pull the dipstick out. Set the gas tank back in place, and reconnect the fuel line (since it’s probably dumping fuel all over everything). Reconnect the 3/8” bolt in the front, and then screw in all 5/16” hex head screws around the top.

The last step is to put the cover back on - and you’re done!
Restarting may take a few pulls depending on how much you’ve moved stuff around. The gas line is filled with air, and while the carburetor may still have fuel, it’s probably low from being bounced around. So, crank until it starts. You’ve got a brand new rope, may as well break it in!
Anyway, hopefully you’ve found this helpful. There’s just no reason to pay a shop to replace a starter string that’s gone missing and wrapped deep inside. I’m not sure how closely this applies to other motors, but they’re all pretty similar (and, if I had to bet, I’d say that a newer Briggs and Stratton probably looks almost identical in a lot of key ways - companies rarely change things radically when the old solution works).
If this is helpful, let me know below. If I’ve missed anything, let me know as well!
I’m going to be doing a few more homestead/property work posts in the near future - as well as some in depth looks at lead acid battery operation for off grid use (and why, in 2017, you might still consider a lead acid bank instead of lithium). Plus, some repair work on a 75 year old tractor (which, I’d note, is entirely DRM-free). If you’re here for the small electronics, don’t worry - I have plenty more of that lined up too, including an in depth analysis of my favorite high power buck converter, and a serial library to go with it! But I’m going to start working some of the property work into my post series, because I’ve been doing a lot of it. My goal is to be able to meet a lot of our own food and energy needs from our property, and like anything else, there’s a large learning curve. If you want to do some of the same type of stuff, I’d love my experiences to help shorten your learning curve.
Comments
Comments are handled on my Discourse forum - you'll need to create an account there to post comments.If you've found this post useful, insightful, or informative, why not support me on Ko-fi? And if you'd like to be notified of new posts (I post every two weeks), you can follow my blog via email! Of course, if you like RSS, I support that too.


)