
Some might wonder why on earth I was doing kernel builds with a Raspberry Pi 3, such that I looked the temperature and throttling behavior. This week, I explain! I’m trying to make the Raspberry Pi 3 into the best little desktop I can - without breaking the bank in the process.
I have a few Raspberry Pi 3s in my office, and while they work well for very light utility use (as well as for light data logging and IRC connectivity), they fall down if you ask them to work as a desktop - and they don’t really fall down gracefully. Chrome with a complex tab or two will freeze up a Pi so badly you have to power cycle it, and that’s just annoying. So I’ve set out to fix it, without spending so much that I’d be better off with a more expensive system to start with.

Interested in how to make a far better desktop out of a Raspberry Pi 3 for an extra $30? Of course you are!
Intel & AMD Issues
For those living under a rock recently, Intel’s chips have been found vulnerable to a nice range of speculative execution related vulnerabilities that leak data. They’re mostly patchable, or at least can be sort of worked around with a variety of methods, but I’d assume there are more nasties hiding where those came from.
AMD came off looking good with that particular kerfluffle - but then a paper came out talking about their secure processor, and it doesn’t look very good for them either.
The Raspberry Pi 3 uses a simpler chip that isn’t vulnerable to speculative execution related bugs - because it doesn’t use speculative execution. It also lacks any sort of management engine functionality. The lack of speculative execution makes it slower, of course, and nobody would argue that a Raspberry Pi, even the Pi 3, is nearly as fast as a “proper desktop.” It’s not. It’s actually quite unusable as anything more than a utility box - stock. But if not that much is required to change it into something more useful, that opens up an awful lot of territory that’s currently x86 only!
“Light Desktop Use”
It’s hard to define, exactly, what “desktop use” means. To one person, it’s a full on development workstation running VMs. To another person, it’s a few Facebook tabs. To yet another, it’s an IRC client and a bunch of terminals. Then there’s “light” use - I clearly don’t expect the Raspberry Pi to function as a full on desktop for my purposes, though I do note that it has significantly more CPU and RAM than many desktops I’ve owned throughout my life…
I consider “light” use to be web browsing with a dozen or so tabs, several terminal windows open, and, importantly, an IRC client running. I’m OK with a bit of lag, but I’d like it generally useful, and I’d like to radically reduce the number of “Oh. Whoops. Well, that webpage killed the system…” related power cycles. And, in that dozen tabs, I include Inbox and Google Docs - traditionally Pi-killers.
The Issues
If you’ve tried to use a Pi3 for any sort of light desktop use, you’ve probably run into the fact that once you load more than a few tabs in Chromium, things just… lock up. If you have swap, it’s mildly better, at the expense of thrashing your microSD card, but it’s still not what most people would call usable. You can’t use Google Docs, GMail is a struggle, forget about Inbox, and more than a few simple tabs just brings the system to a crawl. Forget about having a few tabs open for research - if they’re more than basic text files, you’re done.
One of the main contributors to awful Pi performance under desktop use is the poor random IO performance of microSD cards. They’re not built for being a primary filesystem store - they’re built implicitly assuming media storage. They’re great for doing things like storing the streaming video writes coming off a Mavic Pro shooting 4k video, but a MySQL style filesystem access is just not what they’re intended for.
Like it or not, a lot of modern desktop use is browser based. So a system that can’t run more than one or two tabs just isn’t that useful, even if you can do other things on it.
My hypothesis, based on some time spent digging around and loading my system to death, was that the random IO behavior was largely responsible for the poor system performance, and that the lack of swap in the common configuration (and, specifically, a tiny swap file on a device bad at random IO) was a major part of the problem. This would mean mitigations require better random IO performance, and some better solution to swap.
Swap is Not a Four Letter Word
Swap isn’t inherently evil. There are situations when it’s certainly not welcome, though. On a large production server that has no local storage (but tons of RAM), swap may not be useful. Or, if that server is doing latency sensitive things such that disk IO in response to a memory access would be fatal to latency, swap probably won’t help. If you’ve got a backing store that doesn’t like a lot of write traffic (say, a micro SD card), swap is iffy - but thrashing the swap with constant writes is a bad idea.
But for a desktop system without much memory (let’s be honest, 1GB is barely more than most smartwatches these days), swap isn’t that bad if it’s not being thrashed. Getting infrequently used data out of precious RAM onto something out of the way is just fine, as long as that data is actually infrequently used. There’s been a lot of development of compressed swap as well recently. It’s no secret that most computer memory is highly compressible, and swapping to a compressed region of memory is useful enough that both Windows and OS X implement memory compression in various ways.
When working properly, swap lets the system move old pages out of RAM, leaving memory free for things that actually need RAM (like, say, tabs in a web browser - modern web pages are not pretty to parse). For desktop use, this is ideal. The stuff you’re working on gets memory, the startup services and such that haven’t been used in a while get swapped out. Programs often have data used during startup that isn’t needed later, but without swap, that has to stay in RAM throughout the entire runtime, even though that particular page may never be touched again.
Storage Device Upgrades
I’m just going to say it (again). Micro SD cards suck at being a general purpose disk. They’re not designed for it, and that they tolerate it at all is really quite remarkable. Unfortunately, treating them as a disk tends to wear them out quickly, and the Raspberry Pi is well known for thrashing SD cards badly enough to kill them. If you’re lucky, they still let you read all the data but refuse writes. If you’re not lucky, they simply die entirely. It’s not a good situation, and I’ve fried one SD card so far in my Raspberry Pi experiments (it took about a year of regular data logging writes for solar logging, and my ramdisk wasn’t working quite right without me having realized this - the logging software writes entries every second).
So, I set out finding a solution to storage that was better than the SD card. Ideally, the Raspberry Pi 3 would directly support a M.2 SSD or something, or have a USB3 port - but it doesn’t. It only supports USB2, which is slower (40MB/s).
Some quick benchmarking indicated that my SD card wasn’t producing more than 20MB/s, so theoretically USB2 would be an improvement. A bit of poking around on eBay got me this!

Sorry, that’s not a very impressive picture. It’s a 32GB used SSD and a USB3 to M.2 SSD enclosure! The total cost, if you’re OK with used SSDs, is about $30. That’s really not that much money.


The enclosure runs about $10 and a used 32GB SSD should run you about $20.
Benchmarking this indicated that it would handle sustained read and write (over the Raspberry Pi USB2) of 30MB/s. That’s a 50% improvement, right there!
More importantly, I trust this SSD to take some reasonable amount of write traffic. That opens up some options with regards to swap!
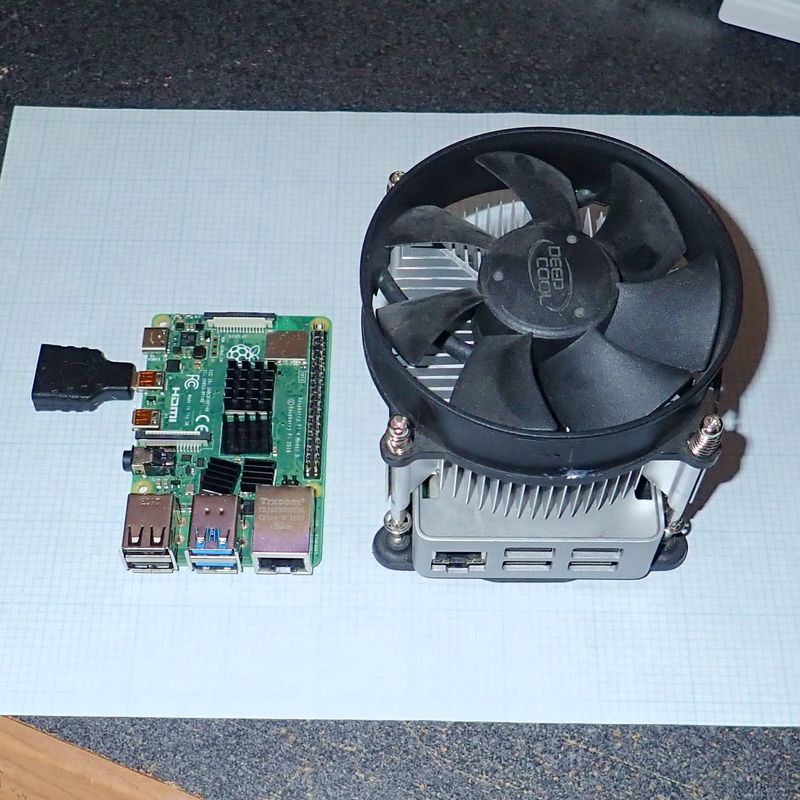
A Good Heatsink
If you don’t have a good heatsink, the Raspberry Pi 3 will throttle - badly. This impacts loaded desktop performance quite substantially, and it’s far worse under load.
I went into this quite in depth last week, so read up there if you haven’t seen that post. A good heatsink really makes a big difference. The unit I have is $8, but you can find anything good - or try the B+ Pi3, as it’s supposed to be a lot better thermally.
Filesystems - and Compression
Just use ReiserFS. It’s the killer filesystem!
Ok, if you don’t get that, you’re either too young, or too old. *waves his cane and mutters about his lawn*
With the SSD on the USB bus, what I have is a very slow storage device compared to the overall system performance. I can push 30MB/s over it, which would have been impressive, 20 years ago. In 2018, it’s not very good - and I’ve got an awful lot of CPU power laying around.
Many, many years ago, I was transferring some files around from a 486 to an 8086 (it had the dot matrix printer attached). Being bored, I tried a few ways of transferring files around, and discovered that on 5.25” floppy disks, zipping the text files (with PKZIP.EXE) made for radically faster transfers. The floppy drive was so slow that the compression and decompression was free - and reducing the amount of data to transfer made the whole process much faster.
The same thing applies here. Since I have what, by modern standards, is a seriously choked disk interface, the less data I can write, the better. The same goes for reads - reading less data, then decompressing it, will be significantly faster than writing out the full uncompressed file.
There’s one modern filesystem that supports transparent compression: btrfs. It’s almost perfectly suited to this task - except that you can’t have a swapfile on it (it’s not supported yet), which means I need a separate swap partition. This is annoying, but, things are what they are.
Over a 30MB/s USB2 link, how fast can I write a gigabyte of zeros? Oh, about 123MB/s (the conv=fsync means that it will sync the file data and metadata before terminating, so I’m not testing writing to RAM).
pi@raspberrypi:~ $ dd if=/dev/zero of=bigzeros bs=1M count=1024 conv=fsync
1024+0 records in
1024+0 records out
1073741824 bytes (1.1 GB) copied, 8.74444 s, 123 MB/s
That’s what I call an improvement! Now, regular data won’t be nearly this nice, but the principle stands - compressing the data before writing it out is well worth the CPU cycles!
zswap
Earlier, I established that swap isn’t evil for my uses (especially with a proper SSD). There are a few different compressed swap options for Linux, but none of them are enabled by default for Raspbian.
The two major compressed swap options for Linux are zram, and zswap/zcache. The more common one, zram, is purely compressed swap. It has no backing disk, and while it can help under some loads, it can also end up with a system thrashing in RAM and just as out of memory as it was before. It’s neat, but it’s not what I want to use here.
On the other hand, zswap is pretty fancy. It’s a compressed front end for a disk based swap file or partition. It supports storing (depending on the allocator) either two or three compressed pages in a single page of memory (so up to 12kb of RAM in a 4kb region), it will pass things that don’t compress well through, and it has a LRU (least recently used) cache flushing algorithm that will make room by pushing old pages onto disk, not requiring new pages spill over.
Since I want to do some compressed swap in RAM, but still have enough disk backing the swap to handle quite a bit, zswap is perfect for me!
The Process
Unfortunately, the process here is not for beginners. I may write a script to try and help with this at some point, especially with the Pi 3 B+ out (very promising looking bit of kit) out. But, fundamentally, there are a few changes you need to make. I’ll assume you’re reasonably Linux-competent, and describe the process at a high level, but not provide copy-paste commands for each individual step. If what I describe makes sense, go for it. If it doesn’t, I don’t want you to ruin a functioning setup by following instructions you don’t understand. If there’s enough demand, I can put some scripts together, but I don’t have time for that at the moment.
The Kernel Configuration
Why was I building a kernel last week to analyze thermal throttling behavior? In reality, I discovered the behavior while trying to build a kernel. The stock Raspberry Pi kernel doesn’t include a few things that are very helpful here - and while you could do them as modules, I’m of an age where building a kernel doesn’t concern me one bit, and I kind of like my monolithic kernels. So I just added a few new things into the kernel configuration as built-ins, and I don’t have to muck with initrds or anything else that’s nastier, IMO, than a kernel build (on a system that normally doesn’t have an initramfs).
You’ll follow the Raspberry Pi Foundation instructions for building the kernel. After you’ve checked out the kernel and built the default configuration, you’ll want to add the following to .config:
CONFIG_ZSWAP=y
CONFIG_ZPOOL=y
CONFIG_ZBUD=y
CONFIG_Z3FOLD=y
And you’ll want to modify the following lines from “m” (for “module”) to “y” (built into the kernel image) - or add them if they’re not present.
CONFIG_BTRFS_FS=y
CONFIG_CRYPTO_LZO=y
CONFIG_ZLIB_DEFLATE=y
The first set of changes adds zswap support - the fun compressed swap magic. The second set of changes is required to add compression for zswap, and to enable btrfs (with compression - the same kernel compression code is used for both).
Once you’ve built the kernel (which will take 2 hours with a good heatsink), you should have a fancy new kernel7.img to put in /boot - you should verify it works properly before going on. Theoretically, everything should come up smoothly.
BTRFS
Adding BTRFS is a bit tricker, because you can’t just copy the filesystem over and convert it - if you want swap partition. BTRFS does not support everything required for a swap file, so you cannot just use the dphys-swapfile system and rely on a little swap file. You need a separate swap partition.
No, really.
sudo apt-get remove -y dphys-swapfile
You want to make sure you don’t have a swapfile.
These next steps should be performed on the USB SSD setup. I did the copy on another Linux box (really, a virtual machine), so I’ll assume you have something like that laying around - and that you’re not copying things around a live install. I’m sure it’s doable, but that’s not how I went about it.
First, create a new set of partitions on the USB SSD. You’ll need a 64MB FAT32 partition at the front end for /boot (you probably should mark it bootable but I don’t think it matters), the main root partition that will be formatted with btrfs, and then some swap space at the end. How much swap you have is up to you, but I’d suggest that 1GB of swap partition is a good compromise. Remember, swapping to this disk won’t be nearly as bad as swapping to the microSD card!
Once you have the partitions, you’ll create the filesystems - mkfs.fat32 and mkfs.btrfs for the two data partitions, and then mkswap for the swap partition.
Now mount your old filesystems and your new filesystems. You’ll want to mount btrfs with the “-ocompress” option - something like mount /dev/sda2 /mnt/newroot -ocompress to ensure that you’ve enabled compression.
Use “cp -avx” to copy all the files from your old microSD install to the new USB root drive. Do the same for your boot partition.
Direct USB Booting
The Raspberry Pi, theoretically, can directly boot from USB. However, I wasn’t able to make this reliable (and some other people in #raspberrypi struggled with it as well). The easy and reliable option is to keep a microSD card in the Pi to boot from. For me, this helped with benchmarking as well, but it’s simply easier to make work.
If you make it work directly on the USB booting, great! One fewer item to have around! But this is a great use for that old 1GB microSD card laying around - a boot partition for a Raspberry Pi running from USB.
There’s no specific need to create a /boot partition on the USB SSD if you’re booting from microSD, so you can save that step if you go this path.
Final Modifications
Now, on the new partitions, you need to make a few modifications so everything works.
In the /boot partition you’re using (either on the microSD card or on the USB drive), you’ll edit cmdline.txt. Make sure it points to the new root filesystem (sda2 on my setup):
root=/dev/sda2 rootfstype=btrfs
Then add some parameters at the end to enable zswap on boot:
zswap.enabled=1 zswap.max_pool_percent=15 zswap.zpool=z3fold
This enables zswap, limits the pool to 15% of RAM (150MB), and uses the z3fold allocator for better compression than the zbud allocator (three compressed pages per page of RAM instead of two).
Finally, on the USB SSD root partition, edit /etc/fstab to point to the new paths (and your new swap partition). Note the compress option!
proc            /proc           proc    defaults          0       0
/dev/sda1       /boot           vfat    defaults          0       2
/dev/sda2       /               btrfs   defaults,noatime,compress  0       1
/dev/sda3  none  swap  defaults  0  0
That should get you booting properly!
Finally, for the finishing touches, mess with the dirty ratio and dirty background ratio. Add these to your /etc/sysctl.conf to improve how the system tries to write dirty pages out to disk (basically, let an awful lot of dirty pages accumulate, but try to start writing them out as soon as you can to keep them from piling up). This improves application responsiveness while making better use of the tiny choked pipe to the SSD.
vm.dirty_ratio=50
vm.dirty_background_ratio=1
The Results
Once you’re booting from the USB SSD, go thrash the system and you should be suitably impressed by how well it holds up! Chromium can actually load Gmail and Inbox, as well as Google Docs, and the system keeps running! You can see I’m beating on swap pretty bad, but the system remains usable and doesn’t lock up like it would stock.

If you want to see how your zswap system is doing, this little incantation will let you see it working:
pi@raspberrypi:~ $ sudo grep -R . /sys/kernel/debug/zswap/
/sys/kernel/debug/zswap/stored_pages:75693
/sys/kernel/debug/zswap/pool_total_size:115769344
/sys/kernel/debug/zswap/duplicate_entry:0
/sys/kernel/debug/zswap/written_back_pages:32420
/sys/kernel/debug/zswap/reject_compress_poor:67240
/sys/kernel/debug/zswap/reject_kmemcache_fail:0
/sys/kernel/debug/zswap/reject_alloc_fail:0
/sys/kernel/debug/zswap/reject_reclaim_fail:7
/sys/kernel/debug/zswap/pool_limit_hit:12045
You may also want to install compsize to observe your btrfs compression in action - you can see that I’ve got 8.8GB of data only using 5.6GB of disk. Not everything is compressible, but a lot of the common stuff going across the link will be compressed. It’s a big improvement.
pi@raspberrypi:~/compsize $ sudo ./compsize -x /
Processed 235209 files, 156121 regular extents (157169 refs), 112601 inline.
Type       Perc     Disk Usage   Uncompressed Referenced
TOTAL       63%      5.6G         8.8G         8.8G
none       100%      3.2G         3.2G         3.2G
zlib        42%      2.3G         5.5G         5.6G
Finally, I’ve done some iozone testing on the SD card (which I was running F2FS on) as well on the USB SSD.
Relevant lines from the USB SSD:
Command line used: ./iozone -e -I -a -s 100M -r 4k -r 512k -r 16M -i 0 -i 1 -i 2
Output is in kBytes/sec
                                                              random    random
              kB  reclen    write  rewrite    read    reread    read     write
          102400       4    10885    11722    11881    12764    11026     9815
          102400     512    26928    27430    26352    26657    26092    26775
          102400   16384    31640    31292    28698    30284    30063    31284
And from the SD card:
                                                              random    random
              kB  reclen    write  rewrite    read    reread    read     write
          102400       4     3061     3043     9279     9435     8722     3346
          102400     512    18953    19084    22630    22427    22594    14009
          102400   16384    19316    20004    22959    22923    22812    19043
What you’ll see here is that the 4k record write speed (so a lot of small file access) is literally 3x faster on the USB SSD across the board (from 3MB/s to 10MB/s). The large record speeds are 50% faster as well (20MB/s to 30MB/s). The random write performance is responsible for a lot of the gains, though.
What About the Raspberry Pi 3 B+?
Of course, between my developing these techniques and the blog post going live, Raspberry Pi released a new little board. It’s the Pi3 B+, and it’s a nice iteration on the Raspberry Pi 3 - 5GHz wireless, gigabit ethernet (limited to about 300Mbit, which is still 3x better than 100Mbit), and a fancy heat spreader and improved thermal behavior. It doesn’t include anything that would change what I’ve suggested here, but if you’re buying a new board, get the B+ board if you can find it. If you can’t, just get the normal Raspberry Pi 3 and don’t worry about the differences.
Is This Worth Doing?
So, with all the effort in, is this project worth it? Would I suggest it?
Absolutely! For less than $40 (if you need a heatsink, a USB enclosure, and the SSD), you can turn a Raspberry Pi 3 from something that can’t handle a modern browser very well to something that works (certainly slowly) with modern Google Apps, and a wide range of other sites that will lock up the normal Pi configuration. Plus, there’s no worry now about minimizing filesystem write. I’m not going to write enough data even with a lot of solar logging to destroy a decent SSD designed for desktop style loads.
It’s complicated, but I’d wholeheartedly suggest trying this out with your Pi. It makes it a much, much more usable system!
Let me know in the comments if you’ve found other tips to help Raspberry Pi performance, or if you’ve tried this out and have feedback!
Comments
Comments are handled on my Discourse forum - you'll need to create an account there to post comments.If you've found this post useful, insightful, or informative, why not support me on Ko-fi? And if you'd like to be notified of new posts (I post every two weeks), you can follow my blog via email! Of course, if you like RSS, I support that too.


