
I wasn’t planning to take apart a Roomba today, but when your kid greets you in the morning with, “Are we going to take apart mommy’s vacuum robot today?” it’s hard to say no. So, I spent part of my day taking apart, documenting, and reassembling a Roomba i7 - the newest generation of the Roomba line, with persistent house maps, a far quieter blower, and quite the surprise waiting inside for the determined explorer!

I like taking things apart - or, at least, seeing them apart. I couldn’t find a good Roomba i7 teardown on the internet, so I made my own. The thing has been out for months already! Join me for a trip inside the Roomba i7!
The Roomba i7
If you’re entirely unfamiliar with the concept of a Roomba, they’re a little robot vacuum cleaner that rolls around your house and vacuums the floors while doing so. The early versions used a “bump and run” algorithm (literally, go straight until you hit something, then go some other direction), with more recent versions getting progressively smarter. The i7 is the latest version, and it’s pretty smart indeed. The upward firing camera allows it to identify landmarks for navigation, and it builds and refines maps of your floorplan as it cleans. This allows you to request it do things like “Clean the living room,” or “Clean the master bedroom.” There’s the normal Alexa/Google Home integration I don’t use, and, as always, an app that lets you see the status, notifies you when it gets stuck, and allows you to tell it to go clean while you’re away (because operating your home while you’re away from home is… something important, it seems). You can schedule cleaning, and it does lots of other interesting things.

This particular Roomba showed up in our house as a Christmas gift for my wife. With two kids, vacuuming tends to fall behind, and we live in an area with a lot of dust and grit. The hope is that this will cover most of our vacuuming needs, and help keep the grit down. So far, it’s doing a very nice job of that. And, yes, I did ask before taking her Roomba apart.
Despite sharing many features, the i7 is actually a substantial redesign from the 980. Things are entirely different in many areas, from what I can tell (I don’t actually have a 980, so I’m going based on a bit of reading about it).
There are endless reviews of this unit on the internet already (mostly around the i7+, which adds a self-emptying base station - I don’t have that), so if you’re looking for a general review, go read those - they mostly say the same things as each other, so pick a few and go on your way.
But - if you want to see what’s actually inside? This post isn’t a review - it’s a teardown. And that’s something totally different, but far more awesome!
The Underside
Flipping Rosie (if you’re not old enough to remember the Jetsons, go ask your parents) over, all the vacuuming bits are on display. We’ve used this unit quite a bit in the last few days, so don’t expect factory-clean in this teardown. The top left contains the side brush. It spins clockwise (from this angle) to sweep debris out from against walls and in corners so the main sucker bits can get at it. The two green rollers in the center are the extractors, which get dirt into the main vacuum stream and beat up the carpet while they’re at it. At the bottom, a large canister collects the dirt. Two powered rubber wheels provide propulsion, and a freely castering nosewheel at the top holds the front off the ground.

One might expect a large flat disc like this to get stuck on all sorts of things, but it really doesn’t - and a lot of that is due to the utterly insane suspension travel. My daughter is helping demonstrate just how far the wheels travel on their springs - it’s very, very difficult to high center a Roomba. As long as nothing gets wrapped up in the wheels, it should be able to work free of any obstacles.
A Roomba still can’t handle stairs, though. To prevent falling down a flight of stairs, there are cliff sensors around the perimeter (you can see two behind the main wheels, two in front, and two on either side of the nosewheel). In earlier versions, these also tended to prevent a Roomba from cleaning a black carpet, but supposedly that’s fixed in the i7 (I don’t have any black carpet, so I haven’t had a chance to test).

The cliff sensors, like most of the other sensors on the Roomba, are IR sensors - they have an infrared emitter, a receiver, and look for the bounce. The i7 also has this weird little brush towards the rear. I’ve seen a bit of speculation about what it could be, so I’ll clear it up - it’s a static discharge brush. The brush is wired to a terminal marked ESD1 - ElectroStatic Discharge. It’s just a ground to help prevent building up too much static charge. Electronics tend to not like that sort of thing.

Another sensor on the bottom is called a floor sensor. I can’t find details on what it does, beyond collect quite a bit of dust and require cleaning. I think it’s a camera of some sort to tell the difference between carpet, wood, tile, etc, and if I had to guess, I’d say it were probably infrared like the rest of the sensors. Anyone know details here?

Finally, at the front, a pair of large charging contacts charge the Roomba when it drives onto the charging base. A Roomba docking is surprisingly cute to watch. The i7 beelines to near the charging station (the station has an IR emitter, though I don’t know how far out it’s used), swings wide to get in front of the station, wiggles back and forth a few times to line up, and then slowly creeps towards the station with a slight serpentine path until it docks and starts charging. Our house is large enough (or dirty enough - not sure which) that a single charge won’t cover the full area, so I get to watch Rosie dock quite a bit. It’s seriously cute!

Zooming in on the extractors, they’re two different textures, and they don’t quite mesh - but they come very close. You’d have to ask a Roomba engineer for details on how they work, but they seem to do a very good job of getting stuff off a variety of surfaces. The guide teeth on the front presumably serve to let the vacuum head drift to the proper height, and I have no idea why the raised lip on the back only extends across half the width.

The Dustbin
Press the big button on the back of the Roomba, and the dust bin pops out. Unlike earlier units, the blower motor is in the chassis, not the dust bin. This means you can clean the dust bin out in the sink (once you remove the filter). Icons on the top indicate that you shouldn’t get the filter wet, but the rest is water-safe. Cleaning it out in the sink every now and then is a good idea, because dust lurks in all sorts of weird places in here, and the static buildup is impressive.
The button on the left pops the front door open so you can empty the dust more easily (of course, if you have the i7+, it self-empties).

If you look carefully, you’ll see a 45 degree angled bit of plastic in the center. This is part of the “bin full sensor” system - clean this every time you empty the bin or you’ll confuse the robot.

The other half of that system is on the Roomba - look for the two black bars on either side of the vacuum opening. Clean those off as well. I assume they’re also infrared emitters, and that the plastic prism bounces the signal across the opening. When too much stuff builds up, the signal is blocked, and the robot decides the bin is full. You can select the behavior at this point - either stop and wait to be cleaned out, or keep cleaning (useful for things like fluffy pet hair that can just keep packing in). The i7+ will head back to the base and suck all the stuff out, if you’ve opted to spend the extra on that particular setup, though I don’t believe it can clean the sensors.
The big opening on the right is for the blower motor, and the two circles on the bottom are also useful - but I’ll cover those later.
See anything else weird in here?

Inside the dust bin, a wire mesh filter stops most of the larger dirt, while allowing plenty of airflow to the paper filter.

One of the consumables on a Roomba is the paper filter. It tucks into the end of the dust bin and is just like the filter in a normal vacuum. Some places say it’s a HEPA filter, some say “high efficiency” - I’m not sure what sort of filter it actually is, but it does a perfectly good job of filtering out dust. When you empty the bin, tap this (dirty side down!) in the trash can a few times to knock off the debris. You could hit it with an air hose from the clean side to knock more gunk out every now and then, if you were inclined to avoid replacing it as often. I’m not sure what the service life is - I suppose I’ll find out when the robot stops sucking up as much dirt.

The Extractors
In addition to cleaning the dust bin out when full, you should clean off the extractors. Pop a little green lever and they come out. I’ve found that hair gets shoved over to the sides and wound around the ends instead of being sucked into the bin - so I have to clean these every time I’ve got the dust bin out. Rinsing them off every so often isn’t a bad idea either.

The drive ends are keyed - you can’t put them into the wrong spot. The lighter green roller, on the left, has some open cell foam filling it to help it keep shape. The dark green roller doesn’t. You can find videos of how this works, conceptually, but it does a good job and the hair is easy to clean out.

The other end contains the pivots, made of a metal pin with some plastic springs that ride against it. I expect these will wear out eventually and be cause for replacing the extractors (in addition to the splines wearing down).

In case you’re concerned about which way they go back in, don’t worry - there’s a handy guide printed on the bottom. Hexagon goes in hexagon, square goes in square. No problem at all! I’ve not figured out what the gold disc in the center is, but it’s somehow related to the cleaning system. Brush it off every now and then.

While not immediately obvious when upside down, the whole vacuum assembly can swing out about half an inch - it’s suspended on some levers. This allows it to better follow the floor, and I assume the unit drops down when on a hard surface, and rides up when on carpet.

Removing the Bumper/Visor
The whole front half of the Roomba is the bumper/visor. Based on the i7’s ability to detect that it’s nearing a wall or object (it slows down before hitting), I’m willing to bet that the black chunk of “infrared transparent plastic” looking stuff is, in fact, infrared transparent plastic. The sensor gizmo up front is an omnidirectional sensor, and I suspect it’s used to detect both the docking station and the “laser walls” - there’s a portable emitter you can set up to block the Roomba from crossing a certain line, and an omnidirectional sensor like this would be perfect for not crossing such a line.

A large collection of screws on the bottom secures the main bulk of the bumper to the bottom slider. With those removed, the wiring for the upper sensor is the only thing holding the bumper on. This wiring is a bit tricky to sneak out, but it comes free, and the whole thing comes clear.

On the inside, you can see the “windows” for the IR sensors, as well as ribbing along the bottom where it will generally make contact with objects. It’s surprisingly strong, but it also takes all the impacts, so it has to be.

Free from the rest of the Roomba, the bumper with the little sensor up top looks like some sort of alien vessel from Star Trek. The sensor is the bridge, with the rest of it being “something sort of unique so you can tell it’s not friendly.”

Front Sensor Arc
Under the bumper, some metal springs keep it pushed forward unless impacting something. The two rubber circles appear to just be bump stops - I don’t think they’re sensors of any form. You can see the IR emitter and receiver pairs starting to arc around. They’re the little clear and black LED lumps sticking out, and there are a lot!

On each side, a physical sensor detects if the bumper is being pushed back. They’re quite sensitive, and don’t have any audible or tactile click as they cycle. Further investigation of those would be interesting, but starts to cross into “I promised that I’d have a working robot at the end of this…” limits.
Given how much dust has already built up under here, I might consider taking the bumper off and using some canned air every 6 months or so - the emitters are going to tolerate an awful lot, but eventually they’ll get totally covered with dust and the Roomba will “go blind.” If you see yours crashing into things at full speed instead of slowing down, try cleaning out under here.

Facing straight forward, a board contains what appear to be more IR hardware. I suspect these are sensors for docking, based on how it wiggles for docking. The jack for the omnidirectional sensor is also on this board.

Is it Solar?
My daughter has a very healthy obsession with solar panels right now - and so we’ve had conversations about what is and isn’t solar powered. She’s asking me if the grey part is a solar panel to power it. Sadly, Roombas are not (directly) solar powered… though ours will be an awful lot more solar powered midway through next year!

Removing the Bottom Plate
To remove the bottom plate, the spinner brush has to come off - you can’t get the plate off otherwise. This is a single screw, and pulling a bit harder than I expected. A hexagonal shaft transmits the rotational energy from a motor to the sweeper.

Remove the five obvious screws, wiggle a bit, and the lower plate pulls off!

With the lower plate off, the bottom lip of the bumper is free to come off. It simply slides back and forth, held in place between the main chassis and the bottom cover.
My, what a big battery compartment you have…

With the bottom plate off, everything you might commonly need to replace is visible. The drive motors come out easily, the battery is simply clipped in, and even the vacuum assembly comes out - this unit is built to be maintained and repaired, which I love to see!
Seriously, though. Look at how small that battery is in the very large compartment!

The Battery
Looking at the battery, it’s rated as a 14.4V/1800mAh battery (26 watt-hours). If you look a bit to the right of the 26Wh marking, you’ll see 16.8V.
What this means is that this is a 4S lithium pack - 4 cells in series. The fully charged voltage is 4.2V/cell (16.8V / 4 = 4.2V), with a nominal 3.6V charge. The “4INR” prefix of the name is a good clue as well (INR is one particular set of lithium ion chemistries). I’d wager there are a set of 4 18650s in here. The 1800mAh rating, in 2018, means there are some serious power cells in there, though the contacts don’t seem like they support an awful lot of power.

Flipping the battery over, there are 5 contacts on the bottom. One is clearly pack negative, one is pack positive, and I’d wager the others are just the cell voltages, brought out for monitoring and balancing by the robot chassis. However, again, in the interests of not possibly damaging something I can’t yet get replacements for, I didn’t go about poking at the terminals. Sorry.

The terminals just mate with a set of contacts at the bottom of the ginormous battery compartment.

Really, though, I’m a bit disappointed by this battery. I’d have expected higher capacity cells, at a minimum. The Roomba has a long enough runtime that it simply doesn’t need tool-pack grade power cells. You need something a bit more power-happy than laptop cells, but 2500mAh cells would still absolutely meet the requirements and pack a good bit more runtime in. Or put a larger pack in. This is not a cheap robot, but this is a cheap battery pack. The runtime is decent, but it can’t finish a 2000 sq ft single level house without recharging.
With the giant battery enclosure for such a tiny battery, I expect iRobot to release some high capacity packs for the i7 at some point. You can buy either a 1800mAh or 3300mAh pack for the 900 series robots, so I’d expect a 3000+mAh upgrade for the i7s at some point when the initial sales drop off and they need another wave of press coverage. Hey, iRobot? Ship me an extended capacity beta pack and I promise I’ll say nice things about it!
If anyone finds themselves with a dead i7 battery pack, please, ship it my way for further analysis and hacking…
Front Wheel Caster
The front wheel caster just pulls out, and the wheel pushes out. It spins on a shaft, and will probably wear out at some point as well, though it’s not a highly stressed component. I’ve seen some modifications that cut a groove in the wheel and put a rubber O-ring in for reducing the chances of scuffing a wood floor, but the wheel is soft enough that I’m not too worried about it on our laminate (also, two kids are far harder on it than a Roomba).

Wheel Modules
Remove two screws, and a wheel module pulls out. These are apparently almost, but not completely, identical to the previous generations. It’s a motor, a geartrain, and a suspension spring. If you feel the need to open the wheels up further, they come apart completely for cleaning or replacement of parts, if you can find the gears.

The wheel drop switch board, at least, dates back to 2007!

I really, really like that they’re using good connectors for these units. This connection is similar to a PCI-E connector, and they’re certainly reliable for the long term. It’s harder to screw up than a normal plug connector, and it “just works” - when the wheel assembly is in place, the connector is seated. These units are made to be repaired, and it shows.

Extractor and Blower Assembly
To my surprise, the whole roller and blower assembly comes out as a unit as well! The blower motor is in the lower right, and on the left is the dustbin release mechanism (a collection of levers and pivots).

Flipping the assembly over, you can see the connectors on the right, and a surprisingly large motor for the extractors on the left. I didn’t continue disassembling the module, but it seems like you could continue pulling things apart, if you had a replacement gearbox. The whole thing is held together with screws, which means you can work on it fairly easily.

Three connectors, three motors. The left connector is for the vacuum motor, the center connection is helpfully labeled “bin sensor,” and the right connector, which isn’t labeled, should run the extractor motor. It looks almost like a prototype connector to me.
These connections are hand soldered. You can see the lower left wire on the right hand connector showing signs of having gotten a bit hot - the insulation is melted and pulling back. But, practically, there’s no way to have a robot do this sort of soldering.

The blower motor looks an awful lot like a fan motor, or an old floppy drive motor. It’s just a brushless DC motor of some variety, and doesn’t look that bad to replace (again, assuming you can get the parts).

I’ve seen some speculation about the i7 and where the blower exhausts the air. It literally just blasts it into the chassis. The blower motor is surprisingly quiet, but there’s no fancy muffler or anything. Just chassis cooling.

Almost everything is out from the underside, and it’s looking pretty empty in here.

Sweeper Brush Motor
There’s still one more part to come out, though - the sweeper brush motor! It comes out easily, and looks similar to the 800/900 series motors, if you need a replacement.

The board looks like a 2006 revision, so I expect that hasn’t changed much over the years. I’m a bit confused by the empty capacitor pads…

Power comes from a pair of springs at the bottom of the opening. It doesn’t strike me as a great way to carry power, but this motor can’t really draw that much with how easily it stalls.

At this point, I had a decision to make. I’d gone into the “user replaceable parts” of the i7, but I hadn’t gone deeper into the actual processing guts. Should I quit now, or keep going?
Actually, this wasn’t a decision. I take stuff apart regularly. On we go - into Rosie’s brains!
Removing the Handle
There’s a nice handle at the front of the robot, and I didn’t even realize it was a handle until I was taking it apart. Remove the screws holding it in, push the handle back, grab the now-exposed tabs, and pull forward. The whole thing comes out.

The lower tabs here fit into some grooves in the case. To reinstall the handle, hold both of these tabs with the front edge facing up, push the handle back in place, then let the tabs rock down and screw them in. You have to get both at the same time or it won’t sit right. It sounds trickier than it is.

Removing the Top Case
At this point, I half expected the robot to start complaining about me removing parts - and if it did audibly protest, I would have happily called it quits. However, with the battery removed, I didn’t hear any complaining.
Removing the top skin took some time to figure out - I didn’t want to snap anything. It turns out, the holes above the dust bin are there for a reason. Push on them, fairly forcibly, and the rear of the top skin pops off. There are four large clips holding the skin in place - two in the rear, two up by the handle. I considered using a spudger to pop them open, but it didn’t seem to be needed.

The whole skin just comes totally off. At some point, if you wanted to replace this with some other color, you likely could, though I’d just buy a vinyl wrap instead.

Well, hello there to you too! The capacitive buttons are handled by coiled springs that press up against the bottom of the plastic shell. It’s not a style I’ve seen anywhere - I expected some wires connecting to an interface plate. Neat! The LED ring is visible around the outside of the center button.

With the skin off, a bunch of screws are exposed. Remove them, and the rest of the top case comes off - exposing the brains of the operation!

The Brains: Central Control
With the top case off, the main board is exposed for our inspection! There’s a large processor chip in the top left, what looks like a wireless module at the bottom, the upward firing camera, and, in the lower right, a cat waving while holding a lint roller.

I’m not kidding. I’m used to finding the occasional bit of circuit board art on things, and hidden art was a major thing in old computers, but… this? This is, near as I can make out, a cat holding a lint roller. It gets even weirder - but, first, the brains.

The largest chip on the board is a STM32F303VET6 - a 72MHz, 32-bit ARM chip. This is likely the main CPU, handling the bulk of the operation, but there are plenty of additional little STM32F chips scattered around the board.

ST’s STM32 is a whole line of microcontrollers based around the ARM architecture, with various capabilities (storage, RAM, IO, etc) based on the needs of the designer. I’m assuming the sub-microcontrollers handle various things like motor drive synchronization, freeing the main CPU to pay attention to high level details.

What’s this? It’s a PCB, IR CARRIER. Printed Circuit board, infrared carrier. This interfaces some of the front sensors used for docking. Really, the whole robot is just a mass of IR emitters and sensors. I tried to get some video of them, but they’re not the near-IR stuff that cameras can capture.

Just in case there’s any speculation about reusing the 980 design, the i7 has a brand new board. Copyright 2018, iRobot. Rev J.

This is a nicely designed board. Everything is labeled, and even if they can’t fit the labels by the parts, they have a remote legend - you can see the blowup of the resistor array near yet another little chip. Routing isn’t too bad either - it’s a good looking board, with plenty of nice fat current carrying traces.

Here’s that ESD1 connection. The wire heads straight down to that little brush on the bottom.

My only real complaint with this board is that it’s held in with melted plastic mushrooms instead of screws. The board is set on posts which are then melted and mushroomed. It’s a good way of holding a board in, but it means you can’t replace just the mainboard. The entire core chassis and mainboard are bonded together, making them (effectively) a single unit. It’s not a major complaint, given how repairable the rest of the unit is, but it’s a bit frustrating to see this on high dollar units. A couple screws would have let you swap out a board instead of throwing out the whole chassis if something up here fails.

Wireless and Camera Board
Behind the main board, there’s a wireless and camera board. The metal shrouds are commonly found on high frequency gizmos, and this unit supports both 2.4GHz and 5GHz wireless, as well as Bluetooth. Interestingly, this board does have a heatsink - the large metal piece across the top has a piece of thermal tape under it, so it’s serving to cool the wireless engines. You can see what looks like a typical wireless antenna cable heading off to the bottom, with an unused antenna port above it. Plus, perhaps, a PCB antenna under the sticker to the left.
Actually, wireless modules don’t take nearly this much cooling. I’ll guess there’s another processor on that module that does something important, but I don’t know what it is, and I don’t care to dive quite that deeply into my wife’s Roomba (removing the RF shields is easy - reinstalling them properly is hard).

Along the bottom of the Roomba, there’s a PCB wireless antenna. This serves to handle wireless and bluetooth. I consider these a black art - some traces on PCB make a perfectly good antenna, and they have all sorts of interesting shapes to them.

Actually… How About a Quad Core ARM A7?
Just because I’m not going to pull the module all the way apart doesn’t mean I can’t pull on some strings and find people who have…
vic7767 over on RobotReviews has pulled the module up, and discovered it’s a Trident AXC Y1.

From there, I can start poking around the FCC database and end up with internal photos - which show us it has a Qualcomm APQ8009. Quad core ARM Cortex A7, 1.3GHz, 32-bit. The Kingston chip is likely DRAM, though I have no idea how much. I can’t identify the other chips, though one may be camera related.
And look at that cat… the same cat, just with a trident and fish. This is a Trident module - cute!

The Mystery Cat Module
Finally, we’re back to the cat. The cat is not just artwork. The cat is on top of what appears to be a very deliberately molded module holder - complete with a rubber plug in the end.
You don’t just randomly put rubber plugs in consumer electronics for no reason…

On the left, an opening protected by a rubber plug. On the right, a set of keyed connectors (the bottom part is longer than the top part, so you can’t connect a keyed connector upside down). In the center, a plastic holder with some vent openings.
What goes here? Who is this cat? Why is it holding a lint roller? I have no idea! But it’s sure interesting! What sort of expansion could go in here? Why do I think it’s for an expansion card instead of just manufacturer debug or something?

Because it’s user accessible! The port has a dust cover to keep dust out - because you can get to it through the dust bin compartment! It’s basically invisible unless you’re deliberately looking for it, and I didn’t notice it until I was mentally playing with things and realized that the port should be accessible from the rear of the unit - and here it is!

So, yes. There’s an expansion port in the i7, user accessible from the dust bin area, with a waving cat holding a lint roller. Today you learned. Anyone want to let me know what it’s for?

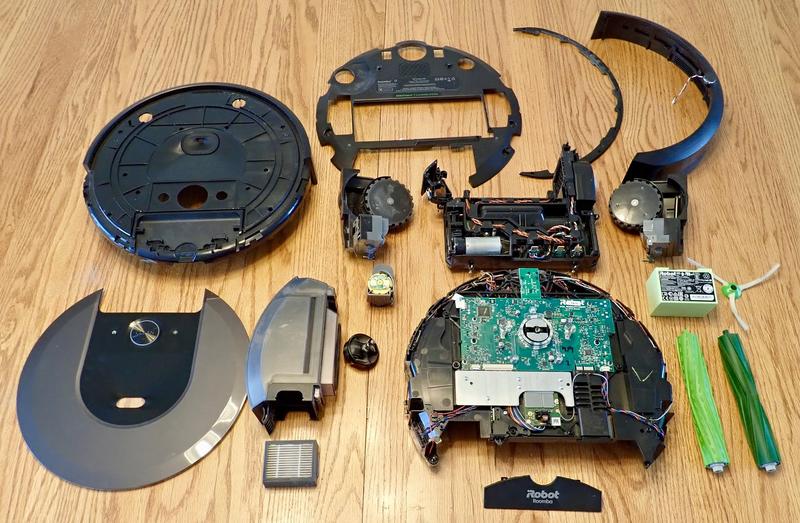
The Whole Robot
That’s everything! The whole thing comes apart very easily to this point (if you’re used to taking stuff apart), and it’s all screws except for the top case skin. Enjoy!
Final Thoughts
This was a total joy to take apart compared to the normal Chinese stuff I take apart. Modular, designed to be easily repaired (once parts are available), and mostly screwed together, with a few mysteries inside as well!
It’s a well designed unit, and other than the mainboard mounting, I don’t see anything I’d do differently (well, OK, fill the battery box - but that’s probably coming soon). I have no idea if we’ll actually see a larger battery or any sort of expansion module, but the capability is there.
I’m hoping most of the various issues Roombas have had over the years are fixed in the newest generation - things like dirt getting into gearboxes and jamming up bearings shouldn’t be a problem. I’ll certainly find out over time.
But, for now? I’m just going to let Rosie work on the grit.
If you found this useful, and are in the market for a Roomba, using my eBay links kicks me a bit of money without changing your cost any. There’s also a donate button on the right side if you find my content generally useful.
Should you buy an i7 instead of a cheaper unit? Probably not - they all do a decent enough job. For our use case (trying to keep grit down in the living room and dining room area), house maps seemed like a useful feature. I’ll certainly report back in a few months with how things actually work!
Oh, and, to answer a common question: Yes, it’s back together. No, it wasn’t hard. I’ve worked on Powerbook G4s - this is simple in comparison!
Comments
Comments are handled on my Discourse forum - you'll need to create an account there to post comments.If you've found this post useful, insightful, or informative, why not support me on Ko-fi? And if you'd like to be notified of new posts (I post every two weeks), you can follow my blog via email! Of course, if you like RSS, I support that too.


