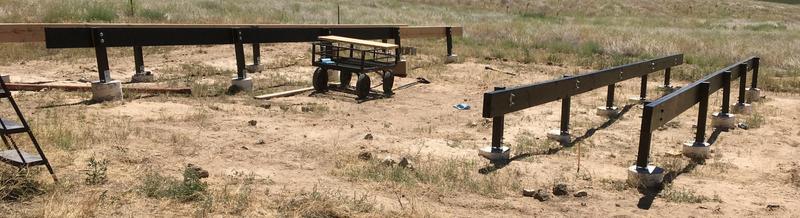

With the concrete footings for the main house frames poured, I set about doing something useful with them - like putting uprights and side rails on! These are the foundation for the A-frames which I’ve been working on for a while.

It seems I didn’t actually take a picture of them when fully painted before I started installing the As, but you get the idea.
Time to go up!
Measuring: Use String!
On my office frames, I had only 4 uprights - and I knew the concrete footings were level, side to side. I just cut four to the same length, put them in, and called it good.
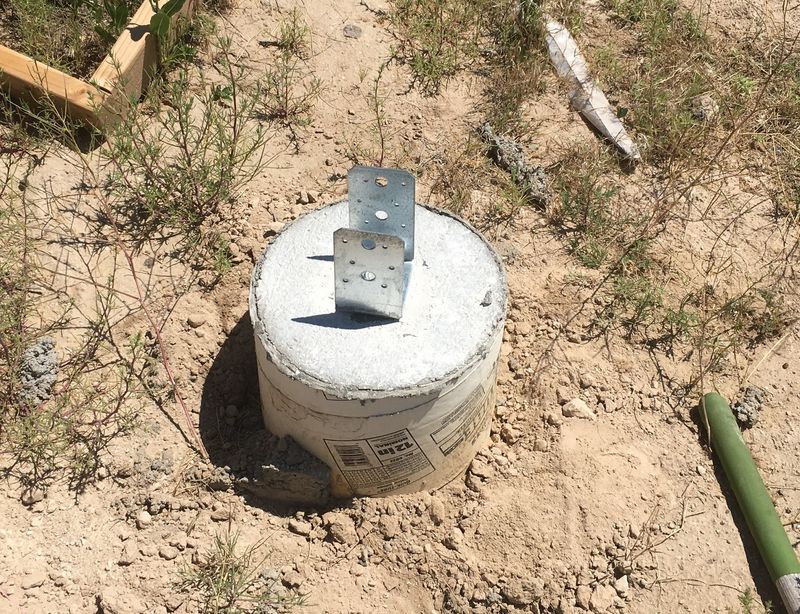
For the house arrays, I’ve got 5 concrete bases per side. They’re level side to side, but due to the nature of my terrain, they’re certainly not exactly in line, vertically.
How to solve this? Corners and string. I measured out the posts for the corners (24” high), bored, painted, and installed them. Then, I stretched a string between them to give me a straight line (it has to be quite tight so it doesn’t sag in the middle).

Measure the distance between the base and the line, and store the data for further use in calculating the midpoint heights!
Despite some illusions of the ground leading me to believe some would be shorter, they all turned out to be the same length or a bit longer than the corners. Uprights ranged from 24” to 28” - oddly more consistent than I’d expected, based on a visual inspection of the terrain.

Boring the Uprights
My office build made very clear that I cannot, for the life of me, freehand a level/straight hole in uprights. Instead of just boring the holes for the base, I also bored the holes that connect to the side rails. Once those are straight, it’s a lot easier to extend a straight hole than to start one!
How do I bore straight holes? If you guessed “Up the hill” and “A 100% functional piece of equipment far older than I am,” you’d be right! I’m not entirely sure when this drill dates from, but it’s mounted on a perfectly good drill press stand, and bores nice straight holes.

Step 1: Mark the holes for the base. I’m using the spacers here, even though they’re not going to be present in the finished install (it’s dry here, I need to adjust stuff after installation for alignment, there are massive bolts going through the sides, it’s fine). Mark the holes, bore them. These are 1/2” holes for mounting.

Then, at the other end, bore the 5/8 holes for the main side rail bolts. I picked, for no reason beyond “halfway even and gives me some wiggle room,” 3” and 6” down from the top. The side boards are 2x10s, so 9” high or so. Ideally, the holes will be equally spaced. Realistically, they’ll be close.

How did you spend your 4th of July? I spent a chunk of mine listening to good music on my truck stereo and painting uprights. Not like there was much else going on this year for the 4th…

After, again, consulting the diagram I’d made of what goes where, I mounted the uprights in the footings and made what is, by far, the weirdest crop (or flock of birds) I’ve seen in my life.

This, meanwhile, is a less-weird bird.

Ground Rods
Before doing too much construction, I drove the ground rods, which suck to drive, get stuck on rocks, and are generally not enjoyable at all to deal with. I wish I had some great trick to driving grounding rods, but I don’t. Beat on them with a sledgehammer until they’re buried or stop moving.
I will say that having a helper hold the rod improves the time required to drive them - it stops it swinging wildly around. Said helper is ideally very trusting…
This particular ground rod ate a pair of my pants when I failed to remember it was back there.

I’ve got two ground rods per A-frame, and while they’re not entirely buried, they’re mostly in. A conversation with the inspector indicated that they did need to be below the ground level, even if one had to bend the top, so I dug some holes and bent the remaining parts over. Will it meet the inspection criteria? I have no idea!
Grounding on solar is an interesting set of problems/recommendations. What seems to be the conclusion from a lot of reading is that you should have ground rods at each location, and that they all should be bonded together. They serve to ground the panel frames for safety (possibly helping prevent Potential Induced Degradation), and one can use the ground for surge protectors - which can dump lightning induced voltages. You probably won’t take a direct strike, but good surge protectors can be the difference between the system surviving a near strike and the system getting fried.
I’ll use some 6AWG bare copper to bond the ground rods to the Iron Ridge rails - with something resembling overkill, because why not?
It doesn’t change the fact that driving ground rods sucks, though.
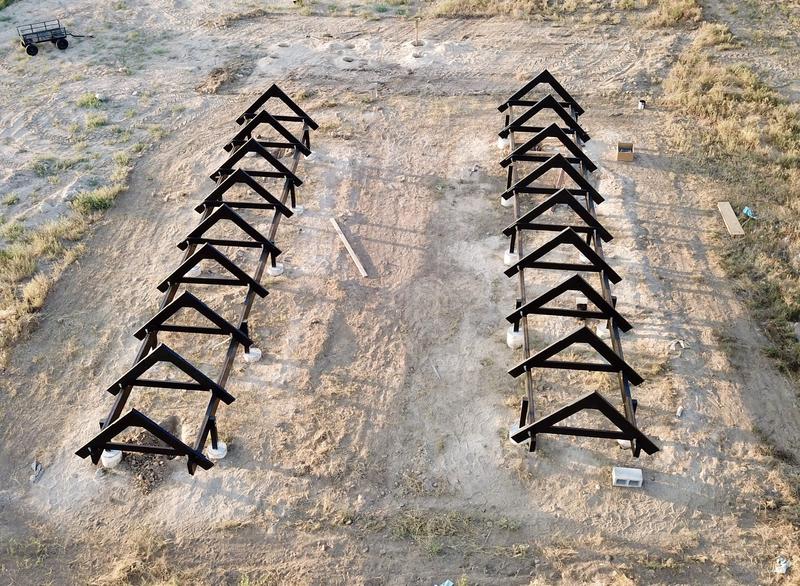
Building the Rails
The total frame length is about 40’. The side rails are 36’ long, which leaves me with slightly over 2’ of overhang on each end with the panel mounting rails. I don’t happen to have the budget to buy 36’ beams of lumber, so I constructed my own beams. Each side rail is a pair of 2x10s, glued and screwed together, staggered, and bolted into the uprights.
One side of it is 16’, 4’, 16’, and the other side is 12’, 12’, 12’. This worked out fairly well with my upright locations and wasn’t too brutal to work with, although I will mention that dead lifting the far end of a 36’ rail while trying to screw down a clamp just isn’t much fun. Total rail weight, per side, is about 250lb assembled.
This is one of those project parts where I don’t have a ton of photos, because I was busy actually working on it instead of taking pictures. I’m more productive when I don’t have my phone near me, so you may have to fill in some gaps with your imagination.
To start, I aligned the first two rails - a 16’ and 12’ segment, slathered them with glue, and clamped them together tightly. In addition to the glue, I’m using screws to hold the rails together, and I’ve gone through quite the collection of 2.5” screws in this project so far! That length gets you deep into both boards without coming out the other side even if your impact driver is a bit aggressive.

I considered assembling the beams on the ground (somewhere flat) and bringing them in, but I couldn’t convince myself this would be much of an improvement over just building them in place.
After clamping the rail in the right position, I bored a hole through it (buy a long auger bit for this sort of thing - it makes life way easier) and ran a bolt loosely through the upright to generally hold it in position. This serves as a pivot for later assembly and also keeps the beam upright.

The build process from there is simple: Get the next segment, add glue, clamp it firmly in place, add screws. You can see my large box of screws down in the lower left, and after putting all the A-frames up, it’s quite empty. There are a lot of screws in this frame.
I also made use of the uprights and clamped the beam to them at various points as needed, but this process, repeated over and over for all 6 pieces of wood that make up a single beam, just keeps going.

It’s impressive just how tightly you can squeeze wood together with the right collection of clamps!
There’s no specific spacing on the screws beyond “A few feet, what feels right.” It’s fairly consistent, but hardly measured. They serve to hold the wood together while the glue sets, and also to add some strength - the modern structural screws are pretty darn spiffy.

Finally, with everything built, I bored the rest of the holes and ran bolts through. These are 5/8” diameter, 8” bolts, and should be an awful lot of overkill.

Beams!

Check Your Plans…
I had a moment of panic when I tried to test-fit one of the As to the rail - it was massively too wide. By… like, the whole width of the 4x4 upright. Plus, I was pretty sure I didn’t design this contraption to need shims like on the second upright in…
And then I realized that I’d forgotten some of my uprights were “inside” uprights because of how the holes were bored. Like this end one.

When boring the holes, I’d carefully placed each hole marker with a post hole digger, and then took a rather non-precise Ford 9N to the holes, which ended up… well, somewhere. I then used the manual post hole digger and widened them in whatever direction was most convenient, instead of running the string again and figuring out what direction I should move them to best align with the desired location.
In any case, moving the end upright to the inside did what was required, and aligned things properly for the intended width.

While I was out there at one point, I found a rather green mantis. These things are good fun!

Paint: Get a 9” Roller
Finally, the last step in the rails: Paint. I did most of the initial paint with a smaller roller, and then got smart for the second coat and actually got a large one that would do the paint in a hurry.
My main problem with paint was actually wind. To keep the paint from blowing around, I had the paint tray and such in a box on the wagon (so I could move it) - and then the wind blew the whole box off the wagon. That’s a good clue to quit for a while before you become covered in paint.

Once the first coat was dry, I took the chance to caulk the top gap. There wasn’t that much, but, hey, may as well keep the little bit of water we get out. They’ll be covered by panels, but… caulk is cheap!

The second layer went on, and the whole setup looked something like this (except with all the rails actually painted).
At this point, the bottoms are still loose - the bolts aren’t fully tightened down. I’ll tighten them after I’ve got the As in place!
With the rails built, it’s time to install As - but that’s two weeks from now!
Comments
Comments are handled on my Discourse forum - you'll need to create an account there to post comments.If you've found this post useful, insightful, or informative, why not support me on Ko-fi? And if you'd like to be notified of new posts (I post every two weeks), you can follow my blog via email! Of course, if you like RSS, I support that too.

