
With lessons learned from my office panel A-frames, I set out to build the home solar A-frames - but with more process improvements to make things better!

A-Frames? Yup! A-Frames!
If you wonder why I’m building A-frames for solar, instead of doing what most people do and just pointing the panels south, it’s because I’m interested in post-net-metering solar - and that involves producing power when it’s useful - not when you can get the peak production from each panel.
I’ll go into a bit more detail on it in some design posts (which I ought to finish up, now that I’m actually building the thing…), but this layout will allow me to produce a good bit of power early in the morning and late into the evening - when power is actually used. It’s an anti-duck-curve approach to solar that ought to also work well if I ever find the need to run grid-down. This is the sort of stuff I’ve learned from my solar office over the years of using it - south facing panels just aren’t as useful as one might think. Ever wonder why utility scale panels track east-west, and aren’t typically aimed south? This is why. And, thus, I’m building A-frames!
Initial Work: Cutting the Segments
Like most of my property projects, this one starts with a run to the home improvement store and a truck full of lumber (along with plenty of other stuff on this run). Plywood, screws, glue… quite a selection of wonderful building materials. Yes, it’s a large truck. No, I don’t drive it around empty unless I’m heading into town to come back with a large load of materials (a handful of exceptions a year exist, and, no, owning yet another vehicle doesn’t improve the state of affairs).

For solar A-frames, if you’re considering this with 60 cell panels, you’ll want 5’ lengths of lumber. I’m using 2x8s, though one could probably manage with 2x6s and be fine for almost all values of “fine.”
One might expect a 2x8x10 to be an even 10’ - but they’re typically a hair longer. Not consistently so, though… Cut the boards down to 5’ lengths, and you’ll probably find some slivers on the end you shave off. On my boards, they range from almost a quarter inch down to “nothing but sawdust off the blade,” but not a single board was exactly 10’ by my measurement - and that was after taking the kerf width out in the center. Precision will help your long term sanity here!

With the boards cut to length, the next step is a halfway precise 45 degree cut for the top. Aim for a corner, and be consistent as you can, because, again, this will drive you nuts down the road if it’s not accurate.
When chopping off ends, consider which end is worse and remove that material. If there’s a funky knot, or a split, see if you can get rid of it in this step. Sometimes it’s not possible, but improve things as much as you can.

Here, tossing one of the waste triangles into the box was enough for it to split along a crack. Obviously, I wanted that crack as removed as possible!
A box of waste is great fun for kids! Stacking, sanding, making ramps… keep this stuff around! You can also make an endless selection of wooden door stops out of this sort of scrap, which might be useful if you need to prop doors open (say, at a school your church meets at).

Some years back, a friend convinced me that I was being silly insisting on doing all my work with a circular saw, and that I should buy a proper compound miter saw - and, turns out, he was 100% right. This has been well worth the money I spent in time savings, sanity savings, and in the safety benefits of not having to use a circular saw nearly as much. Circular saws do kind of scare me, and having known someone who had one kick back and rip his leg up, well, the less I use one, the happier I am. This one can still do plenty of damage, but it’s a bit more constrained in how it can do that damage, and if it hits something and kicks, it’s not going to send a saw blade flying into my leg. I hope…

A nice afternoon’s work and I had all the frame members cut to length and angle - but I’m not done yet!

One remaining use for a circular saw is ripping through plywood to make smaller pieces of wood. The core concept here is using plywood gussets glued to the top of the frames for strength, and that requires making plywood gussets. For these frames, 18” on a square side works very well. With a bit of waste, that works out to 20 triangles per 4x8 sheet. I used half inch outdoor plywood, though it’ll be painted before installation. Clamps are useful for cutting squares into triangles!

With a pile of gussets completed, it’s almost time to start assembling things!

Birdsmouth Cuts: Just Do It
There’s still a bit more cutting to be done for the birdsmouth cuts that allow the frames to sit on the side rails.
Do the research if you want, but what I’m building, to a remarkably good approximation, is a roof. It’s a simple A-frame roof, but it’s a roof - so I may as well use roof building techniques.
For my office A-frames, I assembled the frames and then cut the birdsmouth cuts - and this proved annoying. The frames weren’t exactly the same, so I had to measure and cut each one separately. Insights gained: If the bottom end of the frame is the critical distance, do that work first and key off that instead of the top. I sat down with a piece of paper, a calculator, and dredged some old trig out of my brain to work out the distances to mark. The flats here are 3” long - which matches the width of a pair of 2x lumber that I’ll be using for the frame rails. Everything being 45 degrees makes this really easy!

Another random tip: If you buy a speed square (which you should have for any sort of construction work), just drop the money on a metal one when you first buy one. The plastic-fiber sort seem nice, and they work for a while, but mine didn’t age well. Between sun and heat, after four years, mine didn’t take a piece of wood dropping on it - and that’s not the first time it’s cracked and I’ve repaired it. This time just did it in. Buy metal, buy it for life.

For cutting the actual joints, take a tip from Nike and Just Do It. I think I literally spent longer searching around the internet for how to do this quickly than it took me to do the work. A circular saw for the bulk of the marked cut (this is another small use of a circular saw, when the big saw won’t fit), then finish the cut with a reciprocating saw and wood blade. Simple, easy, and faster to do than to describe.

Jigs: Aligning the Bottom
The reality for these frames is that the exact angle at the top doesn’t matter - the spacing at the bottom does. If the side rails are parallel, then the spacing between them is identical. If all the frames match exactly (or nearly so), it should make the install a lot easier!
To accomplish this, I scrapped the jig I’d built previously (to hold the top at a 90 degree angle) and penciled out a concept for a jig to hold the bottom at the correct spacing. Key to the concept is being able to firmly clamp the frame parts in such that they are held in alignment. The triangular cuts out of the jig let me clamp the As such that the rails are pulled firmly into position.

Some playing around indicated that keeping things aligned front to back was also difficult, so I found some scrap plywood, cut a few pieces out, and screwed it to the jig. Now, everything is fully aligned at the base! Time to build them!

Building the As
With the jig built, the notches cut, and everything ready to go, time to build a bunch of As! My first few involved working out the techniques, and then it actually went rather quickly. I sanded the ends that were being glued, and sanded one of the sides of the gusset for the glue before assembly.
The main structural sides fit neatly into the jig, and the quick clamps did a good job of sliding them into position. The angles work such that as you tighten the clamp, the sides slip into the proper position easily. I’d been planning on waxing the jig if needed, but there was no reason to bother. After both were in position, I adjusted the top a bit, relaxed the clamps, and re-tightened them. I don’t think it made a difference, but it seemed useful to me. I frequently enough invent work for myself…

Flipping the A down, the next step is to drive a long 4” screw through the top, from side to side. This helps hold them together and prevents the peak from shifting during the rest of the assembly. I used one of the screw type clamps to align and hold the top tightly while driving the screw. Any misalignment of the lower part of the joint got forced into place with the clamps and screws.

Apply glue liberally to the wood. I’m using, as I normally use, TiteBond III. It’s a waterproof wood glue that works well in a wide range of conditions. You want it squeezing out - easier to clean it up than to deal with dry joints later. I wiggled the gusset around some to help spread the glue, clamped the point, and clamped the side.

Next, drive some deck screws through the gusset. I settled on 5 for each half, because it seemed to get good pressure around the gusset and squeeze some glue out. The 1 5/8” screws are perfect for this sort of thing - they go almost, but not all the way, through the 1.5” thick 2x8 after going through the plywood, and they won’t poke through even if you countersink them a bit.

Move the clamp over to the other half, put more screws in. Then flip the whole unit over and repeat on the other side.
Once both gussets are screwed in, they’re not going anywhere (even before the glue sets), so stack them for drying!

Test measurements across the base indicate that my jig works perfectly and the As are all quite consistent.
Done? Of course not. I need more lumber! You can see the wall that really set this solar project back, because it was going up during some time I’d been planning to hammer through solar builds. There was just too much bobcat and backhoe running around for me to be able to get much done - I’m not one to try and work near a bobcat, with a bucket of dirt, doing 10mph.

Painting… Oh the Painting
For the house system, I’m going with a bit of a blacked out theme. Why? Because I think it’s going to look properly awesome, that’s why! So, I picked up a couple gallons of a rather high end, very nice black paint, and set to work sanding and painting just about everything.
I also purchased a roller, because there is a lot of surface area to paint here. I also got some help!
Seriously, though, for something like this, get a 9” roller. The small ones are nice, but slow.

Once all 18 are painted and lined up along the shipping container to dry in the sun, there was a bit of a “… oh. Yeah, this is a big project!” moment. There are a lot of A-frames. This is one side done. Flip them over, paint the other side on another day, let them dry again.

Then, on yet another day, paint the undersides. I left the inside corners of the bottoms unpainted for them to sit on, and left the bottom of the peak dry so I could easily move them. I painted those, and since the sides were dry, I stacked them in a rather sketchy pile of As…

Next, the crossmembers had to be painted. The paint I’m using dries fairly quickly, so I was able to do both sides of these in one day.

Of course, this is just the primer coat. I’ll do a second coat once the frames are installed, because I can do both sides at once, and generally get things done somewhat faster then. Where two painted surfaces are facing each other and screwed together, I’m just not that worried about them - though I may run some beads of caulk along the joints for good measure.
Final Assembly
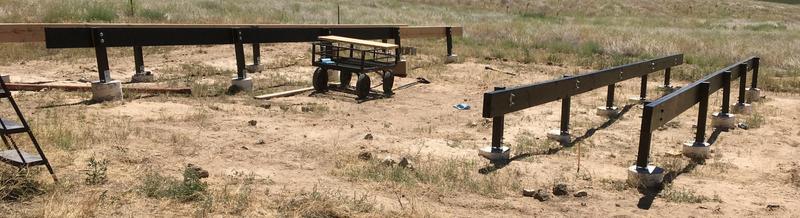
To finish: Mount the As to the side rails!
Simple, right? It did take some time… just like everything else on this project.
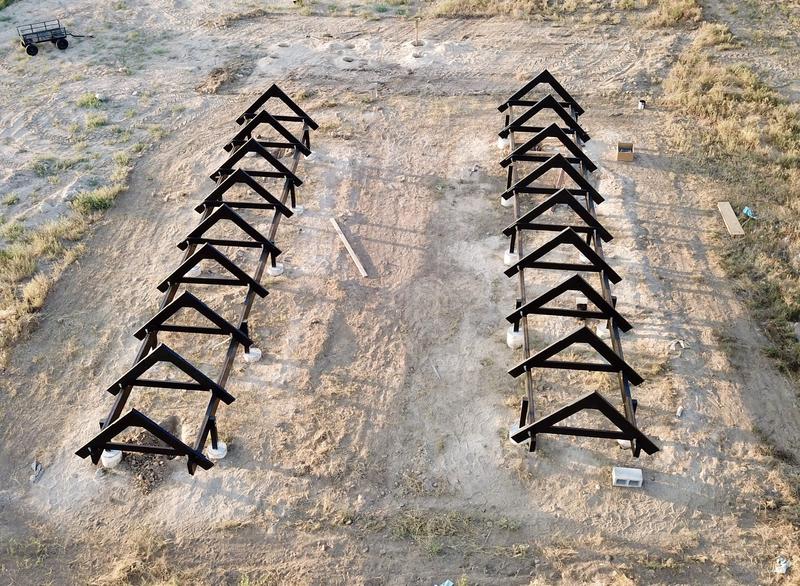
While it looks like these As are all different widths, I swear they’re all identical to the best of my ability. Each frame has 9 As on it, a bit over 4’ apart. This number of frames conveniently works out to put the ends on first, split the gap to locate the center, then split the remaining gaps and put the others on - A5 is halfway between A1 and A9, A3 is halfway between A1 and A5, etc.

Assembly involves putting the A into position, positioning the crossmember, adding a ton of clamps to hold everything straight, and then adding lots of screws - some for the rafter ties, some for holding the cross members to the As, and some just because. Lots of screws.
You can see the “90 degree twist” rafter tie I’m using down between the clamps. I’m using 4 of these per “A” - and while they have holes for 5 nails/screws, I’m only using 3, because the others are too close to really add much strength.

The other side also involved more of the same.
You can see a 2x4 I’m using to force the rails apart. Some of the points required a bit of a wedge to get at the proper separation. This works! Once the As are in place, I’ll tighten down the uprights and make sure everything is firmly held.

Do this a lot, and you get A-frames! Here, shooting from the west, you can see how the west facing panels will still be catching sun even when south facing panels would have long since quit. The sun is north of west, but I’ll still have one set of panels fully illuminated.

So, yes. A-frames. Ready to add rails and panels - once the trenching for wire is done. That’s a story for another post.
Comments
Comments are handled on my Discourse forum - you'll need to create an account there to post comments.If you've found this post useful, insightful, or informative, why not support me on Ko-fi? And if you'd like to be notified of new posts (I post every two weeks), you can follow my blog via email! Of course, if you like RSS, I support that too.

