
Like most of my projects, the theory of “Oh, I’ll just punch some holes in the ground!” for my home solar array met with an awful lot of “Well, that didn’t go as planned.”

But, punch I did, and I’ve got plenty of holes in the ground, filled with concrete, ready for the uprights!
Laying Out the Array
Before punching holes in the ground, it’s important to know where to put them - which requires laying out the general array shape. I did this in the same way I did for my office frames - with some bright orange marking rope that’s nearly invisible in the photos, of course. Look closely! I pounded some short lengths of rebar into the ground (I keep some halfway painted and pointed rebar around for this sort of thing), ran the marking rope, and worked out all the details. The lines run north and south, and I’ve got a base line at the south end that things are measured off.

With the lines laid out, I set about measuring for holes. Precision isn’t essential here - getting the holes generally in the right area beats getting everything exact, because the post hole auger isn’t exactly a precision tool. But, I took my manual digger and laid out the rough spots. These little divots serve well to align the screw on the tip of the tractor’s auger and more or less guide things in. In theory. Reality? Well, again, it’s not a precision task… this comes back to bite me later in a way I’m able to work around.

Let’s Go Digging!
Like most property projects, this one involves my tractor - a 1939 Ford 9N. It’s old, a bit clunky, but runs fine and gets the job done. Would a new tractor do the job better? Probably. Would a new tractor be worth the extra cost? Almost certainly not. I’ve gotten good at making my old tractor do what I need - and I don’t mind the time spent. These are property projects!
So, I hooked up the auger, set out to dig, and… the auger bounced off the dirt. I got a few inches down, and then the auger was done. This sometimes means rocks, but in this case, it meant something far more annoying - hardpan. If you’re not familiar, this is a layer of really, really hard dirt some distance below the surface. It’s typically impervious to water, shovels, and gravity-driven augers.

I spent a bit of time trying to figure out how to get through it. My tractor doesn’t have “down hydraulics” - I can’t force things down, which means I’m limited to the weight of the auger or what I can add. You’ll find people hanging on the auger system to add weight, but I have no interest in dying that way. Screwing around with PTO equipment is a good way to die - quite literally. Man vs tractor? No competition, you lose body parts (and then frequently die). If anyone, including me, is anywhere within a few feet of the auger, the tractor is shut down.
A brief survey of other local tractors I can borrow indicated that none of them had down hydraulics either. So… next option? Call the rental place and see what they’d suggest as a tool to deal with hardpan. A few ideas later, a run into town, and I brought back a new toy: The Bosch “Brute Turbo” electric breaker hammer. It’s a jackhammer you plug in, that demolishes your body and, with luck luck, some hardpan.
I used the chisel tip. One might be fine with the point tip as well, but I don’t think the big flat spade tip would be of any real use for this project.

Digging in Hardpan With a Jackhammer
The following section is almost certainly of no use to most people, but if you do find yourself dealing with an old tractor, an auger, and hardpan, you might find it most useful!
Mark the hole with a manual digger, line the tractor up, and start digging. If you’re really lucky, as I was a few times, you can just dig the hole all the way down. The tractor will load up, the auger will dig, you can pull it and clear it a few times, bury it, and be done. But, of course, if that happened regularly, I wouldn’t be using a jackhammer.
More likely, what will happen is that the auger will go down a few inches, then just start spinning freely. The engine revs up a bit if your governor is shot (as mine is - need to rebuild it), and it stops digging entirely.
At this point, congratulations, you’ve hit hardpan! If you’ve hit a rock, you’ll get some banging and clunking that indicates the auger is pounding a rock. Sometimes letting it spin will clear the rock out, sometimes not. But assuming there’s no rock, it’s time for pain!
Pull the auger out. Clear the hole as best you can with a manual post hole digger - you want all the loose dirt out. Then, bring the jackhammer over. As this tool gets substantially heavier throughout the day for mysterious reasons, you’ll probably start with a jaunty carry, and by the end of the day, sigh and drag it, with the chisel digging in the dirt like Eeyore’s tail.
If you put the jackhammer in the center of the hole and hit the trigger, it will begin jackhammering, drive straight down into the hardpan, and get properly stuck. You shouldn’t have done that! Usually, if you pull straight up, the hammer will “back pound” slightly and you can work the chisel free. But pulling up, hard, on a heavy, vibrating jackhammer? You’ll do that precisely once and then learn your lesson.
What works best, at least out here, is to drive the bit a few inches down in the center, then yank the hammer over - pry it loose sideways. This will break up the core. Then, go around the edges. Drive the hammer in at about a 45 degree angle, 8 or 10 places around the edge - you’ll be hammering into the edge of the hole. Go in for a few seconds, then let the weight of the hammer and a downward press (if needed) break up the dirt. Pull it out, repeat. You’ll eventually learn what it feels like when the hardpan is loose and you can go back to the auger. It might take a few passes depending on the thickness, but this technique should get you through.
When the auger’s back in, bring the revs up and it should eventually start cutting again - you’ll hear the change in the gearbox tone. If it doesn’t cut, well, go clear out more hardpan.
Eventually you should get through!
My aim for the holes was 24” deep. Some made it easily, some were a bit short. I’m fairly certain that for this project, a 22” deep hole won’t pull out of the ground. Some, of course, were closer to 28-30” by the time I got all the soft dirt out.
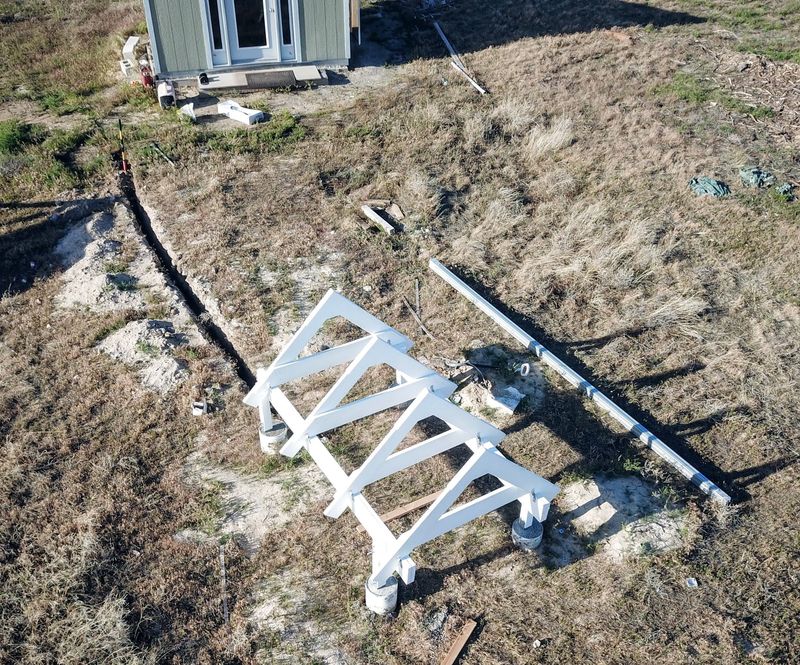
And you’ve got something that looks for all the world like a giant gopher went tearing through the yard.

A Giant, Geometric, Gopher. It looked more like gopher holes before a giant storm came through and blew an awful lot of the loose dirt back into the holes…
You can see the layout here - and the overkill. Twenty large concrete footings will anchor the mounts. Is it stronger than required? Certainly. Should it last 60 years? I sure hope so!

Fitting the Forms
Once the holes are mostly in place, the next step is to fit them out for the cardboard forms. These forms provide structure for the concrete, and also allow you to put the footings up above the ground level. In wet areas, this helps keep the posts from rotting. In dry areas, it… well, lets you level the sides, at least. The hill slopes to the south, and also isn’t quite level east to west. I don’t mind the south slope (it’s actually part of why I’m using this area - natural panel tilt!), but I want the panels level side to side, and it’s easier if the bases are level when you’re doing this.
The tube forms come in 4’ lengths, and while they have a certain “nominal diameter,” they actually have a few different diameters so they can nest for travel - like this! Which, if you’re cutting them down to a shorter length, is awfully convenient.

To cut quickly and easily: Clamp forms together at both ends. Mark the center. Cut with a saw of your choice. A small reciprocating saw works well, though a hand saw and circular saw would work too. I just don’t like using circular saws more than I absolutely have to…

The main problem is that the holes aren’t always exactly the right size (they tend a bit small with my 6” auger, which is perfect), and they’re not always quite straight up and down. Fortunately, it is far easier to scrape the sides down an existing hole than to dig one! Grab a manual post hole digger and enlarge to size. Remember how I said the forms were different sizes? You might keep this in mind and mark them, because the largest of them won’t fit in a hole tightly fit for the smallest.

After some chipping and scraping, they should more or less fit! If the hole bulges out at the bottom below the form, that’s perfectly fine - the concrete will fill in down there and it will help hold the whole plug down.

Pro tip: Before you dig out the holes to fit the forms, run your marking line again. This will avoid the awkward discovery that, no, you really haven’t lined a footing up with the intended line, and will have to get creative. Had I realized this during the “dig out the hole to fit the form” phase, I’d have made sure I removed dirt on the other side. I’ve worked it out, it’s fine, but if you’re doing this, make sure it’s aligned.

Borrow friends, pour concrete. Then buy more concrete, borrow more friends, pour more concrete. It’s far faster with two people, and it’s even more faster with three. Outdoors, windy day, it’s probably fine, right? This project has been massively impacted by Covid-19, and while I’m sick and tired of it, I’m still taking it seriously.

Around this time, some contractors showed up to build a retaining wall that I’ve been trying to get built since last fall. This involved a backhoe, a bobcat (skid-steer), and an awful lot of dirt moving past where I’d really rather have been working. As I’m not one to pick a fight with 10k lbs of machinery, things got delayed for a few weeks while our wall was built. Trump, how’s yours? Mine’s done!

Emplacing the Bolts
Next step? Putting bolts in! I learned, with my office installation, that pouring the bolts in place is quite a pain - so I decided to skip the whole mess and epoxy them in afterwards.
A quick trip to the rental place, and I had a small hammer drill, which made wonderfully short work of the concrete. I was able to place the holes where I wanted them.
Advice? Get your threaded rod before you bother drilling holes. I couldn’t find the lengths of galvanized threaded rod I wanted, so the holes were a bit deeper than required. Not only does this use more of the exceedingly expensive epoxy, but the bolts tend to sink in a bit as the epoxy is curing. It didn’t cause any major issues, but I’ve got a bit less bolt head poking out than I would prefer on some of the blocks.

It’s vital to clear out the holes after drilling, or the epoxy won’t bite properly. You’ll want a concrete hole brush and an extension for your air compressor.

One might… want to be careful clearing holes, if they’re full of water and concrete dust. Tossing 100psi casually down a wet hole leads to very interesting results.
I’m using some galvanized threaded rods - they should hold up to the outdoor environment pretty much forever, given how dry it is here. Though we do get at least some moisture, as made evident by the spare rebar that’s been sitting out…

The small tubes of concrete epoxy are really very interesting. They’ve got the two epoxy bits in the tube, with an inner and outer cylinder of them. They come out of the nozzle together, and are mixed along the spout before extending out into the hole. The spout is quite long, and comes in multiple pieces, so you can fill the holes from the bottom up and avoid air bubbles.

That little orange mixer is a really interesting bit of plastic - it just spirals the contents one way, then back the other, over and over until they’re mixed. I’ve never run into this style of mixing before, but it certainly works!
I didn’t use all the mixers that came with the tubes - changing tubes, I’d use the existing mixer to avoid having to fill a new one (10-15% of the epoxy is required just to fill this mixer). The spares? Insanely popular bath toys, for some reason!

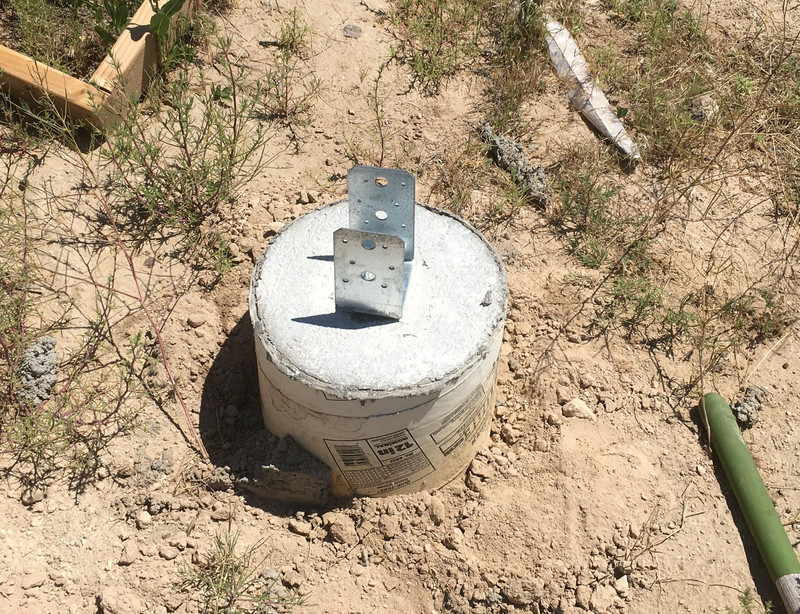
Ideally, your holes are drilled the right depth for your threaded rod, so you can just set the rod all the way in. If it’s not, make sure you measure with your mounting hardware. I left an extra thread or two exposed, though as noted, the stuff sank down in more than I’d expected.

Done right, you should have a tiny bit of squish out, and a threaded rod that will soon be very, very firmly embedded in concrete!

If your rods are very short, you might consider securing them in the proper location. I thought the epoxy was thick enough to keep them in place, and that wasn’t true - the rods sank in a bit. Not a big deal for the big A-frames, as they’re near enough to a ton each frame and dealing with lateral loads instead of lifting loads, but I’ll do it a bit differently for the south frame.
You can see how the white and black epoxy mix in the tube for a uniform grey by the end - it’s really a slick system!

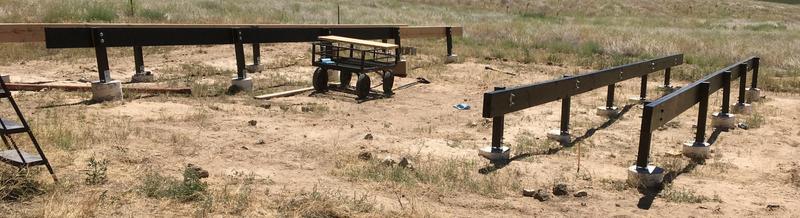
So: Concrete bases, with the post footings ready to go!
I’m making good progress on solar, so will continue steamrolling forward with both the builds and with posts about them until I’m either at a blocking point or have things done. The ARM stuff is interesting, but the reality is that basically all my free time right now is going to solar. If I have a stretch of bad weather, I might polish up some of those posts, but otherwise… solar it is.
I have a hard deadline of mid-December if I want to be grandfathered into net metering (I think net metering in the current form should go away, but I will happily take advantage of it if I can), and I just want this project done. It’s been far, far more work than I expected - and I’m quite the pessimist.
So, expect a few more weeks of solar!
Comments
Comments are handled on my Discourse forum - you'll need to create an account there to post comments.If you've found this post useful, insightful, or informative, why not support me on Ko-fi? And if you'd like to be notified of new posts (I post every two weeks), you can follow my blog via email! Of course, if you like RSS, I support that too.

