

This week is the first of a series of posts on my 1939 Ford 9N - a small utility tractor I use for property work and, importantly, snow removal in the winter. This tractor has a bit of history in the family, but hasn’t been well maintained to “winter plowing” standards - and definitely hasn’t been maintained to my preferred standards. It’s been more “Fix it when it breaks” instead of getting it into good shape and keeping it there - which was fine for the occasional light summer and fall use, but not with what I’m using it for now.

If you’re used to modern, disposable things (which, let’s be honest, is most of the stuff built today), old tractors are entirely different. They’re built to run forever with occasional rebuilds, done mostly by a farmer with a crescent wrench. My tractor is 75 years old now, and I fully expect it to outlive me. It’s a different kind of device, and I’ll try to explain it as I go, for those not familiar with oil bath cleaners, carburetors, sediment bowls, and the like - so keep on reading! If something isn’t clear, please let me know in the comments and I’ll try to explain better.
The 1939 Ford 9N
The Ford 9N is a lightweight tractor, originally designed to replace horses for smaller farms. It’s the first tractor with a rear PTO (power take off - a way to drive tillers and generators and the like) and a three point hitch (a standard way of mounting implements to the rear). It has a 2.0L (122ci) motor making a whopping 23hp (maybe a bit less now), fed through an updraft carburetor, with early point and coil ignition. It’s nothing fancy, but it’s good enough for light property work and plowing a driveway in the winter (until it refuses to start - which is part of why I’m working on this project).

From the factory, the tractor weighs about 2400lb - so very light, as far as tractors go. It has a three speed unsynchronized transmission, and hydraulics on the rear to lift and lower the three point hitch. It has a throttle (really an RPM control - the governor controls the throttle to maintain the requested RPM), a clutch, left and right wheel brakes, a steering wheel, an ignition switch, a choke lever, and the three point controls. That’s about it! There’s not much in the way of fancy features, and it’s most definitely not self driving and GPS guided.
History of My 9N
But, this is my tractor now. And I spent most of last winter working with it - which gave me a solid understanding of what works, what doesn’t, and what this tractor is capable of in snow (a good bit less than I’d prefer, really).
This tractor has been rattling around the family for a while. We live near family, and if I understand properly, this tractor originally found its way into the extended family in exchange for a rifle. One family member owned it, but it’s been living at my inlaws place for quite a while - and I’ve got, by far, the most hours on it in the last year. The problem with an arrangement like this is that maintenance is done on an “as it fails” basis - if it’s everyone’s tractor, it’s nobody’s tractor, and it was maintained to the level needed for a summer utility tractor and a light snow removal tractor, but some trips to the warm southwest desert in the dead of winter meant that nobody needed it to start in the cold and wet. Until I did. And discovered that it didn’t like the cold particularly well.
I’ve got no problem working on older tractors, but I do have a problem putting a lot of money into something that isn’t mine, and is on a “Well, it’ll be around until someone else needs it…” basis. Tractor tires alone are an awful lot of money (and it needs them).
So, to solve this, I bought it - a bit less than an ounce of gold got me the tractor (as-is), the blade, a single sided plow, a set of discs, and a few more bits and pieces that come with it. I figure I’ll be putting at least that much into it, possibly a bit more. But, the frame is solid, the engine has decent enough compression, and, besides, there’s nothing on this tractor I can’t repair if I feel like it!
General Condition
I bought the tractor knowing an awful lot about the condition, because I spent basically all my free time during our record setting winter on it moving, or attempting to move, snow. This year’s goals are purely mechanical - I don’t care what it looks like, I don’t care if it’s rough around the edges, but I want it more reliable than it was last winter. And, ideally, gas-tight. In no particular list, issues I plan to fix:
- The sediment bowl/gas filter leaks out the valve packing. This makes a mess, and meant it drains the gas tank over the course of a few weeks.
- The generator doesn’t work - at all. It spent many hours on a battery charger when not running.
- The exhaust manifold has a pretty bad leak on the #4 cylinder. Someone had crammed it full of steel wool and RTV, but that blew out last winter when I spent plenty of time at full throttle trying to move snow. It sounds like a bad rod knock, but it happens immediately on start with super cold oil when a rod will be pretty quiet.
- The carburetor… isn’t right. It leaks if the fuel is on, it doesn’t fuel evenly, and it occasionally stops fueling and requires full choke to keep the motor running.
- The tires are in rough shape. I didn’t do them any favors last winter spinning them on the snow and ice either.
- But, all that said, the engine has decent compression, it runs, and the transmission doesn’t make any expensive noises!
At least I used a matching battery charger! This is an ancient unregulated 6V battery charger. It still works fine, though it weighs a ton.

This summer, I set out to fix the worst of the issues. I wanted to resolve the fuel leaks, fix the exhaust manifold (before the leak ripped into the block), and generally get a reliable tractor for the winter. Why winter? Well…
Winter Plowing with a 9N
If you wonder if a 9N and a rear blade can remove snow, the answer is yes - with some serious limits. I spent last winter trying (and, if I’m honest, mostly failing in the second half of winter) to keep the driveway clear with this tractor, so here are some useful notes on the topic. This is in the context of a long, sloped driveway with only one edge to push snow off (the driveway is downhill, but it’s also cut into the side of a hill).
For light snow (under about 6”), the rear blade on the 9N or any similar tractor works wonderfully. Adjust the three point so the blade is more or less vertical (with the bottom a bit forward), set it at an angle to push snow to one side, and go at your work. Light, fluffy snow is super easy to move, so get on it early. Heavier snow is harder, but it’s still within the capabilities of an old tractor - if there’s no layer of ice. If the driveway ices up, you’re doomed without chains. Drifts are hard as well, and drifts on an iced up driveway will just get you really, really stuck.
My tires are filled, so there’s an extra 600lb or so in the rear. The total tractor weight, with me on it, is somewhere in the 3100-3200lb range, but I’ve got normal ag tires on. Those are great in dirt, pretty good in soft snow, but awful on ice. Sense a theme?
My driveway is road mix, so as long as the tires can get down to that, there’s no problem. First gear is good for plowing, though if it’s light snow you can probably run in second. I plow downhill, so I don’t really need much in the way of engine RPM for power. I can’t plow uphill, because I don’t have the grip to do it most of the winter. A few passes with the blade suffices to get the snow over to the edge of the driveway, and as long as the snow doesn’t build up too much (and melts a bit between snows), that works wonderfully.
Unfortunately, last winter was the worst winter in decades out where I live, and that just didn’t work as hoped. The early winter plowing didn’t get the snow over that far, since, well, it usually melts off between snows. Didn’t happen. And midway through the winter, the driveway got a nice layer of ice on it - that just wouldn’t melt. So I’ve got heavy snow, a solid windrow (“pile left by a blade”) of snow already built up along the edge, and ice under all of it. With the windrow and the hill, snow started drifting - badly. We’d get a few inches, but I’d have drifts past my knee in the driveway. And I’m not a midget!
If the snow depth exceeds your front tire diameter, you’re going to have a bad time. If you’re dragging the muffler in the snow, you’re well on your way to being stuck.

The second half of the winter was just ugly. I spent more time digging the tractor out than actually moving snow. The snow started packing down (not helped by the tractor quitting in the middle of winter for a few days until I put new plugs in), and I could cut the snow with the blade, but I couldn’t pull it for long before one of the tires would hit a patch of ice. With an open differential, that wheel spun, the tractor stopped, the snow in front of the blade solidified in a hurry, and I was digging. I spent a lot of shovel time trying to keep the tractor moving. If you’re stuck in the snow with a blade full of snow, raise the blade, dig the snow out from in front of the blade, then try to dig paths for the front tire and the rear tire. If you do it right, you’ll get unstuck, though you’ll probably have to stand on the brake of the tire that’s spinning (the “limited slip” capability involves the individual brakes - slow the spinning tire and you transfer torque to the other tire). It gets old in a hurry. If you get stuck going uphill… try to back out of it. You can either go dig for a while, or try to hit the drift with more speed. If you hit it with more speed and fail, you’ll be doing a ton of digging, because you’ll simply be more stuck than you were before. Or you might make it through.
Seriously, if you get more than a few inches at at time, this isn’t the tractor for your winters.
But, it’s the tractor I have, and fits the behavior of most winters out here. And I have a snowblower now as well. So, bring it.
Operating Notes
Just in case you’re curious about the art of operating an ancient tractor (I expect this isn’t terribly likely, but you never know - and, this could be useful knowledge in the future): Some operating notes, for a modern audience! This assumes the tractor is in more-or-less decent condition, of course. A troubleshooting guide is well beyond the scope of my posts, but fortunately, they’re easy to find on the internet. This tractor is over a decade newer than the last antique vehicle guide I wrote!
Engine Controls
There are four primary engine controls: Ignition switch, governor lever, choke knob, and starter switch. Plus one that you’ll forget sooner or later - the fuel bowl valve. This is on the left side, under the fuel tank. Turn it on for operation, turn it off when you shut down for more than a few minutes. If you have a good sediment bowl, you’ll have a reserve feature in which the first two turns enable the main fuel supply, and the rest of the turns give you access to the last gallon or so. That probably doesn’t work, though, so if your tractor doesn’t leak too badly, keep a few gallons in the tank. The tank pickup goes dry easily if you’re low on fuel and on a slope to the right.
You will eventually run out of fuel. This is usually indicated by the engine simply stopping. It doesn’t give much warning at all (if you’re under load, there is no warning whatsoever), and often happens when the tank is low and you’re on an angle some way or another. Add gas. Or turn the fuel valve all the way open, but if you don’t know that you have the high pickup, you probably don’t (which means reserve won’t work).
The ignition switch (not pictured) is on the left of the steering wheel. Turn it clockwise a quarter turn to enable power to the ignition coil. Turn it counterclockwise a quarter turn when you’re done. If you forget to turn this off when you’re done, and leave the ignition system powered, you stand a good chance of burning up the points or the coil before the battery goes dead. Don’t do this. Get in the habit of turning the ignition off any time the engine stops, even if it’s for lack of fuel or from bogging it down, and you shouldn’t leave this on.
The pushbutton down at the base of the console is the starter switch. This pushes a big lever that pushes a switch on the engine side of the console (look for the big wires joining into some gizmo, you’ve found it). No relays here! This switch has a neutral safety (if it doesn’t push down, the transmission isn’t in neutral - jiggle the shifter) that is vital to keep working if you value not being run over by your tractor. Otherwise, this switch has nothing to do with the rest of the electrical system - you can crank the tractor for 15 minutes with the key off, and it’ll never start. Turn the key on first!
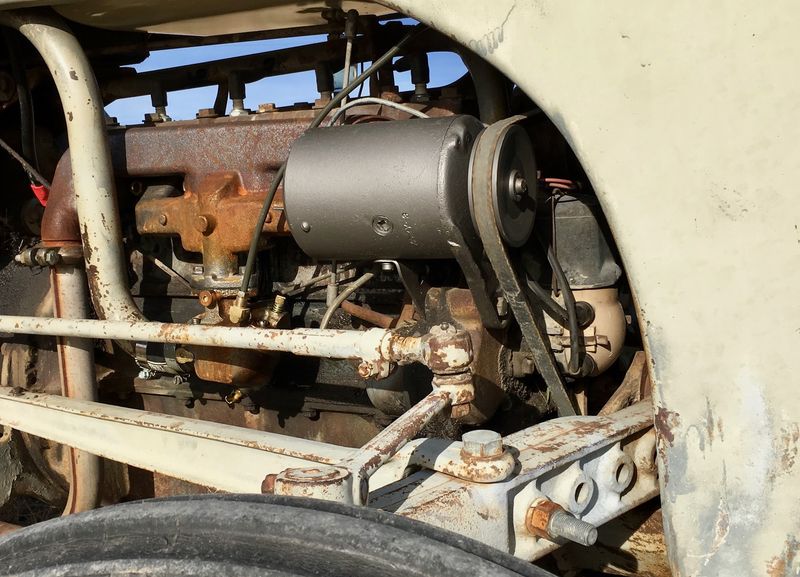
On the right, the big stalk coming off (with a ridged friction plate) is the governor control - not the throttle control. What’s the difference? A throttle directly controls the throttle plate, which regulates airflow into the engine (and therefore power produced). A governor control requests a particular RPM from the governor at the front of the engine, and the governor controls the throttle to hold that RPM regardless of load (as long as you’re within the limits of the engine - also subject to the condition of the governor). What this works out to, practically, is that you request an engine RPM with this lever, and the governor tries to maintain this RPM as load changes. If you’re going up a hill, down a hill, implement down, implement up - it tries to hold this RPM. If the governor works properly, it will hold RPM as long as the engine is capable of doing so. If you’ve got an older tractor, you’ll probably have to fiddle with this a bit.
Finally, the knob in the lower right corner of the panel is the choke lever. This runs a metal linkage going to the carburetor choke plate, of course! If you’re not familiar with old vehicles, a cold engine takes more fuel (a richer mixture) to start. With a carburetor, this is normally accomplished by restricting the airflow - you end up with more vacuum for the airflow, which pulls more fuel in. However, not everything works this way - my Ural motorcycle, for instance, just enrichens the mixture directly. You’ll normally need the choke for starting in colder weather, though it depends a bit on how the carburetor is adjusted. Pull it out when you’re cranking in the cold, and once the motor catches, you can release it. Maybe not all the way, but some tolerate that. Really, the best option is to ask someone who knows how to start that particular tractor how to start it. It varies, and if you replace the carburetor, it’s probably totally different afterwards!

Transmission, Brake, and PTO Controls
Once the engine is running, you just have to make it do something useful! There are three foot levers and a shifter related to moving around, and the PTO engagement lever (which is on the side, so I’m covering it here).
The inside left foot lever is the clutch. On all the N series tractors, this disengages everything behind the engine (and, if it’s cold, you should press it down for starting - you don’t turn the transmission/PTO/pump/etc, which makes it easier to start). This means no movement (unless there’s something heavy on the PTO and you don’t have an overrunning coupler), no PTO, and no hydraulic pump. If you stop and need to lift the implement, shift to neutral and let the clutch out.
The lever directly under the seat (on the left side) controls the PTO and hydraulic pump. Press the clutch, slide it back, and the PTO and hydraulics engage. Slide it forward, they disengage. You want to leave this disconnected to start the motor, though if you get in the habit of pressing the clutch to start, it doesn’t matter as much. What you don’t want is to have the starter motor trying to lift the implement while also trying to start the motor, which will happen if this is engaged, the implement has dropped from a slow fluid leak, and you don’t press the clutch.
Next, brakes. The outside left lever, and the right lever, control their respective wheel brakes. This is more complex than it initially seems in operation. The right brake lever is simple - stand on it, the right wheel stops spinning. But, on the left side, you’ve got the clutch lever and the brake lever. There’s a catch that presses the brake lever down when you press the clutch lever far enough, and you probably should adjust this because it’s almost certainly no longer set right.
But - why do you need independent brake control? There are two reasons: Steering, and limited slip. Since the rear end has an open differential (one wheel can spin freely if it wants), both of these are doable, and useful.
The front tires have some authority for steering, but in soft soil or, say, loose snow, they have limited grip. Standing on one brake in the rear will slow the respective wheel down, and help turn the tractor. This lets you turn tighter than you can with the steering, especially in loose material.
But, the more useful feature (for me - recall, snow and ice) is pseudo limited-slip! An open differential is a torque splitter. This means it will apply more or less equal torque to each wheel. Useful if you’re going around a corner and don’t want to drag tires, less useful if one wheel can’t hold torque because it’s on ice and the other one has good traction (the wheel on ice will spin, the other one will remain stationary). By applying the brake on the spinning side, you increase the torque required to spin that wheel, and if you do it right, you can get both wheels spinning, getting the tractor moving again! If stuck and in doubt, dancing on the brake pedals (alternating between right and left) is as good a plan as any…

Implement Controls
Finally, you’ve got a few controls related to the position of the three point hitch.
The primary control for this is the lever to the right of the seat. This sort of controls the overall implement height, though it’s using the Ferguson system. It’s a proper position control, but a “draft control.” That means that it controls the drag on the three point system. This is very useful if you’re plowing (if you hit a rock, it raises the system instead of flipping you backwards), but it’s less useful for the other uses of the three point. Pull it back to raise the implement, push it forward to lower it, but the details are vague, subject to wear in the hydraulic system, and… beyond “shove it further forward to push it harder into the ground,” you’ll have to learn your tractor. A lot of people convert it to a position control, and that’s often more useful. I plan to do this at some point (the device to do this is called a “Zane Thang”).
The weird crank on a box controls the relative height of the left and right lower bars. Crank it one way to tilt the three point one way, crank it the other way to crank it the other way.
And the big red turnbuckle on top controls the overall tilt of the attachment. Lengthen the third point to tilt the bottom forwards, shorten it to tilt the bottom backwards. You may find this much, much easier to adjust if you put the three point on the ground. Or lubricate the threads. Or both.

Starting the Teardown
It’s a bit hard to replace parts without taking them off, and I wasn’t sure what all needed to be replaced in the first place - so, a reasonable solution in this situation is to start taking parts off!
A bit of advice here: For the week or so before you start tearing into it, go out every day and hose down the bolts you care about with PB Blaster or some similar penetrating lubricant. It will help a ton in getting the bolts free! Yes, it stinks, but it beats snapping off a bunch of rusted bolts and having to find replacements.
Removing the Hood
The first step is taking the hood off. This is harder than it seems, and is really a two person job. There are a lot of ways to take some of the corners off, and how things are hooked up will depend on who last installed the hood.
At a minimum, you’ll want to drain the fuel tank. The hood is heavy enough with no gas in the tank, and adding more weight just makes your work harder. Plus, you stand a good chance of knocking the sediment bowl around while taking the hood off and cracking the glass bowl. If you’re replacing the sediment bowl or working on it, just take it off. If not, be careful with it.
You’ll want to take the battery out first. If you’re used to working on a car’s electrical system (negative ground), remember that the ground is backwards. It’s positive ground, so remove the positive terminal first! If your wrench touches the frame, the frame is already at the potential of the positive terminal. If you remove the negative terminal first, and you hit the frame, you stand a good chance of welding your wrench to the frame. The cables can handle a lot of current, and a 6V battery will supply an awful lot if it’s charged…
Once the battery is out, you need to remove the four cowling bolts around the instrument panel. They’ve got a square shank that locks with the square hole in the cowling, though as the bolt loosens, you may need to grip the head with a pair of pliers.

At the front end, the cowling connects to the frame on each side. There are two “dogleg” brackets down there, and you can detach either end. It doesn’t matter. Just pick whichever is easier to undo. Get a flashlight, dive down there, and it should be pretty obvious how to pull it apart.

Finally, I’d suggest removing the grille. I left it on to take the hood off, and it was tricky. Putting the hood on without the grille was a lot easier, so take it off before you remove the hood.
There are two bolts down at the bottom - one on each side. Remove these, and the whole thing should fall free (you may wish to hold it so it doesn’t fall on your foot). The top is just held in with a few pins.

Finally, look around the sides. There may be a bracket or two attached to the radiator. Or not. Again, it depends on your tractor and who put it together last.
With all the bolts free, it’s time to pull the hood off! Get a friend - this is a two person job. A lot of people recommend some sawhorses to put the hood on after it comes off, but I needed to replace my fuel tank anyway, and cheatgrass is soft enough compared to metal.
Remove the radiator cap, get one person on the front of it, and another on the rear. You should be able to lift the front up and get it over the radiator fill neck - if not, lift the rear slightly to help line things up. Once you’re clear of the radiator cap, lift the rear up and get it around the instrument panel. You should be able to do it without removing the steering wheel, but removing the wheel will certainly make it easier. My wheel is actually pretty bent up, so it wasn’t a problem at all. The front will need to clear the various mounts, so you’ll want to spread the front legs a bit apart to clear things.
It’s awkward, but it should come right off! If you have a really early 9N, you’ll probably have an aluminum hood, and it will be significantly lighter. Those are rare - keep that hood in good shape!
Removing the Generator
My generator doesn’t work - at all. Into the shop it goes! Removing the generator is pretty easy. The charge wire (the only wire connecting to it) comes off first. If you follow this wire back, you’ll find the cutout relay - take that off too.

Then, under the generator, there’s a big bolt holding it all in place. Remove this bolt, and the whole thing comes out. Belt tension isn’t particularly important on this tractor beyond “tight-ish.”

I’m guessing a lot of my readers aren’t particularly familiar with generators on older vehicles. They produce a direct current output, which is nice, but the voltage is highly dependent on RPM - which is not so nice. And there’s no functional difference between a generator and an electric motor. If you apply voltage to a generator, it spins. To prevent the generator from draining the battery when the RPM is too low for charging, a cutout relay disconnects the generator until it exceeds the battery voltage. This also means that extended low RPM operation won’t charge the battery.
For rebuilding a generator like this, you want to find the shop that’s in a cinderblock building, oddly placed, that looks like it slightly predates Noah. That’s going to be your best bet for a rebuild on something like this - and I found exactly such a place. They even sandblasted and painted it for me! It was definitely damaged internally - they had to do a bunch of work on it.

Removing the Exhaust Manifold and Carburetor
My carburetor is leaking and acting up. My exhaust manifold isn’t at all sealed to the block at the rear of the #4 cylinder. And, conveniently, they’re both attached to each other!
Before pulling them off, disconnect everything attached. You’ll need to remove the fuel line, the throttle and choke linkages, and the air pipe.
There are four studs going into the block with, ideally, brass nuts on the end. The theory is that the nuts are softer than the studs and won’t gall into place. You’ll still want to hose these down, thoroughly, with PB Blaster or something. Remove all four nuts (they should have lock washers), and the exhaust manifold/carburetor pair should come right off. When that doesn’t happen, a few taps with a hammer and some gentle prying will improve your odds.

All of the various linkages engine control linkages have this sort of spring loaded end to go over a ball. Simply push the end down (or pull on the rod) and they should pop off. You might consider tossing a bit of a dry lubricant in there when you reassemble things.

“Why my #4 exhaust port is leaking.” Yuck. The gasket is totally blown out, and there’s some sort of sealant goop that’s quite toasted. I understand that, at one point, this gap was crammed full of steel wool, but I blew it out last winter sometime when I was running at max RPM trying to move iced up snow.
The orange residue on the gasket is a high temperature RTV commonly used for sealing exhaust gaskets with iffy sealing surfaces. The exhaust gasses are plenty hot, but the block isn’t that much hotter than the coolant temperature, and the exhaust manifold is still fairly cool compared to the gasses, so the copper stuff works fine.

My main concern was the condition of the block. I knew the exhaust manifold was burned out and likely to be scrap (this is the leaking corner from #4 - it is quite scrap, since welding to carboned up metal is quite difficult). You can see where the flat sealing surfaces are, and you can see that there’s nothing of the sort in the corner that was leaking. I think I identified the issue…

Fortunately, after scraping the carbon away, the block seems to be in good shape. If the block is pitted, there are ways to repair it, but they’re a lot of work and aren’t nearly as good as the original metal. I should be good with a new manifold!

Removing the Fuel Tank and Sediment Bowl
The fuel tank is just held into the hood with three bolts - remove them, and the whole thing comes out. It’s a heavy steel tank, and it makes up an awful lot of the total hood weight.

The sediment bowl simply unscrews. Get a wrench on it if you need.
Pulling mine out led to several interesting observations. First, there’s no filter screen on it (there’s supposed to be a filter that keeps tank crud out of the pickup). Second, there’s no high level pickup (it’s supposed to have a tube that lets you pull gas until the engine quits, then open the valve further and use the reserve capacity to get back to refuel). Third, there’s a quite well preserved leaf cutter bee in my sediment bowl intake. They just love little openings like this, though how it got past the fuel cap is beyond me. I have no idea how old it is, either - it may have been in here for years.
A survey of my fuel system indicated that there were no filters. Anywhere. The sediment bowl pickup screen? Gone. The sediment bowl internal screen? Gone. The carburetor elbow filter? Gone. Raw, unfiltered gasoline (with all the dirt it could find) was making it into the carburetor from the tank. No wonder I was having issues…

The Path Forward
With everything apart (well, mostly), I’ve got my path forward - a new exhaust manifold, rebuild the carburetor, a new sediment bowl, a rebuilt generator, new plug wires, and whatever else I happen to find while I’m messing with the rest of it.
The next three weeks of posts will be discussing this process in my usual level of detail (including how to get the absolute junk modern sediment bowls to seal up). If anything isn’t clear, please ask in the comment section, and I’ll do my best to clear up the details!
Other Posts in This Series
1939 Ford 9N Repair Work: History and Teardown (this post)
1939 Ford 9N Repair Work: Electrical
1939 Ford 9N Repair Work: Fuel, Air, and Oil
Ford N Series Sediment Bowls (suck): Sealing a 9N/2N/8N Fuel System
Comments
Comments are handled on my Discourse forum - you'll need to create an account there to post comments.If you've found this post useful, insightful, or informative, why not support me on Ko-fi? And if you'd like to be notified of new posts (I post every two weeks), you can follow my blog via email! Of course, if you like RSS, I support that too.


