
If you have a Ford N series tractor, you probably know about the sediment bowl. And, if you’ve tried to replace the original sediment bowl with the currently available option, you may have realized that it is an utter and complete piece of crap. It leaks from everywhere that it possibly can, perhaps a few places it can’t conceivably leak from, and it’s quite unlikely that the fuel shutoff valve actually shuts off fuel. Which, of course, is the whole point of a fuel shutoff valve.
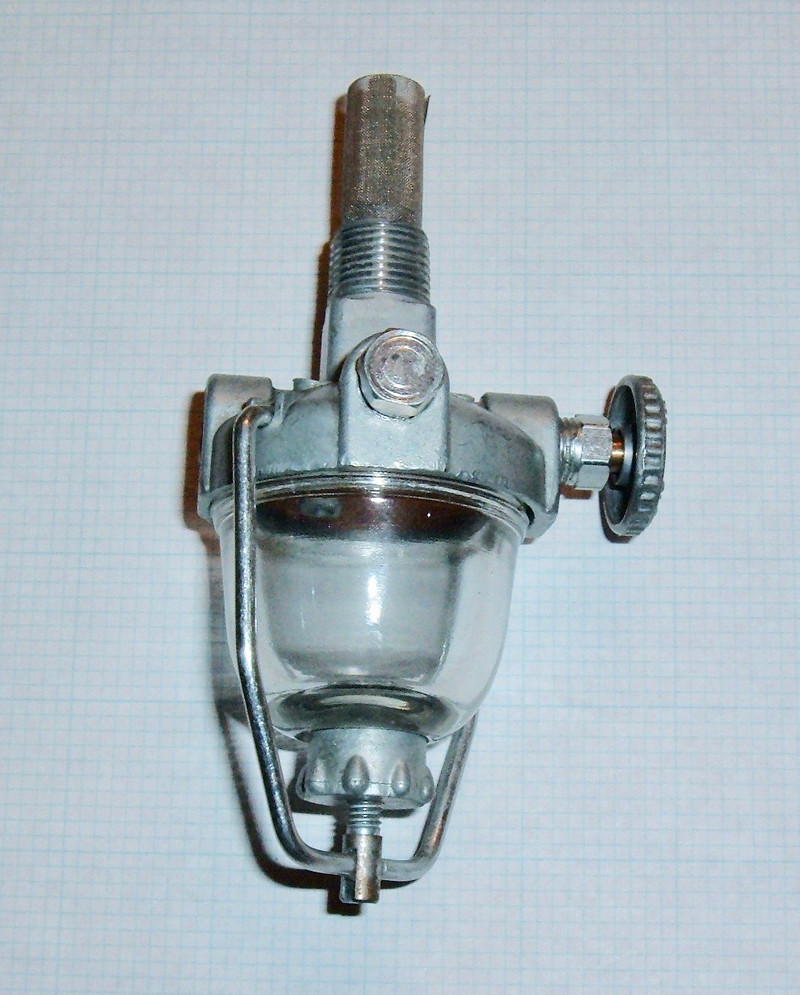
It looks like this, and I’ve managed to beat one into actually behaving, not leaking, and actually shutting off fuel - even though it didn’t start by doing any of those things!

Interested? Read on!
Sediment Bowl Overview and Disassembly
If you’ve worked on a N series tractor (or an awful lot of other older tractors) recently, you’ll recognize this sediment bowl. It’s the aftermarket sediment bowl for an awful lot of tractors - and it’s a piece of junk.
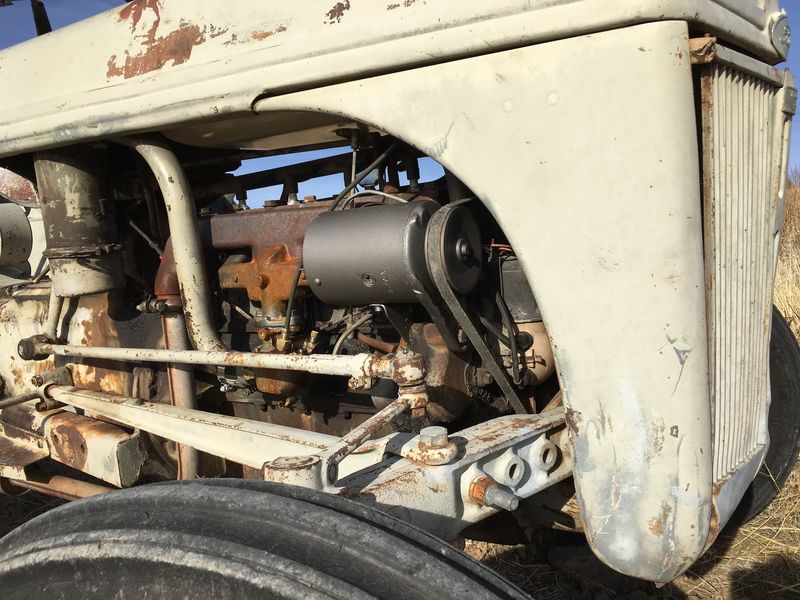
Why do I care about this? I’ve got a 1939 Ford 9N that I spent some of the summer working on - both electrical and air/fuel/oil systems. It took far longer to get the stupid sediment bowl working as desired (“not leaking”), and was frustrating enough that I’d like to share my results in the desire that they help someone else avoid my frustration.
Since not everyone reading my blog is familiar with older engines, what, exactly, is a sediment bowl? It’s a stage in the fuel filtration process - consider it a settling tank for gas straight out of the tank. The gas flows from the tank into the bowl, letting the dirt and grit settle to the bottom of the bowl. The gas then flows up through a fine wire filter, with the clean gas flowing out of the top of the sediment bowl, ideally free of rust flakes and other material that could clog up a carburetor. This is the primary fuel filter in old tractors, and it works tolerably well - the heaviest debris settles out, the smaller stuff gets caught in the filter (and eventually settles out), and stuff that makes it through (and through the carburetor elbow filter) is probably small enough to make it through a jet and into the engine with no ill effects. Eventually, you get some sediment built up in the bottom of the bowl, then remove the fuel bowl and rinse it out. Repeat as needed.
Beyond being a sediment bowl, this is the main fuel shutoff valve for the tractor. As shipped, neither of mine (I ordered two from different suppliers and they both had the same issues) were actually able to shut fuel off. You had one job, and all that…
The way it’s supposed to work is described on the fuel shutoff knob - turn the knob two full turns to open the main fuel pickup, and turn it fully open (another few turns) for reserve. There are two pickups at different levels, and operation is basically identical to how most motorcycles work.

Looking straight down at the top of the new bowl, the two fuel pickup levels are visible. The tube is the “main” pickup - you use this normally. The high pickup prevents you from sucking debris along the bottom of the tank into the bowl, and when the engine quits (my 9N gives no warning when under load - it simply stops like you turned the key off), open the valve further to open the low pickup. This low pickup gives you another gallon or so of gas to get back to the barn to refuel, and beats hauling a 5 gallon jug around the property. If you’ve got an old bowl without the high pickup, you probably know this drill.
The lower pickup is protected by a screen to help keep it from taking too much debris. Both of these feed into the fuel bowl below the screen, so will get filtered, but there’s no reason to pull debris into the fuel system if you can leave it in the tank. This does mean that pulling the fuel bowl every decade or two and rinsing out the tank is a good idea.

Because this is a somewhat universal tractor sediment bowl, there are two filtered fuel taps. They’re both plumbed the same, and the bowl comes with a blockoff plug for the one you’re not using. Which one you use is up to you - I have my bowl set up the same as the original bowl (shutoff knob on the back and fuel coming off towards the front), but you could just as easily rotate it 90 degrees and have the shutoff valve facing out. It’s important to seal up the opening you’re not using, and the bare plug may or may not seal without a bit of help from some sealant.

Both openings are 1/4” inverted flare fittings. This is apparently now the standard for old tractor fuel systems, though the original bowl has a 1/8” NPT fitting on the fuel bowl. Or, at least, mine did.
I’ll talk more about these later, but they’re a bit weird in how they seal - the threads have nothing to do with the sealing for the normal hose connection. However, the plug may rely on the threads for a bit for sealing.

The bottom contains a large knurled screw for holding the actual glass sediment bowl on. It’s reverse threaded, so it works “normally” - turn it clockwise (looking at the bottom of the bowl) to tighten the sediment bowl, turn it counterclockwise to loosen the bowl. You’ll probably have to use pliers if this has been in service for a number of years.

The sediment bowl and tightening mechanism come off easily enough. Before you do anything else with your sediment bowl, pull the glass bowl off and check the sealing edge. If there are any chips in it or rough spots, send the bowl back - you will never get it stop leaking if this glass edge is in bad shape. If there’s a rough spot, you might try polishing it with some sandpaper, but this edge is responsible for an awful lot of leaks - check it out. You should probably also throw some anti-sieze on the threads for the securing nut. Unfortunately, the proper clamping force to keep things sealed is “a lot.” You’ll probably need pliers to get the nut free after a few years.

With the bowl off, the nature of how a sediment bowl filters becomes obvious! The fuel from the gas tank comes through the hole with the square surround. This is the unfiltered gas. It directs the fuel flow down (you can actually watch the fuel burble around if you’ve shut the engine off by turning off the fuel valve and letting it drain the carb), and any crud ends up floating around in the bowl. The crud sinks down, and the clean(er) fuel sits on top, where it flows through the metal screen and into the fuel line (that, presumably, is hooked to one of the outlets). This isn’t the finest fuel filter you’ll ever see, but it’s good enough for a carbureted tractor.
The rubber gasket around the outside needs to seal against both the glass and the metal cap in order to keep the bowl from leaking around the glass.

The rubber gasket comes off to reveal the seating surface (the raised metal around the edge) and the sunken lip for the filter. It’s important that the filter be sitting fully in the dropped lip - if the filter is oversize and is sitting on the metal sealing surface around the edge, you’ll never get the whole thing sealed up. If that’s the case, a bit of trimming would be wise. Also, if the filter doesn’t extend across the whole opening, the filter is pointless and you should get another mesh filter.
It’s up to you, but a very thin smear of Permatex #2 along the sealing surface might be a good idea to help everything seal up. I was able to get things sealed without it, but that stuff is an awfully good way to seal fuel systems that refuse to seal up…

Testing the Fuel Shutoff Valve
Before you do much else with this, you should actually test the fuel shutoff valve. There’s a straightforward way to do this (before you run gasoline through it): Make sure the plug for the other fuel connection is tight, close the valve fully, and blow through the remaining connection.
If it is entirely sealed, great. You got a good one. If you hear any sort of hissing at the fuel intake side, well, your fuel shutoff knob is a useless decoration, not at all suited to actually shutting fuel off. Don’t think it will somehow work if you can hear air flowing through it - gasoline is very slippery and leaks through tiny gaps!
Assuming your valve is like mine and not sealing at all, there might be hope. I got mine to seal!
Fixing the Fuel Shutoff Valve
Get a wrench on the nut behind the valve. If you want to remove the valve knob, now is a good time to do so as well, but it’s not a problem to get a wrench behind it. Unscrew this nut, unscrew the valve all the way, and the whole assembly will pull out. This is the valve, and this is what we’re going to work on. It’ll probably be tight, but if you alternate opening the valve and pulling, eventually the whole stack will come out.

Gotta love that nice corrosion on the brand new valve nut…
This is the core of the valve. There’s the sealing surface at the left end, threads for the valve next, a packing gland (made of rubber), a washer to help compress that packing, and the packing nut to compress the washer and packing. It’s worth noting that there’s no reason you need to tighten the packing nut all the way - it just has to be tight enough to seal. If there’s no gas dripping out the valve stem, it’s tight enough. If the valve is super hard to turn, try backing this off a half turn or so and see how it works. Given that nothing on either of my valves is bored on center, that helps make it easier to deal with.

Inside the casting, you’ll see the rest of the valve guts. There’s a large threaded section for the packing nut, a smooth surface for the rubber seal, more threads to actually move the valve in and out (the reserve fuel opening is in the middle of these threads), and the valve seat that is the actual sealing surface. Ignore that my valve seat looks a bit freshly ground - we’ll get there in a bit.
The main problem I found is that this whole setup is not properly centered! The valve seat isn’t aligned with the valve threads, and the packing nut threads aren’t aligned with the rest of it. Must have been bored on a Friday, sometime after whiskey-o-clock. Or on badly, badly worn out tools. I have no idea, and I don’t really care, but it doesn’t seal - so I set about figuring out how to fix this.

The main problem is that the valve isn’t lined up properly. The brass valve stem doesn’t sit properly on the valve seat, so it won’t seal - and won’t stop gas.
Fortunately, this whole assembly is built of some variety of soft pot metal. I don’t know what it is, but it’s soft, probably has a lot of zinc, and is, importantly, radically softer than the actual valve core that seats against it. So, we’re going to grind ourselves a new valve seat, relying on the hard valve core to do the right thing against the soft pot metal. This is where warranties are void, if you care about such things… but you probably just want it to work.
Take the wheel off the end of the valve stem, take all the assorted pieces off, and grab yourself a good sized pair of vice grips. We’re going to make a valve seat.
Clamp the vice grips on tightly, sit down with your favorite TV show, tighten the valve stem down pretty tight, and start twisting back and forth. Put more emphasis on the tightening side - this is where you’re trying to force the pot metal to warp around the valve stem. Yeah, it’s going to sound and feel like something you shouldn’t be doing - metal on metal and tight. Keep at it. Just tighten and loosen it for a while, cranking it tighter than you think it should probably be, but not tight enough to break things. You’ll notice that you can turn the valve stem a bit further as you go - this is the desired result. Do this for, oh, a while. Eventually you’ll stop making progress - that’s a good indication that you should pull the stem out and check it.

With the stem out, you can see my fresh grind marks on the end. Notice that the wear is not at all centered around the stem - this is the problem! The valve seat is not bored in the center, so things won’t seat. The valve hits one side, but the other side is still open. Grinding back and forth with a pair of vice grips forces the cheap pot metal out of the way and creates a new seat - one that’s actually aligned with the off-center valve bore.

Looking down, you’ll see the new seat is also not symmetrical. That doesn’t matter - yes, it’s cheap junk. What matters is that you can see fresh ground metal all around. You have to grind a full 360 degrees of seat in order to get it to seal - and that’s what you can see here. It’s thicker at the top than the bottom, but there’s a full new sealing surface ground into the seat, and the valve stem can actually shut off the flow against this new seat.

The packing nut and washer aren’t exactly bored properly either. Seriously, whatever tooling was involved in building this thing was badly out of adjustment. It’s junk. Rebuild your old bowl. I hear waxed dental floss makes a good packing for them.

Before putting the fully assembled valve stem back in, make sure it’s lined up like this - the washer goes between the packing and the packing nut.

The knob isn’t exactly a great piece of work, either. One might hope it fits the stem a bit tighter…

When you’re reassembling the valve, the packing nut needs to be tight enough to compress the packing so it won’t leak, but there’s no reason to bottom it out. All you’ll do is make the valve hard to turn, and wear out the packing earlier.
Hopefully, after this process, the valve actually seals. Put the fuel bowl on, put the plug in, shut it fully, and blow in the open fuel port. It should seal. If not, buy another one, and try again. Seriously. These are junk. Rebuild your old one.
Sealing the N Series Carburetor
It rained. My carburetor is now a beautiful orange. Not… quite what I hoped for, really.
If you’re fighting leaks on the carburetor, I have a few helpful suggestions.
First, make sure your fuel bowl seals. If that doesn’t seal, your carburetor will perpetually leak (the needle valve doesn’t seem to seal perfectly). So turn off the fuel when you’re done running.

But if your carburetor is still dripping, I have a few suggestions.
The first: Add a bit of Permatex #2 around the very edges of the carb bowl gasket. You don’t want enough to get into the carburetor, so just a very, very thin coat, right around the edges, should do it. Hit both sides of the gasket, and it should help with leaks through there.

Next, replace the plug at the bottom (which probably doesn’t seal that well anyway) with a drain petcock. You need 1/8” NPT threads on the side that goes into the bowl, and the rest doesn’t matter that much. I found this at my local D&B, but any decent hardware store should have something like this. You can drain the carburetor with it, and it probably seals better than the original plug.
If you don’t install this, hit the threads on the stock plug with Permatex #2. Getting the picture?

Permatex #2
You’ve heard me mention this a few times. This stuff is awesome. It’s basically a thread/gasket sealing putty that doesn’t get hard (“non-hardening”). And it’s gasoline resistant (unlike a lot of RTVs).
If you’ve got an old tractor, and you don’t want gas dripping everywhere, buy a tube of this stuff. It’s magic. Seriously. A thin smear of this, and gasoline doesn’t leak through something! Get it at your local auto parts store, buy it on eBay, or just get some, somehow. You need it.
Use it on gaskets, use it on threads, use it on eggs. Whatever. It’s really that good. Don’t really use it on eggs.

Mounting the Fuel Bowl
The first step in sealing up the fuel system is to mount the fuel bowl without it leaking. Before you do this, you’ll want to seal up the plug in whichever hole you’re not using. That’s pretty simple - coat the threads in Permatex #2, thread it in, crank it down (not too tight - but tight enough). You can see the grey goop on the thread here.
If you’re using one of these modern crap bowls, you can turn it in with a 17mm wrench.
Before you go about doing that, make sure the glass sediment bowl is seated squarely, then crank the knurled knob down - tight. That should seat the bowl, assuming the edge is good.

To seal the fuel bowl, coat the threads in Permatex #2 and thread it into the gas tank. You don’t need to seat all the threads - crank it hand tight, then use your wrench to tighten it until it’s facing the correct direction (valve knob at the back, fuel drain at the front).

Sealing Flare Nut Ends
Finally, it’s worth mentioning inverse flare ends. You’ll probably have these at both the carburetor end and the fuel bowl end (though the stock fuel bowls use a 1/8” NPT thread that’s different).
A flare end seals with the metal flare on both sides, and the threads simply serve to hold the two pieces together. The threads have nothing to do with the actual sealing process - so there’s no point in putting any sort of sealant on them, because the only way they’re getting wet with gas is if the flare isn’t sealing properly.

This is what you’re trying to seal against - a cone in the other end. Look at the (inverse) flare above, look at the cone below, and you can get an idea as to how this is supposed to work. The threads on the connector just hold the two (theoretically matching) bits together.
There’s a “trick” here with getting them to seal: the flare has to sit over the cone, fully centered, before you start cranking the nut down. And you should be able to hand tighten the nut almost all the way.
What this means, in terms of assembly, is that you can’t be “sort of close” on alignment. You have to be dead on. Seat the inverse flare on the tube over the cone in the carburetor or fuel bowl - firmly. Then, start threading the nut in - by hand. You should be able to get it almost all the way down by hand, with no sealant. Finally, put a wrench on the nut. If you have everything right, you shouldn’t be able to get more than about half a turn on with the wrench, or a full turn, tops. If you’re beyond that, the flare and cone aren’t properly seated, so back the nut off try again.
You cannot seal a leaking flare fitting like this by tightening the nut down. It won’t work. If you get more than a turn on the nut with a wrench, things aren’t centered. Pull it apart, adjust the alignment if needed, and try again. This is the only way to get a fitting like this sealed. Trust me!
Final Thoughts: Rebuild Your OEM Bowl
If you haven’t gotten the impression that this new fuel bowl is rubbish, you haven’t been reading.
You are, by far, better off resolving the issues with your stock fuel bowl than you are buying a replacement. The stock bowl is good. This replacement is somewhere between “barely tolerable” and “rubbish.”
If the packing on your OEM bowl is bad, I hear waxed dental floss makes a good material to pack the valve stem with. You should try it. You can get new filter material. This new bowl should be an utter last resort.
I’m not a fan. But, if you find yourself with one, hopefully this will let you get the stupid thing sealed up. Mine is finally sealing, so you can achieve success, even if you have to go through a few bowls to find one that can be beat into shape.
For those of you who have been enjoying my tractor posts, I have bad news - this is the last of them (at least until next summer). For those who wish I’d shut up about ancient machinery and talk about something interesting, I have good news - I’m done with tractor posts for now!
Next week will be something a bit more modern, and probably related to batteries of some sort or another. I haven’t decided if they’ll be lithium or lead yet, though.
Other Posts in This Series
1939 Ford 9N Repair Work: History and Teardown
1939 Ford 9N Repair Work: Electrical
1939 Ford 9N Repair Work: Fuel, Air, and Oil
Ford N Series Sediment Bowls (suck): Sealing a 9N/2N/8N Fuel System (this post)
Comments
Comments are handled on my Discourse forum - you'll need to create an account there to post comments.If you've found this post useful, insightful, or informative, why not support me on Ko-fi? And if you'd like to be notified of new posts (I post every two weeks), you can follow my blog via email! Of course, if you like RSS, I support that too.


:%20Sealing%20a%209N/2N/8N%20Fuel%20System)