

Continuing my Ford 9N repair series, this week covers the air, fuel, and oil systems. If you’ve got no idea what I’m talking about, start with the overview post. I own a 75 year old tractor that’s not been particularly well maintained for the past decade or so, and I’m fixing the problems with it. This is something totally and completely unlike small electronics or cell phones, but it’s properly enjoyable to work on!

The air cleaner was dirty, the exhaust manifold was shot, the carburetor wasn’t much better, and the whole thing needed some oil changes. So, of course, I fixed all that stuff!
Cleaning the Air Cleaner
With everything apart, my first step was the air cleaner (mostly because I thought it would be easy). This is an oil bath type cleaner, which isn’t common anymore, but was quite popular for many, many years. Other than being messy to clean out, they don’t have too many downsides - they do a good job filtering the air, and can be cleaned indefinitely with some rags and solvent. Not a bad setup! Though, not as profitable as easily replaced, neat and tidy paper filters. The paper elements are certainly more convenient… just expensive.
How does an oil bath air cleaner work? It’s a pretty straightforward setup, and this is a perfect example. Air comes in the bug catcher at the top (just a wire mesh to keep bugs out), then heads down the center tube, carrying the air (and dirt) straight down. The air builds up some velocity, then slams into an oil cup, carrying the big particles of dirt straight into the oil cup. As it turns around to go up, it carries some oil with it up into the big wire mesh that makes up the outside of the filter. The oil coats the wire mesh, which helps it catch the remaining dirt particles. The now-clean air heads out the top into the engine. When the engine shuts down, the oil drains off the mesh, carrying the dirt down into the oil cup, which is supposed to be drained and cleaned fairly regularly. Supposed to be…
Vintage Tractor Engineer has a great drawing of how this is supposed to work!

This is my air filter, with the outside cleaned off somewhat. The brake cleaner cap isn’t actually part of the cleaner.

Under the bug screen, there’s a funnel that helps direct the air down and through the tube. It… seems to collect oily fuzz over time, somehow. I’m sure this is properly vintage dirt, but away it goes.

For regular cleaning, the oil cup on the bottom comes off by loosening a big clamp. Turn the key on the left, loosen the clamp, and the whole oil cup comes down - and, wisely, the clamp is directional so it doesn’t come off the rest of the filter. This tractor is designed for farmers and fields, and parts falling off when you’re trying to clean it just means you’ll lose parts and run without them. Air filters are pretty important for engine longevity.

With the clamp loose, the cup comes down. If you clean it regularly, it comes down easily. If you haven’t cleaned it in years, it takes a bit of thwacking to get it free. This is what’s in the cup - just some engine oil. The smooth, calm surface is hiding something.

What’s hiding in the bottom is years and years of gunk. Just… gunk. I imagine Dr. Seuss worked on old tractors to get some of his descriptions - Gunkity Gunk, Gloppity Glop, Goopity Goop. The terms come to mind when dealing with this kind of oil and dirt and water accumulation. Even with this amount of crud in the bottom, the filter should still work as advertised, though. They really are a neat little design.

If you have to clean up an old oil cup like this, brake cleaner, paper towel, and a screwdriver are your friends. Shove the paper towel in, spray in some brake cleaner, slide it around, and repeat until the thing is cleaned out. The paper towels will be quite disgusting after this process. Normally, it shouldn’t be this bad, but it’s an awful lot of years of dirt in here.

After an awful lot of paper towel and brake cleaner, it looks more or less clean. Some of the remaining corrosion is from water in the oil, or water in debris, and I simply don’t care to spend the effort to remove it. The “oil level” line on the outside and inside is the fill line, and the holes in the center cup help level the oil out after running (you can end up with more oil on the outside from draining down the mesh). Recommended oil is “whatever you’re running in the crankcase.” If you were particularly cheap, you could drain off the oil, clean out the bottom, and put the clean oil from the top of the temporary container back in, topping it off up to the fill line - the oil doesn’t actually wear out, and anything heavy enough to matter will drop to the bottom of the cup relatively quickly.

The rest of the air cleaner consists of what looks an awful lot like steel wool wrapped around the outside of the intake tube. This is the bulk of the filtering - oil gets tossed up into it with the airflow, the oil helps collect dirt, and when the engine shuts down, the oil and dirt drain back down. This needs to be cleaned as well, but not as often as the oil cup. Cleaning this mostly involves sloshing some variety of solvent (I used brake cleaner since I had it out already) around, and draining it. If your filter material is really bad, you can pull it out and replace it, but mine wasn’t bad enough to bother with that. Maybe in the future, but as long as it’s clean and not rusted, it should be fine. My very dry environment helps a lot with that.

Mostly clean, back together, and on the tractor! A common discussion found on the internet relates to the merits of oil bath cleaners versus the newer paper element filters, and while this is like an oil thread in that it can go on forever, the general consensus seems to be that a paper filter will filter better, an oil bath filter is probably better for a seriously dusty environment (it’s a lot cheaper and easier to clean/replace than a paper element filter), and mostly, paper element filters didn’t exist in the late 1930s, so this was the best technology available. Some people gut them and convert them to paper element, but I don’t see any real reason to do that. This has worked fine for 75 years, and the maintenance isn’t a big deal to me. Drain it every 10 hours of operation, clean it every 100 hours… that’s an awful lot of snow moving.

Exhaust Manifold
If you recall from the teardown two weeks ago, my old exhaust manifold was scrap. There was no material around the end of the #4 cylinder, and it was leaking pretty badly there. The block was still intact, but a prolonged exhaust leak will eventually start eating into the block, which is a lot harder to repair.
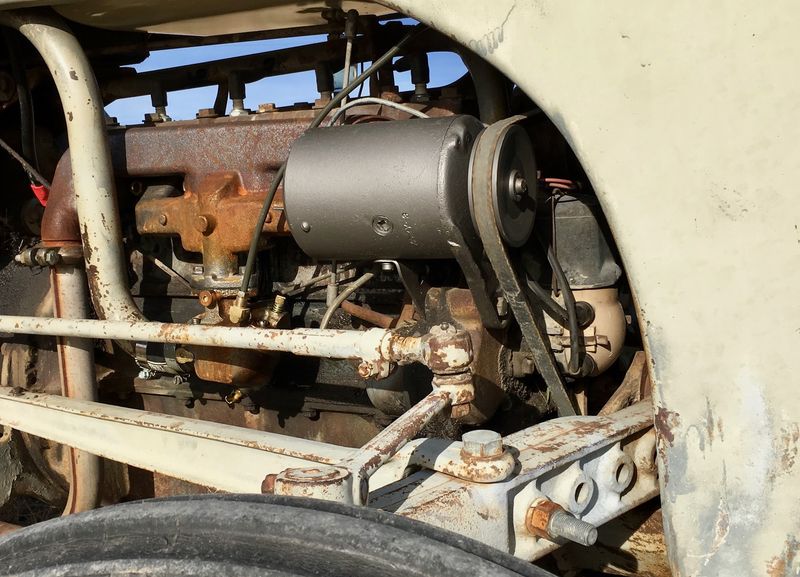
Fortunately, with over half a million N series tractors built, and an awful lot of them still rolling around, parts are easy to come by - though quality may be suspect. This is my brand new Ford N Series exhaust manifold (the 9N, 2N, and 8N all have the same basic engine). The wider ports are the exhaust ports, flowing (through a series of poorly flowing bends) to the exit on the left. The center, square holes are the intakes, fed from a carburetor which attaches to the center flange.
Yes, the intake and exhaust go through the same manifold. While not ideal from a power making perspective (it heats up the carburetor and intake charge), it’s quite good from a cold weather running perspective and is quite good at keeping the carburetor warm enough to prevent carburetor ice. It’s not like the engine makes very much power to start with (about 23hp, as tested by University of Nebraska in April, 1940).

Installation is pretty simple: Scrape all the old gasket material off, then apply your new gaskets and the manifold. I’m using copper RTV here to help get a better seal - the block isn’t perfect, and the machining on the manifold leaves a bit to be desired. It would probably be fine without the sealant, but there’s no harm in putting it there, and it should help if there are any surface imperfections. This RTV is good to 700F or so, and while that’s lower than exhaust gas temperatures, it’s more the block and manifold temperatures that matter, which should be low enough that it’s fine. It was fine on the previous manifold, so I assume it’ll be fine here.

I bought new brass nuts for the manifold, since I wasn’t sure about the condition of the old ones. I probably could have reused them, but new nuts are cheap enough. They’re held in place with lock washers, so the torque isn’t that high. “Enough, but not too much” is a good value here, as everywhere. I just tightened them by feel. The theory is that the brass nuts will be weaker than the iron studs, and if you have to crack a nut to get it off, you won’t destroy the studs. I appreciate details like this on an old engine designed to be maintained!

Carburetor
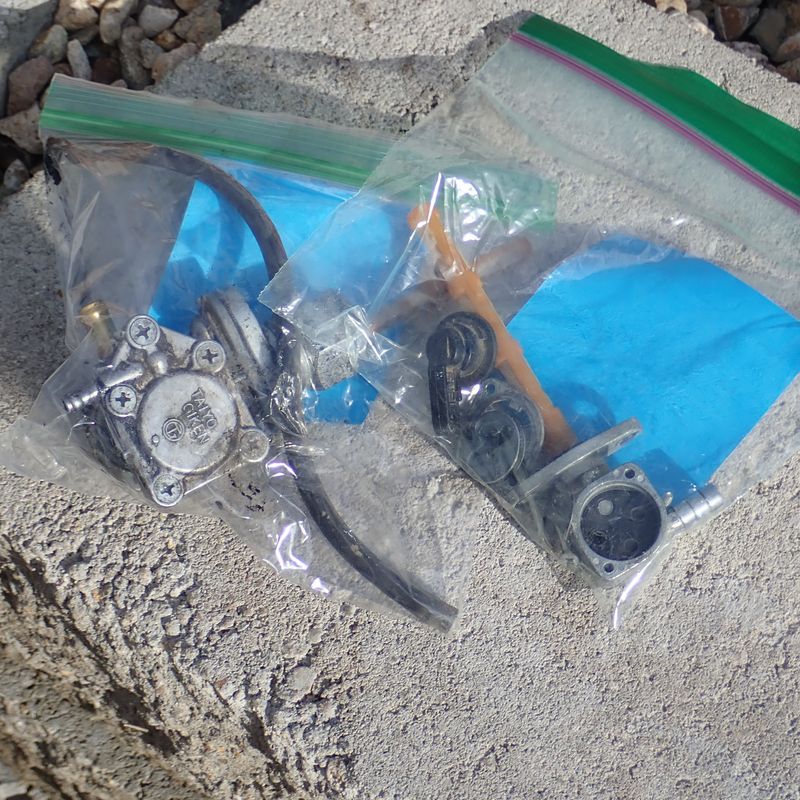
I bought a rebuilt carburetor with the rest of my supplies, because the existing carburetor was a hideous mess. There were no filters in the fuel system, and I’m not sure when they were removed, but it showed in how the tractor ran. It would randomly stop running and barely struggle along with heavy choke, until the blockage cleared and things were fine for a while longer. Once I realized that I had no filters, the reason for the issue was pretty clear…
I can rebuild a carburetor, and I may rebuild my existing one at some point to have a spare, but for a time-sensitive project (it was starting to get cold, and I do need this in the winter), a rebuilt one wasn’t that much more than a rebuild kit. I did stick with the stock Marvel-Schebler carburetor instead of putting on the common aftermarket Zenith. I may get around to restoring it at some point, and the fewer non-original pieces I put on, the easier my job will be!

If you’re not familiar with carburetors, they’re mechanical (and pressure, and fluid) devices for mixing fuel and air. They predate fuel injection, but accomplish the same thing, for reasonable values of accomplish. If I really wanted to, I could get a MegaSquirt setup (standalone fuel injection controller) and appropriate hardware to run it, but there’s just no point in that for this tractor, and a well maintained carburetor (read, “has all the filters” and “isn’t left for years with gas in it”) will last pretty much forever.
The butterfly in the top is the throttle plate (yes, it’s tiny). On a car or motorcycle, the throttle is directly connected to this, but on this tractor, the “throttle” by the steering wheel controls the governor setting, and the governor controls the throttle to attempt to maintain the requested RPM. It’s a lot better for something with varying loads - the tractor will maintain a constant RPM regardless of terrain or load, if the governor is in good shape and the engine can provide the requested power.

The air intake side contains the choke butterfly. This is directly controlled by the operator, and temporarily enrichens the mixture (by restricting the airflow) for starting in cold weather. A well maintained N series tractor should start in very cold conditions! The choke won’t stay applied - you simply pull it while cranking if needed. On my tractor, at least, I start cranking, and pull the choke out if it doesn’t start quickly. That usually lights it off, and I can let go of the choke. It’ll run a bit rough until it warms up, but I don’t need to hold the choke on.

While you’re working on the carburetor, pull the fuel elbow out. You should have a metal strainer on it - like this. Of course, mine didn’t have this filter. The strainer is the last filter before the carburetor, and it’s a good idea to have. If you don’t have the strainer, your local Tractor Supply should carry these for about $5. Or you can pay an awful lot more online.

The carburetor mounts to the bottom of the intake/exhaust manifold, as pictured. There’s a gasket that goes between the exhaust manifold and the carburetor, and you’ll want that in place. You might consider coating it with a thin film of some variety of RTV or Permatex #2 to help it seal properly.

One thing I’d highly suggest doing - replace the drain plug in the bottom of the carburetor with a proper drain petcock. This makes it so much easier to drain the carburetor if you’re storing the tractor for the winter (or the summer), and makes it easy to drain out a bit of fuel if the tractor has been sitting. Get the old gas out, let the new gas in. It’s a fairly cheap part, and is useful often enough to justify the cost.
On the topic of gasoline: use ethanol free if you can find it. But, if not, just try to not let it sit that long. Octane doesn’t matter - it’s a low compression, low stress motor. I run mine on premium ethanol free with Stabil and Seafoam, simply because that’s what I keep around as my general “property motor” fuel - it’ll run mowers, generators, motorcycles, and while totally overkill for the tractor, the tractor runs just fine on it.

I found my drain petcock in the hardware section of D&B, but this is what you’re looking for. You want 1/8” male pipe thread for the side that fits into the carburetor, and the rest doesn’t matter.
Though I did have to buy a good set of SAE wrenches and sockets for this project. It turns out, when everything you own for a decade is metric, your SAE sockets go missing.

Exhaust Pipe Clamp
The exhaust pipe clamps to the manifold with a system originally designed for the old Model A Ford. The pipe seats up against the manifold, ideally matching the taper, and then clamps in place. If all works properly, this forms an exhaust-tight seal composed entirely of metal components - no gasket. If it doesn’t, well, it leaks a bit. Not that big a deal. You can tell from the carbon buildup on the pipe sealing flange that this hasn’t been gas-tight for years. I’m just going to reinstall it the best I can and worry about a new pipe next year (which is, apparently, best done by a local exhaust shop, for a fraction the price of buying a prebuilt replacement).

The clamp has a big side and a small side. The big side faces down (the smaller diameter clamps around the exhaust pipe, not the manifold). If you put it on upside down, it won’t hold the exhaust pipe securely in place (try to wiggle the exhaust pipe after clamping it - if it wiggles, you’ve got it wrong). Be gentle on this part - a lot of the newer replacements are built of “crap metal.” You’re probably better off cleaning your old one and getting new bolts for it.

If you mount it with the ears facing this way, they’ll interfere with the air intake tube. Rotate it 90 degrees so the ears are facing “left and right” on the tractor, and you’ll be nicely out of the way of the air intake!

Replacing the Air Hose Couplers
The air tube from the air filter to the carburetor has a pair of rubber boots used to hold it in place. Mine are, like everything else on the tractor, quite old. I suspect they’re reusable, if I really wanted to, but there’s no good reason to reassemble parts with ancient, cracking, crumbling rubber. If they fail, you’re sucking unfiltered air into the engine, which is just no good.

Fortunately, building replacement couplers is easy! Go to your local parts store and find some tubing that’s 1.5” inside diameter. Cut to length (2 3/8” is apparently the common length, if you need a reference), and install! Straightforward and easy.

While you have the hose off, clean up the ends of the air intake tube if they’re rusty. A bit of sandpaper helps a lot. If the tube is really, really bad, you can buy a replacement, but mine is still in perfectly good shape (just a bit of rust).
Getting the new boots on is eased, greatly, by some silicone lube. Spray down the end of the tube, spray some inside the new boots, and they’ll slide right on. You might be able to install them dry as well, but it’s a tight fit and this makes the task a lot easier. I’ve used this spray a good bit when reassembling the tractor, and it’s a good thing to have on hand!

I don’t know if this is true on all the tractors, but on mine, the air tube will fit over the carburetor intake. This is not how you want to align things - the tube won’t compress with a clamp, and there’s not enough area left to clamp the boot down, so you won’t get a good connection and the whole tube assembly can just bounce free, letting unfiltered air into your engine.
Line things up so the tube sits next to the carburetor intake, and the worm gear clamps can hold both ends firmly in place.

A few of the worm gear clamps still have the original paint, but the rest have been replaced at some point throughout the history of this tractor. When routing the tube, make sure that there’s clearance between the tube and the exhaust manifold. They’ll be close, but they shouldn’t be touching or you’ll wear a hole in the tube in pretty short order. This shows the proper positioning of the exhaust clamp as well.
The exhaust manifold sort of wraps around a portion of the air tube. I don’t know if this is deliberately designed for intake air heating or not, but it will certainly help heat the air tube, which helps heat the intake air, and that should help prevent carburetor icing. Also, the carburetor being attached to the intake/exhaust manifold (which gets quite hot in operation) helps keep things warm. Carburetor icing is a condition in which moisture in the air freezes out as the air goes through the carburetor venturi (the pressure drop also means a temperature drop), and it leads to an over-rich mixture and, eventually, the engine stopping. Heating the intake air and the carburetor body helps prevent it.

Finishing the Fuel System
With the engine mostly bolted back together, the last major bit of work was to replumb the fuel system - the old plumbing was a mix of metal and rubber, which isn’t ideal for a fuel line that crosses over the exhaust manifold. There be tractor fires, and tractor fires lead to grass fires in my area. No good.
I replaced the fuel tank entirely - the old one had a lot of rust on the bottom, and wasn’t in great shape. I think it still held fuel, but with the hood off, I may as well replace it while I’m in here. The new one should be good for another half century or so. The fuel tank is held in with three bolts - installation is the same as how it comes out.

Installing the hood is a two person job, and made much easier with the front grille removed. That lets you spread the side legs and wiggle the whole thing into place much, much more easily than trying to do it with the grille installed. Plus, it’s a lot heavier.
Take the radiator cap off, get the hood lined up, and set it down. Nothing too tricky. You’ll want to bolt it in place before doing much of the rest of the work here, though.

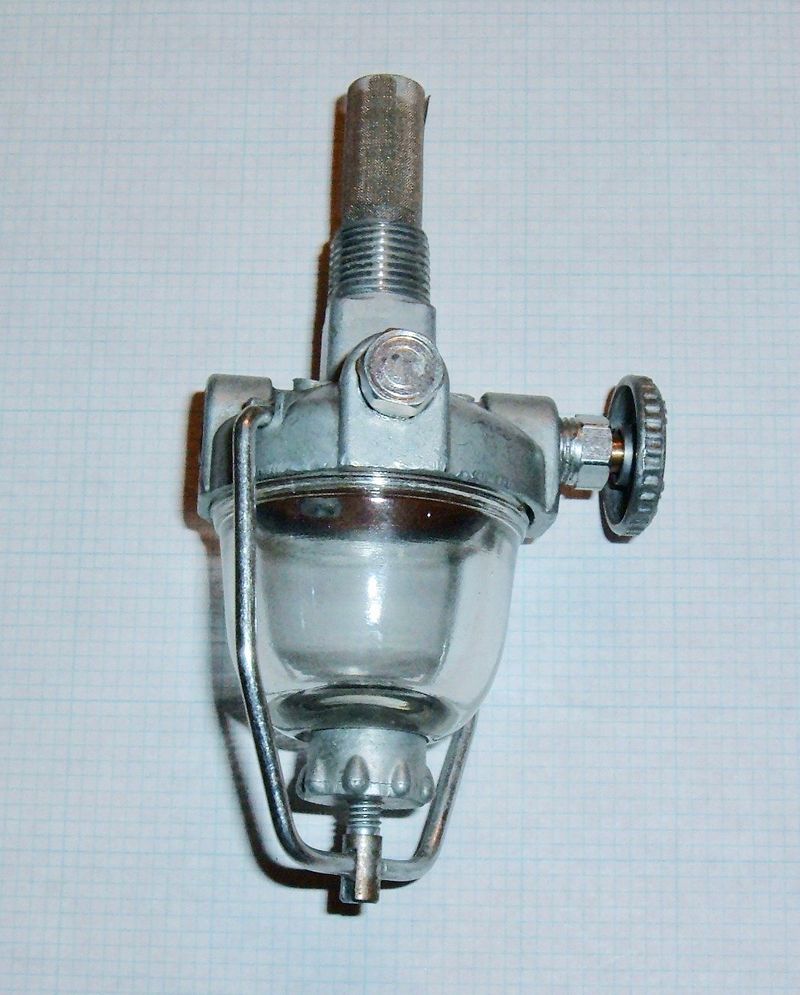
I installed the new sediment bowl after putting the hood on - you could put it on before, but I was concerned about banging the glass into something while trying to get the hood on and breaking it. This sediment bowl is a complete piece of crap. It’s such a unique piece of crap that I’m devoting next week’s post to how to get the stupid thing sealed up and ideally not leaking too much gasoline. If you can restore your old sediment bowl, do that. The new ones are made of pot metal, are improperly bored, and are utter pieces of leaky crap. Seriously, they are that bad. More rant next week.

A 17mm wrench fits the top of these new fuel bowls quite well. You’ll want to put some Permatex #2 on the threads to help seal them, and you don’t have to crank it down particularly tight - just thread it hand-tight, and use the wrench to turn it another half turn or whatever is required for proper alignment. You don’t need to use all the threads.

If you want to buy a pre-bent metal fuel line, you can do that - or you can just build your own. If you’re building your own fuel line, your local auto parts store should have something like this - you want 1/4” x 30”, Inverted Flare fittings on the end. This will work with the new fuel bowls, though it may not work with the original fuel bowls (they have some different threads - 1/8” NPT). This is normally sold as brake line, but it’s a metal line that’s designed to be reasonably easy to bend into shape.

When you pick up the brake line, you’ll want to pick up a tubing bender as well. This is a handy little tool for bending tube without crushing it. You can also use a dowel or piece of pipe to bend the tube around, but freehand bending is a bit tricky, especially if you haven’t done it before. Something like this will work perfectly and let you bend the tube without crushing it.

If you’re bending your own fuel line, the routing is up to you. Keep it from rubbing on anything and you should be fine. I ran the line straight forward from the fuel bowl, across the front of the motor, and arced it down like this. The normal routing for the prebent lines is a bit different, but I couldn’t tell you what it is - my line is a bit longer so went a longer route.

I’m talking about sealing the fuel system in great detail next week, but if you’re not familiar with flare fittings, they can seem impossible to seal. The flare in the tube fits against a (hopefully identical) cone in the fitting, and that’s the seal. The threads aren’t part of the seal at all - they simply press the flare and cone together.
This means that you can’t force a leaking connection together by tightening the nut. It won’t work. You have to line the connection up before you tighten the fitting at all. Make sure the flare is seated firmly and squarely on the cone, then start the threads by hand. You should be able to get it almost all the way down by hand. When you’re getting close, wiggle the fitting a bit to make sure everything is aligned, then keep turning until the nut is finger tight. Put a wrench on it to tighten it, but you shouldn’t get more than half a turn or slightly more of rotation before it’s properly tight. If you get more than a full turn, you probably didn’t have the flare seated right, and it will leak no matter what you do. Back it off and try again.

With the fuel system done, there was only one thing left to do - crank it up! She lit up right away, and was happy to move for the first time in a few months. Just a few things left to do…

Oil Change - Engine Oil
When was the oil last changed? I have no clue. With the tractor running, the next reasonable thing to take care of was the oil - both in the engine and in the transmission/final drive. Engine oil first.
The drain plug is very, very large. It’s a 2” plug, and it’s probably in there very, very tightly. The head for a wrench is square, so your sockets probably don’t work either. I solved my problem with a high quality adjustable wrench (they do wear out over time), a long cheater bar, and a jack plus piece of 2x4 to hold everything in place while I put an awful lot more torque on this drain plug than seems at all reasonable.

Because you’re working under a tractor, you want to keep the wrench from sliding off. This is hard if you’re using a long cheater bar. A piece of wood and a jack keeps everything pressed firmly up so it won’t mangle the square head. Also, since you’re working upside down, make sure you know which direction to turn things. For me, with the cheater on the left of the tractor (when sitting on it), I had to pull the cheater towards the front tires. After an hour or so of messing around and trying other wrenches (I started with a pipe wrench), I finally got the drain plug loosened!

The oil on this tractor doesn’t drain out nicely. It gushes out violently when you remove the plug. Get your drain pan up close to the tractor, and prepare to get messy. There’s no good way to get the plug out, especially if you have the screen still in place (which I didn’t, of course - someone defiltered this tractor rather completely).

While this is draining, you can open up the filter canister and pull out the old filter. Just use a wrench on the top nut. Eventually the bolt comes out, and you can open the lid, pull the old canister, and install the replacement.

This is the replacement canister I picked up - your local Tractor Supply should have them, or you can find them online. Some people install a spin on filter adapter, but I haven’t seen the need for that just yet.

Remove the old gasket from the lid, if present, and put the new gasket in. You’ll want to oil it up a bit so it doesn’t leak when installed.

Are you curious about the “screen” you’re supposed to have on the drain plug? It’s not subtle. This is what you should have. If you don’t, go get a drain plug that has it - or build your own. It’s just metal window screen soldered in place. Henry Ford was a very cheap man, and if the tractor didn’t need this filter screen, he wouldn’t have included it. The screen does mean you have to pull the drain plug about 2” straight down before you can move out of the way of the gush of oil, which makes changing the oil very messy. You might just let it drop in the drain pan and fish it out later.

Finally, remove the crankcase vent/oil fill tube cover, and fill it with oil! This has a slot on the top, and should be installed with the slot facing into the engine (there’s also a helpful “front” stamped into the top that will get alignment correct). You want it to be able to breathe, but any oil captured in the element should drain back into the crankcase.

“Full” is about 6 quarts, depending on how much sludge is in the oil pan. I’m running Rotella 15W-40, as a mid grade oil that should still be able to flow in the winter when it’s cold out. Some people run thicker, some run thinner - it just depends on how worn out your motor is.

One perk of a starter switch that’s not tied to the ignition is that you can motor the engine over with the starter for a while and build oil pressure before starting it. This is a good idea after an oil change - motor it until you see oil pressure, run the starter for another 5 seconds or so to get oil spread around, then turn the ignition on and it should light right up. Or… uh, maybe light off the mixture in the exhaust pipe. You might want to let that vent for a little bit first.

Transmission and Final Drive Oil Change
Finally, the rear end of the tractor needed new fluid. I’m not exactly sure what all was in there, but I replaced it with something a bit more correct. I’m pretty sure it was some sort of hydraulic oil, which is better than nothing - but not by much. The rear end oil serves as transmission oil, final drive oil, and hydraulic oil for the three point hitch. The first two are reasonably compatible, but the last one is totally different. Pick which you care about most - and I’d offer that protecting the transmission and final drive is more important than quick operation of the hydraulics.
There’s about 5 gallons of mixed fluid/sludge in the rear - so getting a 5 gallon bucket under the tractor is a great way to deal with the gush. Normally, a 5 gallon bucket won’t quite fit under, so I ran the tractor up on some ramps made of stuff I had laying around. If you have a slight pit in the ground, you could also straddle that with the tractor and put the bucket down there. Be aware that you will make a mess, so don’t do this over dirt you’re particularly attached to.

There are three drain plugs - one smaller one in the rear, and two large plugs under the transmission and rear end. You’ll want to remove all of them, though if you start from the back, it’ll drain a bit more gradually and make somewhat less mess. These are likely to be just as stuck as the oil drain, so get your good wrenches and try not to round them off too badly.

Again, you’ll want the bucket up close, because you don’t get a gentle drain of fluid - you get a massive gush. Fortunately, there are no screens in these to get in the way, but try not to drop the plug into the bucket - you’ll be up to your elbows in old oil trying to fish it out, and that’s just no fun.

Finally, with everything drained, pull the fill cover by the gearshift off (actually, removing this before you drain is probably a good idea), and fill it back up! Check the dipstick - it won’t actually take 5 gallons, especially not if there’s a lot of sludge down there. Mine only took a hair over 4 gallons, and I’m going to try to clean out the sludge next summer.
What oil you should use is the subject of a long series of debates on the internet, which a quick search should find. I’d suggest using something that’s a “rear end/transmission” fluid, and accepting the quirks of hydraulic operation from that. The original spec is a 90 weight gear oil (80 weight in the winter, though I doubt that ever happened).

Back Together!
With all this done (combined with last week’s electrical work), my tractor is back together and running pretty well! I’ve been able to do some blading work with it, and it runs a ton better. Another opinion (someone who was quite familiar with how this used to run) also thinks it runs a lot better - it can grade up the driveway now, which it couldn’t do before!
This concludes the main set of posts on my tractor work for the summer. It’s ready for winter - I hope! Next week will be a special post on “How to seal up a Ford N series fuel system” - including an awful lot on how to get the cheap pot metal sediment bowls to seal up. Plus some on gaskets, flare ends, and other stuff I learned in the process of trying to get my tractor to stop leaking gas. I won’t say it doesn’t leak, it just doesn’t leak gas anymore. After that, I’ll be back into some posts on batteries and off grid solar - stuff I’ve learned over the past year and a half.
And… have I mentioned just how much of a joy it is to work on old tractors? Or old vehicles of any kind? They have more maintenance requirements, but they also are designed to be worked on. Too many modern devices are owner-maintenance hostile - Apple has their stupid pentalobe screws for literally no reason other than to keep people out, modern phones are thinner and thinner with more and more glue, computers are less and less repairable, and cars are pretty much just computers with a few mechanical pieces attached.
This? This is pure. The “firmware” in this tractor is the steel bits meshing and clanging together. I don’t have to worry about self driving quirks. It’s honest. Screw up too badly, she will attempt to kill you. Treat her well, she’ll do an awful lot of work, very smoothly. I won’t say I enjoy plowing snow in the winter, but I do enjoy the time spent - me, tractor, driveway, snow. Nothing else. Well, OK, sometimes a shovel when I get stuck. If you ever have the chance to work with older machinery, take it. They’ll teach you something very, very different from what modern life has to offer.
Other Posts in This Series
1939 Ford 9N Repair Work: History and Teardown
1939 Ford 9N Repair Work: Electrical
1939 Ford 9N Repair Work: Fuel, Air, and Oil (this post)
Ford N Series Sediment Bowls (suck): Sealing a 9N/2N/8N Fuel System
Comments
Comments are handled on my Discourse forum - you'll need to create an account there to post comments.If you've found this post useful, insightful, or informative, why not support me on Ko-fi? And if you'd like to be notified of new posts (I post every two weeks), you can follow my blog via email! Of course, if you like RSS, I support that too.


