
I’ve torn down plenty of little solar powered gizmos on this blog, but I haven’t torn down a crank powered gizmo - until now! I had some spare birthday money and was at Harbor Freight. Harbor Freight is a bad idea, generally speaking, because I end up with some neat (and cheap) gizmos to pull apart.
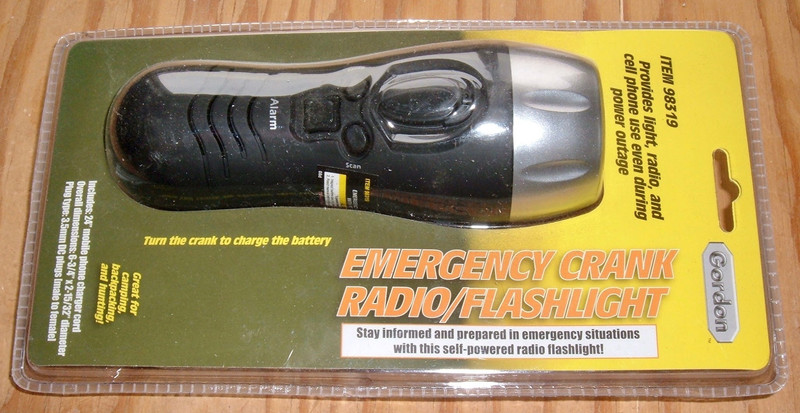
Like this one! This is an “Emergency Crank Radio/Flashlight.” Well, I’ve had crank flashlights before, but I’ve never ripped one apart to see what makes it tick!

What’s inside? How does it work? How can I improve it? Is this worth buying? What are the power consumption numbers? Read on for the answers to all these questions!
Gordon Item 98319 Emergency Crank Radio/Flashlight
Quite the name for a little gizmo. According to the blurb, it “Provides light, radio, and cell phone use even during power outage.” Which is… mostly true. Or, perhaps, “Historically true.” It’s not totally true right now, but we’ll get into that later. The package comes with the flashlight and a little pouch on the back for some cables and a halfway decent instruction manual.

There are some performance claims: “One minute of hand cranking will provide up to 30 minutes of 3 LED light, 1 hour of 1 LED light, or 3-4 minutes of radio; 2-8 minutes of mobile phone standby with 3 minutes of hand cranking.” Well, that’s pretty weasel wordy, but it gives some ballpark numbers to mess around with later. I’ll see what I can find.

It also “Includes flashlight, radio, alarm, charger for mobile phone, and stereo earphone jack.” Yes, it does, though the mobile phone charging is for older candybar phones, not a modern 5V USB charged device. This is my one major complaint about it, and everything charges on USB now.
“Super bright LED bulbs never need to be replaced.” Very likely! They shouldn’t burn out in the useful life of this unit.
“Conforms to FCC standards.” Well, probably. I sure couldn’t find much in the way of markings, but I really don’t care that much for a receiver. The FM receiver chip is probably FCC listed, and that’s about all that matters in here.

With the package opened, here’s the flashlight. It’s a slightly soft feeling plastic, which I like - nice and grippy. And you can see the mobile phone charger adapters that look nothing like a USB plug…

The Manual
Unlike most cheap gizmos out of China, this radio actually comes with a useful manual! The directions are readable without mentally translating, which is nice.

And it comes with a parts list and breakdown of parts! This is unheard of for anything cheap, and I’m so excited to see it! Instead of having to blindly explore the flashlight, I can get an idea as to what’s inside before I even dive in! Yay!

Finally, there are some specifications regarding runtime versus crank time. These are a bit optimistic, but are so heavily dependent on how you crank (are you cranking slowly, or do you have a manic 10 year old cranking?) that they’re mostly worthless. I’ll discuss energy use measurements later, though.

Feature Overview
There are three features worth discussing: The flashlight, the radio, and the alarm.
I’ll start with the alarm. It’s a push button toggle. It’s loud. You’ll startle yourself when you hit it by mistake. I have no idea why you’d use this, but it’s there if you want it (presumably if you’re lost, you can use this to save your voice or something).
The flashlight switch is a mechanical switch as well, and comes with a handy bit of rubber to keep the light switch fully off - this is nice, as it means that it stands a chance of holding a useful charge instead of draining quietly in the glovebox. There are two modes - one LED, and three LEDs. Neither mode is particularly bright (hardly “super bright LEDs”), but they produce a useful amount of light, especially if you don’t have any other source. We often over-light rooms just because we can, and this is certainly enough to read by at night.
Finally, there’s the radio. This version has a two button interface (and a volume knob on the side) - scan, and reset. Reset sets the radio to the bottom of the dial, and scan will skip up to the next station that has enough signal (or anything that has enough signal). Tap scan repeatedly, you can find stations. Tap reset to begin again. It’s not a particularly amazing interface, and the newer iteration of this flashlight changes to a more standard dial - but this is what I’m reviewing, so this is what I have!

One side of the radio has a pair of jacks - one standard 3.5mm headphone jack for normal headphones (this works with the radio), and a cell phone charger that’s useless for modern USB cell phones. These jacks are covered with a rubber flap that’s better than nothing, but don’t consider this flashlight waterproof. It’s a dust flap, at best.
If you don’t have any audio from the speaker, run a headphone jack in and out of the headphone port. At least on mine, the jack doesn’t always reset cleanly and it’ll still try to route audio when there’s no headphone in there.

The other side has the radio volume dial - with a nice click at the end to turn the radio off. You can see the charger crank here as well - it’s a solid cranking unit.

The LEDs on the front are not particularly bright. I can take this picture without blowing out the image, and you can still see the background, so that should tell anyone who has tried to take pictures of flashlights an awful lot. Again, they’re bright enough to be useful, but there’s no mistaking this for a modern 18650 based photon blaster.

Finally, the back end has a nice carrying strap with a wire heading into it - the radio antenna. It’s a really good spot for it, since it’s outside the enclosure, and if you hang the flashlight by the handle, the antenna will be vertical - ideal for reception of FM broadcasts! This unit doesn’t receive AM, though the newer version does.

Going Inside
With the features covered, it’s time to see what makes this tick. The first step is to remove the “Do Not Remove” tag. I do this a lot - tags like this tend to be in the way of opening things!

Find screws, unscrew them. Twist things that look like they might twist. Those two pieces of disassembly advice are literally all you need to get this thing apart! The lens end of the flashlight unscrews, and there are 4 screws in the corners of the back that come out to split the case. No glue, nothing fancy. I love devices like this - they come apart so easily!

With the case split, the various parts come apart. The LED assembly and interface board (it’s not really a driver board, but serves the same purpose) are in the top left. There’s a green shrink wrapped battery just below that, on top of the pair of circuit boards for the system.
Below the circuit boards is the speaker, and the black wire extending out is definitely an antenna.
On the right side, a set of gears speeds up the crank rotation to feed a little generator down at the bottom (the round metal disc). The gears are nylon (or some sort of similar plastic), but the support for them is metal. That’s great to see - a strong support for gears often correlates to long life. Plastic gears here are fine, as they’re simply not transferring much power. There’s a bit of a white lubricant on the gears as well (you can see a glob of it to the left of the generator).

The Battery
Stock, this flashlight comes with a 80mAh 3.6V NiMH battery. NiMH is an older battery chemistry that predates lithium, but it’s really well suited to something like this (partly because of some things it does, mostly because of some things it doesn’t do).
NiMH is a very forgiving chemistry - it tolerates a lot of abuse, and really doesn’t care that much. You can charge it without any real regulation, because mild overcharging just generates heat when the battery is full. Most of the “solar yard lights” and such rely on unregulated NiMH charging, and it works well enough, since the panel doesn’t produce enough power to damage the batteries. And, while it doesn’t particularly like being deep discharged, it doesn’t get physically damaged by the process like lithium does. You just hurt capacity long term, but it’ll still work, and for something like this, “still works” is pretty important.
The only real downside of NiMH for an emergency flashlight is that the self discharge rate is quite high (on the order of 15%/month). This means it’s going to be dead if you store it, but since being fully discharged isn’t that bad for the chemistry, it’s probably fine. Though this battery will certainly last a lot longer if you crank it for a bit every few months.

Inside the wrapper, there are three “B80H” Ni-MH CELLs stuck together (somehow). I have no idea who makes this cell, but it’s certainly a cheap NiMH cell. For reference, a good AA NiMH cell is around 2500mAh. This is a small cell, and it’s fine for a backup flashlight, but… 80mAh? I think I can do better.

The LED Light Head
To emit light (the primary purpose of a flashlight), there are three LED emitters in a cheap lens unit. The switch toggles between one LED and three LEDs (always the same one, so that will probably dim first, if you were to run this endlessly).
The LED interface board sits behind the lenses, and, mildly annoyingly to flashlight snobs, is resistor based. LEDs are ideally driven by a constant current source, but those chips are expensive and a resistor will work tolerably. It’s certainly a valid enough way of handling the current limiting.

And, actually, for something like this, I prefer resistor based LED circuits. Why? As the battery voltage drops, the current drops significantly, which allows for very good battery life on a tiny battery. I took some 3-LED current measurements at various voltages, and here’s the current across the useful range of battery voltages (for the original NiMH as well as lithium). Fully charged, an 80mAh battery wouldn’t last much past an hour, but as the voltage drops, the LEDs dim and the current drops as well. This is great for a windup flashlight/radio designed for emergency use. It’s not going to pass muster among hardcore flashlight types, but this isn’t an 18650 based lumen blaster - it’s an emergency flashlight designed to be tossed in your glovebox or camper or supply closet.

The back of the driver board is just plain old PCB. Just a single layer board. Nothing fancy. If you want to pull the screw out, you can get at the LEDs.

Radio Power/Volume Knob/Headphone Jack
The radio is controlled by a knob on the side - and I am so excited to see this style of control in this flashlight! Take a look at the top lever and spring combination - it’s touching the metal bit on the right, which means the radio is on. That’s the power control for the radio circuit, with the lower three contacts being the variable resistor for the volume control.

But check this out! The “click” when turning the radio off - it physically disconnects the power by moving the lever! There is now no power to the radio - at all! So many modern devices are “soft off” - they’re not fully powered, but they still have power going to the button circuits and such, and will drain a battery over time even if you don’t use them. This radio control physically disconnects power, which means there is zero parasitic power draw. So exciting to see this on a wind up radio - this is how you should do it!

The rest of the radio control board has the headphone jack (on the left), and the cell phone charger (which is useless for modern phones that charge on 5V USB). The row of pins at the bottom is how this board connects to the main circuit board. Again, it’s a pretty simple board.
Again, if you can’t get the speaker to work with the radio, try ramming a headphone jack in and out.

Main Circuit/Charging Board
The main circuit board contains, admittedly, a bit more circuitry than I’d expected to find in a wind up flashlight/radio/alarm.
On the top, there are three phase lines that come from the crank generator (which I’ll discuss later). However, there are also six diodes that form a standard three phase rectifier. The generator produces a three phase AC current, and this set of diodes turns it into a more or less DC current that goes into the battery for charging.
In the center of the board, there’s the largest IC - which is the radio-on-chip. This is a SX6116 - a simple FM receiver chip. Nothing fancy, but it gets the job done.
To the lower right, behind the antenna cable, you’ll see an 8002 audio amplifier. This drives the speaker (with either the radio or alarm output).
Between the two of these components, current draw with the radio on at a reasonable volume on the speaker is about 35mA when playing static, and about 50mA when playing an actual radio station. This works out to slightly over an hour of radio on a fully charged battery, depending on volume.
If you’re curious about the “0” components - these are 0Ω resistors that serve as jumpers. For a single sided circuit board, these are used to jump across traces. It’s cheaper than a full second layer. The people in Flatland would have trouble understanding these, but it should be pretty obvious from our third dimensional view of the world - they simply bounce a trace up into the third dimension, briefly.
Did you know there was a Flatland movie? It’s not very good…

The other side of this single layer board contains two filter capacitors, an oscillator, and a few switches. Plus some jacks for LED board, speaker, and battery. It also contains a curious daughterboard (just under the slide switch) that I believe to be the circuit for the alarm. Or, at least, everything else is accounted for on the backside…
Again, like the radio switch, these switches physically disconnect everything. When all the switches are off, the parasitic draw on the battery is 0. Zero! This is quite useful for something like a crank charged flashlight. Unfortunately, the self discharge on NiMH dominates the charged life - but I do think I can improve that a bit…

With the circuit boards out of the way, all that’s left on the “top” is the speaker, which is screwed in and has a two wire connector for it. And the switches, which are just lined up on top of the buttons on the circuit board and either slide or press them. It’s a nice simple setup. The only real trick here is that the slider has to be over the switch handle on reassembly, or the flashlight switch won’t work right.

The Generator
This being a windup flashlight, the unusual bit is certainly the generator. With the flashlight apart, the generator comes out easily enough. The wires are soldered to the PCB, which seems a bit odd given that everything else is socketed. A socket for the generator wouldn’t have been particularly difficult to add.
But, with the generator out, here’s what we’ve got! A gear train! The crank engages the big gear on the right, a three-gear speedup system spins the generator an awful lot faster than you crank (about a 23:1 speedup), and the whole thing is lubricated by some variety of white grease. If you ever played with the Technic Legos growing up, this should be entirely familiar.

The metal backing plate for this is quite stout - I’m not at all concerned with this flexing under reasonable loads. Attach a power drill to the crank, sure. All bets are off. But for hand cranked? This is more than strong enough.
The gears are plastic, spinning on metal shafts. As long as you keep them lubed and don’t put too much force through the system, this is more than good enough. I have no complaints at all about this geartrain. There’s no reason to open it up and lubricate it, but if you do manage to get the flashlight wet and sandy, you might want to clean these out.

The actual generator is a cute little permanent magnet three phase generator. I couldn’t pull the rotor off without pulling the drive gear, and I didn’t feel like doing that, so this is as much view as you get. The magnets live in the outside case (which spins around), and the windings are inside. You get three phase AC output, which is rectified (by the previously mentioned arrangement of six diodes) into something more or less resembling DC.
How much current does this setup generate? Well, into a dead short, it can produce between 200mA and 300mA (depending on how hard you’re cranking). Into a battery, a bit less, but it’s still a decent little generator - a few watts if you’re cranking hard. It can produce enough current to drive the system voltage over 5V with the stock battery, which is certainly rather inefficient in terms of energy delivered to the battery (5V in, 3.85V out).

Thoughts on the Flashlight
With the flashlight fully torn apart, I really, really like this $15-ish flashlight as an emergency backup. It’s done right - and it’s rare for me to say that about something like this. It has mass where it counts (in the generator drivetrain), they’ve avoided the temptation to get too fancy with power switching (it has physical switches), and the battery chemistry, while older and kind of boring, is perfectly suited to something that’s likely to sit dead for long periods of time and eventually be recharged for use.
I haven’t done runtime numbers, mostly because they’re somewhat useless here. The point of a flashlight like this is to sit, stone dead, until you need it, and then to work. NiMH will do that. The capacity you have? Well, that varies. A lot. Something less than 80mAh if it’s been sitting, for sure. But even on a mere 10-20mAH of useful capacity, this flashlight/radio will still be useful - and that’s awesome. Worst case, you can run it purely on the hand crank, though that’s a bit annoying. But, if the battery is totally dead, you can remove the battery with nothing more than your hand, and still have a useful enough device.
But at a brisk cranking rate of 200mA, a minute of cranking can run the flashlight for 20-30 minutes at low voltage, and can run the radio for 4 minutes. Or, if you crank harder, longer.
This is absolutely worth buying and keeping around as an emergency flashlight. The only real improvement I might consider would be something like putting in a large lithium battery instead of a small NiMH cell… which, in fact, I think I’ll do!
Upgrading to Lithium
It’s no secret that I like lithium batteries. I work with them a lot, and I rebuild an awful lot of lithium packs. So, when it comes to a backup flashlight, converting it to lithium makes sense - for me. I’m not sure it makes sense for anyone else, but it’s the type of thing I enjoy doing for the challenge, and to see how it works. It’s just a nifty little tweak, and I enjoy improving things I find laying around.
In general, any 3S NiMH battery can be replaced with a 1S lithium cell. A NiMH cell is around 1.4-1.5V fully charged, spends most of its life at 1.2V, and is fully drained around 0.9V - this works out to 4.2 - 4.5V fully charged, about 3.6V for the bulk of the operating range, and drained at 2.7V. This is entirely compatible with a 1S lithium cell, which is 4.2V fully charged, has a nominal discharge voltage of 3.7V, and is fully drained around 2.5V (though you hurt cycle life if you drain past about 3.0V). Close enough for my purposes!
Some measurements indicated that I can neatly fit a 503040 pouch cell in the flashlight - 5mm thick, 30mm wide, 40mm long. These are easily found on eBay for under $10, and work out to about 600mAh Chinese Nameplate (I suspect rather less in actuality, but even so, it’s still a nice upgrade from 80mAh).

If you can find a battery with a 2.0mm JST connector, awesome - otherwise, you’ll need one of these connectors too (male). Be aware that this battery is wired backwards to most of the connectors you can find. Swapping the pins around isn’t a big deal - just press the tab on the underside and the pin slides out.

A bit of solder and a bit of electrical tape later, and I’ve got my new battery wired up. Wrap both terminals, then wrap the whole thing. A lithium battery shorting out just isn’t any fun. Theoretically, the BMS should prevent this from doing anything particularly bad, but I simply don’t care to find out that it doesn’t work.

Now, put the battery on top of the speaker and run the wire! I used some superglue to hold the battery in place - there’s not a lot of excess clearance between this battery and the generator rotor. You can fit 5mm against the speaker and clear the rotor, but not with much room left. My normal double sided sticky foam tape is too thick for this. You could use a thin double sided tape just fine. The goal is to keep it from rattling around and hitting the generator rotor. Rubbing on that is a bad idea, because you’ll eventually rub through the plastic, expose the guts to air, and that’s just not the kind of excitement anyone needs.

Reassemble, hook the battery up, and you’re done!
The biggest difference is that the generator handle is harder to turn. This is mostly because it’s being more efficient. While the NiMH battery, at 3.85V, spiked to over 5V while cranking vigorously (a charge efficiency of less than 77%), the lithium cell, at the same base voltage and cranking vigor, only rises to 3.95V (around 97.5% efficiency). That means a much more efficient charge process, and more amps turned into actual output watts. It’s a very significant change - and a rather nice improvement.
Otherwise, I’ve just got an awful lot more capacity on tap, and a much lower self discharge rate! Draining lithium fully is a bad idea, so it would be wise to put the modified flashlight somewhere you’ll see it, and give it a few cranks every month or so. That should deal with the lithium self discharge rate and BMS draw, and keep your flashlight ready to go for emergencies!

If you have a local Harbor Freight, definitely pick one up next time you’re out there. Otherwise, you can always find one on eBay. But, seriously. This is an awesome little emergency flashlight!
Comments
Comments are handled on my Discourse forum - you'll need to create an account there to post comments.If you've found this post useful, insightful, or informative, why not support me on Ko-fi? And if you'd like to be notified of new posts (I post every two weeks), you can follow my blog via email! Of course, if you like RSS, I support that too.


)